Articles
How To Calculate Binding For A Quilt
Modified: August 22, 2024
Learn how to calculate binding for your quilt with these helpful articles. Find step-by-step instructions and tips to create beautiful quilt bindings.
(Many of the links in this article redirect to a specific reviewed product. Your purchase of these products through affiliate links helps to generate commission for Storables.com, at no extra cost. Learn more)
Introduction
Welcome to the wonderful world of quilting! Whether you’re a seasoned quilter or just starting out, one of the essential skills you need to learn is how to calculate binding for a quilt. Binding is the finishing touch that not only adds durability to the edges of your quilt but also enhances its overall aesthetic appeal.
In this article, we will walk you through the step-by-step process of planning, designing, and calculating the binding for your quilt. From understanding binding measurements to determining the length and width of the binding strips, we will cover all the essential aspects to ensure you have the perfect binding for your quilt.
Gathering the right materials is crucial for any quilting project. We will provide you with a comprehensive list of the materials you’ll need to successfully complete your quilt binding. Additionally, we will guide you through the cutting and joining of the binding strips, as well as the attachment and finishing techniques.
Whether you’re quilting for relaxation, as a creative outlet, or as a thoughtful gift for someone special, learning how to calculate and apply binding is a skill that will greatly enhance your quilting journey.
So, grab your favorite fabric and let’s dive into the exciting world of binding calculations for quilts!
Key Takeaways:
- Mastering quilt binding involves careful planning, precise measurements, and seamless joining. Understanding the width and length needed, along with meticulous finishing, ensures a professional and durable quilt edge.
- Gathering the right materials, calculating the length and width of binding, and mastering the joining and finishing techniques are essential for creating a polished and visually appealing quilt binding.
Read more: How To Join Ends Of Quilt Binding
Planning and Designing Your Quilt
Before you begin calculating the binding for your quilt, it’s important to first plan and design your quilt. Consider the overall theme, color scheme, and design of your quilt to ensure that the binding complements and enhances the overall aesthetic.
Start by deciding on the size and shape of your quilt. Whether you’re making a baby quilt, a lap quilt, or a bed quilt, determine the dimensions and layout before moving forward. This will help you estimate the amount of binding fabric you’ll need.
Next, choose your fabric for the quilt top, backing, and binding. Opt for high-quality, durable fabrics that can withstand the wear and tear of regular use. Consider the color and pattern of your binding fabric, taking into account how it will interact with the quilt top and backing.
Sketch out your quilt design on paper or use digital design software to visualize your ideas. This will help you plan the block arrangement, sashing, borders, and any other design elements. Keep in mind that the dimensions and design of the quilt will affect the amount of binding required.
Once you have a clear plan and design in mind, it’s time to move on to the next step: gathering your materials.
Things to consider when planning and designing your quilt:
- Size and shape of the quilt
- Color scheme and theme
- Quality and durability of fabrics
- Interaction between binding fabric and quilt top/backing
- Block arrangement, sashing, and borders
By carefully considering these factors, you’ll be well-prepared to move forward with calculating and applying the perfect binding for your quilt.
Gathering the Materials
Once you have your quilt design planned and ready to go, it’s time to gather the materials needed to create your binding. Having everything prepared and on hand will make the process smoother and more enjoyable.
Here are the essential materials you will need:
- Fabric: Choose a fabric that complements your quilt design. Ideally, use the same fabric that you used for the backing or select a complementary fabric. Make sure you have enough fabric to cut the required length of binding strips. Depending on the size of your quilt, you may need anywhere from 1 to 3 yards of fabric.
- Cutting Tools: To accurately cut your binding strips, you will need a rotary cutter, a cutting mat, and a quilting ruler. These tools will ensure clean and precise cuts.
- Iron and Ironing Board: Pressing your fabric and seams is essential for achieving professional-looking results. Make sure you have an iron and ironing board readily available.
- Pins or Wonder Clips: These will come in handy when attaching the binding to your quilt.
- Sewing Machine and Thread: You will need a sewing machine to sew the binding onto your quilt. Ensure that it is in good working condition and has the appropriate thread for your project.
- Optional: Binding Clips or Bias Tape Makers: While not necessary, binding clips or bias tape makers can make the process of folding and pressing your binding strips easier.
Take the time to gather all these materials before starting your project. Having everything organized and readily available will save you time and frustration during the quilting process.
Now that you have your materials ready, let’s move on to understanding binding measurements and how to calculate the length of binding needed for your quilt.
Understanding Binding Measurements
Before diving into calculating the length of binding needed for your quilt, it’s important to understand the concept of binding measurements. Binding is typically cut into strips that are then folded in half and sewn to the edges of the quilt. The width and length of these strips will determine the final appearance and durability of your binding.
Width: The width of your binding strip is typically determined by personal preference or the pattern instructions. The most common widths for quilt binding are 2.5 inches or 2.25 inches. Wider bindings, such as 3 inches, are often used for quilts that will undergo heavy use or need extra durability.
Length: The length of your binding strip will depend on the dimensions of your quilt. To calculate the length, you need to measure the perimeter of your quilt, which is the sum of all four sides. However, you also need to factor in extra length for corners and joining seams.
Binding strips are typically joined using diagonal seams to reduce bulk and create a seamless appearance. For this reason, you need to add the diagonal seam allowances to your binding length calculation.
The formula to calculate the length of binding needed is:
Total Length of Binding = Perimeter of Quilt + Corner Seam Allowance + Joining Seam Allowance
The corner seam allowance is typically 2 times the width of your binding strip, as it accounts for the mitered corners. The joining seam allowance is the extra length needed to join the binding strips together using diagonal seams.
By understanding these measurements and calculations, you can proceed with confidence in determining the exact length and width of binding strips needed for your quilt.
Now, let’s move on to the step-by-step process of calculating the length of binding for your quilt.
Calculating the Length of Binding Needed
Calculating the length of binding needed for your quilt involves measuring the perimeter of the quilt and accounting for corner seam allowances and joining seam allowances. Follow these steps to determine the exact length of binding required:
- Measure the perimeter of your quilt: Using a measuring tape, measure the length of each side of your quilt. Add up all four sides to find the total perimeter. For example, if your quilt measures 60 inches on each side, the perimeter is 240 inches.
- Calculate the corner seam allowance: Multiply the width of your binding strip by 2 to determine the corner seam allowance. For example, if you’re using a 2.5-inch-wide binding strip, the corner seam allowance is 5 inches (2.5 inches x 2).
- Calculate the joining seam allowance: This is the extra length needed to join the binding strips together using diagonal seams. It’s usually around 12 inches.
- Add the corner seam allowance and joining seam allowance to the perimeter: Take the total perimeter of your quilt and add the corner seam allowance and joining seam allowance to it. In our example, if the perimeter is 240 inches and the corner seam allowance is 5 inches, and the joining seam allowance is 12 inches, the total length of binding needed is 257 inches (240 inches + 5 inches + 12 inches).
After calculating the length of the binding needed, it’s advisable to add a few extra inches to account for any unforeseen adjustments or errors during the quilting process. It’s always better to have a little extra than to run out of binding fabric before completing your quilt.
Once you have determined the length of binding needed, you can move on to determining the width of the binding strip.
Now, let’s explore how to determine the width of the binding strip for your quilt.
When calculating binding for a quilt, measure the perimeter of the quilt and add 20 inches for seams and corners. Then, divide by the width of your binding strips to determine how many strips you need.
Read more: How To Make Binding On Quilt
Determining the Width of the Binding Strip
The width of your binding strip can be determined based on personal preference or the instructions provided in your quilt pattern. While the most common widths for quilt binding are 2.5 inches or 2.25 inches, you can choose a width that suits your design and desired aesthetic.
Consider the following factors when determining the width of your binding strip:
- Quilt Size: The size of your quilt can influence the width of the binding strip. For larger quilts, wider binding strips, such as 2.5 or 3 inches, are often used to provide more durability and visual impact.
- Quilt Design: The design of your quilt can also affect the width of the binding strip. For intricate or highly detailed quilts, a narrower binding strip, such as 2.25 inches, may be preferred to provide a delicate finish that doesn’t overpower the design.
- Style and Functionality: Consider the style and functionality of your quilt. If you want a bold and prominent binding, a wider strip can achieve that effect. On the other hand, if you prefer a more subtle and understated look, a narrower strip may be more suitable.
- Mitered Corners: Keep in mind that regardless of the binding width, you will need to miter the corners for a clean and professional finish. The width of your binding strip will determine the size and bulkiness of the mitered corners.
Once you have considered these factors, make a decision on the width of your binding strip that aligns with your quilt design and aesthetic preferences.
Now that you have determined the width and length of your binding strip, it’s time to cut and join the strips together.
In the next section, we will guide you through the process of cutting and joining the binding strips for your quilt.
Cutting and Joining the Binding Strips
Once you have determined the width of your binding strip and calculated the total length needed, it’s time to cut and join the binding strips for your quilt. Follow these steps for a successful and seamless binding:
- Cut Your Binding Strips: Using a rotary cutter, cutting mat, and quilting ruler, cut strips of fabric according to the determined width and total length needed. Make sure to cut the strips parallel to the fabric selvage for a straight and continuous binding.
- Join the Strips: Take two strips of binding and align them at a 90-degree angle, right sides together, forming an “L” shape. Sew diagonally from corner to corner to create a diagonal seam. Trim the excess fabric, leaving a 1/4 inch seam allowance. Press the seam open or to the side.
- Repeat the Joining Process: If you need more than two strips to achieve the total length of binding, repeat the joining process until you have one continuous strip.
- Press and Fold: Press your binding strip in half lengthwise with an iron to create a neat fold. This fold will be the finished edge of your binding.
It’s important to note that when joining binding strips, be sure to stagger the diagonal seams to distribute the bulkiness evenly. This will result in a smoother and more visually appealing finished binding.
Once your binding strip is cut, joined, and pressed, you’re ready to attach it to your quilt.
In the next section, we will guide you through the process of attaching the binding to your quilt.
Attaching the Binding to the Quilt
Attaching the binding to your quilt is an important step that requires precision and attention to detail. Follow these steps to ensure a clean and professional finish:
- Prepare the Quilt Edges: Trim any excess batting or backing fabric so that all edges of the quilt are even and straight.
- Starting Point: Choose a starting point on one side of the quilt, leaving a tail of binding strip for later joining. Align the raw edges of the binding strip with the raw edge of the quilt, placing the binding strip on the quilt’s front side.
- Sew with a 1/4 inch Seam Allowance: Using a 1/4 inch seam allowance, begin sewing the binding to the quilt, starting a few inches from the corner. Sew all the way to the next corner, backstitching at the beginning and end of the seam to secure it.
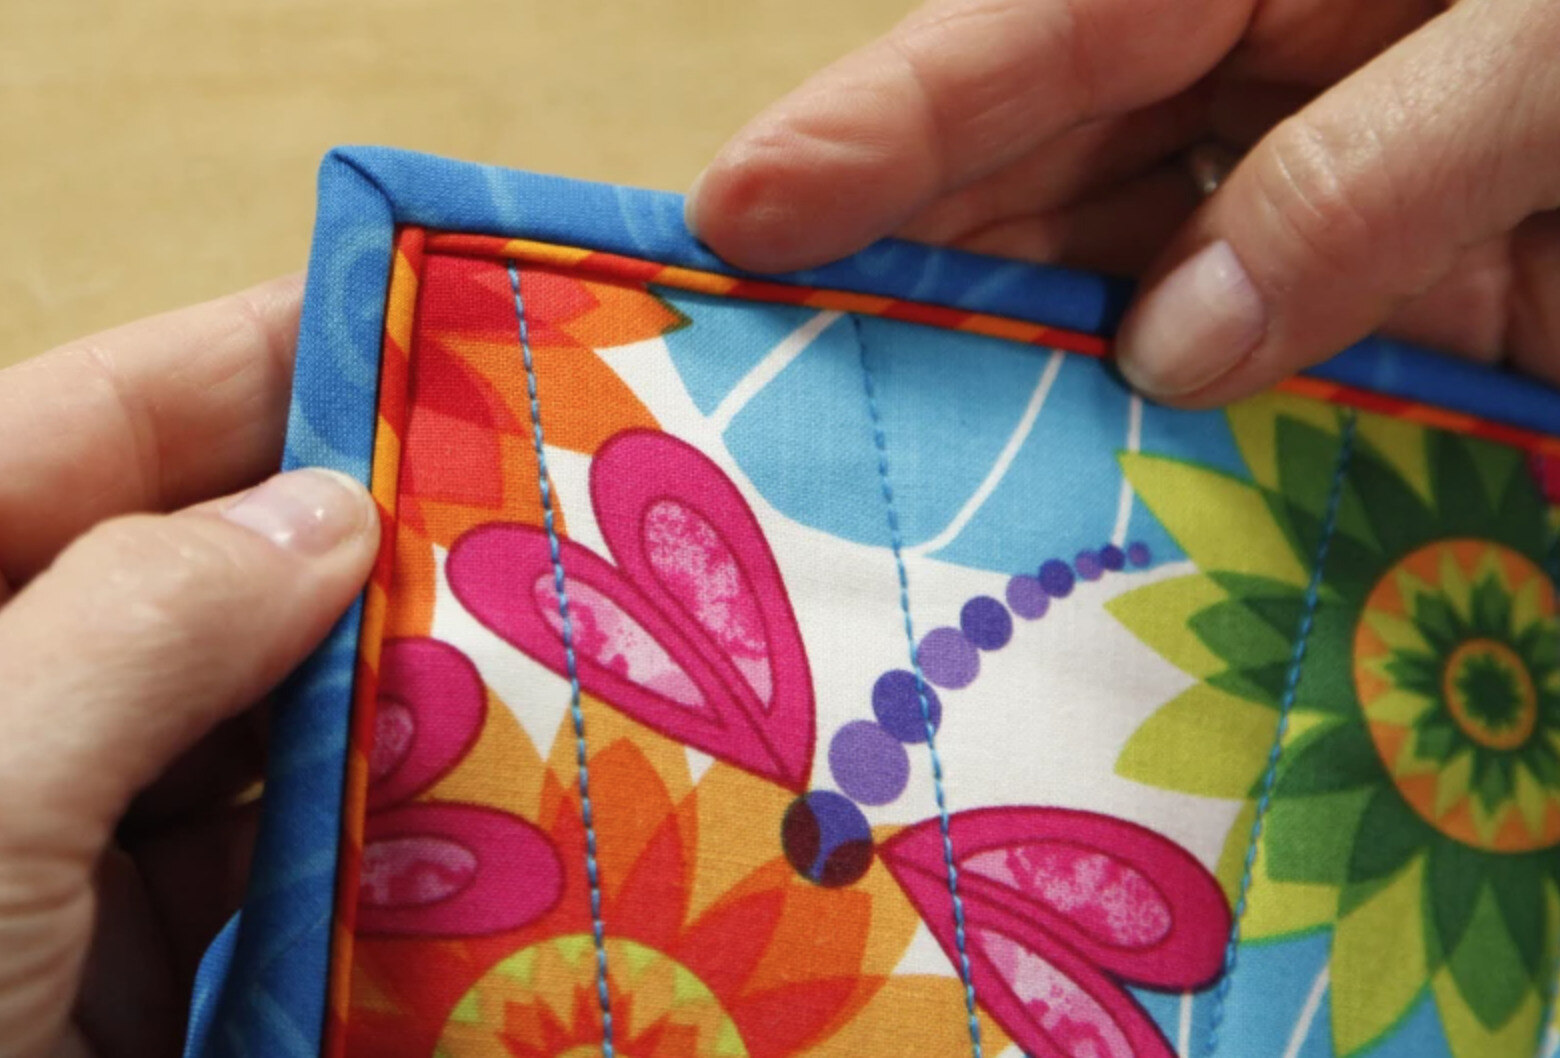
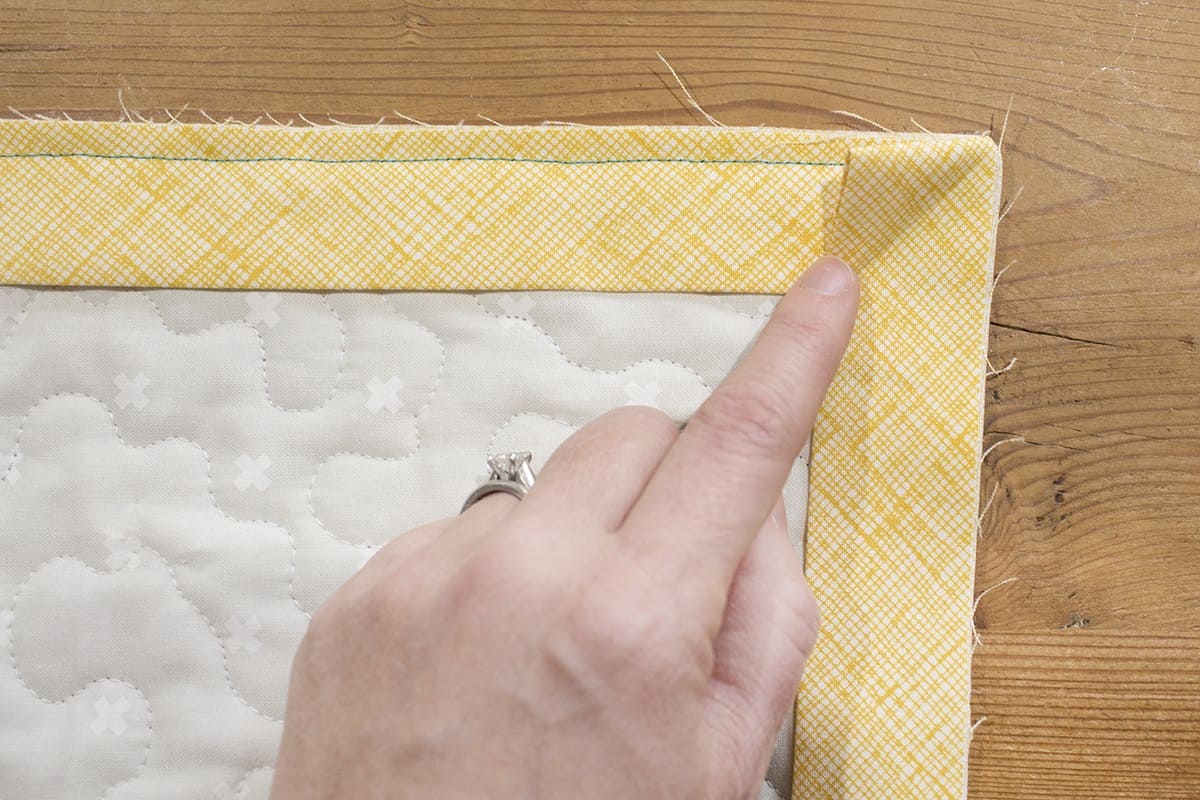
- Mitering the Corners: When approaching a corner, stop sewing 1/4 inch away from the corner edge. Pivot the quilt and the binding strip 45 degrees, aligning the raw edges. Fold the binding strip up, creating a neat mitered corner, and then fold it back down to continue sewing along the next side.
- Continue Sewing and Mitering: Repeat the process of sewing and mitering the corners until you have reached the starting point. Stop sewing a few inches before the starting point, leaving a tail of binding strip.
- Joining the Ends of the Binding: Trim the excess binding strip, leaving a few inches of overhang. Open up the binding strip and fold the tail back on itself. Place the tail from the beginning of the binding strip on top of the folded tail and mark the overlap. Trim the excess, align the ends, and sew them together using a diagonal seam. Press the seam open or to the side.
- Completing the Binding: Finish sewing the remaining portion of the binding to the quilt, starting at the point where the ends were joined.
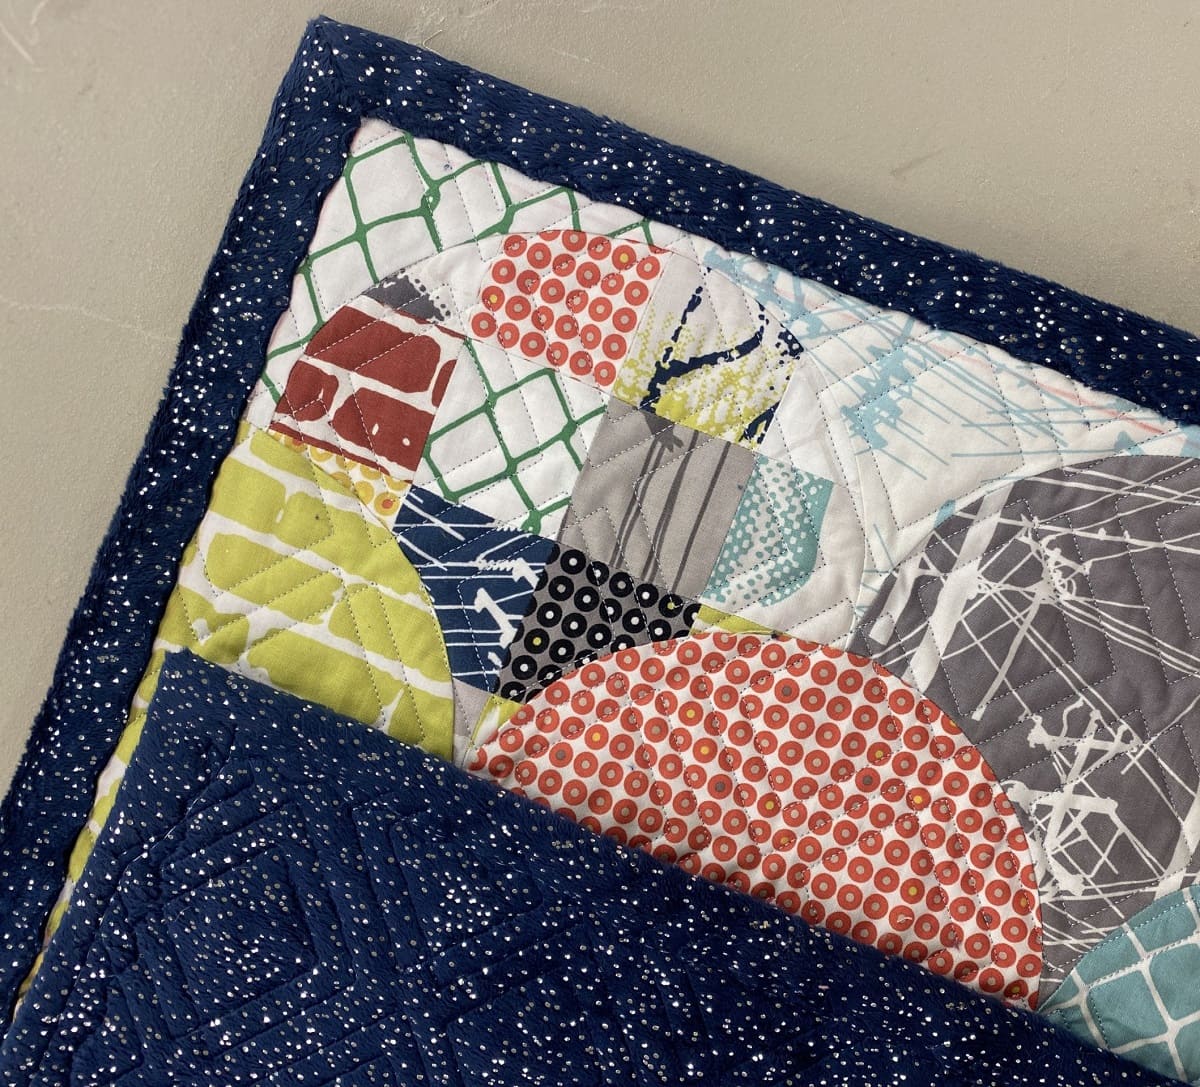
As you sew the binding, ensure that the folded edge of the binding covers the stitch line on the quilt’s back side. This will provide a clean and professional finish on both sides of the quilt.
Once the binding is securely stitched in place, it’s time to move on to finishing the binding.
In the final section, we will guide you through the process of finishing the binding for your quilt.
Finishing the Binding
Finishing the binding is the final step in completing your quilt. It’s crucial to take your time and pay attention to detail to achieve a polished and professional-looking finish. Follow these steps to finish your binding:
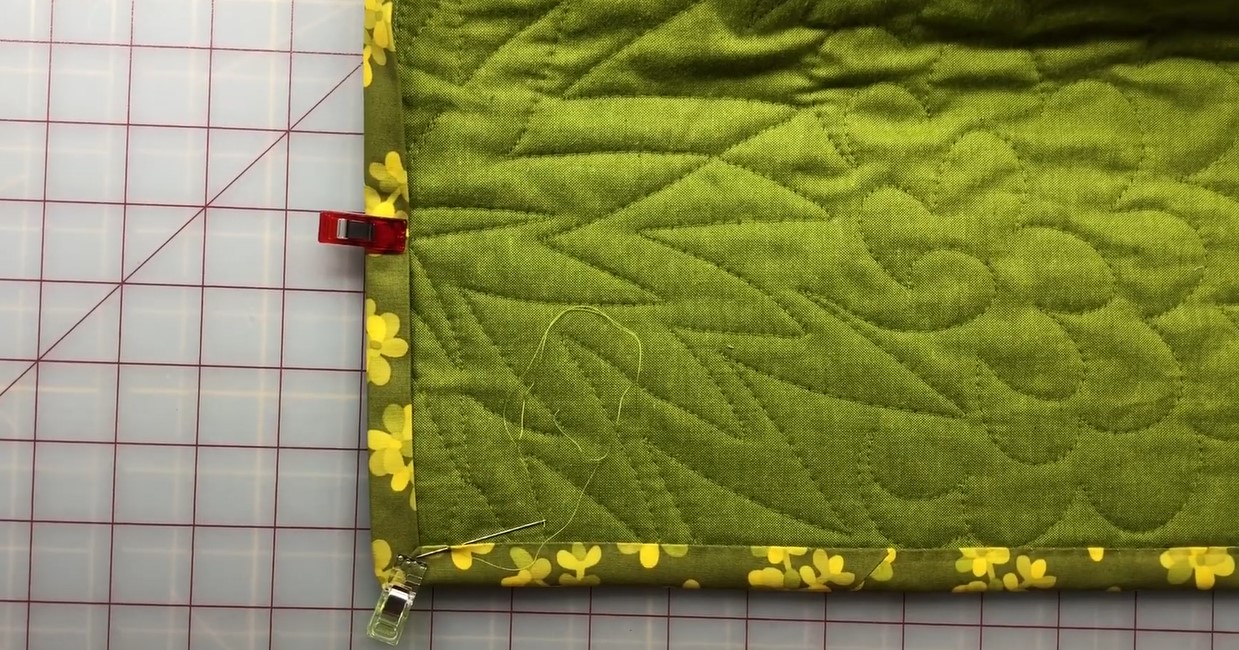
- Trim Excess Fabrics: Trim any excess batting or backing fabric that extends beyond the binding edge. This will create a clean and even finish.
- Press the Binding: Take a hot iron and carefully press the binding away from the quilt, ensuring that the fold is crisp and the binding lays flat all around the edges.
- Hand Stitch or Machine Stitch: There are two main methods for finishing the binding: hand stitching and machine stitching. Hand stitching provides a nearly invisible finish, while machine stitching is quicker and more secure. Choose the method that best fits your preferences and time constraints.
- Hand Stitching: If you prefer hand stitching, fold the binding strip over the raw edge of the quilt to the backside. Use a whip stitch or ladder stitch to secure the folded edge of the binding to the quilt. Take small, even stitches to create an invisible finish.
- Machine Stitching: If you opt for machine stitching, fold the binding strip over the raw edge of the quilt to the backside. Use a straight stitch or a decorative stitch to sew along the edge of the binding, ensuring that the stitching catches both the binding and the quilt. Choose a thread color that matches or complements the binding for a cohesive look.
- Secure the Corners: When you reach the corners, fold and miter them neatly before continuing the stitching. This will ensure that the corners are neatly finished and well secured.
- Finishing Touches: Once the binding is stitched in place, give the quilt a final press to smooth out any wrinkles or creases. Take the time to inspect the binding and make any necessary adjustments or repairs for a clean and professional finish.
Finishing the binding may be the last step, but it plays a vital role in giving your quilt a polished and completed look. Take your time and follow these steps to achieve a beautiful finish that will stand the test of time.
Congratulations! You’ve successfully learned how to calculate, cut, join, attach, and finish the binding for your quilt. Your hard work and attention to detail have resulted in a beautiful, completed quilt that can be cherished for years to come.
Happy quilting!
Read more: How Wide To Cut Binding For A Quilt
Conclusion
Calculating and applying the binding for your quilt is an essential skill that adds the finishing touch to your quilt project. By understanding binding measurements, gathering the necessary materials, planning and designing your quilt, and carefully following the steps for cutting, joining, attaching, and finishing the binding, you can create a quilt that is not only durable but visually appealing as well.
Remember to take your time during each step of the process, ensuring accuracy and precision. Plan and design your quilt with care, considering the size, shape, color scheme, and theme. Gather all the necessary materials and tools before starting your project to make the quilting process more seamless.
Understanding binding measurements, such as the width and length of the binding strip, is crucial in achieving the desired look and functionality for your quilt binding. Calculate the length needed by measuring the quilt’s perimeter, adding corner seam allowances and joining seam allowances. Determine the width based on personal preference and the quilt’s design.
Cutting and joining the binding strips requires accuracy and attention to detail. Sewing the binding to the quilt should be done methodically, mitering corners and ensuring a secure attachment. Finishing the binding can be done through hand stitching or machine stitching, with both methods providing a professional look when executed with care.
Remember, quilting is a creative and rewarding process. Each quilt you make is a work of art, and the binding is the final element that brings it all together. So take the time to master the art of calculating and applying binding for your quilts, and enjoy the satisfaction of creating beautiful and functional pieces that will be cherished for generations to come.
Now, armed with the knowledge of calculating binding for your quilts, go forth and create stunning quilting projects that will amaze and inspire. Happy quilting!
Frequently Asked Questions about How To Calculate Binding For A Quilt
Was this page helpful?
At Storables.com, we guarantee accurate and reliable information. Our content, validated by Expert Board Contributors, is crafted following stringent Editorial Policies. We're committed to providing you with well-researched, expert-backed insights for all your informational needs.


0 thoughts on “How To Calculate Binding For A Quilt”