Home>diy>Architecture & Design>How To Create A Floor Plan In Word
Architecture & Design
How To Create A Floor Plan In Word
Modified: January 2, 2024
Learn how to create a floor plan in Word with our step-by-step guide. Perfect for architecture design enthusiasts looking to unleash their creativity.
(Many of the links in this article redirect to a specific reviewed product. Your purchase of these products through affiliate links helps to generate commission for Storables.com, at no extra cost. Learn more)
Introduction
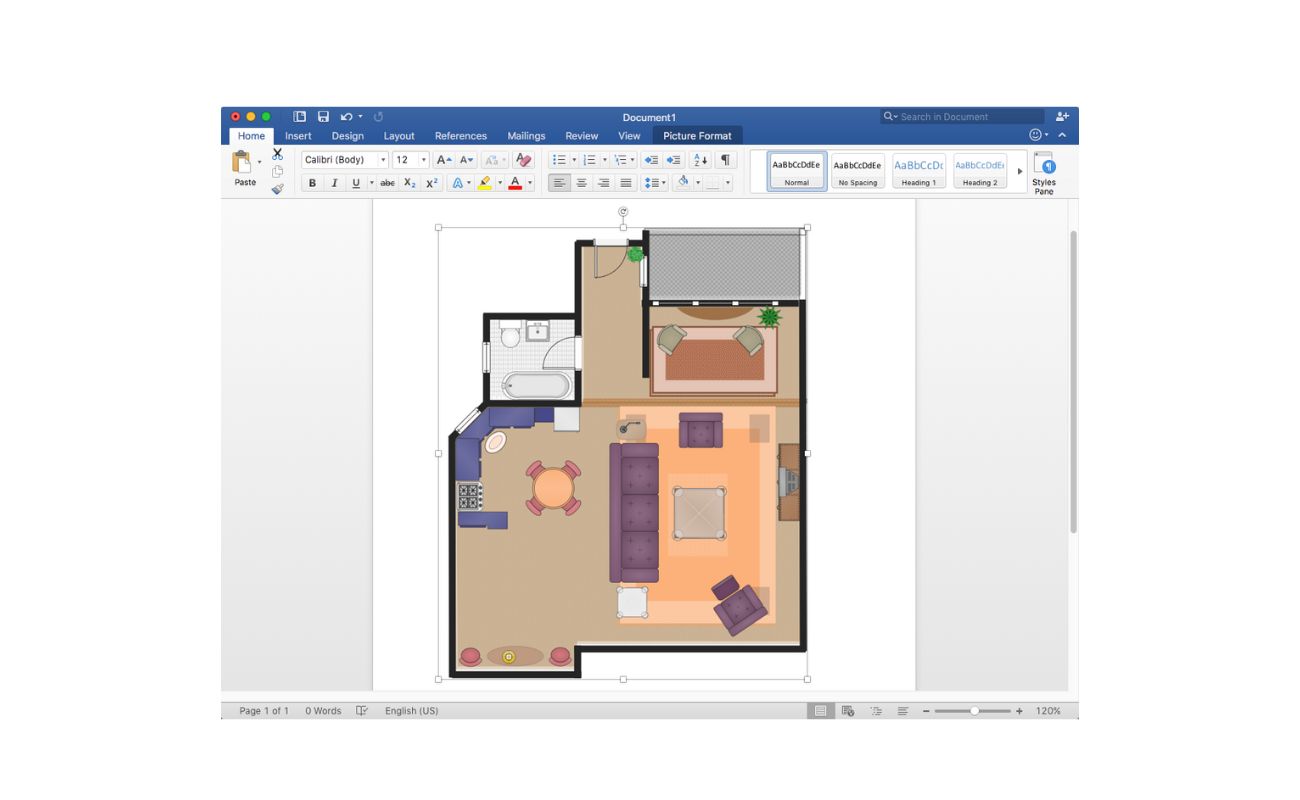
Designing a floor plan is an essential step in the architectural and interior design process. It allows you to visualize the layout of a space, including the placement of walls, furniture, and fixtures. While there are many specialized software tools available for creating floor plans, you can also utilize everyday office software, such as Microsoft Word, to accomplish this task.
In this article, we will guide you through a step-by-step process on how to create a floor plan using Microsoft Word. Whether you’re a homeowner planning a renovation, a designer showcasing your ideas, or just someone who wants to explore their creativity, this article will provide you with the necessary knowledge to create an impressive floor plan.
With Microsoft Word’s simplicity and versatility, you’ll be able to create a professional-looking floor plan without the need for extensive technical knowledge or expensive software. So let’s dive in and get started!
Key Takeaways:
- Create professional floor plans in Microsoft Word using tables, shapes, and customization options. Perfect for homeowners, designers, and creatives without specialized software.
- Visualize, customize, and share your floor plan with ease in Microsoft Word. Add walls, doors, furniture, fixtures, and labels for a comprehensive design.
Read more: How To Create A Floor Plan For Free
Step 1: Open Microsoft Word
The first step in creating a floor plan in Microsoft Word is to open the software on your computer. If you don’t have Microsoft Word installed, you can download it from the official Microsoft website or use an alternative word processing program that supports table creation.
Once you have Microsoft Word open, you will be greeted with a blank document ready for your floor plan. Take a moment to familiarize yourself with the various tools and options available in the software. You will find the toolbar at the top of the screen, where you can access different features like formatting, tables, and shapes.
If you already have an existing Word document that you want to use as the basis for your floor plan, you can open that document instead. Simply go to “File” in the top menu and select “Open” to browse your computer for the file.
It’s important to note that while Microsoft Word is a versatile tool for creating various documents, it may not offer the same extensive features as specialized floor planning software. However, with a little creativity and customization, you can still create a functional and visually appealing floor plan.
Now that you have Microsoft Word open and ready, let’s move on to the next step in creating your floor plan.
Step 2: Set the Page Layout
Before you start creating your floor plan, it’s important to set up the page layout in Microsoft Word to ensure that your design fits within the desired dimensions. To do this, follow these steps:
- Go to the “Layout” or “Page Layout” tab in the toolbar at the top of the screen. This is where you can access various formatting options for your document.
- Click on “Size” or “Page Setup” to open a drop-down menu with different page size options. Choose the page size that best matches the scale of your floor plan. Common options include Letter (8.5 x 11 inches), Legal (8.5 x 14 inches), or A4 (8.3 x 11.7 inches).
- Next, navigate to the “Orientation” option and select either “Portrait” or “Landscape” depending on the layout of your floor plan. Landscape orientation is typically used for wider or more spacious floor plans, while portrait orientation is suitable for taller or narrower designs.
- If needed, adjust the margins by clicking on “Margins” or “Page Margins” in the same toolbar. This allows you to define the empty space around the edges of your floor plan. You can choose from pre-set margin options or customize them according to your preferences.
Setting the page layout correctly ensures that your floor plan will be accurately presented without any cropping or distortion. Take into consideration the size of the paper you will be printing on or the screen size on which you plan to display your floor plan.
Once you have configured the page layout to meet your requirements, you are ready to move on to the next step in creating your floor plan in Microsoft Word.
Step 3: Insert a Table
Now that you have set up the page layout for your floor plan, it’s time to insert a table in Microsoft Word to create the basic structure of your design. The table will act as a grid where you can add walls, furniture, and other elements.
To insert a table, follow these simple steps:
- Place your cursor in the document where you want to insert the table. This could be at the top of the page or anywhere within the document.
- Go to the “Insert” tab in the toolbar at the top of the screen.
- Click on the “Table” button. A drop-down menu will appear with different options.
- Hover over the grid of squares to select the desired number of rows and columns for your table. For a basic floor plan, a 2×2 or 3×3 table is a good starting point.
- Click on the selected grid to insert the table into your document.
Once the table is inserted, you will see a grid structure on your page, representing the layout of your floor plan. It’s important to note that you can easily adjust the size and dimensions of the table later to accommodate your specific design needs.
The table provides a visual reference for placing walls, furniture, and other elements. It acts as a framework for your floor plan, making it easier to organize and visualize the space you are designing.
With the table in place, you are ready to move on to the next step and start customizing and refining your floor plan in Microsoft Word.
Step 4: Adjust Table Dimensions
After inserting a table in Microsoft Word for your floor plan, you may find that the default dimensions do not fit your design accurately. In this step, we will guide you through the process of adjusting the table dimensions to match your specific needs.
Follow these steps to adjust the table dimensions:
- Click anywhere inside the table to select it.
- Look for the “Table Tools” tab that appears at the top of the screen when the table is selected.
- Within the “Table Tools” tab, click on the “Layout” tab to access additional customization options.
- In the “Layout” tab, locate the “Cell Size” group. Here, you can make precise adjustments to the height and width of the table cells.
- Manually input the desired measurements for each cell, or use the provided arrows to incrementally adjust the dimensions.
- Continue adjusting the dimensions until the table aligns with the scale and proportions you wish to convey in your floor plan.
As you adjust the dimensions, you will see the table cells resizing accordingly. This flexibility allows you to create a table that accurately reflects the layout of the rooms and spaces in your floor plan.
By customizing the table dimensions, you gain greater control over the design elements you will add in the following steps. This step is crucial for creating a well-balanced and visually appealing floor plan in Microsoft Word.
With the table dimensions adjusted, you are now ready to move on to the next step and begin customizing your floor plan further.
Read more: How To Create Floor Plan In Excel
Step 5: Customize the Table
Now that you have the basic table structure in place for your floor plan, it’s time to customize it further to accurately represent the layout of your space. In this step, we will guide you through the process of customizing the table in Microsoft Word.
Follow these steps to customize the table:
- Select the entire table by clicking and dragging the cursor over it.
- Right-click on the selected table to open a context menu. Here, you will find various options for customizing your table.
- Explore the different customization options such as borders, shading, and cell alignment to enhance the visual representation of your floor plan.
- Adjust the borders of the table and the individual cells to make them more prominent or subtle, depending on your preference.
- Change the shading of the cells to differentiate between different areas or elements in your floor plan. For example, you can use lighter shades for walls and darker shades for furniture.
- Align the content within the cells by selecting the desired alignment option, such as left, center, or right.
By customizing the table, you can create a more visually appealing and organized representation of your floor plan. The customization options in Microsoft Word allow you to highlight specific elements and add clarity to your design.
Remember, you can always experiment with different customization options to find the look and feel that best suits your floor plan. Don’t be afraid to get creative and play around with different styles and designs.
With the table customized to your liking, you are now ready to move on to the next step and start adding walls and doors to your floor plan in Microsoft Word.
Use the “Shapes” tool in Word to create walls, doors, and furniture. You can also use the gridlines to align and position the elements accurately.
Step 6: Add Walls and Doors
Adding walls and doors is a crucial step in creating a detailed and accurate floor plan in Microsoft Word. These elements define the structure and flow of the space, allowing you to visualize how rooms and areas connect to each other.
Follow these steps to add walls and doors to your floor plan:
- Select a cell in the table where you want to add a wall. This cell will represent the starting point of the wall.
- Go to the “Insert” tab in the toolbar and click on the “Shapes” button.
- In the drop-down menu, select the “Line” or “Rectangle” shape. The line shape can be used to create straight walls, while the rectangle shape can be used for walls with corners.
- Click and drag the cursor within the table cell to draw the wall shape. Use the gridlines of the table as a guide to create straight lines or right angles for corners.
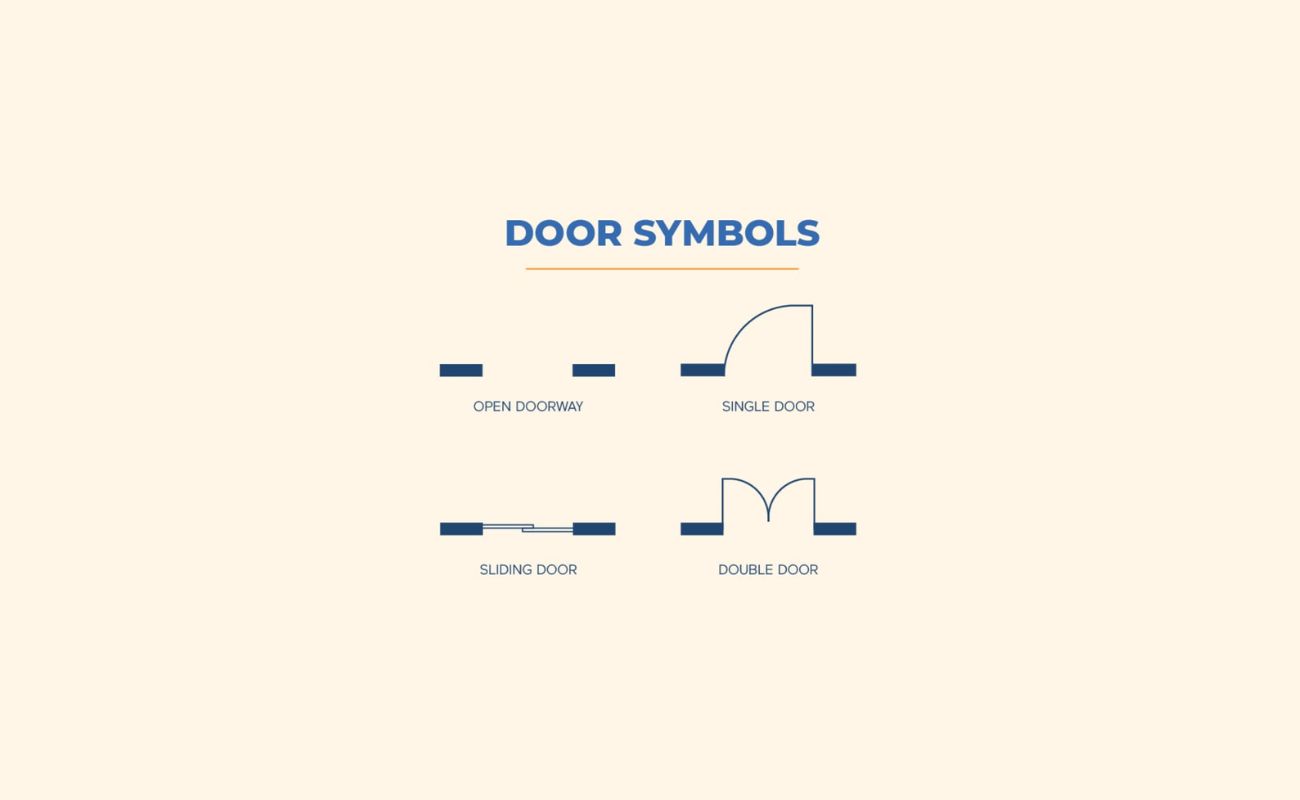
- To add a door, repeat the previous steps to create another line or rectangle shape representing the door opening. Position it within the wall shape.
- Customize the wall and door shapes by adjusting their colors, borders, and sizes. This helps differentiate them from other elements in your floor plan.
Continue adding walls and doors by selecting different cells in the table and repeating the process. Remember to align the walls and doors with the dimensions and layout of your floor plan accurately.
Adding walls and doors brings your floor plan to life, giving it a realistic representation of the actual space. It allows you to visualize how rooms are interconnected and how people can move within the design.
With the walls and doors in place, you can now move on to the next step and add furniture and fixtures to complete your floor plan in Microsoft Word.
Step 7: Insert Furniture and Fixtures
Now that you have the structure of your floor plan defined with walls and doors, it’s time to add furniture and fixtures to complete the design. This step allows you to visualize the placement of key elements within each room, such as tables, chairs, beds, appliances, and more.
Follow these steps to insert furniture and fixtures into your floor plan:
- Select a cell or group of cells where you want to add a furniture item.
- Go to the “Insert” tab in the toolbar and click on the “Shapes” button.
- In the drop-down menu, choose the shape that best represents the furniture item you want to add, such as a rectangle for a table or a circle for a chair.
- Click and drag the cursor within the selected cells to create the shape of the furniture item. Adjust the size and proportions to fit the scale of your floor plan.
- Repeat the process for each furniture item you want to include. You can use different shapes and colors to represent various pieces of furniture.
- Label the furniture items by adding text next to or inside the shapes. This helps clarify the purpose of each item and adds clarity to your floor plan.
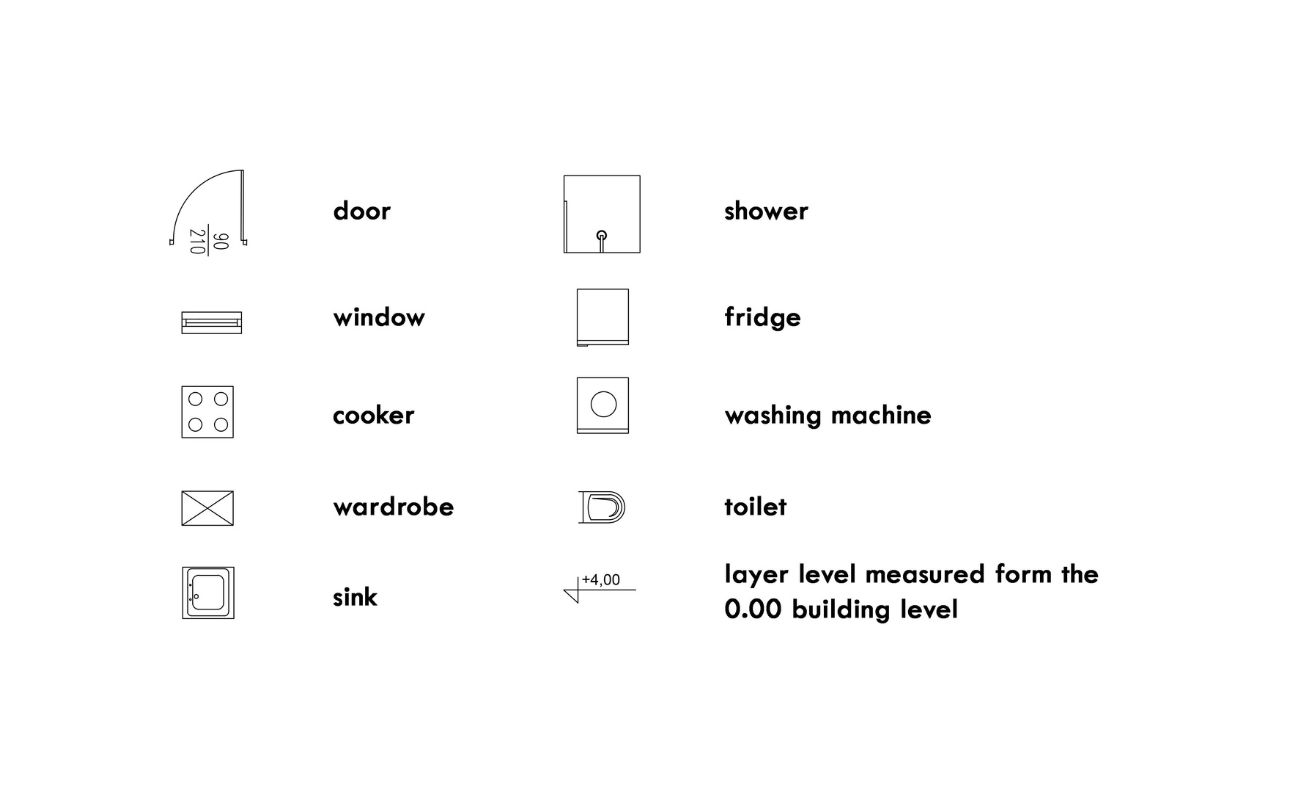
- If desired, you can also insert symbols or icons to represent fixtures such as sinks, toilets, or appliances.
As you add furniture and fixtures, consider the functionality and flow of each room. Visualize how people will interact with the space and make adjustments as needed to ensure a practical and aesthetically pleasing design.
Adding furniture and fixtures brings your floor plan to life, allowing you to visualize the layout and functionality of each room. It enables you to assess the space requirements and make any necessary adjustments before proceeding with the actual implementation.
With the furniture and fixtures inserted, you are one step closer to completing your floor plan in Microsoft Word. However, there is still more to do to ensure a comprehensive and detailed representation.
Step 8: Label the Floor Plan
The next step in creating a comprehensive floor plan in Microsoft Word is to label the various elements within your design. Adding labels helps provide clarity and context to your plan, making it easier for viewers to understand the layout and purpose of each room or area.
Follow these steps to label your floor plan:
- Select the “Insert” tab in the toolbar and click on the “Text Box” button.
- Choose the desired text box style from the drop-down menu. You can opt for a simple rectangular text box or a more decorative option.
- Click and drag the cursor on the area of your floor plan where you want to add a label.
- Type in the label text, such as the name of a room, a specific area, or any additional description that helps clarify the purpose of that space.
- Repeat the process for each element you want to label, such as rooms, furniture, or fixtures.
- Customize the label text by adjusting the font, size, color, and alignment to ensure visibility and consistency.
Labels are an essential part of your floor plan as they provide important information about the different elements present in the design. They aid in understanding the flow of the space and help users navigate through the plan effectively.
Ensure that the labels are well-placed and legible, allowing viewers to easily identify and comprehend the layout and purpose of each element. Consistency in labeling style and formatting also enhances the overall presentation of your floor plan.
With the floor plan labeled, you are now ready for the final step – saving and sharing your Microsoft Word floor plan.
Step 9: Save and Share the Floor Plan
After putting in the effort to create a detailed floor plan in Microsoft Word, it’s crucial to save your work and share it with others. Saving your floor plan allows you to revisit and make further modifications if needed, while sharing it enables you to receive feedback or present your design to clients, colleagues, or contractors.
Follow these steps to save and share your floor plan:
- Click on the “File” tab in the toolbar at the top left corner of the screen.
- Select “Save As” from the drop-down menu to specify where you want to save the floor plan on your computer.
- Choose a file name that is descriptive and easy to remember.
- Select the desired file format, such as .docx or .pdf, which allows for easy viewing and sharing across different devices and platforms. PDF format is preferable if you want to ensure the layout remains intact when viewed on different devices.
- Click “Save” to save your floor plan to the designated location.
- To share your floor plan, you can attach it to an email, upload it to a cloud storage service, or use a file-sharing platform. Ensure you choose a method that is convenient for both you and the recipient.
- If sharing digitally, consider converting the Word file to a PDF to ensure that the formatting remains consistent and intact.
When sharing your floor plan, provide any additional information or context that helps the recipient understand the purpose and layout of the space. This can include a brief description of the project, specifications, or any specific questions or areas you want them to focus on.
Remember to keep a copy of your floor plan saved on your computer or a backup storage device for future reference or modifications.
Congratulations! You have successfully completed all the steps to create, save, and share your floor plan using Microsoft Word. Now you have a well-designed floor plan that can be utilized for various purposes, whether it’s for personal use, presentations, renovations, or communicating your design ideas.
Keep exploring your creativity and continue using Microsoft Word as a versatile tool for your architectural and design needs.
Conclusion
Creating a floor plan in Microsoft Word may not be the most conventional method, but it proves to be a viable option for those who do not have access to specialized floor planning software. With the use of tables, shapes, and customization options, you can design a visually appealing and functional floor plan right within the familiar interface of Microsoft Word.
Throughout this article, we walked you through the step-by-step process of creating a floor plan in Microsoft Word. From setting up the page layout to adding walls, doors, furniture, fixtures, and labels, each step contributed to bringing your floor plan to life and providing an accurate representation of the space you’re designing.
While Microsoft Word may not offer the same extensive features as dedicated floor planning software, it does provide the necessary tools to create a basic floor plan. By utilizing your creativity, attention to detail, and the customization options available, you can achieve impressive results.
Remember to save your floor plan and share it with others to receive valuable feedback or present your design ideas. Whether you’re a homeowner planning a renovation, a designer showcasing your concepts, or anyone looking to explore their creativity, Microsoft Word can be a valuable tool in the floor planning process.
Now that you’re familiar with the process, feel free to experiment, refine, and iterate on your floor plan as needed. The more you practice and engage with the software, the better you’ll become at creating professional and visually captivating floor plans in Microsoft Word.
So don’t hesitate to embark on your next floor planning project using Microsoft Word. Let your creativity flow and explore the endless possibilities of designing spatial layouts right at your fingertips.
Frequently Asked Questions about How To Create A Floor Plan In Word
Was this page helpful?
At Storables.com, we guarantee accurate and reliable information. Our content, validated by Expert Board Contributors, is crafted following stringent Editorial Policies. We're committed to providing you with well-researched, expert-backed insights for all your informational needs.


0 thoughts on “How To Create A Floor Plan In Word”