Home>diy>Architecture & Design>How To Show Ceiling Height On A Floor Plan
Architecture & Design
How To Show Ceiling Height On A Floor Plan
Modified: May 6, 2024
Learn how to accurately represent ceiling height on a floor plan with expert tips and techniques in architecture design. Enhance your drawings and create visually stunning spaces.
(Many of the links in this article redirect to a specific reviewed product. Your purchase of these products through affiliate links helps to generate commission for Storables.com, at no extra cost. Learn more)
Introduction
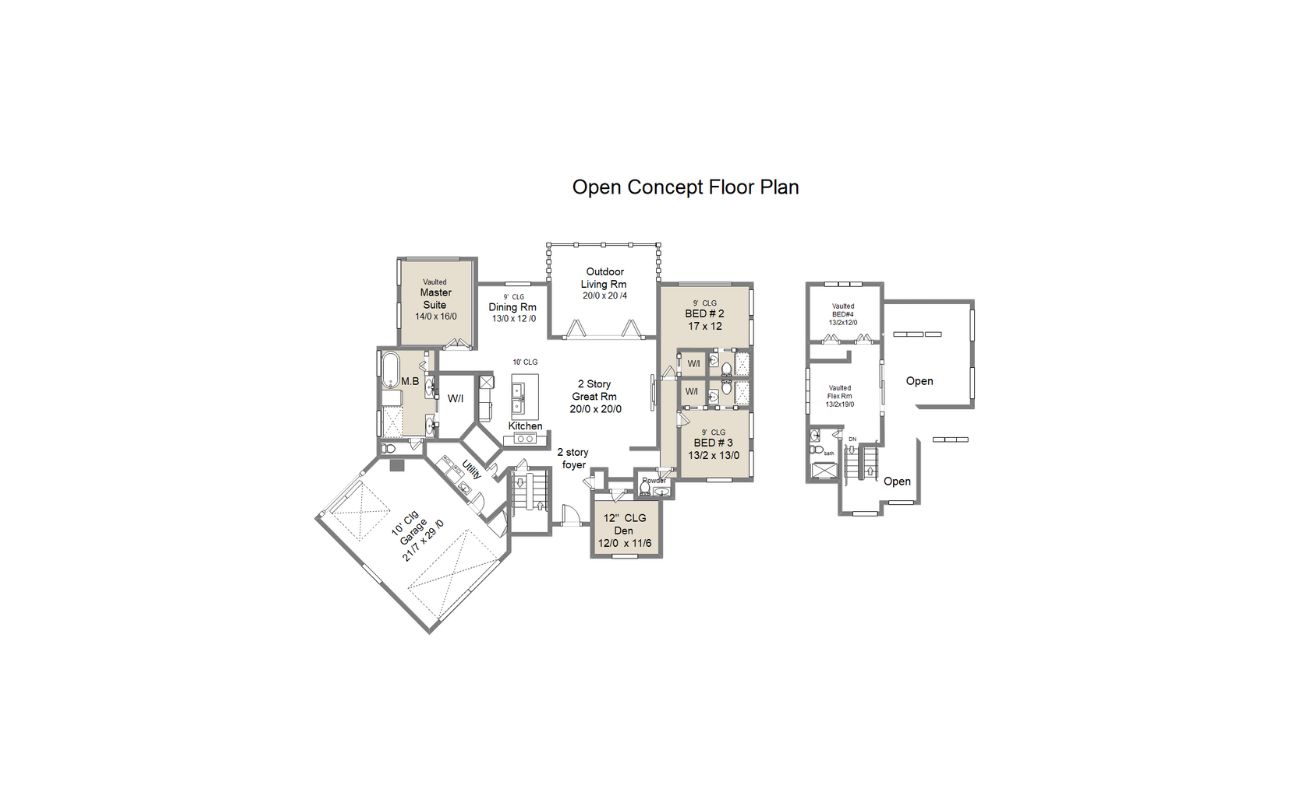
When it comes to designing a floor plan, one crucial aspect that often gets overlooked is representing the ceiling height. The ceiling height is an integral part of the architectural design as it influences the overall aesthetic appeal and functionality of a space. Whether you’re an architect, interior designer, or a homeowner looking to renovate, properly showcasing the ceiling height on a floor plan can provide valuable information and insight.
In this article, we will guide you through the process of effectively displaying the ceiling height on a floor plan. By following these steps, you can ensure that your floor plans accurately depict the vertical dimensions of a space, allowing stakeholders to visualize the height and scale of the room.
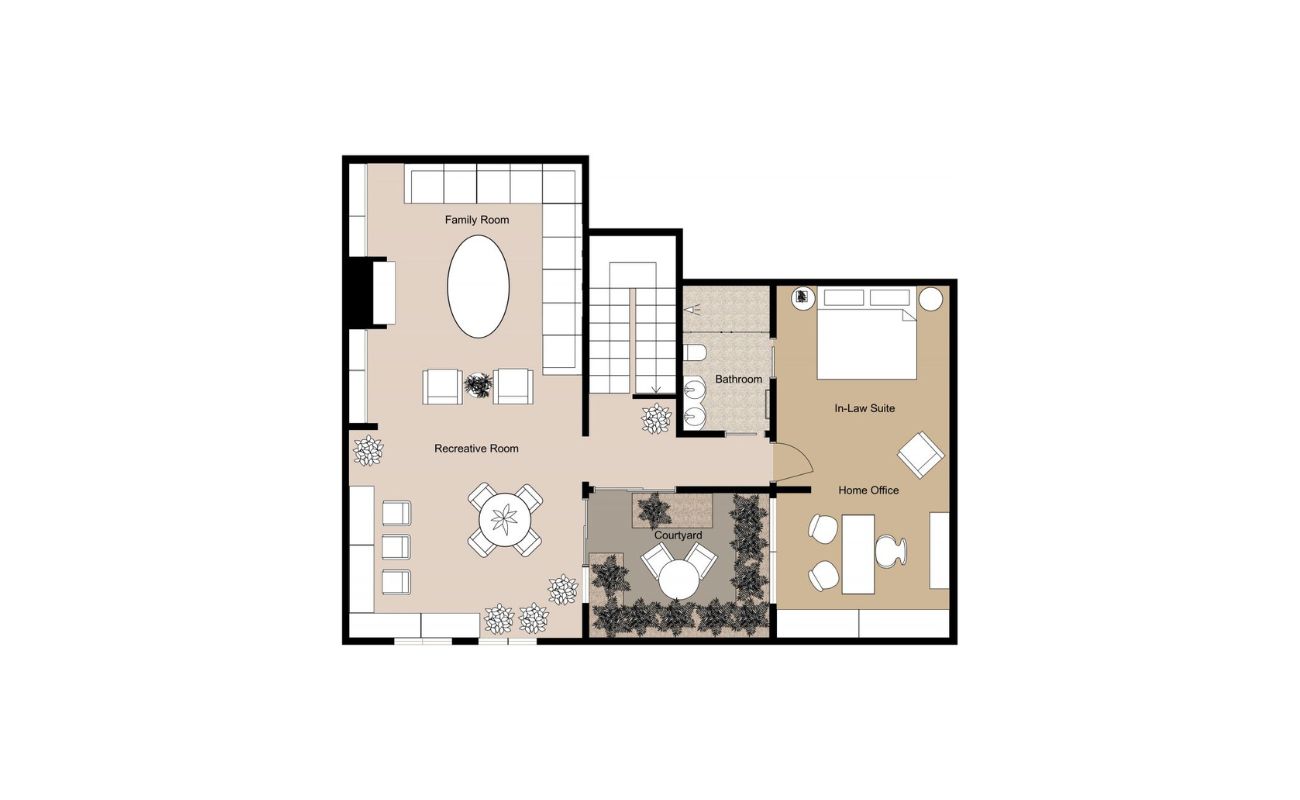
Creating a floor plan that accurately represents the ceiling height requires attention to detail, precision, and a good sense of spatial visualization. Additionally, utilizing symbols, labels, and annotations can enhance the clarity and readability of the floor plan, making it easier for viewers to understand the design intent.
So, whether you’re working on a residential project or designing a commercial space, understanding how to showcase the ceiling height on a floor plan is essential. By doing so, you will not only improve communication with clients and contractors but also create a visually appealing and informative document that portrays the true essence of your architectural design.
Key Takeaways:
- Accurately showcasing ceiling height on a floor plan involves determining scale, identifying vertical elements, and using symbols, labels, and color to enhance clarity and visual appeal.
- Effective representation of ceiling height on a floor plan facilitates clear communication, accurate construction, and visualization of spatial dimensions, contributing to visually stunning and functional spaces.
Read more: How To Raise Ceiling Height
Step 1: Determine the Scale and Measurements of the Floor Plan
Before you can accurately depict the ceiling height on a floor plan, it’s crucial to establish the scale and measurements of the plan itself. The scale represents the proportional relationship between the floor plan and the actual dimensions of the space it represents. Follow these steps to determine the scale and measurements:
Choosing the appropriate scale:
The scale will depend on the size and complexity of the space you are designing. Common scales for floor plans include 1/4 inch equals 1 foot or 1/8 inch equals 1 foot. Selecting the appropriate scale ensures that the floor plan fits on the page while maintaining accuracy. It’s important to consider the level of detail required and the available space on the page when choosing a scale.
Measuring the dimensions accurately:
To accurately represent the ceiling height on the floor plan, it’s essential to measure the dimensions of the space accurately. Use a measuring tape or a laser measuring tool to measure the length and width of the room. Ensure that you measure from the base of the floor to the top of the ceiling to get the exact height.
Record these measurements on graph paper or use a computer-aided design (CAD) software program to create a digital floor plan. This will serve as the foundation for accurately showcasing the ceiling height.
By taking the time to determine the scale and measure the dimensions accurately, you will set the stage for a precise and realistic representation of the ceiling height in the floor plan.
Step 2: Identify the Vertical Elements
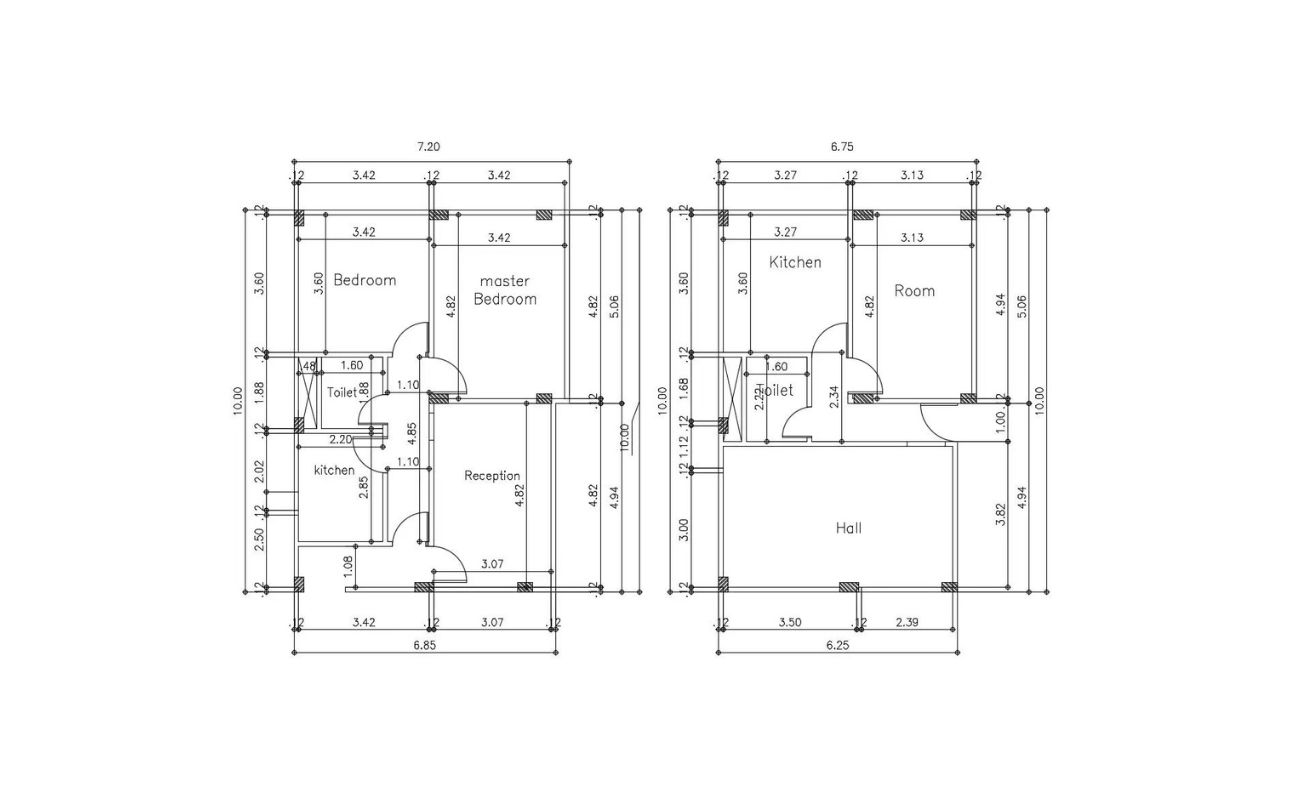
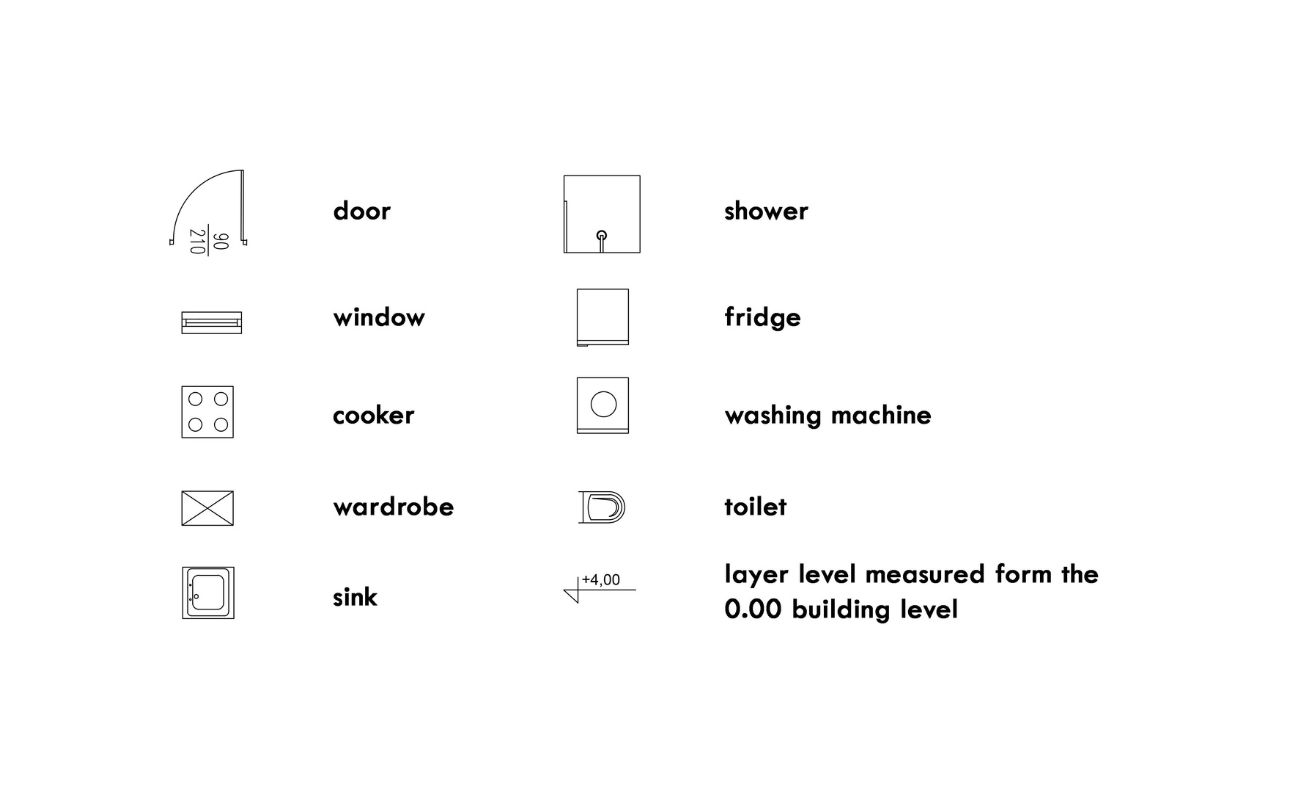
Once you have established the scale and measurements of the floor plan, the next step is to identify and indicate the vertical elements within the space. This includes walls, partitions, doors, and windows, which play a critical role in determining the ceiling height representation. Follow these steps to effectively showcase these elements:
Indicating walls and partitions:
Start by drawing the walls and partitions on the floor plan using the appropriate line type and thickness. Use solid lines for walls and dashed lines for partitions. Make sure to align the walls accurately with the measured dimensions to maintain the scale. This will create a clear visual representation of the structure of the space.
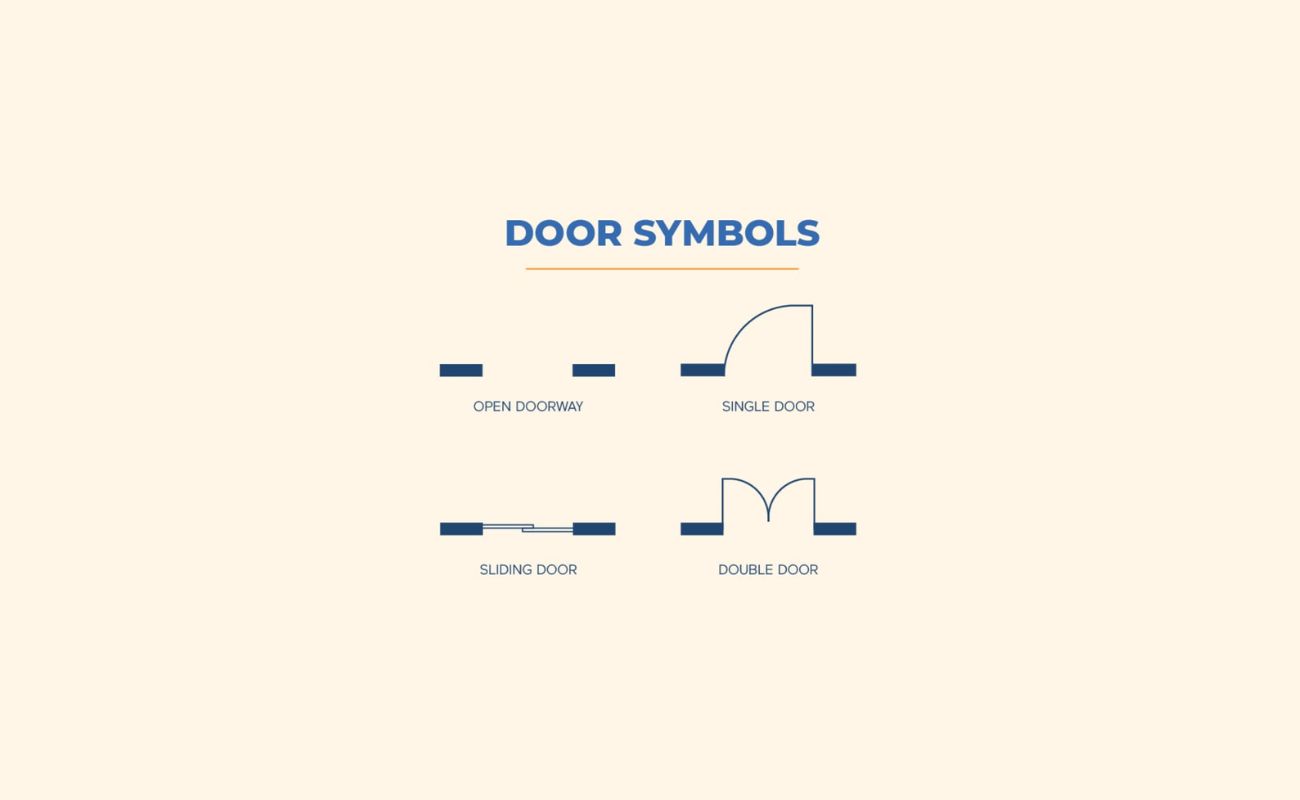
Highlighting doors and windows:
Next, add symbols or icons to represent doors and windows on the floor plan. Use unique symbols for each to differentiate between them. Make sure to position the symbols accurately to reflect the actual location of these elements within the space. This will ensure that the floor plan provides a comprehensive understanding of the room layout and the placement of vertical elements.
By effectively indicating the walls, partitions, doors, and windows on the floor plan, you create a solid foundation for showcasing the ceiling height in relation to these vertical elements. This step is crucial in ensuring that the floor plan accurately represents the architectural design of the space.
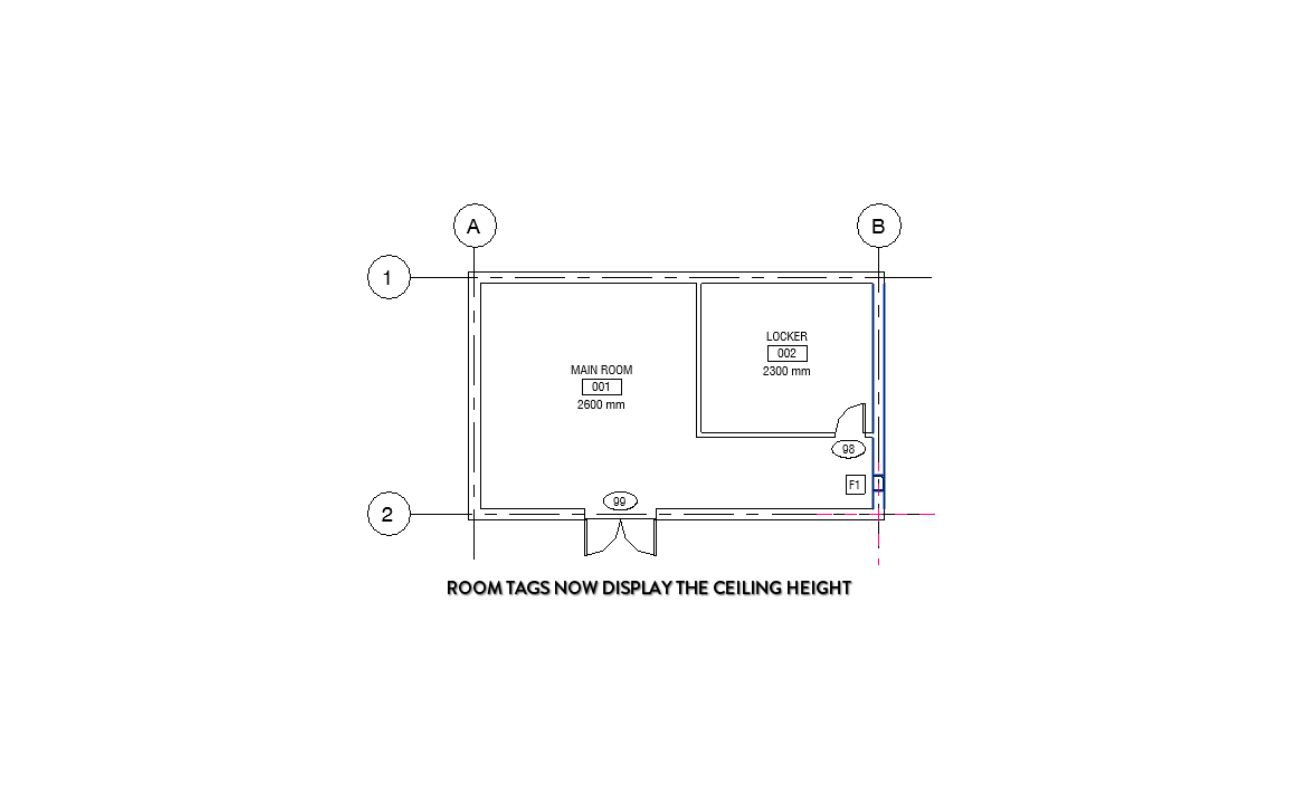
Step 3: Indicate Symbol for Ceiling Height
Once you have identified the vertical elements on the floor plan, the next step is to indicate a suitable symbol to represent the ceiling height. This symbol will help viewers understand the vertical dimension of the space at a glance. Follow these steps to effectively showcase the ceiling height:
Selecting a suitable symbol for ceiling height:
Choose a symbol that clearly represents the concept of height, such as an arrow pointing upwards or a horizontal line with markings indicating the height. The symbol should be easily distinguishable from the other elements on the floor plan and visually appealing to catch the viewer’s attention. Consider using different symbols for different ceiling heights if your floor plan includes various levels within the space.
Placing the symbol accurately on the floor plan:
Determine the location within the space where you want to showcase the ceiling height. Typically, this would be in the middle of the room or at specific points of interest, such as above a grand staircase or in a vaulted area. Place the selected symbol in the desired location, ensuring that it does not overlap with other elements on the floor plan.
Consider using different colors or shading for the symbol to make it stand out from the rest of the floor plan. This will help viewers quickly identify and understand the representation of the ceiling height.
By selecting a suitable symbol and placing it accurately on the floor plan, you provide viewers with a clear visual indication of the ceiling height, enhancing the understanding of the spatial dimensions of the room.
Use a dashed line to represent the outline of the ceiling on the floor plan. Label the height of the ceiling next to the line for clarity.
Step 4: Add Labels and Annotations
Adding labels and annotations to the floor plan is an essential step in providing clarity and enhancing the understanding of the ceiling height representation. These labels help viewers interpret the symbols and other elements on the plan accurately. Follow these steps to effectively label and annotate the floor plan:
Labeling the ceiling height symbol:
Include a text label next to the ceiling height symbol indicating the actual numerical measurement of the height. This label should be clear, concise, and placed in a location that does not obstruct the view of the symbol or other elements on the floor plan. Consider using a font size and style that is easily legible and complements the overall aesthetics of the plan.
Adding other relevant annotations, if necessary:
In addition to the ceiling height label, you may need to include other annotations on the floor plan to provide further information about specific areas or features within the space. This could include notes about special ceiling treatments, suspended fixtures, or any other architectural detail that impacts the overall height of the room.
Use arrows or lines with text annotations to highlight these areas or features on the floor plan. Place the annotations strategically to ensure they are easily visible and do not clutter the plan. The goal is to provide viewers with a comprehensive understanding of the architectural design and any unique elements that influence the ceiling height.
By adding labels and relevant annotations, you enhance the clarity and comprehensibility of the floor plan. This enables viewers to interpret the ceiling height representation accurately and gain crucial insights into the overall spatial dimensions of the room.
Read more: What Is A Floor Plan
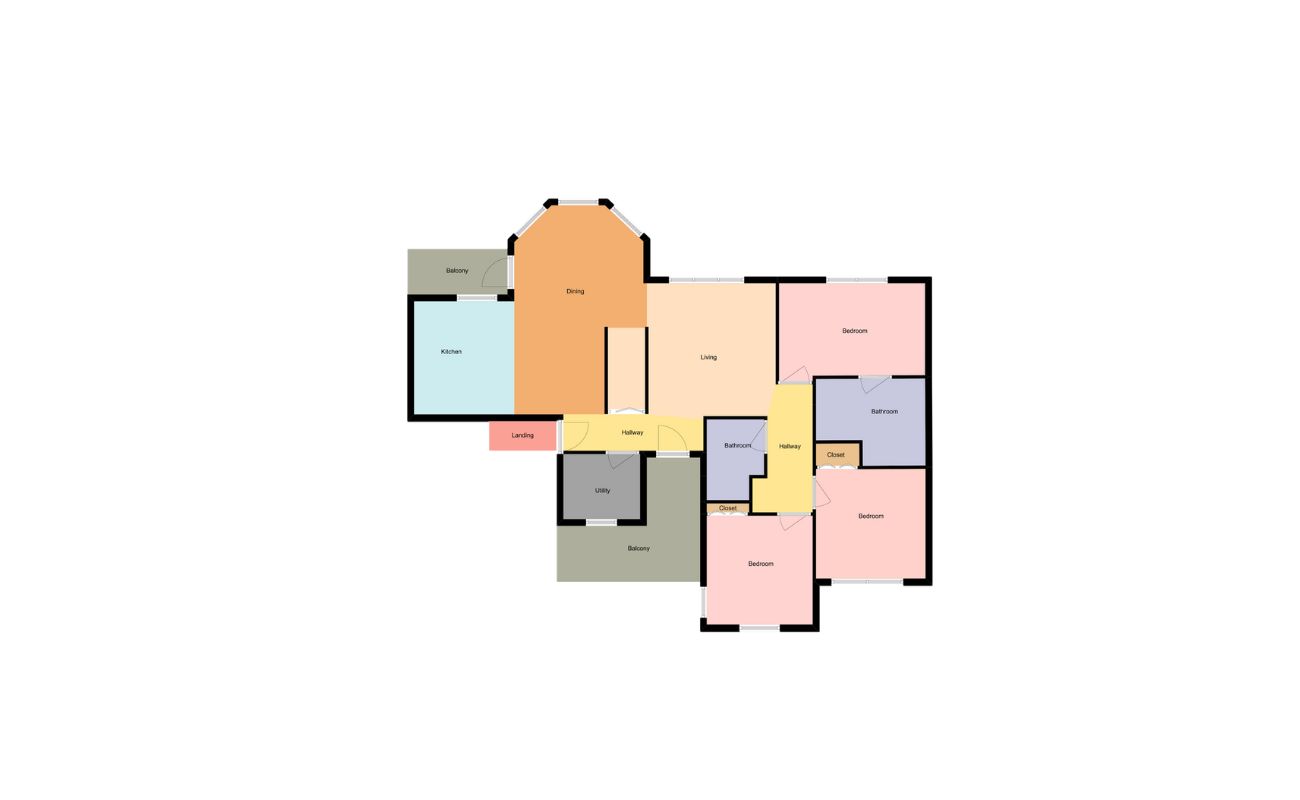
Step 5: Apply Color or Shading
Adding color or shading to the floor plan can be a powerful tool to further emphasize the representation of ceiling heights. Color can help distinguish different heights or levels within a space, creating a visual hierarchy and making it easier for viewers to interpret the floor plan. Follow these steps to effectively apply color or shading:
Using color or shading to emphasize ceiling heights:
Select a color or shading technique that visually differentiates the ceiling height areas from the rest of the floor plan. Consider using a lighter or darker shade of the same color scheme to represent various heights. For example, you could use a lighter shade for higher ceilings and a darker shade for lower ceilings. This contrast will make it easier for viewers to identify and understand the variations in ceiling heights within the space.
Selecting a color scheme that complements the floor plan:
When choosing the color scheme, consider the overall aesthetic of the floor plan and the design style of the space. Choose colors that complement the other elements on the plan and enhance its visual appeal. A harmonious color scheme will ensure that the floor plan remains coherent and visually pleasing, while still effectively portraying the ceiling height representation.
Ensure that the chosen colors or shades do not overpower or distract from the other elements on the floor plan. The goal is to strike a balance between drawing attention to the ceiling height representation and maintaining the overall unity and clarity of the plan.
By applying color or shading strategically, you can enhance the visualization of ceiling heights on the floor plan, making it easier for viewers to grasp the spatial dimensions and variations within the space.
Step 6: Double-Check for Accuracy
Before finalizing the floor plan with the ceiling height representation, it is crucial to double-check for accuracy. Verifying the correctness of the ceiling height representation ensures that the floor plan provides an accurate and reliable depiction of the spatial dimensions of the room. Follow these steps to ensure your floor plan is accurate:
Verifying the correctness of the ceiling height representation:
Review the measurements and calculations of the ceiling height to ensure they accurately reflect the actual dimensions of the space. Compare the recorded measurements with the visual representation on the floor plan to confirm their alignment. Pay close attention to any areas where the ceiling height may vary, such as sloping ceilings or raised platforms.
Making adjustments if needed:
If any discrepancies or errors are identified, make the necessary adjustments to ensure the accuracy of the floor plan. This may involve modifying the symbols, labels, or annotations related to the ceiling height representation. Use the measured dimensions as the basis for making these adjustments and ensure they are consistent throughout the floor plan.
Additionally, seek feedback from colleagues, architects, or other professionals to ensure the accuracy and clarity of the ceiling height representation. Fresh perspectives can help identify potential areas of improvement or issues that may have been overlooked.
By double-checking for accuracy, you can ensure that your floor plan with the ceiling height representation is a reliable and informative document that accurately portrays the spatial dimensions of the room.
Conclusion
Effectively showcasing the ceiling height on a floor plan is essential for conveying the architectural design and spatial dimensions of a space. By following the steps outlined in this article, you can create accurate and visually appealing floor plans that accurately represent the vertical elements and ceiling heights. Here’s a quick recap of the steps:
- Determine the scale and measurements of the floor plan.
- Identify the vertical elements such as walls, partitions, doors, and windows.
- Indicate a suitable symbol for the ceiling height and place it accurately on the floor plan.
- Add labels and annotations to enhance clarity and understanding.
- Apply color or shading to emphasize the ceiling heights and select a complementary color scheme.
- Double-check for accuracy and make adjustments if needed.
By incorporating these steps into your floor plan design process, you can create floor plans that effectively showcase the ceiling height and provide valuable insights to clients, contractors, and other stakeholders. Clear representation of the ceiling height enhances communication, facilitates accurate construction, and helps stakeholders visualize the spatial dimensions and aesthetics of a space.
Remember, it’s important to strike a balance between providing accurate and informative floor plans while still maintaining a visually appealing design. Use symbols, labels, and annotations strategically, and consider incorporating color or shading to enhance the visual impact.
With a well-executed floor plan that showcases the ceiling height, you can effectively communicate your design intent, facilitate smooth project execution, and create spaces that are visually stunning and functional.
Now that you've got the hang of representing ceiling heights on your floor plans, why not delve deeper into the fundamentals? Understanding what a floor plan encompasses will refine your skills further. This knowledge not only clarifies layouts but also improves your ability to visualize spaces effectively. Don't miss out on our detailed discussion on the essentials of floor plans, where each element is broken down to enhance your drafting expertise.
Frequently Asked Questions about How To Show Ceiling Height On A Floor Plan
Was this page helpful?
At Storables.com, we guarantee accurate and reliable information. Our content, validated by Expert Board Contributors, is crafted following stringent Editorial Policies. We're committed to providing you with well-researched, expert-backed insights for all your informational needs.


0 thoughts on “How To Show Ceiling Height On A Floor Plan”