Home>Furniture & Design>Interior Design Trends>How To Attach Glass To Wood
Interior Design Trends
How To Attach Glass To Wood
Modified: May 6, 2024
Learn the latest interior design trends for attaching glass to wood. Discover innovative techniques and tips for a modern and stylish look.
(Many of the links in this article redirect to a specific reviewed product. Your purchase of these products through affiliate links helps to generate commission for Storables.com, at no extra cost. Learn more)
Introduction
Attaching glass to wood can be a challenging yet rewarding endeavor, whether you are crafting a custom piece of furniture, creating a unique art installation, or simply repairing a cherished item. The fusion of these two materials can result in a stunning and functional creation that adds a touch of elegance to any space. However, achieving a secure and aesthetically pleasing bond between glass and wood requires careful consideration of the adhesive, surface preparation, and application techniques.
In this comprehensive guide, we will delve into the intricacies of attaching glass to wood, providing step-by-step instructions and valuable insights to help you navigate this process with confidence. From selecting the right adhesive to applying it effectively and ensuring a durable connection, we will cover all the essential aspects of this craft. Whether you are a seasoned artisan or a DIY enthusiast, this guide will equip you with the knowledge and techniques needed to accomplish this task successfully.
As we embark on this journey, it's important to recognize the significance of precision and attention to detail in this undertaking. The successful attachment of glass to wood hinges on a combination of factors, including the type of adhesive used, the condition of the surfaces, and the method of application. By understanding and implementing these elements effectively, you can achieve a seamless and enduring union between these distinct materials.
Throughout this guide, we will explore the nuances of selecting the most suitable adhesive for your project, preparing the surfaces to ensure optimal adhesion, and executing the attachment process with finesse. Additionally, we will address the finishing touches that can elevate the visual appeal and durability of the glass-wood fusion.
Whether you are embarking on a creative endeavor or seeking to restore a cherished item, the process of attaching glass to wood offers a blend of artistry and practicality. By mastering the techniques outlined in this guide, you can bring your vision to life and create enduring connections that harmonize the beauty of glass with the warmth of wood. Let's embark on this journey together, uncovering the art and science of attaching glass to wood with precision and creativity.
Key Takeaways:
- Achieving a strong bond between glass and wood requires choosing the right adhesive, preparing surfaces meticulously, and applying the adhesive with precision. These steps ensure a durable and visually appealing connection.
- After attaching glass to wood, adding finishing touches like sealing, cleaning, and reinforcement enhances the assembly’s visual appeal and durability. Clear maintenance guidelines ensure the longevity of the glass-wood fusion.
Read more: How To Attach Wood To Stucco Wall
Choosing the Right Adhesive
Selecting the appropriate adhesive is a critical first step in the process of attaching glass to wood. The adhesive serves as the foundation of the bond, dictating the strength, durability, and visual appeal of the connection. When choosing an adhesive for this application, it is essential to consider several key factors to ensure optimal results.
Consider the Materials
The compatibility of the adhesive with both glass and wood is paramount. For glass, the adhesive should be formulated to create a strong bond with the smooth, non-porous surface. Additionally, it should be transparent to maintain the clarity and aesthetics of the glass. When it comes to wood, the adhesive must effectively adhere to the porous and textured surface, providing a secure and lasting bond. Considering the unique properties of both materials is crucial in selecting an adhesive that can effectively bridge the gap between them.
Evaluate Strength and Flexibility
The adhesive chosen should offer a balance of strength and flexibility to accommodate the inherent differences in expansion and contraction between glass and wood. It should be resilient enough to withstand external forces and environmental factors, ensuring the longevity of the bond. At the same time, the adhesive should possess a degree of flexibility to accommodate any slight movements or vibrations without compromising the integrity of the connection.
Transparency and UV Resistance
Given that the adhesive will be in direct contact with the glass, transparency is a key consideration. A high-quality adhesive should dry clear, maintaining the visual clarity of the glass and preserving its aesthetic appeal. Furthermore, UV resistance is essential to prevent the adhesive from degrading or yellowing over time when exposed to sunlight. This characteristic ensures that the bond remains visually pristine and structurally sound, even in environments with ample natural light.
Read more: How To Attach Moss To Wood In Home Decor
Application Method and Drying Time
The ease of application and the drying time of the adhesive are practical considerations that can significantly impact the attachment process. A user-friendly adhesive that allows for precise application and provides an adequate window for adjustments before setting can streamline the bonding process. Additionally, understanding the curing time of the adhesive is crucial for planning subsequent steps in the attachment process, ensuring a seamless and efficient workflow.
By carefully evaluating these factors and selecting an adhesive that aligns with the specific requirements of attaching glass to wood, you can lay a solid foundation for a successful and enduring bond. The right adhesive will not only facilitate a strong and visually appealing connection but also contribute to the overall longevity and resilience of the glass-wood fusion.
Preparing the Surfaces
Preparing the surfaces of both the glass and wood is a crucial precursor to achieving a strong and durable bond. Proper surface preparation sets the stage for optimal adhesion, ensuring that the adhesive can form a secure and lasting connection between these disparate materials.
Cleaning and Degreasing
Before commencing the surface preparation, it is imperative to thoroughly clean the glass and wood to remove any contaminants that could hinder adhesion. For the glass, a gentle yet effective glass cleaner can be used to eliminate fingerprints, dust, and any residual substances. It is essential to ensure that the glass surface is entirely free of any debris or oily residues that could compromise the bonding process.
Similarly, the wood surface should be cleaned to remove dirt, dust, and any traces of grease or wax. A mild detergent solution can be employed to cleanse the wood, followed by rinsing and thorough drying. This step is critical in creating an ideal surface for the adhesive to adhere to, free from any substances that could impede the bonding process.
Sanding and Smoothing
In the case of wood, sanding the surface is a fundamental step in preparing it for the adhesive. This process serves to smooth out any rough or uneven areas, creating a uniform and receptive surface for the adhesive to bond with. Additionally, sanding the wood promotes better adhesion by enhancing the surface area available for the adhesive to grip onto, ultimately contributing to a stronger and more reliable bond.
Read more: How To Attach Wire Fence To Wood Post
Ensuring Dryness and Uniformity
Once the cleaning and sanding processes are complete, it is essential to ensure that both the glass and wood surfaces are completely dry before proceeding with the attachment. Any residual moisture can compromise the effectiveness of the adhesive, potentially leading to a weak or unstable bond. Furthermore, verifying the uniformity of the surfaces is crucial, as any irregularities or inconsistencies can impact the adhesion and overall quality of the connection.
Final Inspection
Before applying the adhesive, a final inspection of the prepared surfaces is advisable to confirm that they are free from any contaminants, smooth, dry, and uniform. This meticulous approach to surface preparation sets the stage for a successful attachment, laying the groundwork for a secure and visually appealing bond between the glass and wood.
By meticulously preparing the surfaces of both the glass and wood, you can optimize the conditions for effective adhesion, setting the stage for a robust and enduring connection. This attention to detail in surface preparation is a pivotal step in the process of attaching glass to wood, contributing to the overall quality and longevity of the fusion between these distinct materials.
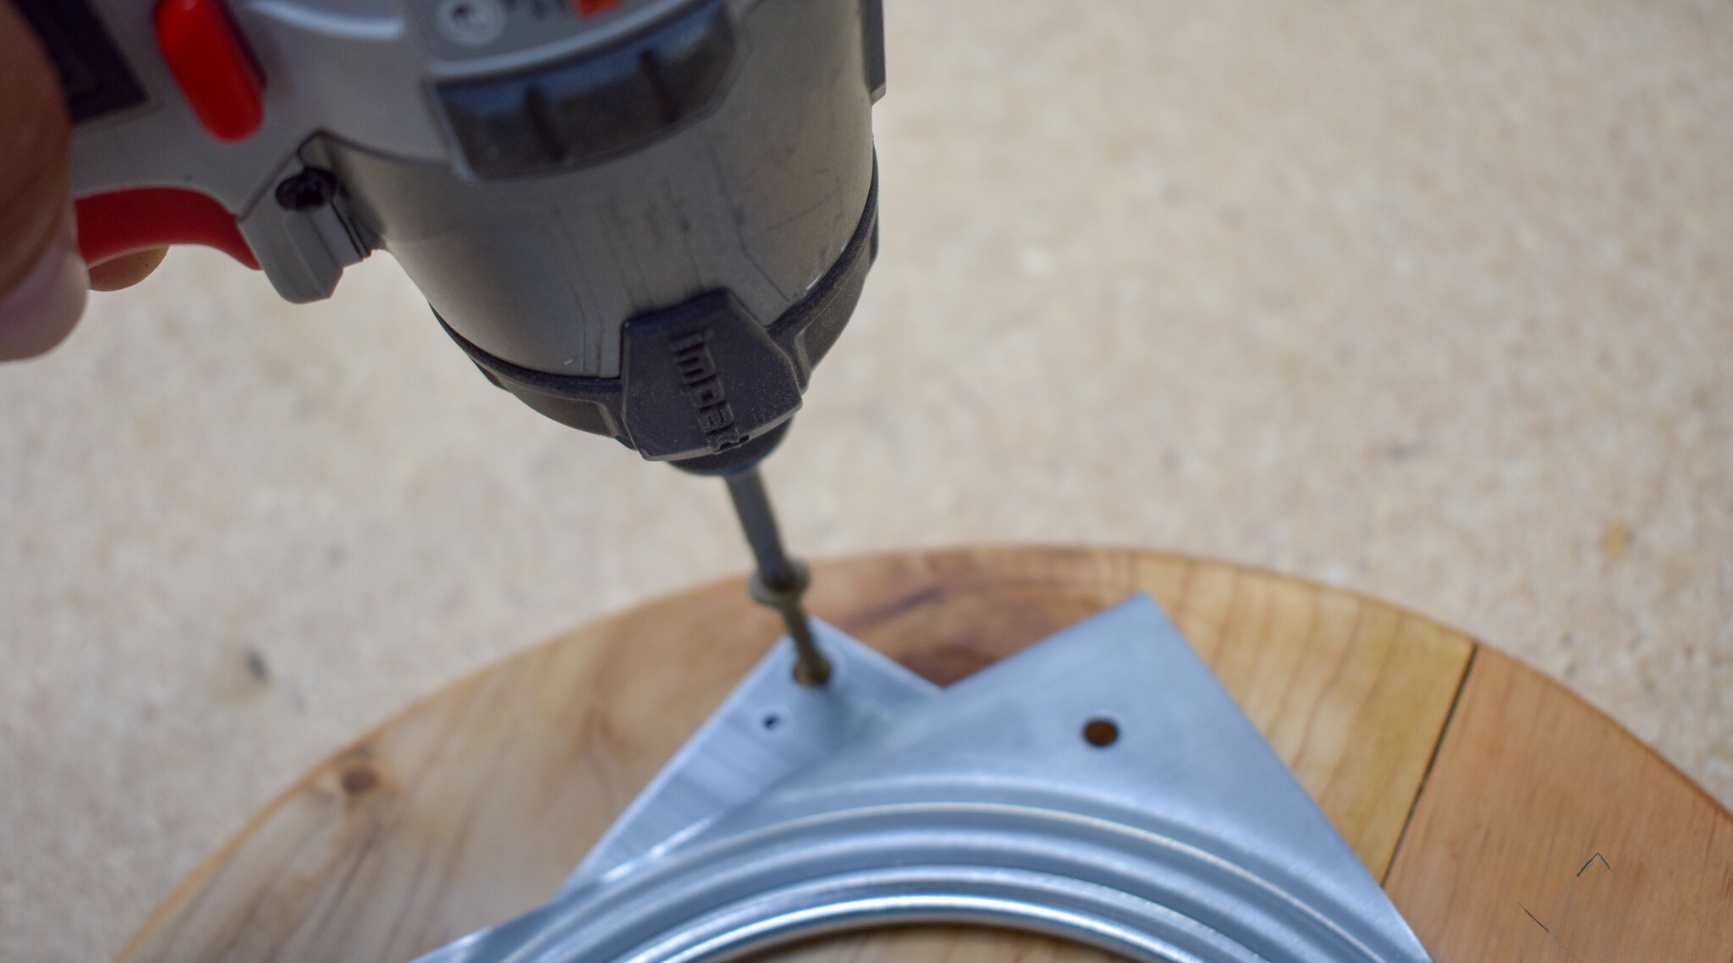
Applying the Adhesive
The application of the adhesive is a pivotal phase in the process of attaching glass to wood, as it directly influences the strength, durability, and visual appeal of the bond. Executing this step with precision and care is essential to ensure a secure and seamless connection between these distinct materials.
When applying the adhesive, it is crucial to follow the manufacturer's instructions meticulously, as different adhesives may have specific application guidelines. Prior to application, it is advisable to conduct a test on a small, inconspicuous area to assess the adhesive's compatibility with the materials and to gauge the drying and bonding characteristics.
Using a suitable applicator, such as a fine-tipped nozzle or a small brush, apply a thin and even layer of the adhesive to the prepared surface of the wood. It is important to avoid excessive application, as this can lead to visible smudges or excess adhesive seeping onto the glass. For the glass surface, the adhesive should be applied with precision, ensuring complete coverage while avoiding spills or smudges that could mar the visual clarity of the glass.
Once the adhesive is applied, carefully position the glass onto the wood surface, aligning it according to the desired placement. Exercise caution and precision during this step, as adjustments may be challenging once the glass makes contact with the adhesive. Gentle pressure can be applied to the glass to promote even adhesion, taking care to avoid excessive force that could result in slippage or misalignment.
After the glass is positioned, any excess adhesive that may have seeped out can be carefully removed using a suitable solvent or adhesive remover, taking care not to disturb the bond between the glass and wood. This meticulous approach to managing excess adhesive contributes to the visual cleanliness and professional finish of the attachment.
Following the application of the adhesive and the positioning of the glass, it is essential to allow adequate time for the adhesive to cure and set. The recommended curing time can vary depending on the specific adhesive used, environmental conditions, and the size and weight of the glass. Patience during this phase is crucial, as premature handling or stress on the bond can compromise its integrity.
By adhering to these meticulous steps and exercising precision throughout the application process, you can establish a robust and visually pristine bond between the glass and wood. The application of the adhesive represents a critical juncture in the attachment process, shaping the quality and longevity of the fusion between these materials.
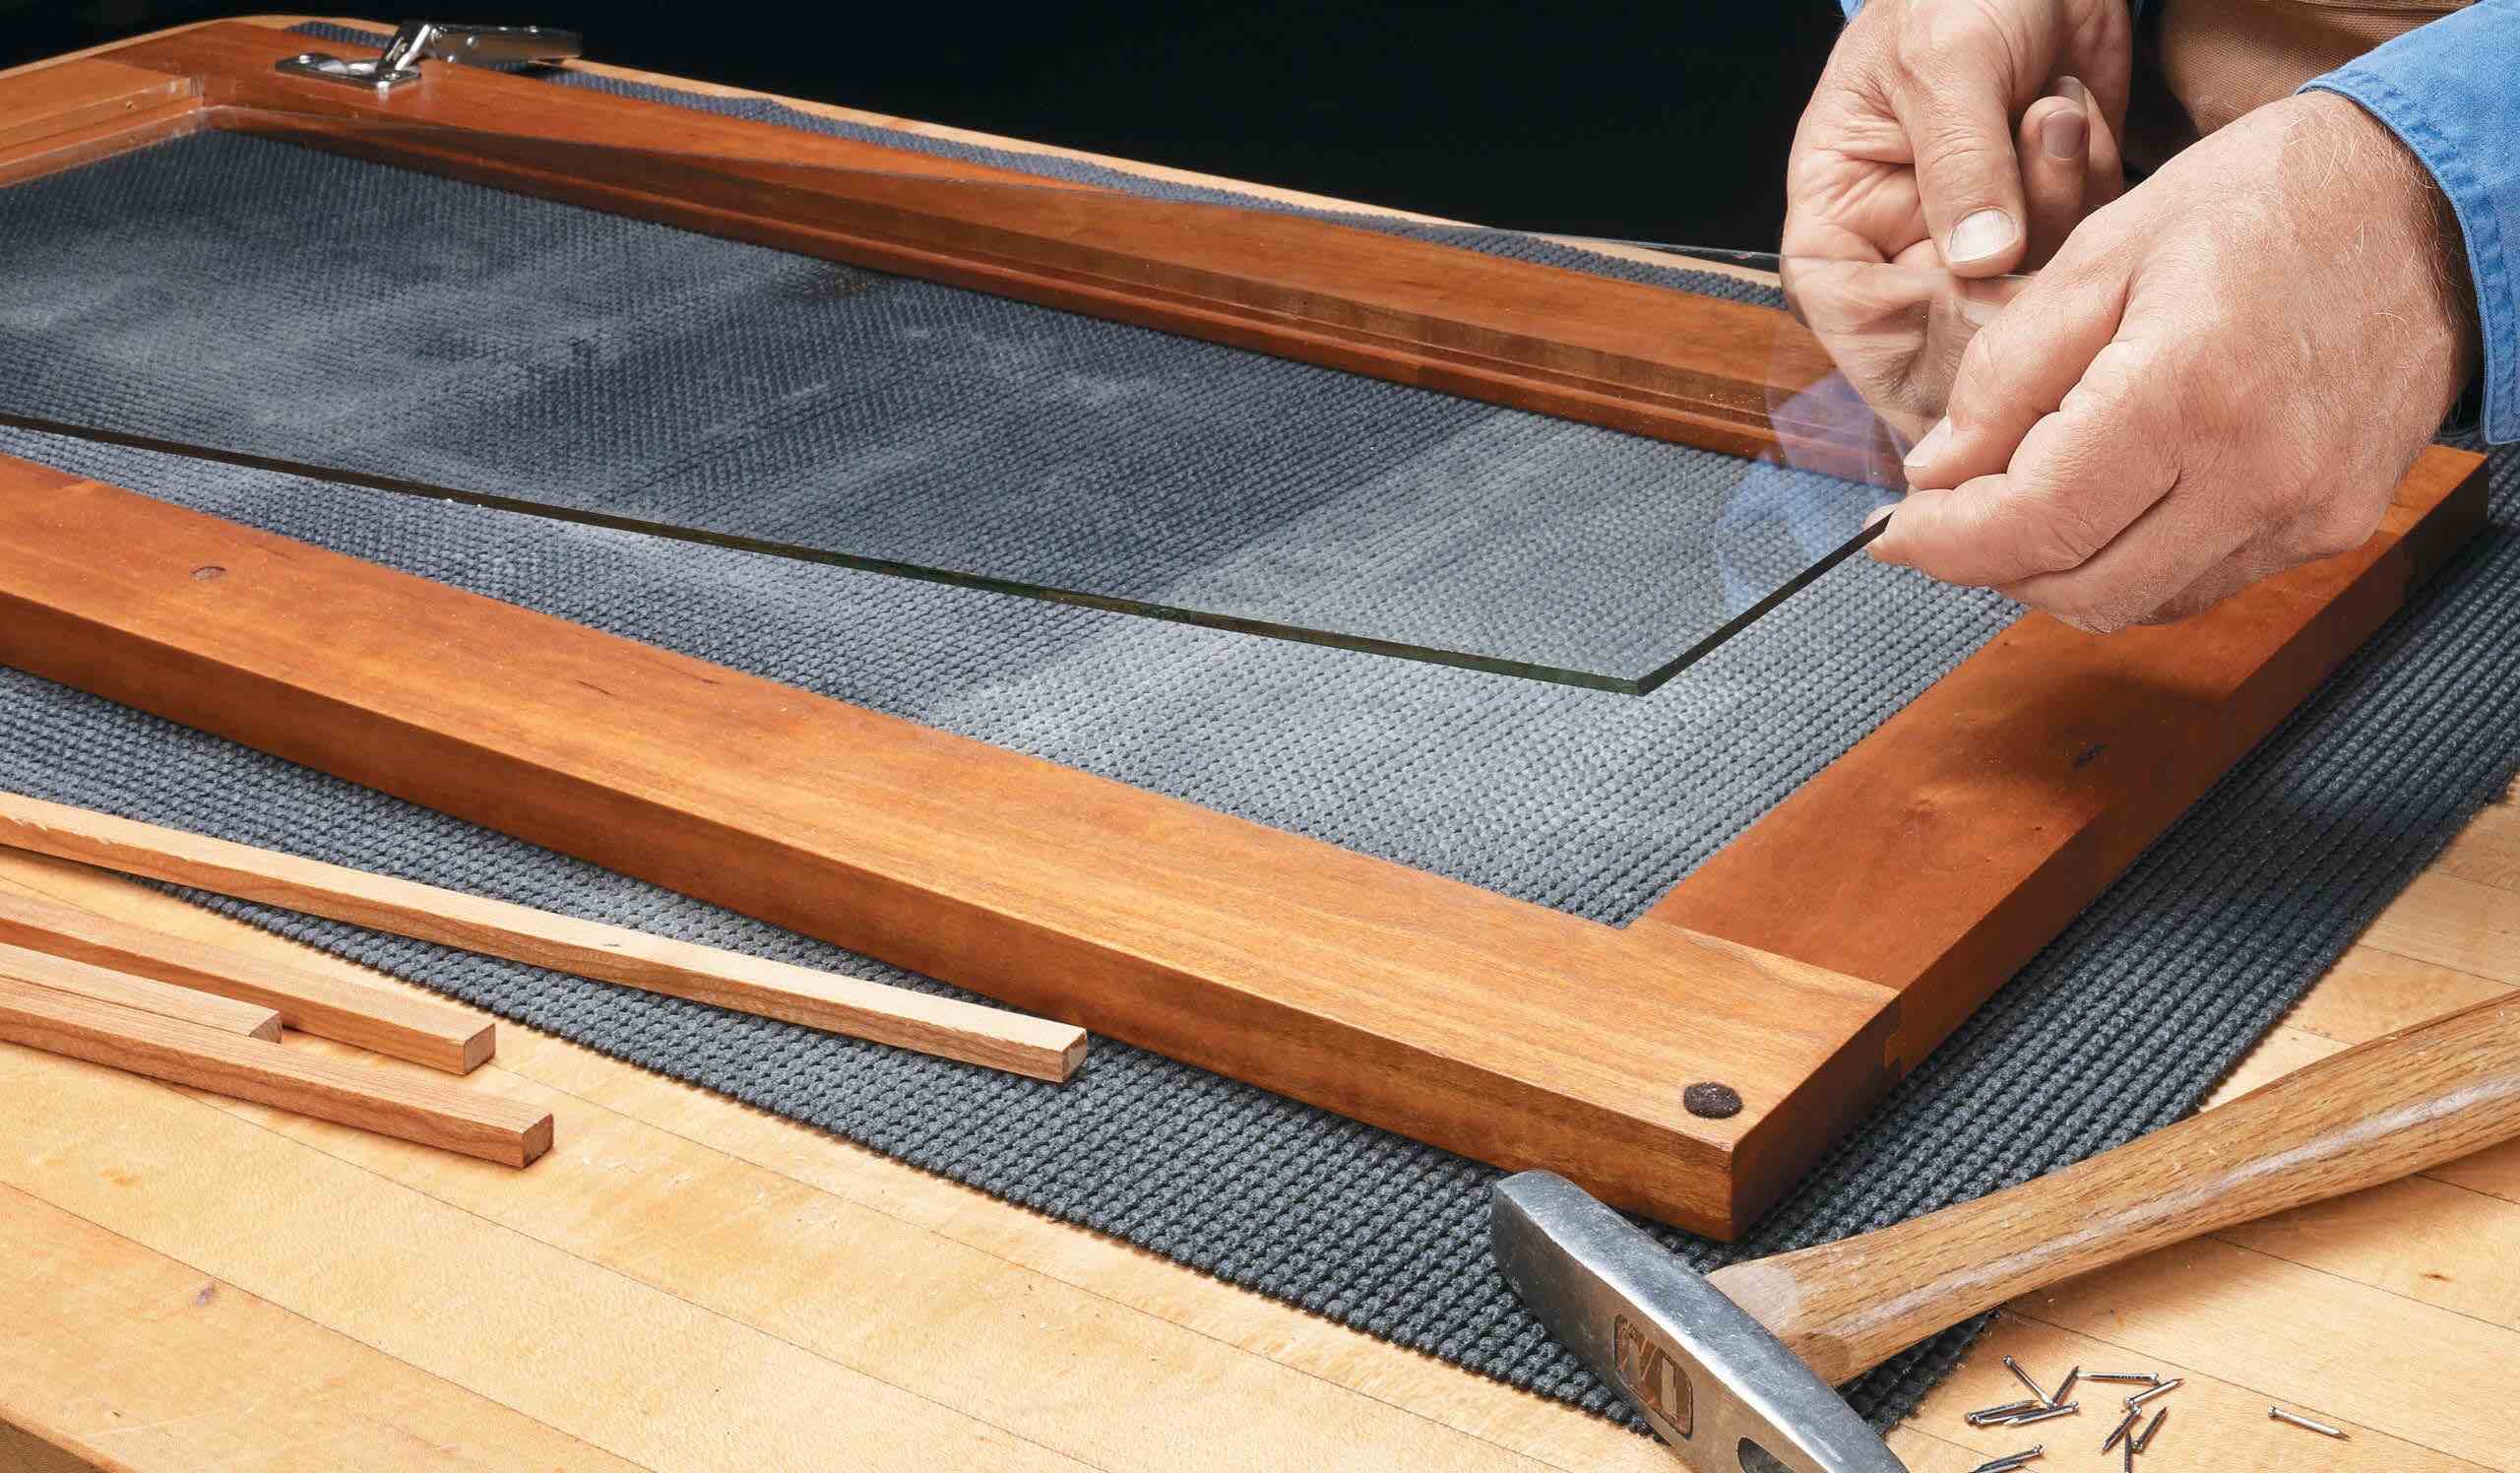
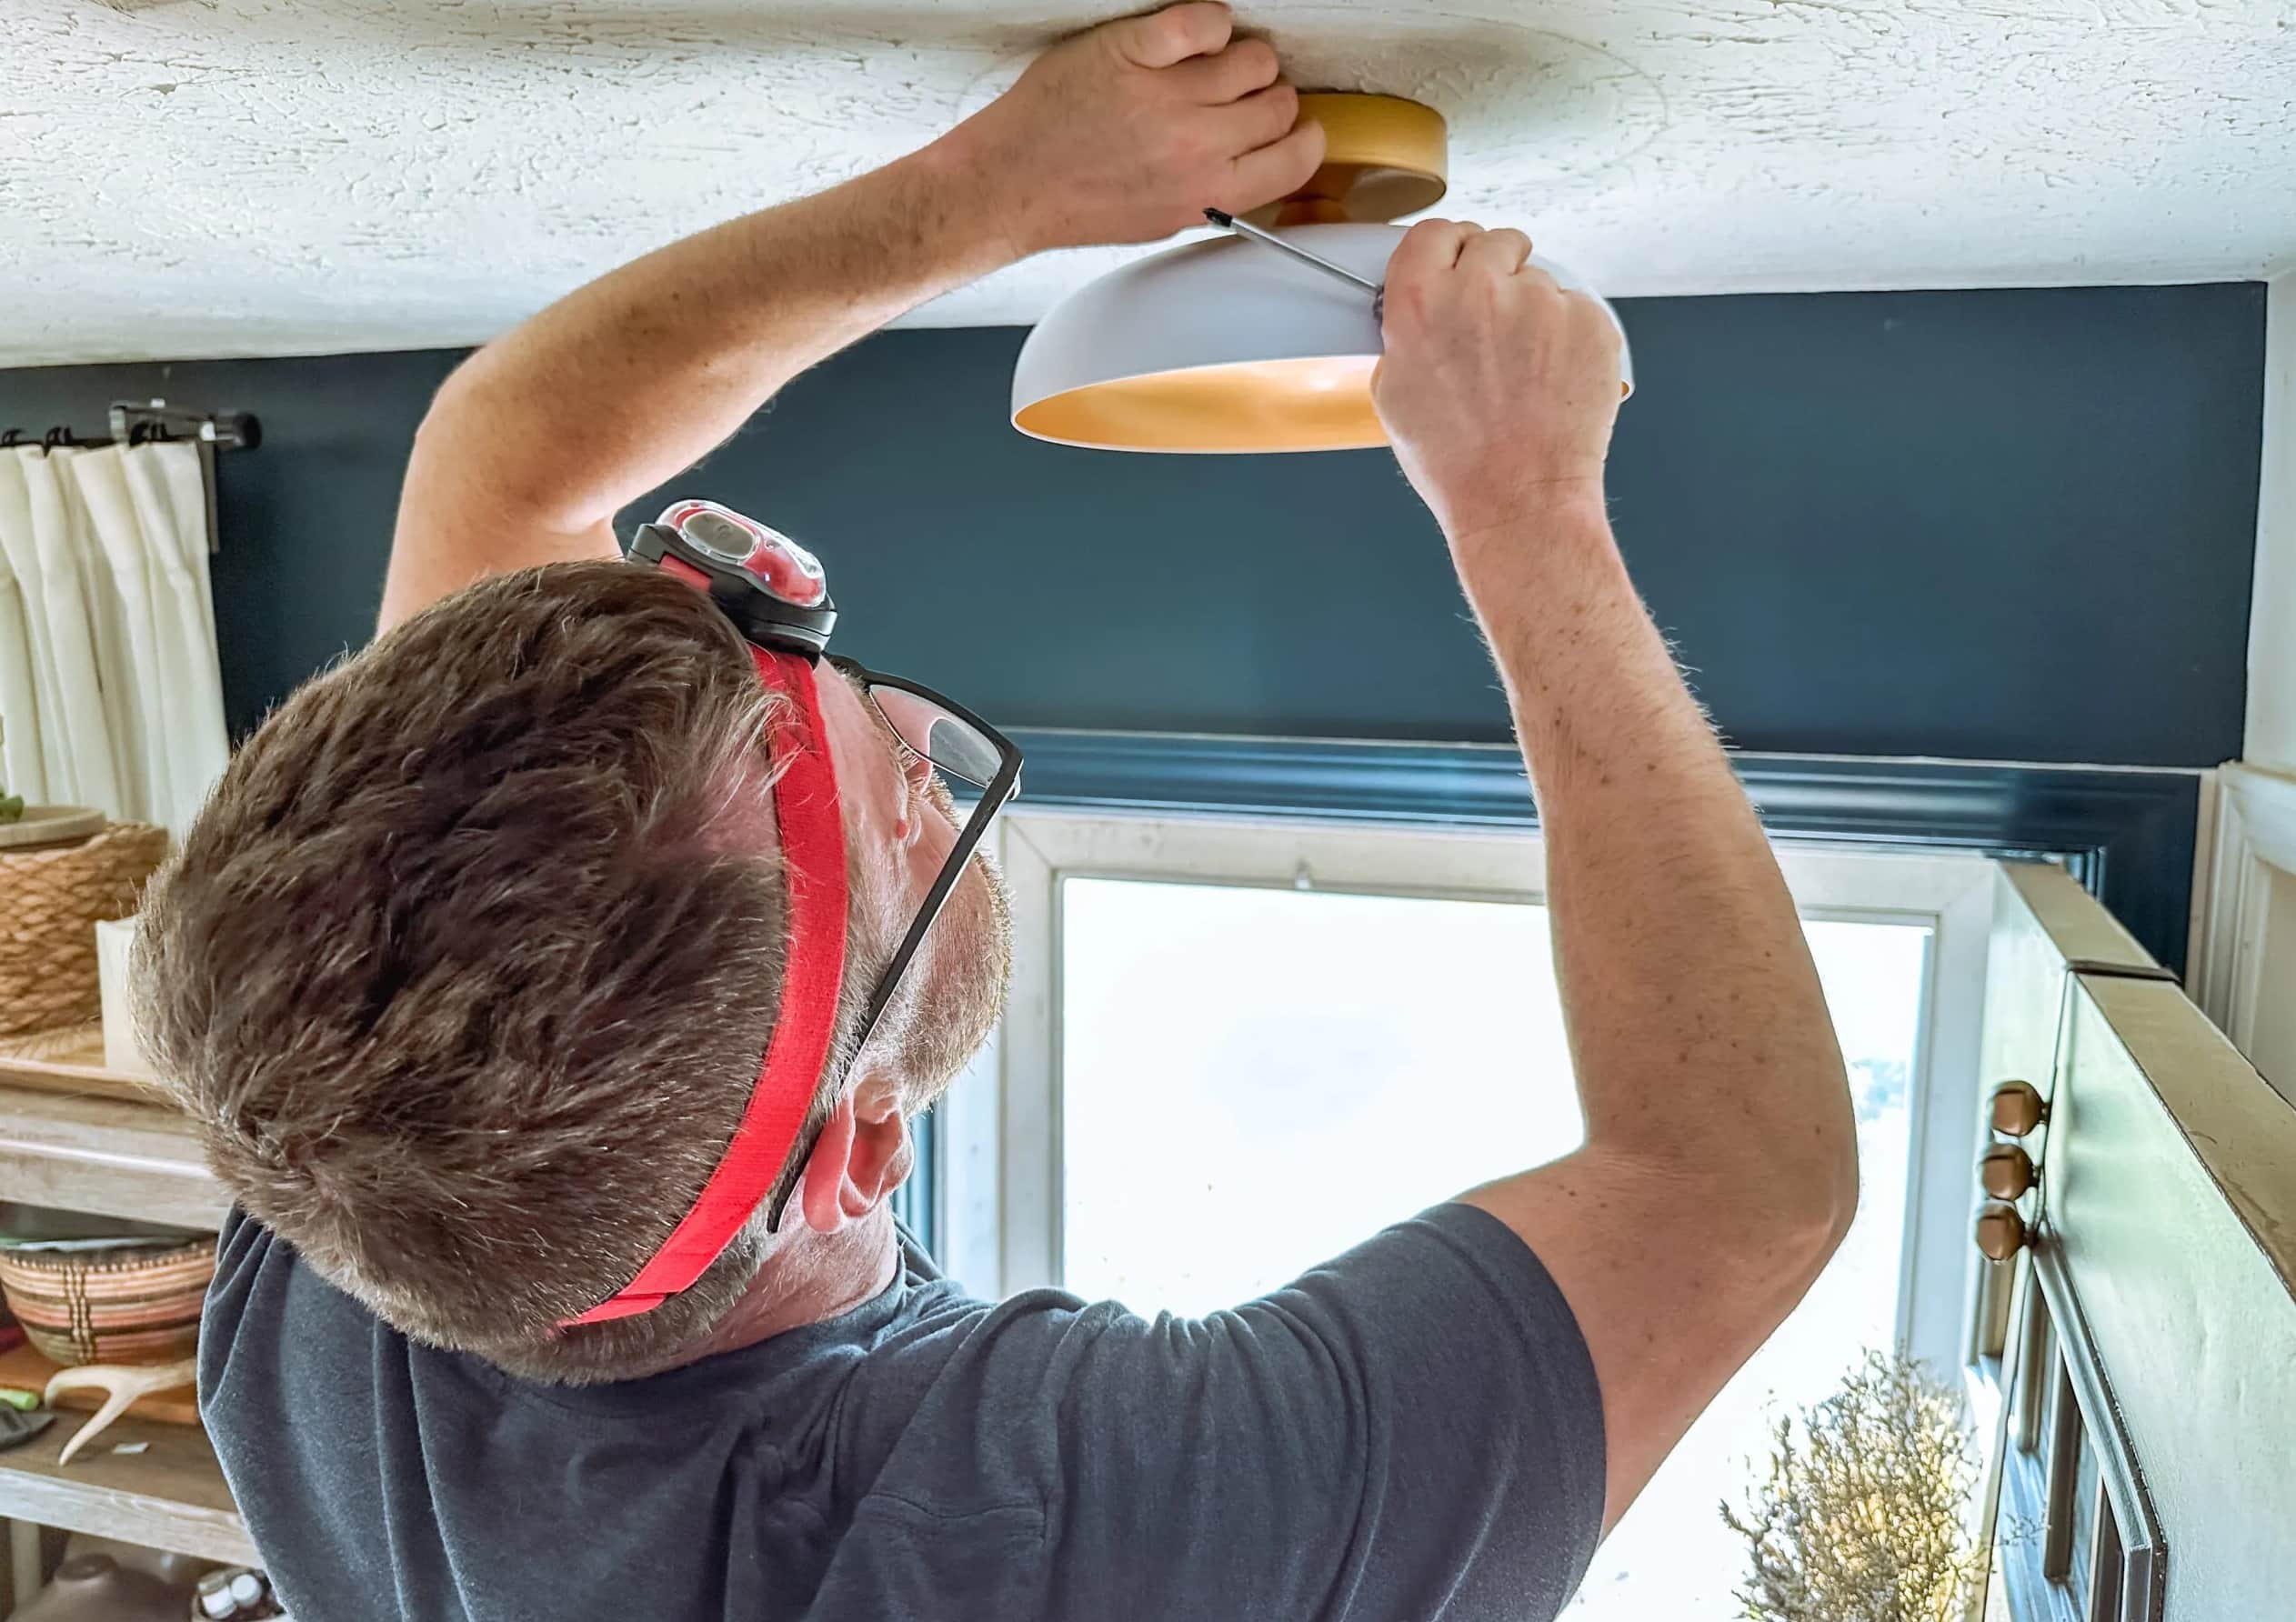
Attaching the Glass to Wood
With the surfaces prepared and the adhesive meticulously applied, the pivotal moment arrives to unite the glass and wood in a seamless and enduring bond. This phase demands precision, patience, and a keen eye for detail to ensure that the attachment is not only secure but also visually impeccable.
Carefully align the glass with the wood surface, taking into account the desired positioning and ensuring a uniform and balanced placement. The alignment process is critical, as any misplacement can compromise the aesthetics and functionality of the final assembly. Whether you are mounting a glass tabletop, securing a decorative glass panel, or integrating glass elements into a wooden structure, the alignment sets the stage for a harmonious and visually appealing union.
Once the glass is positioned, apply gentle and even pressure to promote adhesion between the glass and wood. This step facilitates the intimate contact between the two materials, allowing the adhesive to form a robust and enduring bond. It is essential to exercise caution during this process, avoiding excessive force that could lead to slippage or misalignment.
As the glass makes contact with the wood, verify the alignment and positioning one final time, ensuring that it meets the intended specifications. This meticulous attention to detail is instrumental in achieving a flawless and professional outcome, reflecting the precision and care invested in the attachment process.
Following the successful alignment and application of pressure, allow the adhesive to cure and set according to the manufacturer's recommendations. This phase is characterized by patience and restraint, as the bond between the glass and wood gradually strengthens and solidifies. Resisting the urge to handle or stress the attachment prematurely is crucial, as it ensures the integrity and longevity of the connection.
Upon completion of the curing period, conduct a thorough inspection of the attachment to confirm its stability, visual appeal, and overall quality. This comprehensive assessment serves as a final validation of the meticulous efforts invested in attaching the glass to wood, affirming the successful realization of a durable, visually pristine, and harmonious fusion between these distinct materials.
By navigating the process of attaching glass to wood with precision, care, and attention to detail, you can achieve a seamless and enduring union that harmonizes the elegance of glass with the warmth of wood. This phase represents the culmination of meticulous preparation, precise application, and patient waiting, culminating in a visually captivating and structurally resilient connection that enriches any space it inhabits.
Read more: How To Glue Glass To Wood
Finishing Touches
After the successful attachment of glass to wood, attention to the finishing touches elevates the visual appeal, durability, and overall quality of the fusion. These final steps not only enhance the aesthetics of the assembly but also contribute to its resilience and longevity, ensuring that the glass-wood connection remains visually captivating and structurally sound over time.
Sealing and Edging
Applying a sealant or edge treatment around the perimeter of the glass serves multiple purposes. It not only enhances the visual presentation by providing a clean and polished appearance but also acts as a protective barrier, safeguarding the edges of the glass from potential damage. The sealant or edging material can be selected to complement the design and style of the assembly, adding a refined and professional finish to the attachment.
Cleaning and Polishing
A meticulous cleaning and polishing regimen can significantly enhance the overall presentation of the glass-wood fusion. Using a high-quality glass cleaner and a suitable wood polish, the assembly can be meticulously cleaned and polished to restore its luster and clarity. This step not only accentuates the visual appeal of the attachment but also underscores the care and attention invested in its maintenance.
Reinforcement and Support
In cases where the attachment involves load-bearing or structural elements, reinforcing the connection with additional support can bolster its strength and stability. This may entail integrating discreet brackets, supports, or fasteners to fortify the attachment, ensuring that it can withstand the intended usage and environmental factors. The strategic reinforcement of the glass-wood fusion underscores a commitment to its longevity and functionality.
Read more: How To Frame Glass With Wood
Inspection and Adjustment
A thorough inspection of the completed attachment allows for the identification of any potential adjustments or refinements. This meticulous assessment ensures that the assembly meets the desired specifications in terms of alignment, stability, and visual presentation. Any minor adjustments or refinements can be made at this stage, further refining the quality and integrity of the glass-wood connection.
Protection and Maintenance Guidelines
Providing clear guidelines for the ongoing protection and maintenance of the glass-wood assembly is essential for preserving its visual appeal and structural integrity. This may include recommendations for cleaning, handling, and environmental considerations to ensure that the attachment retains its pristine condition and functionality over time. Equipping users with the knowledge to care for the assembly reinforces its longevity and value.
By attending to these finishing touches with precision and care, the attachment of glass to wood transcends mere functionality, evolving into a visually captivating and enduring fusion. These final steps underscore a commitment to excellence, ensuring that the glass-wood connection not only meets but exceeds expectations in terms of aesthetics, durability, and overall quality.
Now that you've mastered the art of fusing glass with wood, why not expand your DIY skills further? For enthusiasts eager to dive deeper into crafting, our guide on the best woodworking techniques is a must-read. You'll find insights into tools and methods that are shaping the future of woodworking. If crafting furniture is more your style, don't miss our comprehensive tutorial on furniture making. From selecting materials to assembling your pieces, this guide ensures you'll create stunning, durable furniture in no time.
Frequently Asked Questions about How To Attach Glass To Wood
Was this page helpful?
At Storables.com, we guarantee accurate and reliable information. Our content, validated by Expert Board Contributors, is crafted following stringent Editorial Policies. We're committed to providing you with well-researched, expert-backed insights for all your informational needs.


0 thoughts on “How To Attach Glass To Wood”