Home>Furniture & Design>Outdoor Furniture>How To Install Outdoor Up Lighting
Outdoor Furniture
How To Install Outdoor Up Lighting
Modified: March 1, 2024
Learn how to install outdoor up lighting to enhance your outdoor space with our expert tips and ideas. Explore outdoor furniture, furniture, and design for a stunning outdoor ambiance.
(Many of the links in this article redirect to a specific reviewed product. Your purchase of these products through affiliate links helps to generate commission for Storables.com, at no extra cost. Learn more)
Introduction
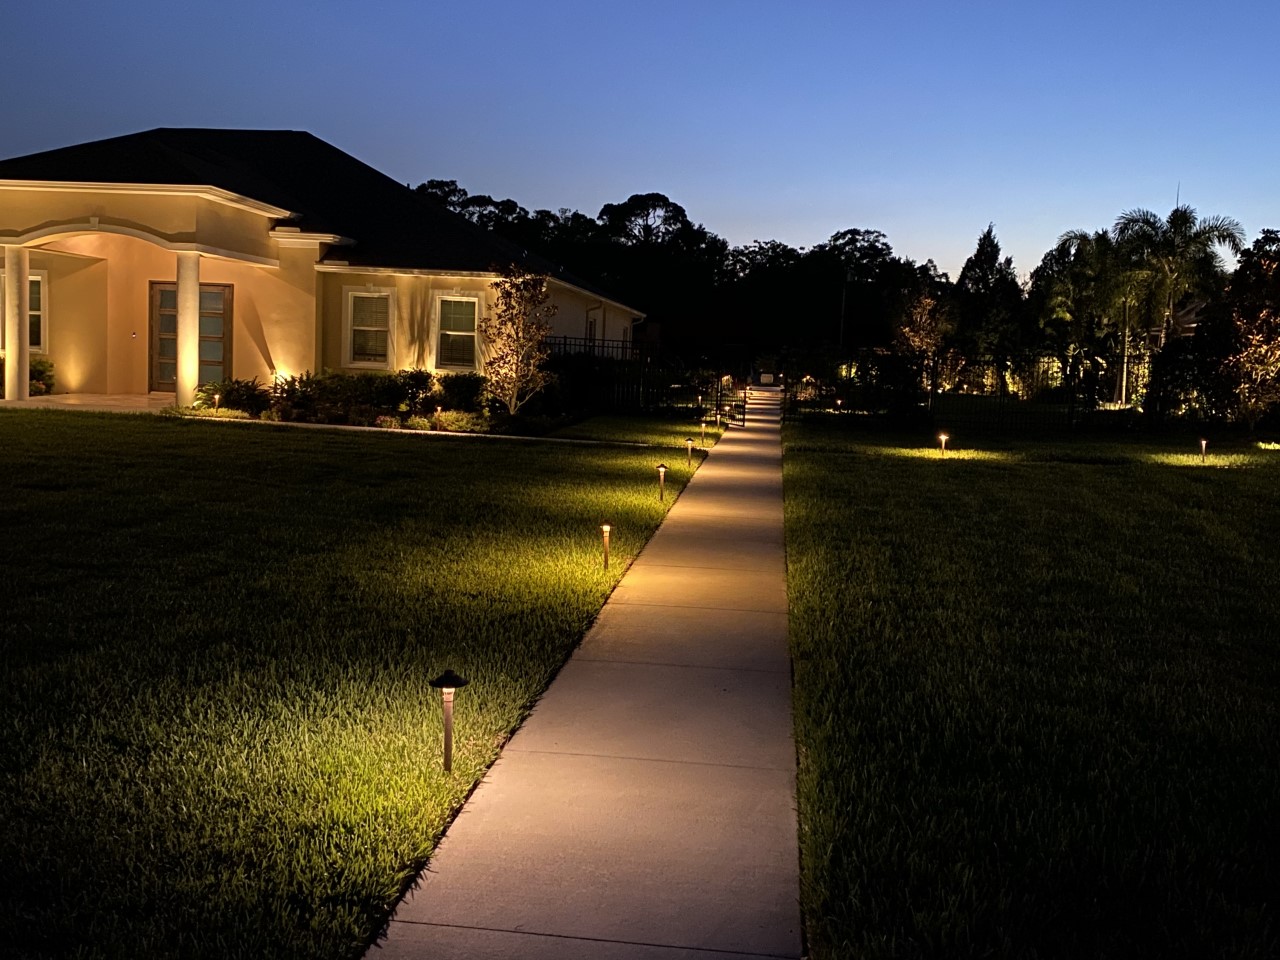
Welcome to the world of outdoor up lighting! Whether you're looking to enhance the ambiance of your garden, illuminate a pathway, or highlight a feature like a tree or a sculpture, outdoor up lighting can work wonders in transforming your outdoor space into a captivating and inviting environment. In this comprehensive guide, we'll walk you through the essential steps of installing outdoor up lighting, from planning and preparation to selecting the right fixtures, choosing the ideal locations, and ensuring proper installation and testing. By the end of this guide, you'll be well-equipped to create a stunning outdoor lighting display that not only adds beauty to your outdoor area but also enhances its functionality and safety.
Outdoor up lighting is a versatile and impactful way to add depth, drama, and a touch of magic to your outdoor landscape. Whether you're aiming to create a cozy atmosphere for evening gatherings, increase the security of your property, or simply elevate the visual appeal of your outdoor space, up lighting can be an excellent addition to your outdoor design arsenal. With the right techniques and a keen eye for creativity, you can effectively use outdoor up lighting to accentuate the best features of your landscape and architecture, while also adding a layer of safety and security to your property.
Before we dive into the nitty-gritty of installing outdoor up lighting, it's important to note that safety should always be a top priority. If you're not confident in your electrical or technical skills, it's best to consult a professional to ensure that the installation is done correctly and safely. Additionally, be sure to check local regulations and codes regarding outdoor lighting installations to avoid any potential issues down the line.
Now, let's embark on this illuminating journey and discover how to bring your outdoor space to life with the art of outdoor up lighting. Let's get started!
Key Takeaways:
- Illuminate your outdoor space with captivating up lighting to enhance ambiance, safety, and visual appeal. Careful planning, fixture selection, and installation ensure a stunning and functional lighting display.
- Strategic placement of up lighting fixtures creates depth, dimension, and enchanting illumination. Thoughtful testing and adjustments optimize the visual impact and functionality of your outdoor lighting display.
Read more: How To Install Outdoor Lighting
Planning and Preparation
Before you start installing outdoor up lighting, it’s crucial to lay the groundwork for a successful and visually appealing lighting display. This phase involves careful planning, thoughtful consideration of your outdoor space, and gathering the necessary tools and materials. Here’s what you need to do to ensure a smooth and effective planning and preparation process:
- Assess Your Outdoor Space: Take a walk around your outdoor area during the day and at night to identify the key areas you want to illuminate. Consider architectural features, trees, shrubs, pathways, and any other elements that could benefit from up lighting.
- Set Your Goals: Determine the objectives of your outdoor lighting project. Are you aiming to create a warm and inviting ambiance for outdoor gatherings, improve security by illuminating dark areas, or simply enhance the aesthetic appeal of your landscape?
- Sketch a Lighting Plan: Using a rough sketch of your outdoor space, mark the locations where you intend to place the up lights. Consider the angles and directions in which you want the light to shine to achieve the desired visual effects.
- Choose the Right Fixtures: Research different types of up lighting fixtures to find the ones that best suit your specific lighting needs and the style of your outdoor space. Look for fixtures that are durable, weather-resistant, and capable of producing the desired lighting effects.
- Gather Tools and Materials: Make a list of the tools and materials you’ll need for the installation, including up lights, wiring, connectors, a transformer, a shovel for burying cables, and any additional accessories required for securing the fixtures in place.
- Consider Power Source: Determine the power source for your up lighting. If you’re using low-voltage fixtures, you’ll need a transformer to convert the standard household voltage to the low voltage required for the lights. Plan the location of the transformer and ensure that it’s adequately protected from the elements.
- Check Local Regulations: Before proceeding with the installation, check local regulations and codes related to outdoor lighting installations. Compliance with these regulations is essential to ensure the safety and legality of your lighting project.
By investing time in thorough planning and preparation, you’ll set the stage for a successful outdoor up lighting project. This phase is crucial for visualizing the end result, selecting the right fixtures, and ensuring that the installation process proceeds smoothly. With the groundwork laid, you’ll be ready to move on to the next steps of bringing your outdoor space to life with captivating up lighting.
Choosing the Right Fixtures
When it comes to outdoor up lighting, selecting the right fixtures is essential for achieving the desired lighting effects and ensuring the longevity of your lighting display. With a wide array of fixtures available on the market, it’s important to consider factors such as durability, lighting capabilities, and aesthetic appeal. Here’s a guide to help you choose the perfect fixtures for your outdoor up lighting project:
- Consider the Lighting Effect: Determine the specific lighting effect you want to achieve. Whether it’s highlighting a tree, casting a gentle glow on a pathway, or illuminating a feature wall, different fixtures are designed to produce various lighting effects. For example, spotlights are ideal for directing focused light onto a specific area, while well lights can create a soft, diffused glow.
- Assess Durability and Weather Resistance: Given that outdoor fixtures are exposed to the elements, it’s crucial to choose fixtures that are built to withstand the outdoor environment. Look for fixtures made from durable materials such as brass, copper, or corrosion-resistant composites. Ensure that the fixtures have adequate weatherproofing to prevent water intrusion and damage from the elements.
- Explore Different Styles: Outdoor up lighting fixtures come in a variety of styles and finishes to complement different outdoor aesthetics. Whether your outdoor space features a modern, minimalist design or a more traditional and ornate look, there are fixtures available to suit every style. Consider how the fixtures will blend with the overall design of your outdoor space.
- Opt for Energy-Efficient Options: Look for fixtures that are energy-efficient and compatible with LED bulbs. LED lights not only consume less energy, but they also have a longer lifespan, reducing the need for frequent bulb replacements and minimizing maintenance requirements.
- Check for Adjustability: Some fixtures offer adjustable features, allowing you to change the angle and direction of the light beam. This flexibility can be valuable for fine-tuning the lighting effects and accommodating changes in your outdoor landscape over time.
- Consult with Lighting Professionals: If you’re uncertain about which fixtures would best suit your lighting needs, consider seeking advice from lighting professionals or visiting a specialized lighting showroom. Professionals can provide valuable insights and recommendations based on your specific outdoor lighting goals and the layout of your outdoor space.
By carefully considering these factors, you can select fixtures that not only meet your lighting requirements but also contribute to the overall visual appeal and functionality of your outdoor space. Choosing the right fixtures is a crucial step in the outdoor up lighting installation process, setting the stage for a stunning and effective lighting display that enhances the beauty and allure of your outdoor environment.
Selecting the Right Location
Choosing the optimal locations for your outdoor up lighting fixtures is a pivotal aspect of creating a captivating and well-balanced lighting display. Strategic placement of the fixtures can accentuate the best features of your outdoor space while ensuring that the lighting effects contribute to the overall ambiance and functionality. Here’s a guide to help you select the right locations for your up lighting fixtures:
- Highlight Key Features: Identify the key features in your outdoor space that you want to highlight with up lighting. This may include trees, shrubs, architectural elements, sculptures, or any other focal points that add visual interest to your landscape.
- Consider the Viewing Angle: Take into account the viewing angles from various vantage points in your outdoor space. Assess how the lighting effects will appear from different perspectives, ensuring that the fixtures are positioned to create visually appealing and balanced illumination.
- Create Depth and Dimension: Use up lighting to create depth and dimension in your outdoor landscape. Position fixtures at varying distances from the focal points to produce a layered lighting effect that adds depth and visual interest to the surroundings.
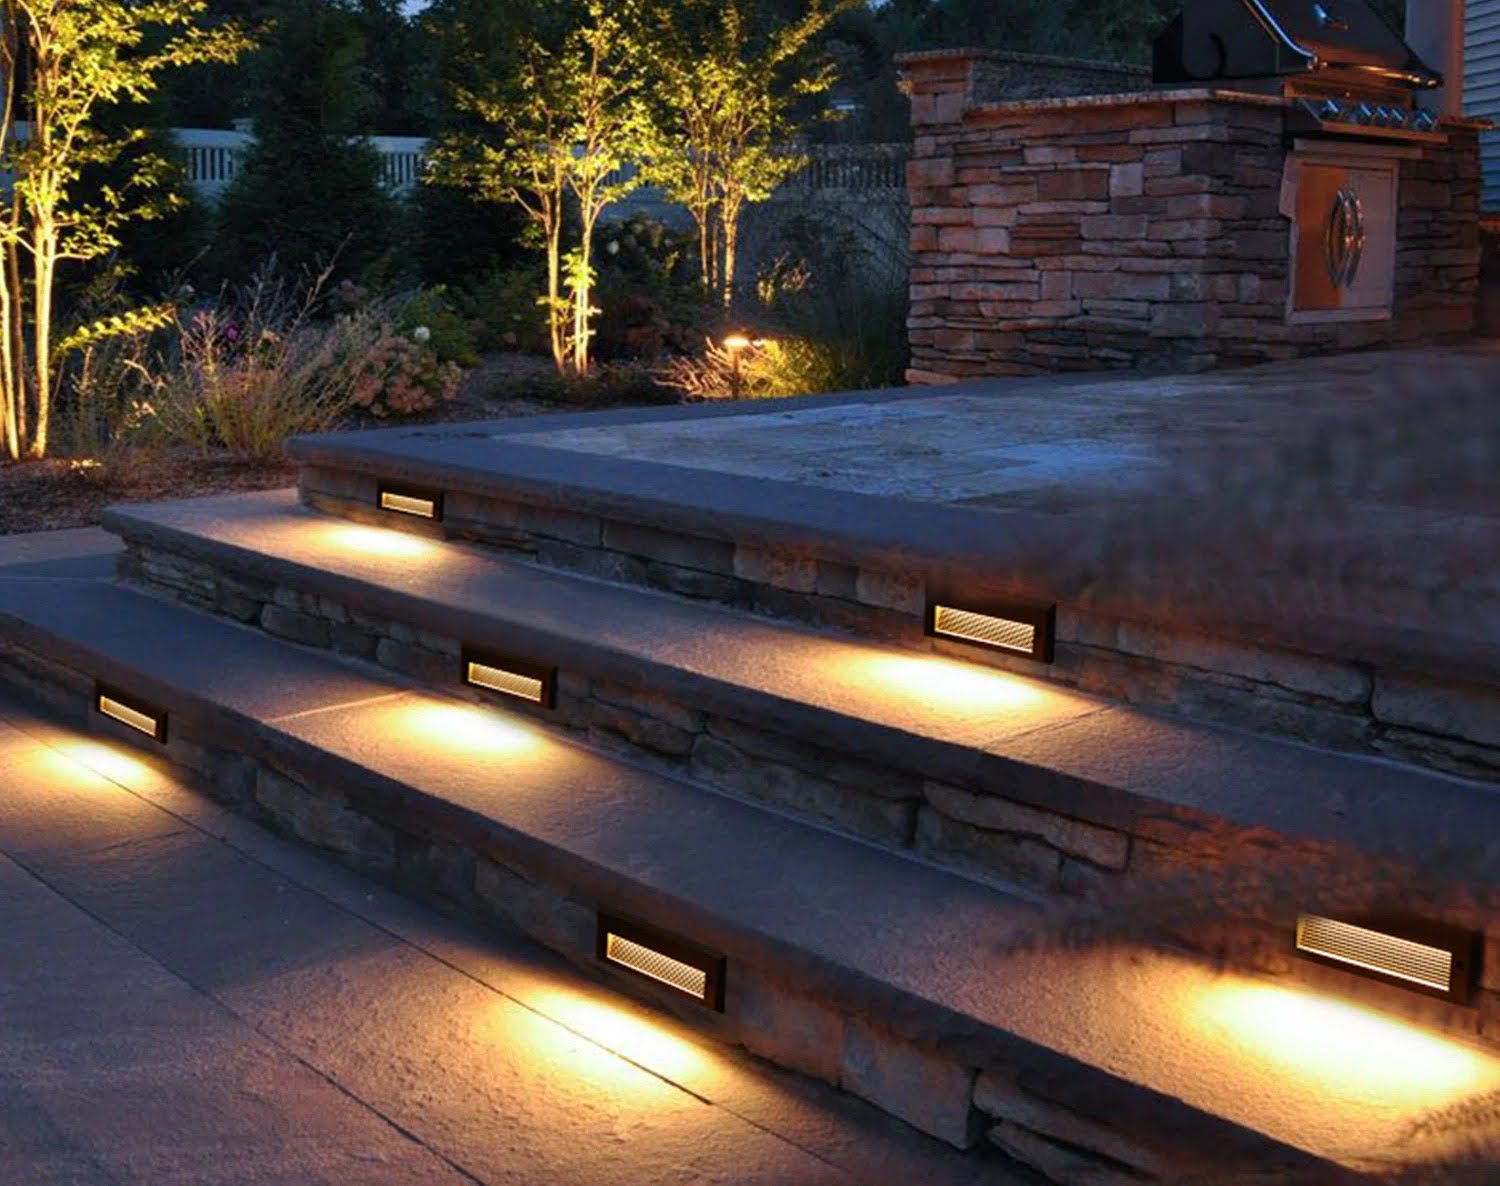
- Illuminate Pathways and Steps: Enhance the safety and functionality of your outdoor space by illuminating pathways, steps, and other potential tripping hazards. Placing fixtures near pathways not only improves visibility but also adds a touch of elegance to these areas, making them more inviting and secure.
- Avoid Glare and Hot Spots: Be mindful of potential glare and hot spots caused by the positioning of the fixtures. Adjust the angle and direction of the lights to minimize glare and ensure that the light distribution is even and gentle, creating a harmonious and comfortable lighting environment.
- Adapt to Seasonal Changes: Consider how the foliage and landscape features in your outdoor space may change with the seasons. Select locations for the fixtures that allow for adjustments as the vegetation grows or sheds, ensuring that the lighting effects remain effective and well-balanced throughout the year.
- Test Different Positions: Before permanently installing the fixtures, experiment with temporary placement to assess the lighting effects and make any necessary adjustments. This hands-on approach allows you to fine-tune the positioning of the fixtures for optimal results.
By carefully selecting the right locations for your up lighting fixtures, you can create a captivating and harmonious lighting display that enhances the beauty and functionality of your outdoor space. Thoughtful placement of the fixtures not only accentuates the best features of your landscape but also contributes to a welcoming and enchanting outdoor environment, day or night.
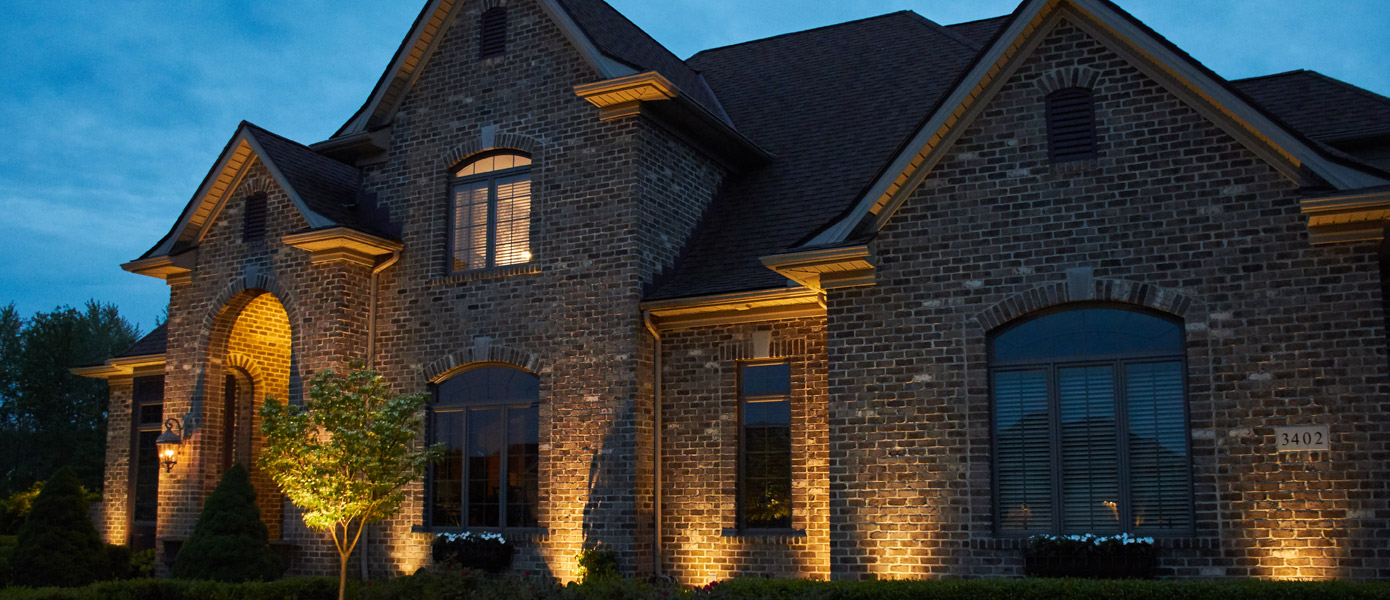
When installing outdoor up lighting, make sure to position the lights at a 30-degree angle to highlight the architectural features of your home. This will create a dramatic and visually appealing effect.
Installing the Up Lighting
With careful planning and the selection of the right fixtures and locations, you’re now ready to proceed with the installation of your outdoor up lighting. This phase involves physically placing the fixtures in the chosen locations, ensuring proper alignment, and securing the fixtures to create a visually stunning and functional lighting display. Here’s a step-by-step guide to help you navigate the installation process:
- Prepare the Fixture Locations: Begin by clearing the areas where the fixtures will be installed. Remove any obstructions, debris, or overgrown vegetation to create a clean and accessible installation site. This step is crucial for ensuring that the fixtures are positioned securely and that the lighting effects are unobstructed.
- Position the Fixtures: Carefully place the fixtures in the predetermined locations, ensuring that they are aligned according to your lighting plan. Take into account the angles and directions in which you want the light to shine, aiming to achieve the desired lighting effects and visual impact.
- Secure the Fixtures: Once the fixtures are positioned correctly, securely anchor them in place to prevent movement or displacement. Depending on the type of fixtures and the installation surface, this may involve using mounting stakes, brackets, or other suitable methods to ensure stability and durability.
- Bury and Conceal Cables: If your up lighting fixtures require wiring, carefully bury and conceal the cables to create a neat and unobtrusive installation. Use a shovel or trenching tool to create shallow trenches for the cables, ensuring that they are protected from damage and remain hidden from view.
- Adjust the Fixture Angles: Fine-tune the angles and positions of the fixtures to achieve the desired lighting effects. Experiment with the direction of the light beams, making adjustments as needed to create balanced and visually appealing illumination of the targeted areas.
- Ensure Stability and Safety: Double-check the stability and safety of the installed fixtures. Confirm that they are securely anchored and that any exposed wiring is adequately protected and insulated to prevent potential hazards.
By following these steps, you can effectively install your outdoor up lighting fixtures with precision and care, ensuring that they contribute to a captivating and functional outdoor lighting display. Proper installation is crucial for achieving the desired lighting effects, maintaining the longevity of the fixtures, and creating a safe and visually appealing outdoor environment.
Read more: How To Light Up Outdoor Steps
Wiring and Power Source
As you embark on the installation of your outdoor up lighting, ensuring a reliable and safe wiring and power source is essential for the functionality and longevity of your lighting display. Properly executed wiring and power management not only contribute to the effectiveness of the lighting effects but also play a crucial role in maintaining the safety and integrity of the entire system. Here’s a comprehensive guide to help you navigate the wiring and power source aspect of your outdoor up lighting installation:
- Choose the Right Wiring: Select high-quality, outdoor-rated wiring suitable for the specific requirements of your up lighting system. Opt for durable and weather-resistant cables that are designed to withstand outdoor conditions, providing long-term reliability and performance.
- Calculate Voltage Drop: Determine the appropriate wire gauge and calculate voltage drop to ensure that the electrical current reaches the fixtures without significant loss of power. Proper voltage drop considerations are crucial for maintaining consistent and effective illumination across the entire lighting display.
- Install the Transformer: If you’re using low-voltage up lighting fixtures, install a suitable transformer to convert the standard household voltage to the low voltage required for the lights. Position the transformer in a protected and accessible location, ensuring that it is equipped with the necessary features for safe and efficient operation.
- Plan the Wiring Layout: Strategically plan the layout of the wiring, ensuring that it is concealed, protected, and laid out in a manner that minimizes potential hazards and obstructions. Create a clear path for the wiring, burying it where necessary and using appropriate cable management techniques to maintain a tidy and organized installation.
- Connect the Fixtures: Carefully connect the fixtures to the wiring, following the manufacturer’s instructions and ensuring that the connections are secure and insulated. Properly executed connections are essential for the reliable operation of the fixtures and the overall safety of the lighting system.
- Implement Safety Measures: Incorporate safety measures such as ground fault circuit interrupters (GFCIs) and waterproof junction boxes to protect the wiring and electrical components from moisture and potential electrical faults. Adhering to safety standards and regulations is paramount for the long-term safety and performance of the up lighting system.
- Conduct a Thorough Inspection: Before energizing the system, conduct a comprehensive inspection of the wiring, connections, and power source components. Verify that all elements are properly installed, insulated, and protected, and address any potential issues or discrepancies before proceeding.
By paying close attention to the wiring and power source aspects of your outdoor up lighting installation, you can ensure a reliable, safe, and effective lighting system that enhances the beauty and functionality of your outdoor space. Thoughtful planning, meticulous execution, and adherence to safety standards are fundamental to the success of the wiring and power management phase of your up lighting project.
Testing and Adjusting
As you near the completion of your outdoor up lighting installation, thorough testing and fine-tuning of the lighting effects are essential for ensuring that your lighting display achieves the desired visual impact and functionality. Testing the system under various conditions and making necessary adjustments will allow you to optimize the lighting effects and address any potential issues before finalizing the installation. Here’s a comprehensive guide to help you navigate the testing and adjusting phase of your outdoor up lighting project:
- Energize the System: Once the fixtures are installed and the wiring is in place, energize the lighting system and verify that all fixtures receive power and illuminate as intended. Confirm that the transformer and power source are functioning properly and that there are no electrical faults or malfunctions.
- Assess the Lighting Effects: Observe the lighting effects produced by the fixtures from various viewing angles and distances. Evaluate the intensity, color rendition, and distribution of light to ensure that the desired visual impact is achieved and that the lighting contributes to the overall ambiance and functionality of the outdoor space.
- Make Necessary Adjustments: Fine-tune the positioning, angles, and direction of the fixtures as needed to optimize the lighting effects. Adjust the beam spread, height, and orientation of the lights to create balanced and visually appealing illumination of the targeted areas, taking into account factors such as glare and shadowing.
- Test Under Different Conditions: Test the lighting system under different environmental conditions, including varying levels of natural light, to assess its performance and adaptability. Confirm that the lighting effects remain effective and visually pleasing during different times of the day and under different weather conditions.
- Address Glitches and Issues: Identify and address any glitches, inconsistencies, or issues with the lighting system. This may include addressing flickering lights, uneven illumination, or any unexpected behavior of the fixtures, ensuring that the system operates reliably and consistently.
- Seek Feedback and Input: Consider seeking feedback from family members, friends, or neighbors to gather diverse perspectives on the lighting effects. Their input can provide valuable insights and help identify any areas for improvement or refinement in the lighting display.
- Document the Settings: Once the optimal lighting effects are achieved, document the settings and adjustments made for future reference. This documentation can serve as a valuable reference point for maintenance, troubleshooting, or future modifications to the lighting system.
By rigorously testing and adjusting your outdoor up lighting system, you can ensure that the installation delivers the intended visual impact, enhances the functionality of your outdoor space, and operates reliably under various conditions. This phase allows you to fine-tune the lighting effects and address any potential issues, resulting in a captivating and well-balanced lighting display that elevates the allure and ambiance of your outdoor environment.
Conclusion
Congratulations on completing the installation of your outdoor up lighting! By embarking on this illuminating journey, you’ve not only enhanced the visual appeal of your outdoor space but also contributed to its functionality, safety, and ambiance. As you bask in the captivating glow of your newly installed up lighting, it’s important to reflect on the transformative power of outdoor lighting and the artful impact it has on your outdoor environment.
Outdoor up lighting serves as a versatile and impactful tool for accentuating the best features of your landscape, creating depth and dimension, and infusing your outdoor space with a touch of magic and allure. Whether you’ve chosen to illuminate majestic trees, architectural elements, pathways, or other focal points, the strategic placement and thoughtful selection of fixtures have undoubtedly contributed to the creation of a captivating and inviting outdoor oasis.
Throughout the planning, preparation, and installation phases, you’ve demonstrated a keen eye for detail, a commitment to safety and quality, and a passion for enhancing your outdoor living experience. By carefully selecting fixtures, positioning them with precision, and ensuring reliable wiring and power management, you’ve crafted a lighting display that not only elevates the aesthetics of your outdoor space but also adds a layer of security and functionality.
As you revel in the enchanting glow of your outdoor up lighting, take the time to appreciate the beauty and tranquility it brings to your outdoor environment. Whether you’re hosting evening gatherings, enjoying quiet moments under the stars, or simply admiring the artful play of light and shadow, your outdoor space has been elevated to a new level of charm and allure.
Remember, the journey doesn’t end with the installation. Regular maintenance, occasional adjustments, and the opportunity to explore new lighting effects will continue to enrich your outdoor lighting experience. As the seasons change and your outdoor landscape evolves, your up lighting system can adapt and continue to captivate with its timeless charm and elegance.
With your outdoor space now aglow with the captivating beauty of up lighting, you’ve not only illuminated your surroundings but also illuminated the potential for creating lasting memories and moments of joy in your outdoor sanctuary. Embrace the enchanting allure of outdoor up lighting and revel in the transformative power it brings to your outdoor living experience.
Here’s to the magic of outdoor up lighting and the radiant beauty it bestows upon your outdoor oasis!
Frequently Asked Questions about How To Install Outdoor Up Lighting
Was this page helpful?
At Storables.com, we guarantee accurate and reliable information. Our content, validated by Expert Board Contributors, is crafted following stringent Editorial Policies. We're committed to providing you with well-researched, expert-backed insights for all your informational needs.


0 thoughts on “How To Install Outdoor Up Lighting”