Home>Home Appliances>Lighting Appliances>How To Change A High Ceiling Light Bulb

Lighting Appliances
How To Change A High Ceiling Light Bulb
Modified: February 18, 2024
Learn how to change a high ceiling light bulb with our step-by-step guide. Keep your lighting appliances in top condition with these easy tips.
(Many of the links in this article redirect to a specific reviewed product. Your purchase of these products through affiliate links helps to generate commission for Storables.com, at no extra cost. Learn more)
Introduction
Changing a light bulb in a high ceiling fixture can seem like a daunting task, especially if you're not accustomed to working at heights. However, with the right tools, a steady hand, and a bit of caution, it's a manageable job that you can tackle with confidence. Whether you're replacing a burnt-out bulb or upgrading to a more energy-efficient option, this guide will walk you through the steps to safely and effectively change a high ceiling light bulb.
When it comes to high ceiling fixtures, safety should always be the top priority. Working at heights introduces additional risks, so it's crucial to approach the task with a clear plan and the right equipment. By following the steps outlined in this guide, you'll not only ensure your safety but also streamline the process of changing the light bulb, saving time and effort in the long run.
In the following sections, we'll cover the essential tools you'll need for the job, the importance of using a stable ladder or step stool, and the critical step of turning off the power to the fixture. We'll then walk you through the process of removing the old light bulb and installing the new one, providing clear instructions to help you navigate each step with ease. Finally, we'll discuss the crucial final step of turning the power back on, ensuring that your newly installed light bulb illuminates your space effectively.
Whether you're a seasoned DIY enthusiast or a first-time light bulb changer, this guide is designed to equip you with the knowledge and confidence needed to tackle the task of changing a high ceiling light bulb. With a focus on safety, efficiency, and practical tips, you'll be well-prepared to take on this home maintenance project and enjoy a well-lit space once the new bulb is in place. So, let's dive into the step-by-step process and empower you to conquer the challenge of changing a high ceiling light bulb.
Key Takeaways:
- Changing a high ceiling light bulb requires a stable ladder, safety precautions, and the right tools. Prioritize safety, turn off the power, and handle the bulbs with care for a successful replacement.
- Use a stable ladder, turn off the power, and handle the bulbs with caution when changing a high ceiling light bulb. Prioritize safety and precision for a well-lit and safe environment.
Read more: How To Change Light Bulb On High Ceiling
Step 1: Gather the necessary tools
Before embarking on the task of changing a high ceiling light bulb, it's essential to gather the necessary tools to ensure a smooth and efficient process. Having the right equipment at hand not only simplifies the task but also contributes to the overall safety of the operation. Here's a comprehensive list of tools and supplies you'll need:
-
Sturdy Ladder or Step Stool: Since the light fixture is located on a high ceiling, a stable and appropriately sized ladder or step stool is crucial for reaching the fixture safely. Ensure that the ladder is in good condition, with non-slip feet and secure locking mechanisms to provide stability while working at heights.
-
Replacement Light Bulb: Select a light bulb that is compatible with the fixture and meets the required wattage and type specifications. Whether it's an incandescent, LED, or CFL bulb, make sure to have the appropriate replacement on hand before starting the process.
-
Safety Gloves: It's advisable to wear protective gloves to safeguard your hands from any sharp edges or potential debris around the light fixture. Additionally, gloves provide a better grip when handling the bulb and can protect against accidental breakage.
-
Safety Glasses: Eye protection is essential, especially when working overhead. Safety glasses shield your eyes from dust, debris, or any accidental falling objects, ensuring a safe and clear line of sight throughout the task.
-
Voltage Tester (Optional): If you're unsure whether the power to the fixture has been successfully turned off, a voltage tester can be a valuable tool for confirming that the electrical circuit is safe to work on.
-
Dust Cloth or Duster: High ceiling fixtures are prone to accumulating dust and debris over time. Having a dust cloth or duster on hand allows you to clean the fixture before and after replacing the bulb, ensuring optimal illumination and maintaining a tidy appearance.
By gathering these essential tools and supplies, you'll be well-prepared to tackle the task of changing a high ceiling light bulb with confidence and efficiency. With safety as a top priority, having the right equipment at your disposal sets the stage for a successful and hassle-free maintenance project.
Step 2: Use a stable ladder or step stool
When it comes to changing a light bulb in a high ceiling fixture, having a stable and reliable ladder or step stool is absolutely essential. The choice of equipment for reaching the elevated fixture directly impacts both the safety and efficiency of the task. Here's a detailed look at the importance of using a stable ladder or step stool and the key considerations to ensure a secure working platform.
Importance of Stability
The primary objective when selecting a ladder or step stool for high ceiling tasks is to prioritize stability. A wobbly or unsteady platform significantly increases the risk of accidents and can make the process of changing the light bulb more challenging. Look for a ladder or step stool with non-slip feet that provide a firm grip on the floor, minimizing the likelihood of unexpected movement while you're working at heights. Additionally, ensure that the ladder or step stool has secure locking mechanisms to maintain its stability throughout the task.
Appropriate Height and Reach
Selecting a ladder or step stool of the appropriate height is crucial for reaching the high ceiling fixture comfortably and safely. Consider the height of the ceiling and the location of the light fixture to determine the optimal size of the ladder or step stool. It's important to choose a platform that allows you to reach the fixture without overstretching or standing on the top rungs, which can compromise stability and pose a safety risk. By using a ladder or step stool that provides the right amount of elevation, you can maintain a secure and balanced position while working on the light bulb replacement.
Read more: How To Change Bulb In A High Ceiling
Weight Capacity and Durability
Another key factor to consider when using a ladder or step stool is its weight capacity and overall durability. Ensure that the chosen equipment is capable of supporting your weight along with any additional tools or supplies you may need to carry. Check the weight rating of the ladder or step stool to confirm that it meets the requirements for the task at hand. Additionally, inspect the construction and materials of the platform to ensure that it is sturdy and durable, providing a reliable support structure for the duration of the light bulb replacement process.
Safety Precautions
Before ascending the ladder or step stool, take a moment to assess the surrounding area for any potential hazards or obstacles. Clear the space around the fixture to create a safe working environment, free from tripping hazards or obstructions. Additionally, ensure that the ladder or step stool is positioned on a level surface to maintain its stability. If working near electrical fixtures, be mindful of the proximity to power sources and take necessary precautions to avoid contact with live wires.
By prioritizing stability, appropriate height, weight capacity, and safety precautions, you can effectively use a stable ladder or step stool to access the high ceiling fixture and proceed with confidence to the next steps of the light bulb replacement process. A secure and reliable platform sets the stage for a safe and successful maintenance task, ensuring that you can navigate the height with ease and complete the job efficiently.
Step 3: Turn off the power
Before proceeding with any electrical maintenance task, especially when dealing with high ceiling fixtures, it is crucial to prioritize safety by turning off the power to the light fixture. This essential step ensures that the electrical circuit is de-energized, minimizing the risk of electric shock or other potential hazards during the light bulb replacement process.
To effectively turn off the power to the high ceiling light fixture, follow these detailed steps:
-
Locate the Circuit Breaker: Begin by identifying the circuit breaker that controls the power supply to the specific light fixture. In most residential settings, circuit breakers are located in the main electrical panel. If you're unsure which breaker corresponds to the fixture, consider enlisting the assistance of a qualified electrician to ensure accurate identification.
-
Switch Off the Circuit Breaker: Once you've located the correct circuit breaker, switch it to the "off" position to cut off the power supply to the light fixture. It's advisable to use a flashlight or portable light source during this step, especially if the area will be dimmed due to the power being turned off. This precaution ensures that you have adequate visibility while working on the subsequent steps of the light bulb replacement process.
-
Confirm Power Deactivation: After turning off the circuit breaker, it's important to verify that the power to the fixture has been successfully deactivated. You can do this by using a voltage tester, which allows you to check for the presence of electrical current. By carefully following the manufacturer's instructions for the voltage tester, you can confirm that the electrical circuit is safe to work on, providing an additional layer of assurance before proceeding with the light bulb replacement.
By diligently following these steps to turn off the power to the high ceiling light fixture, you prioritize safety and minimize the risk of electrical accidents during the maintenance process. This proactive approach sets the stage for a secure and controlled environment, allowing you to proceed with confidence to the subsequent steps of removing the old light bulb and installing the new one.
Ensuring that the power is safely turned off not only safeguards your well-being but also contributes to a smooth and efficient light bulb replacement experience. With the electrical circuit deactivated, you can focus on the task at hand, knowing that you've taken the necessary precautions to create a secure working environment for the maintenance project.
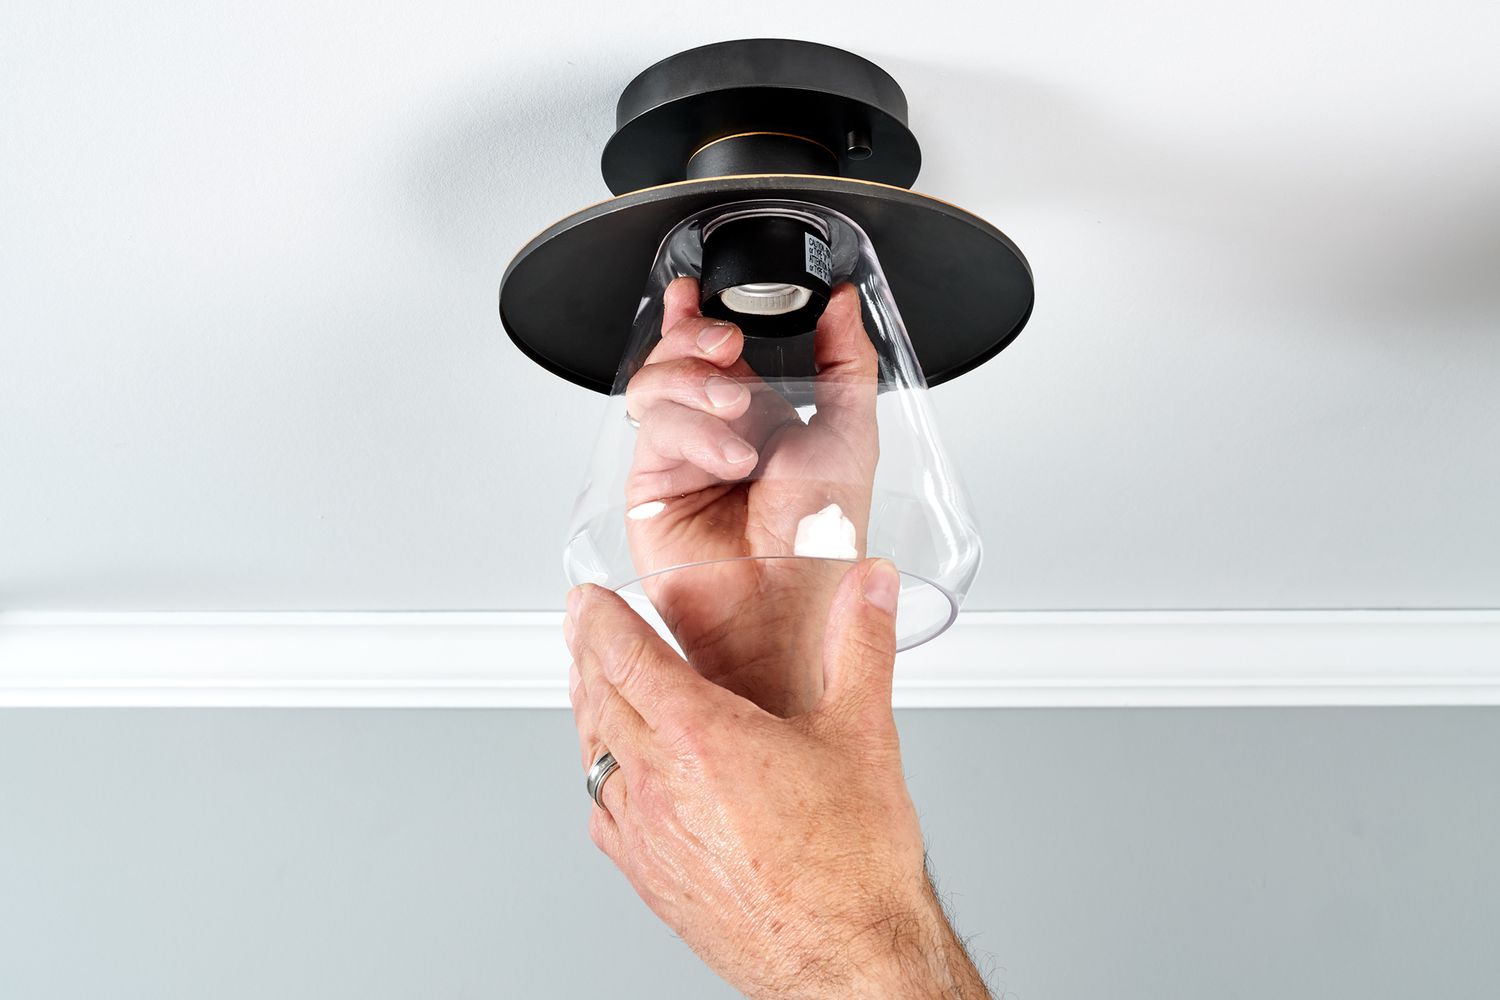
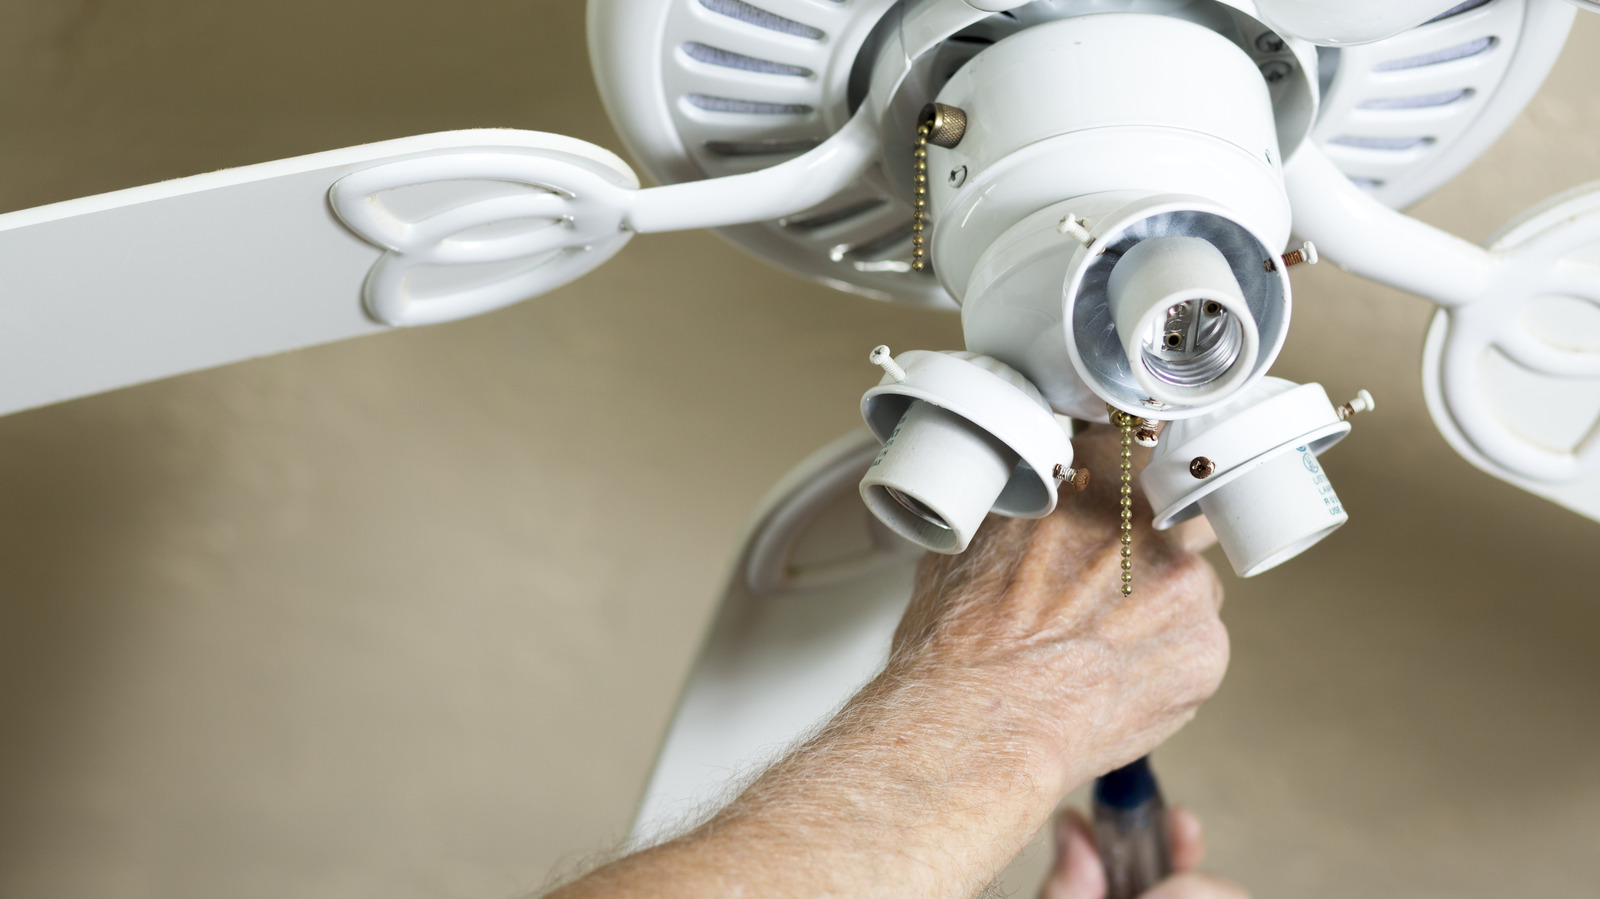
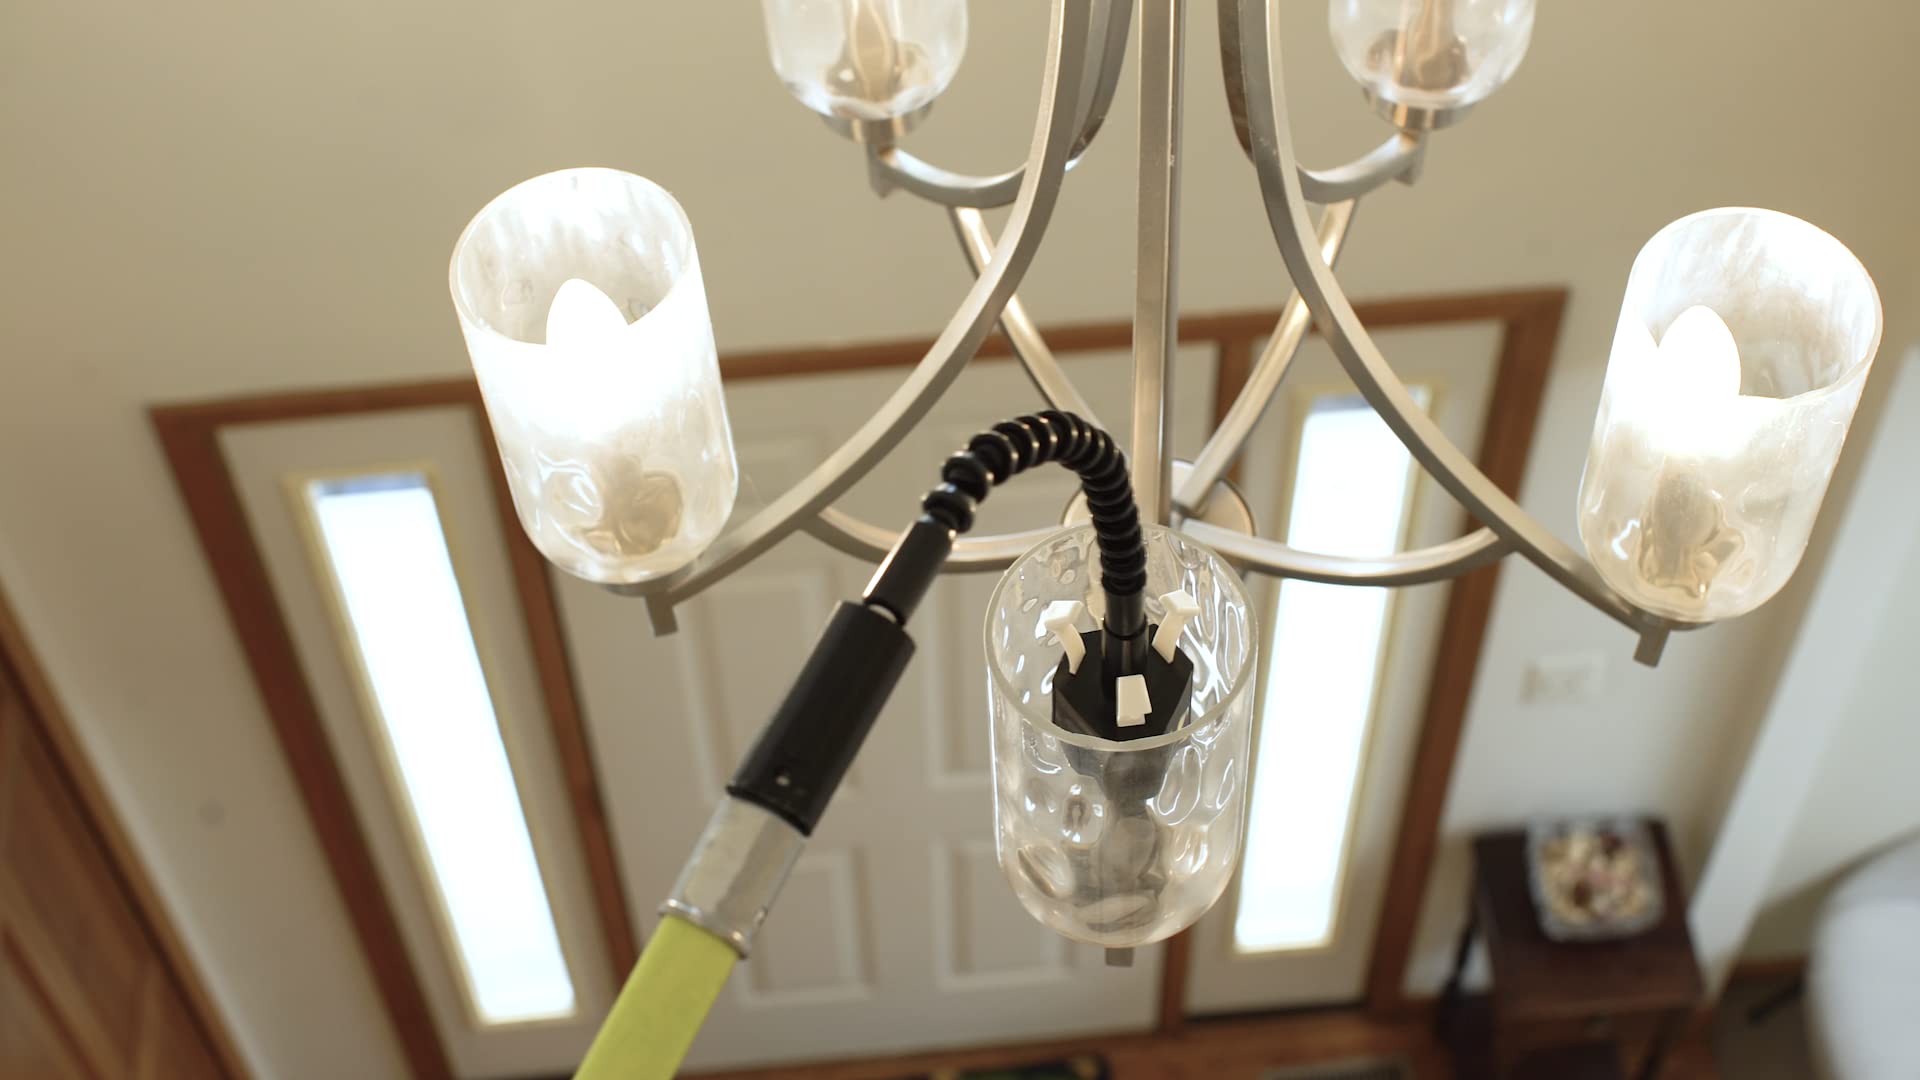
Step 4: Remove the old light bulb
With the power to the high ceiling light fixture safely turned off, you can proceed to the crucial step of removing the old light bulb. This process requires attention to detail and a steady hand to ensure that the bulb is extracted without any damage to the fixture or surrounding components. Here's a comprehensive guide to effectively removing the old light bulb from the high ceiling fixture:
-
Assess the Fixture: Before reaching for the old light bulb, take a moment to visually inspect the fixture. Look for any signs of damage, corrosion, or loose components that may require attention. Additionally, check for accumulated dust or debris that could hinder the removal process. By assessing the condition of the fixture, you can address any potential issues before proceeding with the bulb removal.
-
Wear Protective Gloves: As a precautionary measure, it's advisable to wear protective gloves when handling the old light bulb. Gloves not only provide a better grip but also protect your hands from any residual heat or potential sharp edges on the bulb. By wearing gloves, you minimize the risk of accidental injury and ensure a secure hold on the bulb during the removal process.
-
Unscrew the Bulb: Depending on the type of fixture, the method for removing the old light bulb may vary. In most cases, traditional incandescent or LED bulbs can be unscrewed in a counterclockwise direction to release them from the socket. Exercise caution and apply gentle pressure to avoid overtightening or forcing the bulb, which could lead to breakage. If the bulb is a twist-and-lock type, follow the manufacturer's instructions for disengaging it from the socket.
-
Dispose of the Old Bulb: Once the old light bulb has been successfully removed, handle it with care to prevent breakage. If the bulb is still functional, consider recycling it if local facilities are available. If the bulb is burnt out or damaged, dispose of it responsibly according to local regulations for proper waste management. Be mindful of any specific disposal guidelines for different types of bulbs, such as CFLs, which may require special handling due to their mercury content.
-
Inspect the Socket: After removing the old bulb, take a moment to inspect the socket for any signs of damage, corrosion, or debris. Ensure that the socket is clean and free from any obstructions that could affect the installation of the new bulb. If necessary, use a soft brush or compressed air to gently clean the socket, maintaining optimal contact for the replacement bulb.
By following these detailed steps, you can effectively remove the old light bulb from the high ceiling fixture, setting the stage for the subsequent installation of the new bulb. With a focus on precision and safety, this process ensures that the maintenance task progresses smoothly, allowing you to proceed with confidence to the next step of installing the replacement light bulb.
Read more: How To Change A Ceiling Light Bulb
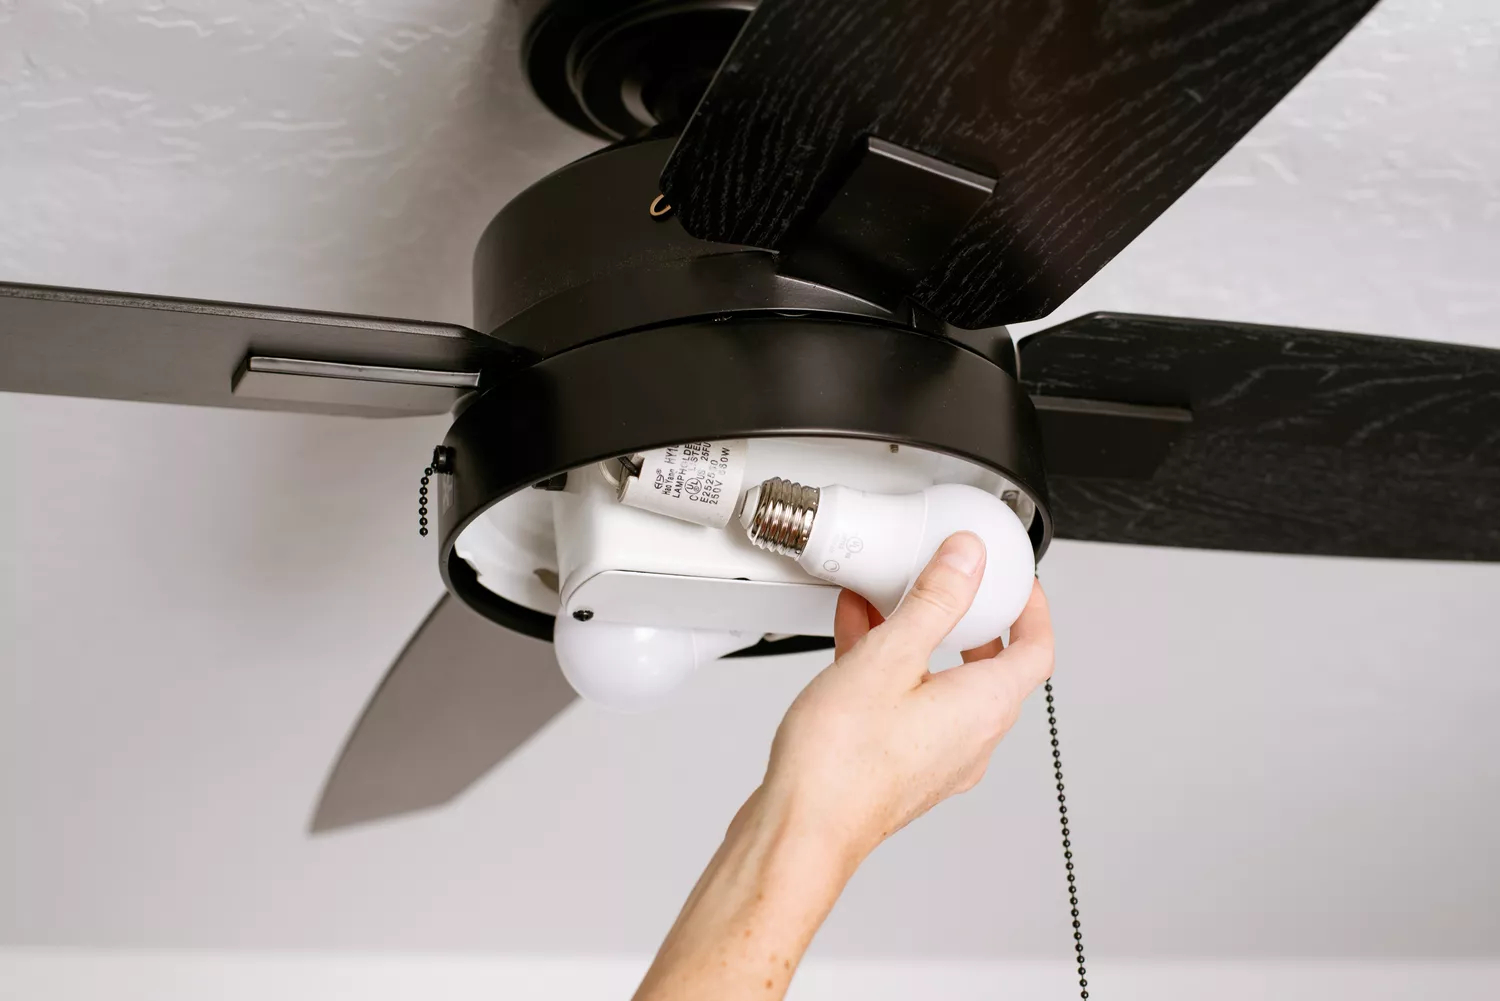
Step 5: Install the new light bulb
With the old light bulb successfully removed and safety measures in place, it's time to proceed with installing the new light bulb in the high ceiling fixture. This step requires attention to detail and precision to ensure a secure and functional placement of the replacement bulb. Here's a comprehensive guide to effectively installing the new light bulb:
-
Select the Correct Bulb: Before proceeding, ensure that the replacement light bulb is compatible with the fixture and meets the required wattage and type specifications. Whether it's an incandescent, LED, or CFL bulb, verify that it aligns with the fixture's guidelines for optimal performance.
-
Handle the New Bulb Carefully: When handling the new light bulb, it's important to exercise caution to avoid any damage. Hold the bulb by its base, avoiding contact with the glass to prevent fingerprints or residue, which can affect its longevity and performance. Additionally, be mindful of the bulb's fragility and handle it with care to prevent breakage.
-
Align and Insert the Bulb: Position the new light bulb at the socket, aligning the base with the socket's contact points. Depending on the type of bulb, gently insert it into the socket and rotate it in a clockwise direction to secure it in place. Ensure that the bulb is seated properly and engages with the socket to establish a reliable electrical connection.
-
Twist or Lock the Bulb: If the replacement bulb features a twist-and-lock mechanism, follow the manufacturer's instructions to secure it in the socket. Apply the appropriate twisting motion to engage the bulb securely, ensuring that it is firmly in place and ready for operation.
-
Test the Bulb: Once the new light bulb is installed, it's advisable to perform a brief test to confirm its functionality. Turn the power back on to the fixture and observe the illumination of the new bulb. Verify that it emits light without flickering or irregularities, indicating a successful installation.
-
Adjust and Secure the Fixture: After confirming the functionality of the new bulb, take a moment to adjust and secure the fixture if necessary. Ensure that any movable components or decorative elements are properly repositioned and tightened to maintain the stability and aesthetics of the fixture.
By following these detailed steps, you can effectively install the new light bulb in the high ceiling fixture, ensuring a seamless transition to renewed illumination. With a focus on precision and care, this process sets the stage for a well-lit and functional space, allowing you to proceed with confidence to the final step of turning the power back on.
Use a sturdy stepladder to reach the high ceiling light. Turn off the power, then carefully unscrew the old bulb and replace it with a new one. Be sure to secure the new bulb tightly before turning the power back on.
Step 6: Turn the power back on
After successfully installing the new light bulb in the high ceiling fixture, the final step is to restore power to the fixture, allowing the newly installed bulb to illuminate the space effectively. This critical step requires a cautious approach to ensure the safe reactivation of the electrical circuit and the seamless operation of the light fixture. Here's a detailed guide to turning the power back on:
-
Verify the Fixture Stability: Before proceeding to turn the power back on, ensure that the fixture is stable and securely positioned. Check for any loose components or fittings that may have been disturbed during the bulb replacement process. By confirming the fixture's stability, you minimize the risk of unexpected movement or dislodgment when the power is restored.
-
Double-Check the Circuit Breaker: Return to the electrical panel and locate the circuit breaker that controls the power supply to the light fixture. With caution, switch the circuit breaker to the "on" position, reactivating the electrical circuit. Take note of any audible clicks or visual indicators that signify the restoration of power to the fixture.
-
Observe the Bulb Illumination: As the power is restored, observe the newly installed light bulb for its illumination. Verify that the bulb emits a steady and consistent light, indicating that it is functioning as intended. If the bulb fails to illuminate or exhibits irregularities, immediately turn off the power and reassess the installation to address any potential issues.
-
Test the Light Switch: If the high ceiling fixture is controlled by a wall switch, test the switch to ensure that it effectively activates the light. Confirm that the switch operation aligns with the illumination of the newly installed bulb, allowing for seamless control of the light fixture from the designated switch.
-
Final Inspection: Once the power is back on and the light fixture is operational, perform a final inspection of the surrounding area. Check for any signs of electrical anomalies, such as flickering lights or unusual sounds, which may indicate underlying issues. Additionally, ensure that the area around the fixture is clear of any tools or debris, completing the maintenance process with a tidy and safe environment.
By diligently following these steps to turn the power back on, you finalize the process of changing a high ceiling light bulb with a focus on safety and functionality. With the electrical circuit reactivated and the new bulb illuminating the space, you can appreciate the successful completion of the maintenance task, enjoying the renewed brightness and ambiance of the area.
Conclusion
In conclusion, the process of changing a high ceiling light bulb encompasses essential steps that prioritize safety, precision, and efficiency. By following the comprehensive guide outlined in this article, you can confidently navigate each stage of the maintenance task, from gathering the necessary tools to turning the power back on. With a focus on safety precautions, meticulous handling of the light bulbs, and attention to detail, you can successfully maintain a well-lit environment while ensuring a secure and controlled working process.
The importance of using a stable ladder or step stool cannot be overstated, as it sets the foundation for safe access to the high ceiling fixture. By prioritizing stability, appropriate height, and weight capacity, you create a secure platform for executing the light bulb replacement with confidence. Additionally, the critical step of turning off the power to the fixture ensures a secure working environment, minimizing the risk of electrical accidents and allowing for a focused approach to the maintenance task.
Removing the old light bulb and installing the new one requires precision and care to ensure a seamless transition to renewed illumination. By assessing the fixture, handling the bulbs with caution, and verifying the compatibility of the replacement bulb, you can effectively maintain the functionality and aesthetics of the high ceiling fixture. The final step of turning the power back on completes the process, allowing you to appreciate the successful installation of the new bulb and the enhanced brightness it brings to the space.
Throughout the entire process, the emphasis on safety, attention to detail, and adherence to best practices ensures a smooth and efficient experience in changing a high ceiling light bulb. By incorporating these guidelines into your maintenance routine, you can approach future light bulb replacements with confidence and expertise, maintaining a well-lit and inviting environment in your living or working space.
In essence, the process of changing a high ceiling light bulb is not only a practical maintenance task but also an opportunity to prioritize safety, enhance the functionality of the fixture, and contribute to a well-lit and comfortable environment. With the knowledge and insights gained from this guide, you are well-equipped to tackle the challenge of changing a high ceiling light bulb with confidence and efficiency, ensuring that your space remains brightly illuminated for optimal comfort and productivity.
Frequently Asked Questions about How To Change A High Ceiling Light Bulb
Was this page helpful?
At Storables.com, we guarantee accurate and reliable information. Our content, validated by Expert Board Contributors, is crafted following stringent Editorial Policies. We're committed to providing you with well-researched, expert-backed insights for all your informational needs.


0 thoughts on “How To Change A High Ceiling Light Bulb”