Home>Furniture>Outdoor Furniture>How To Build A Sunroom On A Patio
Outdoor Furniture
How To Build A Sunroom On A Patio
Modified: October 28, 2024
Learn how to transform your patio into a stunning sunroom with our step-by-step guide. Create a cozy outdoor space with stylish outdoor furniture and enjoy the beauty of the outdoors all year round.
(Many of the links in this article redirect to a specific reviewed product. Your purchase of these products through affiliate links helps to generate commission for Storables.com, at no extra cost. Learn more)
Introduction
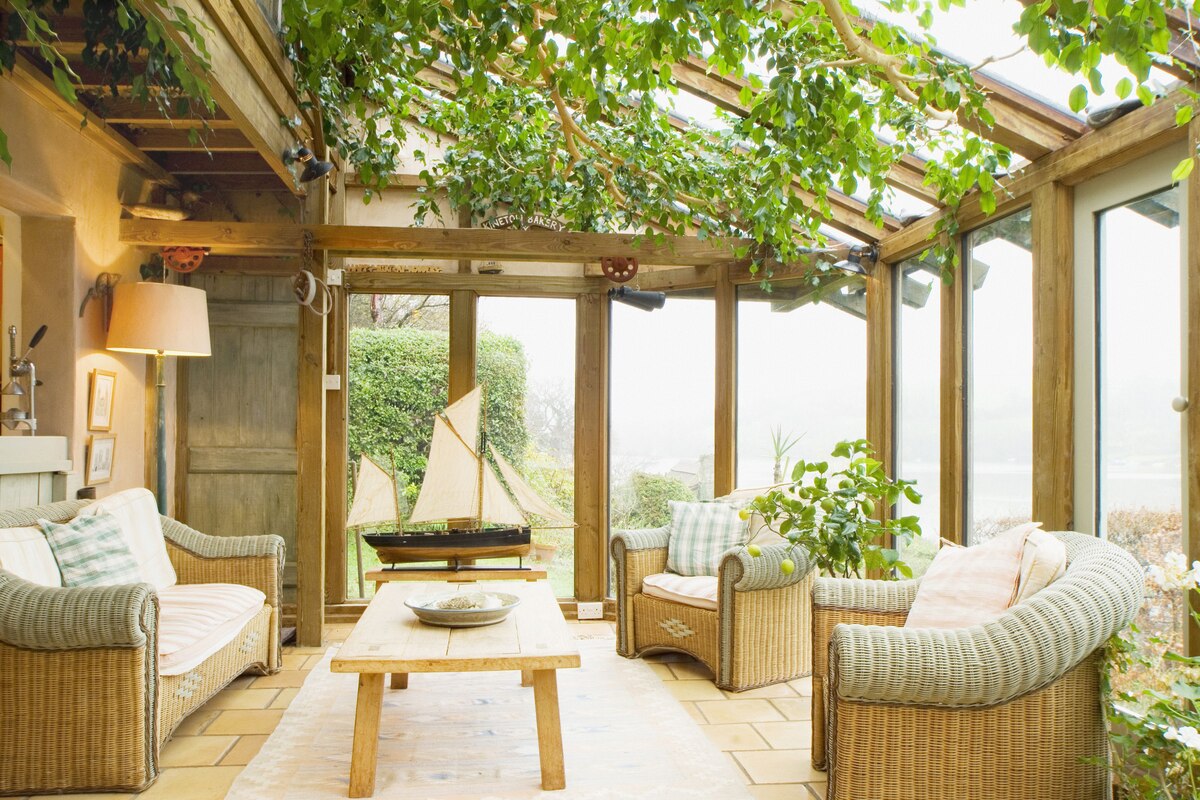
Welcome to our comprehensive guide on how to build a sunroom on a patio. If you’re looking to enhance your outdoor living space, a sunroom is a fantastic addition that allows you to enjoy the beauty of the outdoors while still being protected from the elements. Whether you want to create a cozy retreat, a space for entertaining guests, or a room filled with natural light for indoor plants, you can customize your sunroom to suit your needs and preferences.
Building a sunroom on your patio may seem like a daunting task, but with the right planning and preparation, it can be a rewarding DIY project. In this guide, we will take you through the step-by-step process to help you create your dream sunroom. From assessing the patio space to obtaining permits, designing the sunroom, choosing suitable materials, preparing the patio surface, and completing the finishing touches, we will cover all the essential aspects of building a sunroom.
Before we dive into the details, it’s important to note that building codes and regulations can vary depending on your location. It’s crucial to check with your local authorities or consult a professional to ensure you comply with all necessary regulations and obtain the required permits for your sunroom construction. Safety should always be a top priority when undertaking any home improvement project.
Now that we have the preliminaries out of the way, let’s begin the exciting journey of creating your own sunroom oasis. Get ready to transform your patio into a versatile and inviting space where you can relax, entertain, and enjoy the beauty of the outdoors, regardless of the weather.
Key Takeaways:
- Building a sunroom on your patio involves careful planning, obtaining permits, assessing space, choosing materials, and completing construction steps. It’s a versatile addition that enhances outdoor-indoor living.
- Insulating, ventilating, and finishing touches are crucial for creating a comfortable and inviting sunroom. Proper maintenance ensures longevity and enjoyment of this delightful home addition.
Read more: How To Turn A Patio Into A Sunroom
Step 1: Assessing the Patio Space
The first step in building a sunroom on your patio is to assess the available space. Take the time to thoroughly examine your patio area and consider the following factors:
- Size and shape: Evaluate the dimensions and shape of your patio. Consider whether it is large enough to accommodate the desired size of your sunroom. Take into account any obstructions, such as trees, utility lines, or neighboring structures, that may limit the available space.
- Orientation and sunlight: Take note of the direction the patio is facing. An ideal sunroom should have ample sunlight throughout the day. South-facing patios generally receive the most sunlight, while north-facing patios may have limited exposure. Consider how the sun moves across your patio space and plan accordingly.
- Access and traffic flow: Assess the accessibility of your patio and how it interacts with the rest of your outdoor space. Think about how you and your guests will enter and exit the sunroom, as well as how it will connect to other areas, like your backyard or garden.
- Structural stability: Check the structural integrity of your patio. Ensure that it is capable of supporting the additional weight of a sunroom. If you have any concerns, it’s advisable to consult a professional contractor or engineer to assess the patio’s strength and make any necessary reinforcements.
By carefully assessing your patio space, you can determine if it is suitable for a sunroom and make any necessary adjustments or preparations. Remember that the size and layout of your patio will influence the design and dimensions of your sunroom. It’s worth noting that if you don’t currently have a patio, you may need to lay a foundation before proceeding with the construction of the sunroom.
Once you have thoroughly assessed your patio space and ensured its suitability for a sunroom, you can move on to the next step: obtaining the required permits.
Step 2: Obtaining the Required Permits
Before you can start building your sunroom, it is important to obtain the necessary permits and approvals from your local building department or municipality. Each area has its own building codes and regulations regarding the construction of sunrooms, so it’s crucial to research and comply with the specific requirements in your jurisdiction.
Here are some common steps to follow when obtaining permits for your sunroom project:
- Research local regulations: Start by familiarizing yourself with the local building codes and regulations that govern sunroom construction. This information can usually be found on the website of your local building department or by contacting the department directly. Pay attention to requirements regarding setbacks, maximum size limitations, foundation and footing specifications, electrical and HVAC systems, and any other relevant guidelines.
- Prepare your application: Once you have a clear understanding of the regulations, gather all the required documentation and information for your permit application. This may include architectural drawings, a site plan, engineering calculations, product specifications, and any other relevant details. It’s essential to provide accurate and comprehensive information to expedite the permit approval process.
- Submit your application: Take your completed permit application along with the supporting documentation to the appropriate building department office. Pay any required fees and submit your application. Be sure to follow any specific submission guidelines or procedures outlined by your local building department.
- Review and approval: Once your application is submitted, it will undergo a review process by the building department. This process ensures that your proposed sunroom meets all the necessary building codes and regulations. The review time can vary depending on the workload of the department, so be prepared for some waiting. If any revisions or additional information are requested, promptly provide them to expedite the approval process.
- Receive your permit: Once your application is approved, you will be issued a permit. This permit will outline the approved scope of work, including any conditions or requirements that must be met during construction. Make sure to display the permit prominently on-site as required by your local building department.
Obtaining the necessary permits ensures that your sunroom construction is legal and compliant with building codes and regulations. It’s important to note that failure to obtain the proper permits can result in fines, delays, or even the need to modify or dismantle your sunroom. Therefore, it is always best to seek the appropriate approvals to avoid any legal issues.
Once you have obtained your permits, you can move on to the exciting phase of designing your sunroom.
Step 3: Designing the Sunroom
Designing your sunroom is an exciting process that allows you to create a space that reflects your personal style and meets your specific needs. Consider the following factors to ensure a well-designed and functional sunroom:
- Purpose: Determine how you plan to use your sunroom. Will it be a relaxation retreat, a dining area, a home office, or a combination of purposes? Clearly defining the purpose of your sunroom will help guide the design process and ensure that the space is tailored to your specific needs.
- Layout: Consider the layout and flow of the sunroom. Take into account the placement of windows and doors, as well as the position of furniture and other functional elements. Pay attention to natural light and ventilation to maximize the benefits of your sunroom design.
- Style: Determine the overall style and theme of your sunroom. Do you prefer a contemporary, traditional, rustic, or eclectic look? Consider the existing aesthetic of your home and outdoor space to create a cohesive design that complements your surroundings.
- Materials: Select the materials that will be used in your sunroom. From the flooring and walls to the windows and roof, choose materials that are durable, weather-resistant, and visually appealing. Consider factors such as insulation properties, maintenance requirements, and the level of sunlight exposure your sunroom will receive.
- Functionality: Think about the functional aspects of your sunroom, such as electrical outlets, lighting fixtures, heating or cooling systems, and any technology or entertainment components you may want to include. Designing with functionality in mind will ensure that your sunroom serves your needs throughout the year.
Take the time to sketch out your sunroom design or use design software to create a visual representation of your vision. This will help you visualize the space and make adjustments as needed before construction begins.
Additionally, consider consulting with a professional architect or designer who specializes in sunroom design. They can provide valuable insights and expertise to ensure that your sunroom design is structurally sound, aesthetically pleasing, and optimized for your specific requirements.
Once you have finalized your sunroom design, you can proceed to the next step: choosing the suitable materials for construction.
Step 4: Choosing the Suitable Materials
When it comes to building a sunroom, selecting the right materials is crucial for both aesthetic appeal and durability. The materials you choose will determine the overall look of your sunroom as well as its resistance to weather elements and longevity. Here are some key considerations when choosing materials:
- Windows and Doors: The windows and doors of your sunroom play a vital role in its functionality and energy efficiency. Opt for high-quality windows and doors that offer good insulation and are resistant to the elements. Double or triple-glazed windows with low-emissivity (Low-E) coatings can help regulate temperature and reduce energy costs.
- Roofing: The roof of your sunroom is an essential component for protection against rain, snow, and excessive sunlight. Consider options like insulated panels or shingles that are durable and provide proper insulation. Additionally, skylights or roof windows can enhance natural light inside the sunroom.
- Flooring: Choose flooring materials that are suitable for both indoor and outdoor use. Common options for sunroom flooring include tiles, hardwood, laminate, or vinyl. Ensure that the flooring is designed to withstand temperature fluctuations and moisture exposure, especially if you live in an area with extreme weather conditions.
- Walls and Ceilings: Depending on your sunroom design, you may have walls made of glass, insulated panels, or a combination of both. Glass walls offer unobstructed views and maximum light, while insulated panels provide better insulation and privacy. Consider the desired balance between transparency, insulation, and privacy for your sunroom walls.
- Structural Elements: The structural elements of your sunroom, such as beams and supports, should be made from sturdy and weather-resistant materials that can withstand the test of time. Aluminum, vinyl, or composite materials are popular choices due to their durability and low maintenance requirements.
As you choose the materials for your sunroom, keep in mind your budget, maintenance preferences, and the overall aesthetic you want to achieve. Consult with professionals or visit local home improvement stores to explore different material options and gather information on their durability, maintenance requirements, and warranties.
Remember, selecting high-quality materials will not only enhance the longevity of your sunroom but also contribute to the overall enjoyment and comfort of the space. Now that you’ve chosen the materials, it’s time to prepare the patio surface for sunroom installation.
Read more: How To Build A Sunroom
Step 5: Preparing the Patio Surface
Before you can begin the construction of your sunroom, it’s essential to properly prepare the patio surface. The preparation process will ensure a stable foundation for your sunroom and prevent any issues that may arise in the future. Follow these steps to prepare the patio surface:
- Clean the surface: Start by thoroughly cleaning the patio surface. Remove any debris, dirt, or vegetation that may have accumulated over time. Use a broom, blower, or pressure washer to get rid of any stubborn dirt or stains. A clean surface will provide a clean slate for the next steps.
- Repair any damages: Inspect the patio surface for any cracks, holes, or uneven areas. Repair any damages using appropriate materials such as concrete patching compound or epoxy filler. Ensure that the surface is level and smooth, as this will ensure the proper installation and stability of your sunroom.
- Address drainage issues: Proper drainage is crucial to prevent water accumulation and potential damage to your sunroom. Evaluate the existing drainage system and make any necessary adjustments to ensure water flows away from your sunroom. This may involve installing additional drains or adjusting the slope of the patio surface.
- Apply a waterproofing sealant: To protect your sunroom and patio surface from moisture, consider applying a waterproofing sealant. This will help prevent water penetration and prolong the life of your sunroom. Choose a sealant that is appropriate for your patio material and follow the manufacturer’s instructions for application.
- Install a vapor barrier: If your sunroom will have a concrete floor, consider installing a vapor barrier to prevent moisture from seeping through the concrete. A vapor barrier will help maintain a dry and comfortable environment inside your sunroom. Ensure that the vapor barrier covers the entire floor area and is properly sealed.
By properly preparing the patio surface, you are setting the foundation for a successful sunroom installation. This process will ensure that your sunroom is built on a stable and level surface, protecting it from potential issues caused by uneven ground or water damage.
Once you have completed the preparation of the patio surface, you are ready to move on to the next step: installing the foundation for your sunroom. This is a crucial step in ensuring the stability and longevity of your sunroom structure.
Step 6: Installing the Foundation
The foundation of your sunroom is a critical element that provides stability and support for the structure. Installing a solid foundation ensures that your sunroom will be able to withstand the test of time and various weather conditions. Here’s a step-by-step guide on how to install the foundation for your sunroom:
- Excavation: Begin by excavating the area where the foundation will be laid. This involves removing the top layer of soil and creating a level surface. The depth of the excavation will depend on local building codes and the type of foundation you plan to use.
- Footings: Next, dig footings at specific intervals along the perimeter of the sunroom. Footings are typically wider and deeper than the foundation walls and provide additional stability. The size and depth of the footings will vary depending on the size and design of your sunroom.
- Formwork: Construct formwork using plywood or other suitable materials to create the shape and dimensions of the foundation walls. Ensure that the formwork is properly aligned and secured, as it will serve as a template for pouring the concrete.
- Rebar and Reinforcement: Install steel rebar within the formwork to reinforce the foundation walls. The rebar adds strength to the concrete and helps prevent cracking or shifting over time. Follow the specifications outlined in your local building codes for the appropriate size and spacing of the rebar.
- Pouring Concrete: Once the formwork and reinforcement are in place, it’s time to pour the concrete into the excavated area. Work with a professional concrete contractor or follow the guidelines in your local building codes to ensure the proper mixing, pouring, and finishing of the concrete. Use a vibrating tool to remove air bubbles and ensure even distribution.
- Curing: Allow the concrete to cure and harden for the recommended time period. Curing helps strengthen the concrete and ensures its long-term durability. Follow the curing instructions provided by the concrete manufacturer or consult with a professional contractor for guidance.
- Waterproofing: Once the foundation is fully cured, apply a waterproofing membrane or coating to protect it from moisture penetration. This will help prevent leaks or water damage in your sunroom.
It’s important to note that foundation installation may require professional expertise, especially when dealing with complex designs or challenging soil conditions. Consulting with a qualified contractor or engineer can ensure that the foundation is installed correctly and meets all necessary requirements.
With the foundation in place, you’re one step closer to constructing your sunroom. The next step involves framing the walls, laying windows and doors, and bringing your sunroom to life.
When building a sunroom on a patio, make sure to carefully consider the materials you will use. Look for durable, weather-resistant materials that will withstand the elements and provide a comfortable space for year-round use.
Step 7: Framing the Sunroom Walls
Once the foundation is prepared, it’s time to move on to framing the walls of your sunroom. The framing process involves constructing the skeletal structure that will support the windows, doors, and roof of your sunroom. Follow these steps to successfully frame the walls:
- Plan the layout: Start by planning the layout of your sunroom walls. Take measurements, determine the wall heights, and mark the locations of windows, doors, and any other desired openings.
- Set the wall plates: Attach treated lumber or other suitable materials to the top and bottom of the walls. These horizontal pieces, known as wall plates, provide a base for the wall framing and help distribute the load evenly.
- Frame the walls: Begin constructing the wall frames by attaching vertical studs to the bottom and top plates at predetermined intervals. Use a level and framing square to ensure that the walls are plumb and square. Depending on the design, you may need to include additional support, such as headers or cripple studs, around window and door openings.
- Install windows and doors: As you frame the walls, leave openings for windows and doors. Follow the manufacturer’s instructions to properly install windows and doors, ensuring they are securely anchored and weather-sealed.
- Brace the walls: Temporarily brace the walls to keep them stable and aligned. Use diagonal braces or other appropriate methods to prevent any movement or shifting during the construction process.
- Connect the walls to the foundation: Securely anchor the walls to the foundation using anchor bolts, straps, or other recommended methods. This connection provides additional stability and helps ensure the structural integrity of your sunroom.
- Inspect and reinforce: Once the walls are framed, carefully inspect them for any structural weaknesses or gaps. Reinforce any weak areas by adding additional support or bracing as needed.
It is crucial to follow local building codes and regulations when framing the walls of your sunroom. These codes often specify requirements for wall spacing, stud size, load-bearing capacity, and fire safety. Consulting with a professional contractor or building inspector can provide guidance and ensure compliance with the necessary regulations.
After completing the framing of the walls, you can move on to the next step: adding windows and doors to your sunroom. This will not only contribute to the aesthetics of your sunroom but also provide natural light and access to the outdoor environment.
Step 8: Adding Windows and Doors
Adding windows and doors to your sunroom is a crucial step that will enhance its functionality, aesthetics, and comfort. These elements not only provide natural light and ventilation but also offer beautiful views of the outdoors. Follow these steps to successfully install windows and doors in your sunroom:
- Select the right windows and doors: Choose windows and doors that align with your sunroom design, energy efficiency goals, and personal style preferences. Consider factors such as the number of panes, glass type (e.g., insulated, Low-E), opening mechanism (e.g., sliding, casement), frame material (e.g., vinyl, aluminum), and security features.
- Prepare the openings: Measure and mark the locations where the windows and doors will be installed. Ensure that the openings are plumb, level, and square. Make any necessary adjustments to the framing if required.
- Install flashing: Apply flashing around the perimeter of the window or door openings to create a weather-resistant barrier. This will prevent water penetration and protect against potential leaks or damage.
- Attach the windows and doors: Following the manufacturer’s instructions, carefully install the windows and doors into their respective openings. Use shims to ensure a snug and level fit. Secure them in place using screws or nails provided by the manufacturer.
- Insulate and weather-seal: Apply insulation around the windows and doors to improve energy efficiency and control temperature levels inside the sunroom. Additionally, use weatherstripping or sealing materials to create an airtight and watertight seal.
- Test and adjust: After installation, open and close the windows and doors to ensure they operate smoothly. Make any necessary adjustments to the hardware, hinges, or locking mechanisms to ensure proper functionality.
- Consider additional features: Depending on your preferences and needs, you may want to add additional features to your windows and doors. This could include screens, blinds or shades, security features, or even built-in ventilation systems.
Proper installation of windows and doors is essential to ensure their performance, energy efficiency, and longevity. If you’re unsure about the installation process, it’s advisable to consult a professional contractor or follow the guidelines provided by the window and door manufacturer.
Adding windows and doors to your sunroom will not only enhance the visual appeal but also provide natural light, ventilation, and easy access to the outdoor space. Now that your sunroom is taking shape, it’s time to move on to the next step: roofing your sunroom to protect it from the elements.
Read more: How To Build Patio
Step 9: Roofing the Sunroom
The roof is a crucial component of your sunroom, providing protection against the elements and ensuring a comfortable interior space. When it comes to roofing your sunroom, there are various options to consider based on your preferences, budget, and the overall design of your sunroom. Follow these steps to successfully roof your sunroom:
- Evaluate roofing materials: Research and evaluate different roofing materials suitable for your sunroom. Common options include asphalt shingles, metal roofing, polycarbonate panels, or insulated roof panels. Consider factors such as durability, insulation properties, maintenance requirements, and aesthetics.
- Choose the roofing style: Select a roofing style that complements the design of your sunroom and blends with the existing architecture of your home. Common roofing styles for sunrooms include gable, shed, hip, or combination styles. Consider the slope and pitch of your roof to determine the most suitable style.
- Measure and plan: Measure the dimensions of your sunroom roof and plan the layout of the roofing material accordingly. Ensure accurate measurements to avoid wastage and ensure proper coverage of the roof area. Take into account any additional features such as skylights or ventilation systems that may need to be integrated.
- Prepare the roof surface: Ensure that the roof surface is clean and free of debris. Remove any existing roofing material or make necessary repairs to the subroof. Install appropriate underlayment or waterproof membrane to provide an added layer of protection against moisture.
- Install the roofing material: Follow the manufacturer’s instructions to install the chosen roofing material on your sunroom. This may involve laying shingles, fastening metal roofing panels, or connecting polycarbonate or insulated roof panels. Secure the roofing material according to the recommended specifications to ensure a weatherproof and durable roof.
- Address intersections and edges: Pay attention to the intersections and edges of the roof where water may accumulate. Install flashing and drip edges to direct water away from these vulnerable areas and prevent water damage. Ensure that all edges and joints are properly sealed to prevent any leaks.
- Inspect and make adjustments: Once the roof is installed, carefully inspect the entire area for any gaps, loose fittings, or potential issues. Make any necessary adjustments or repairs to ensure a secure and watertight roof for your sunroom.
Roofing your sunroom is a significant step in completing the structure and protecting it from the elements. It’s important to consider the specific requirements of your sunroom design, as well as any local building codes or regulations related to roofing materials and installations.
With the roof in place, you’re almost ready to enjoy your sunroom oasis. The next step involves insulating and ventilating your sunroom to create a comfortable and energy-efficient space.
Step 10: Insulating and Ventilating the Sunroom
Insulating and ventilating your sunroom is crucial to ensure a comfortable and energy-efficient space. Proper insulation helps maintain a consistent temperature inside the sunroom, while effective ventilation helps regulate air circulation and control humidity levels. Follow these steps to insulate and ventilate your sunroom:
- Choose insulation materials: Select insulation materials that are suitable for your sunroom. Common options include fiberglass batts, spray foam insulation, or rigid foam panels. Consider the R-value of the insulation, which determines its thermal resistance and energy efficiency.
- Insulate the walls and ceiling: Install insulation between the wall studs and ceiling joists of your sunroom. Ensure that the insulation is properly cut and fitted to eliminate any gaps or areas of heat transfer. Pay attention to corners, edges, and any areas where air infiltration may occur.
- Insulate the floor: If your sunroom has a raised floor, insulate it using insulation materials appropriate for the floor design. This will help maintain a comfortable temperature and reduce energy loss through the floor.
- Seal air leaks: Locate and seal any air leaks in the sunroom. Common areas of air infiltration include around windows and doors, electrical outlets, and gaps in the walls or ceiling. Use caulk, weatherstripping, or expanding foam to seal these gaps and prevent drafts.
- Install appropriate ventilation systems: Consider the ventilation needs of your sunroom. Install windows that can be opened to allow for natural airflow. You can also incorporate skylights or roof vents to promote air circulation. Depending on your climate, you may also consider installing ceiling fans or a dedicated HVAC system to regulate temperature and humidity.
- Control solar heat gain: To prevent excessive heat buildup in your sunroom, consider using blinds, shades, or UV-blocking window films. These measures help control solar heat gain during the warmer months and reduce the need for additional cooling.
- Consult with professionals: If you’re unsure about insulation and ventilation requirements, it’s advisable to consult with professionals such as insulation contractors or HVAC specialists. They can assess your specific needs and recommend the most effective solutions for your sunroom.
Proper insulation and ventilation are key to creating a comfortable and energy-efficient sunroom. Paying attention to these aspects will ensure that your sunroom remains a pleasant space throughout the year, regardless of the outside temperature.
With insulation and ventilation in place, your sunroom is nearly complete. The final step involves selecting and installing the flooring, as well as adding the finishing touches to transform your sunroom into a truly inviting space.
Step 11: Flooring and Finishing Touches
The flooring and finishing touches of your sunroom play a crucial role in tying the whole space together and creating a welcoming atmosphere. It’s important to choose flooring materials that are durable, aesthetically pleasing, and suitable for the unique conditions of a sunroom. Follow these steps to complete your sunroom project:
- Select the right flooring: Choose flooring materials that are designed for both indoor and outdoor use. Consider factors such as durability, resistance to moisture and sunlight, ease of maintenance, and visual appeal. Popular options for sunroom flooring include tiles, hardwood, laminate, vinyl, or even stained concrete.
- Prepare the subfloor: Ensure that the subfloor is clean, dry, and level before installing the flooring. If necessary, apply a moisture barrier or primer to prevent moisture damage. Follow the manufacturer’s instructions for preparing the subfloor based on the chosen flooring material.
- Install the flooring: Follow the manufacturer’s instructions to install the selected flooring material. This may involve laying tiles, planks, or sheets, depending on the chosen material. Take care to achieve proper alignment, spacing, and a smooth finish. Use appropriate adhesives or fasteners as recommended.
- Add baseboards and trim: Install baseboards and trim to provide a clean and finished look to the edges of the flooring. Ensure that they are properly cut and fitted to cover any gaps between the flooring and walls. Choose materials and styles that complement the overall aesthetics of your sunroom.
- Paint or finish the walls: Apply a fresh coat of paint or finish to the walls of your sunroom. Choose colors that enhance the desired ambiance and match the overall style of your sunroom. Consider using light and neutral hues to create a bright and airy atmosphere.
- Enhance with decorative elements: Personalize your sunroom by adding decorative elements such as curtains, blinds, or shades for privacy and light control. Consider adding indoor plants, furniture, and accessories that reflect your style and create a cozy and inviting space.
- Evaluate lighting options: Determine the lighting needs of your sunroom and choose appropriate fixtures. Consider natural lighting through windows, skylights, or roof panels, as well as artificial lighting options such as recessed lights, pendant lights, or floor lamps. Create a well-lit space that can be adapted to different activities and moods.
- Consider additional comfort features: Enhance the comfort of your sunroom by adding features such as ceiling fans, heating systems, or air conditioning. These elements can extend the usability of your sunroom throughout the year, regardless of the outside temperature.
Completing the flooring and adding the finishing touches will transform your sunroom into a beautiful and functional space where you can relax, entertain, and enjoy the outdoors from the comfort of your home. Take the time to select the right materials and design elements to create a sunroom that truly reflects your style and meets your needs.
With the flooring and finishing touches complete, you can now sit back, relax, and enjoy your newly constructed sunroom. Whether you’re using it as a cozy retreat, a sunlit office, or a space to entertain guests, your sunroom is sure to become a favorite spot in your home.
Conclusion
Congratulations on completing your sunroom construction project! You have transformed your patio into a beautiful and functional space where you can enjoy the outdoors while being protected from the elements. Through careful planning, assessing the patio space, obtaining permits, designing the sunroom, selecting suitable materials, preparing the surface, installing the foundation, framing the walls, adding windows and doors, roofing, insulating and ventilating, and finishing with flooring and touches, you have created a space that enhances your home and lifestyle.
A sunroom is a versatile addition to any home, offering a multitude of possibilities for relaxation, entertainment, and enjoying nature. It provides a seamless transition between indoor and outdoor living, allowing you to bask in natural light and admire the beauty of your surroundings, regardless of the weather.
Remember to maintain your sunroom regularly by cleaning the windows, inspecting for any signs of damage or wear, and ensuring proper ventilation. This will help keep your sunroom in top condition and extend its lifespan.
As you enjoy your new sunroom, take the time to appreciate the craftsmanship and effort that went into its construction. Share the space with family and friends, create meaningful memories, and make the most of this delightful addition to your home.
We hope this comprehensive guide has provided you with the necessary knowledge and inspiration to build your own sunroom on your patio. However, always consult with professionals, follow local regulations, and prioritize safety throughout your construction journey. With proper planning and attention to detail, your sunroom will be a place of joy and relaxation for years to come.
Now go ahead and embrace the beauty of your sunroom as you savor the outdoor-indoor experience all year round!
Frequently Asked Questions about How To Build A Sunroom On A Patio
Was this page helpful?
At Storables.com, we guarantee accurate and reliable information. Our content, validated by Expert Board Contributors, is crafted following stringent Editorial Policies. We're committed to providing you with well-researched, expert-backed insights for all your informational needs.


0 thoughts on “How To Build A Sunroom On A Patio”