Home>Furniture>Outdoor Furniture>How To Lay Bluestone Patio
Outdoor Furniture
How To Lay Bluestone Patio
Modified: October 18, 2024
Learn how to lay a beautiful bluestone patio and create a perfect outdoor space for your furniture. Expert tips and step-by-step guide to enhance your outdoor living.
(Many of the links in this article redirect to a specific reviewed product. Your purchase of these products through affiliate links helps to generate commission for Storables.com, at no extra cost. Learn more)
Introduction
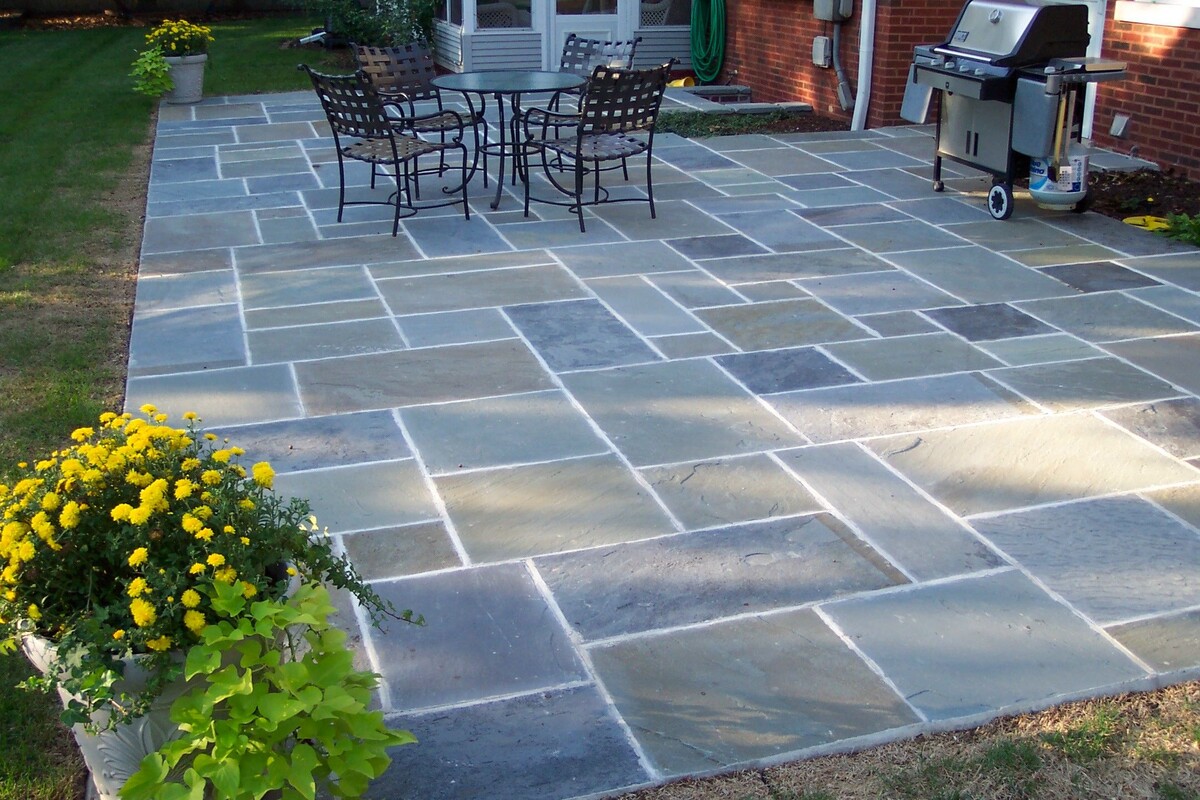
Welcome to the world of outdoor living! Creating a beautiful and functional outdoor space is a dream for many homeowners. And one of the key elements in achieving this is by having a well-designed patio. A patio not only offers extra living space but also acts as an extension of your home, allowing you to enjoy the outdoors in comfort and style. When it comes to choosing the right material for your patio, bluestone is an excellent option.
Bluestone is a natural stone that offers durability, versatility, and timeless beauty. With its unique blue-gray color and subtle variations, bluestone adds a touch of elegance to any outdoor setting. It is commonly used for patios, walkways, and other outdoor surfaces, making it a popular choice among homeowners and landscape designers.
In this article, we will guide you through the process of laying a bluestone patio, from planning and preparation to proper maintenance. By following these steps, you can transform your outdoor space into a stunning retreat that will be the envy of your neighbors.
So, let’s get started and learn how to lay a bluestone patio that will enhance the beauty and functionality of your outdoor living area!
Key Takeaways:
- Transform your outdoor space with a stunning bluestone patio, offering durability, elegance, and functionality. Follow the steps to create and maintain your own outdoor oasis for lasting memories.
- By carefully planning, preparing, and maintaining your bluestone patio, you can enjoy a beautiful and versatile outdoor living area. Embrace nature, entertain, and relax in style with your personalized retreat.
Read more: How To Clean Bluestone Patio
Planning and Preparation
Before you begin the project, it’s important to do some careful planning and preparation. This will ensure that you have all the necessary materials and tools, and that you have a clear vision of how you want your patio to look. Here are some key steps to follow:
- Determine the size and shape: Measure the area where you want to install the patio and decide on the shape and size. Consider the purpose of your patio and how you plan to use it. This will help you determine the appropriate dimensions.
- Choose the bluestone: Visit a local stone supplier to select the bluestone pavers that best suit your taste and style. Bluestone comes in various thicknesses and finishes, so make sure to choose the ones that align with your preferences and project requirements.
- Consider the layout: Plan the layout of your patio, taking into account any existing structures or features. Think about how the patio will flow with the rest of your outdoor space and how it will complement your landscaping.
- Check for permits or restrictions: Depending on your location, you may need to obtain permits or adhere to specific regulations when installing a patio. Check with your local authorities or homeowner’s association to ensure compliance.
- Gather the necessary tools and materials: Make a list of all the tools and materials you’ll need for the project. This may include items such as a shovel, wheelbarrow, level, rubber mallet, compacting plate, landscape fabric, gravel, sand, and of course, the bluestone pavers.
By taking the time to plan and prepare, you’ll have a solid foundation for a successful bluestone patio installation. This will help streamline the process and minimize any potential issues along the way. So, let’s move on to the next step: measuring and marking the area.
Measuring and Marking the Area
Once you have completed the planning stage, it’s time to move on to measuring and marking the area where your bluestone patio will be installed. This step is crucial to ensure accurate placement and the desired shape of the patio. Here’s how you can do it:
- Gather your measuring tools: Grab a measuring tape, a long piece of string or rope, and some stakes.
- Outline the shape: Using the string or rope, create an outline of the desired shape and size of your patio. Drive the stakes into the ground along the perimeter and tie the string tightly between them. This will help you visualize the patio’s boundaries.
- Check for squareness: Use the 3-4-5 rule to ensure that your patio is perfectly square. Measure three feet along one side of the patio, four feet along the adjacent side, and check the diagonal distance between the two points. If the distance is precisely five feet, then your patio is square. Adjust the stakes as needed to achieve squareness.
- Measure for the base: Measure and mark the area within the perimeter to determine the dimensions for the base layer. This will include both the length and width of the patio, plus any additional space for a border or edging if desired.
It’s important to be precise when measuring and marking the area for your bluestone patio. Take your time and double-check your measurements to ensure accuracy. Once you are satisfied with the layout, move on to the next step: clearing the site.
Clearing the Site
With the area for your bluestone patio measured and marked, it’s time to clear the site and prepare it for the installation process. This step involves removing any existing vegetation, debris, or obstacles that may hinder the construction of your patio. Follow these steps to clear the site effectively:
- Remove plants and vegetation: Start by clearing away any plants, grass, or weeds that are within the marked perimeter of your patio. Use a shovel or gardening tools to dig up the roots and remove the vegetation completely.
- Clear away debris: Remove any rocks, branches, or other debris from the site. Use a rake or a wheelbarrow to collect and dispose of the debris properly.
- Address drainage issues: Take this opportunity to assess the site’s drainage and make any necessary adjustments. If there are low areas or areas prone to pooling water, consider adding drainage solutions such as a French drain or gravel to promote proper water dispersal.
- Inspect for underground utilities: Before digging, it’s crucial to check for any underground utilities such as gas lines, water pipes, or electrical cables. Contact your local utility company to mark the location of any underground lines to avoid accidental damage.
- Level the surface: Use a rake or a shovel to level the area where the patio will be installed. Remove any high spots and fill in any low spots to ensure a smooth and even surface for the patio base.
Clearing the site may require some physical exertion and attention to detail. Take your time to complete this step thoroughly, as it lays the foundation for a successful bluestone patio installation. Once the site is cleared, you’re ready to move on to the next step: excavating the area.
Excavating the Area
With the site cleared, it’s time to excavate the area where your bluestone patio will be installed. Excavation involves removing the top layer of soil to create space for the patio base. Here’s how you can excavate the area for your patio:
- Begin digging: Using a shovel, start digging within the marked perimeter of the patio. Dig to a depth that allows for the desired thickness of the base material and the bluestone pavers. Typically, a depth of 6-8 inches is recommended, but this may vary depending on your specific project requirements.
- Create a slight slope: To ensure proper drainage, create a slight slope by angling the excavation away from your house or any other structures. This will help water flow away from the patio instead of pooling on the surface.
- Check the depth: As you dig, periodically check the depth using a tape measure or a level. Make sure the excavation is uniform and meets the desired depth requirements throughout the entire area.
- Remove excess soil: As you dig, place the excavated soil onto a tarp or a wheelbarrow. This will make it easier to remove and transport the excess soil from the site.
- Compact the soil: Once the excavation is complete, use a hand tamper or a plate compactor to compact the soil in the area. This will help create a stable base for your patio.
Excavating the area requires some physical labor and precision. Take your time to ensure that the excavation is accurate and the depth is consistent. This will lay the groundwork for a strong and long-lasting bluestone patio. Now that the area is excavated, it’s time to move on to the next step: preparing the base.
Read more: How To Lay A Cobblestone Patio
Preparing the Base
With the area excavated, the next step in laying your bluestone patio is to prepare the base. The base serves as a stable foundation for the patio and ensures its longevity and durability. Here’s a step-by-step guide on how to prepare the base for your bluestone patio:
- Install landscape fabric: Before adding any materials to the excavation, it’s recommended to lay down a layer of landscape fabric. This will help prevent weed growth and keep the base materials separated from the underlying soil.
- Add a layer of gravel: Start by spreading a layer of well-compacted gravel evenly over the excavated area. The thickness of the gravel layer may vary, but a depth of 4-6 inches is typically sufficient. Use a rake or a shovel to distribute the gravel and ensure it is level. Compact the gravel using a plate compactor or by gently tamping it down with a hand tamper.
- Add a layer of sand: Once the gravel layer is in place, add a layer of sand on top. Aim for a thickness of about 1 inch. Spread the sand evenly and use a rake or a board to level it out. Take care to create a smooth and even surface.
- Compact the sand: Similar to the gravel layer, compact the sand using a plate compactor or by gently tamping it down. This will help stabilize the base and provide a solid surface for the bluestone pavers.
- Check the level and slope: Use a level to ensure that the base is level and that it has a slight slope away from your house or any structures. This will ensure proper water drainage and prevent water from pooling on the surface of the patio.
By properly preparing the base, you are setting the stage for a successful bluestone patio installation. The base acts as a solid foundation, providing stability and preventing the pavers from shifting or settling over time. Now that the base is ready, let’s move on to the next step: installing the edging for your bluestone patio.
Before laying bluestone patio, ensure the ground is properly graded for drainage. Use a sturdy base of crushed stone and sand for stability. Compact each layer thoroughly to prevent shifting.
Installing the Edging
Installing edging is an important step in the process of laying your bluestone patio. Edging serves multiple purposes, including defining the boundaries of your patio, providing structural support, and preventing the pavers from shifting. Here’s how you can install the edging for your bluestone patio:
- Select the edging material: There are various options for edging materials, including plastic, metal, and stone. Consider the style and aesthetic of your patio and choose an edging material that complements it.
- Prepare the area: Clean and level the area where the edging will be installed. Remove any debris or obstacles that may hinder the installation process.
- Place the edging: Starting from one corner of the patio, position the edging material along the outer edge. Ensure that it is flush with the ground and aligned with the desired shape of the patio. Use stakes or spikes to secure the edging in place.
- Continue installing: Proceed to install the edging around the entire perimeter of the patio, making sure to connect the pieces securely. Trim or overlap the edging as needed to accommodate corners or curved sections.
- Check for stability: Once the edging is installed, check for stability by applying gentle pressure. Make sure it is securely anchored and will not move or shift when the pavers are installed.
The edging will not only add a polished look to your patio but also provide structural support to keep the bluestone pavers in place. It acts as a boundary, preventing the pavers from spreading or shifting over time. With the edging installed, you’re now ready to move on to the exciting part: laying the bluestone pavers!
Laying the Bluestone Pavers
Now that the base and edging are prepared, it’s time to start laying the bluestone pavers for your patio. This step requires careful attention to detail to ensure proper alignment, spacing, and stability. Here’s a step-by-step guide on how to lay the bluestone pavers:
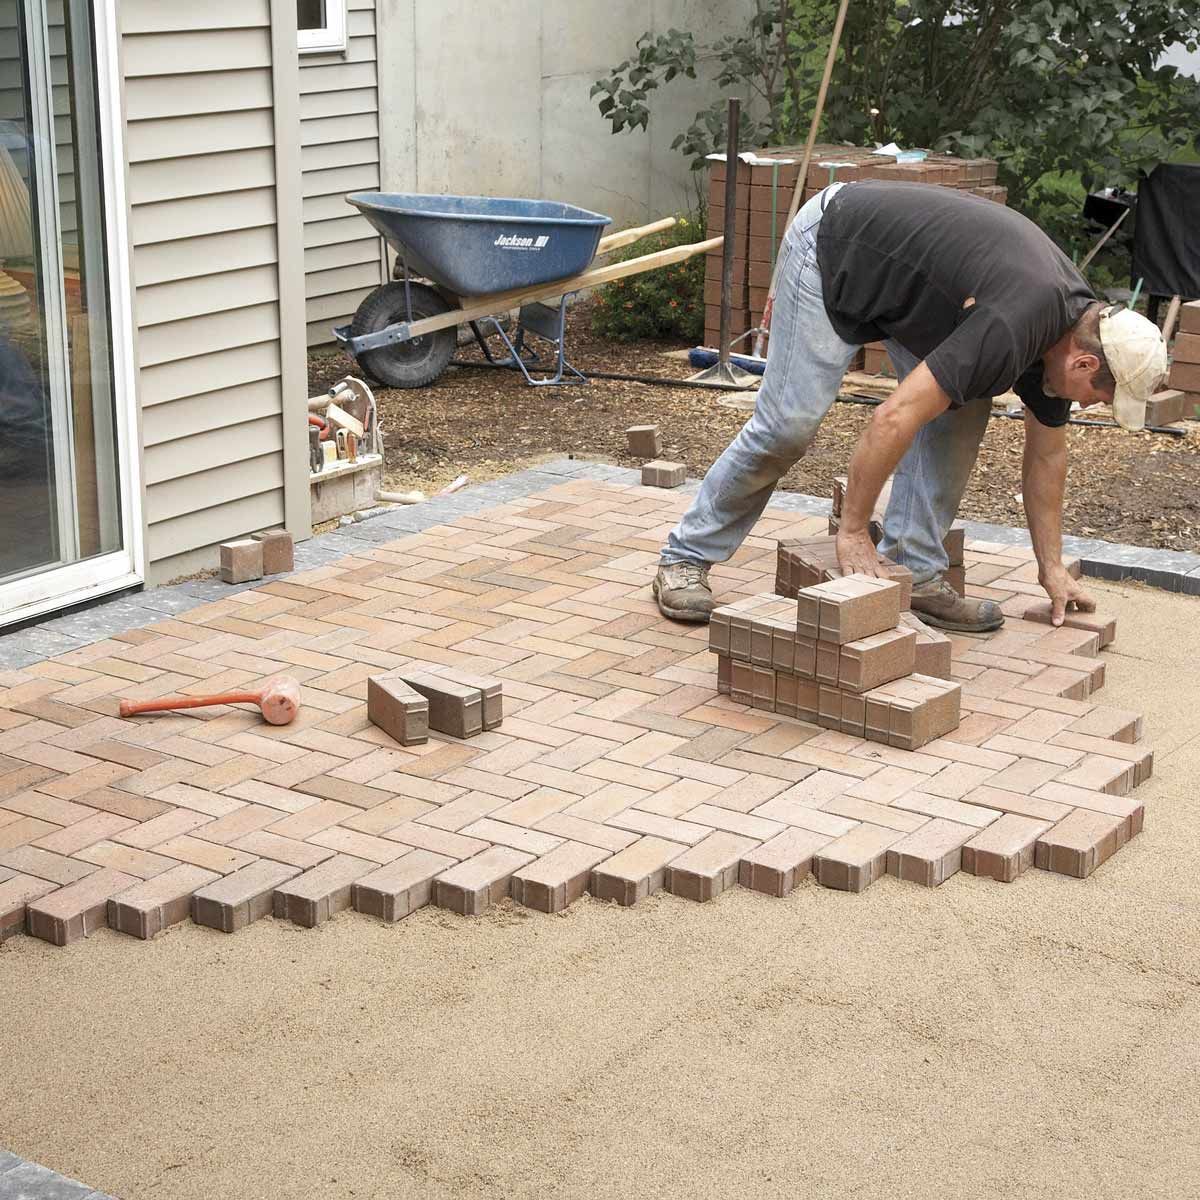
- Start from a corner: Begin laying the pavers from a corner of the patio. This will establish a starting point and provide a reference for the rest of the installation process.
- Place the first paver: Position the first bluestone paver on the sand bed, snugly against the edging. Make sure it is level and aligned with the desired pattern or direction for your patio.
- Continue laying: Proceed to lay the remaining pavers, working your way across and down the patio area. Maintain consistent spacing between the pavers using plastic spacers or your finger. This will allow for proper drainage and prevent the pavers from rubbing against each other.
- Check for levelness: Use a level to ensure that each paver is level and at the same height as the adjacent ones. Adjust the sand bed as necessary to achieve a smooth and even surface.
- Trimming the pavers: In some cases, you may need to trim the bluestone pavers to fit into specific areas or around obstacles. Use a wet saw or a chisel and hammer to carefully cut or shape the pavers accordingly.
As you lay the bluestone pavers, periodically step back to assess the overall pattern and ensure everything is aligning properly. Take your time to ensure accuracy, as any mistakes can be difficult to correct once the patio is complete.
Once all the pavers are laid, gently tap them down with a rubber mallet to ensure they are secure and level. Double-check the spacing and make any final adjustments before moving on to the next step.
Congratulations! You have successfully laid the bluestone pavers for your patio. The transformation is undoubtedly impressive. Now, let’s move on to the next step: filling the joints between the pavers.
Filling the Joints
After laying the bluestone pavers for your patio, the next step is to fill the joints between them. This not only enhances the overall appearance of the patio but also helps stabilize the pavers and prevent weed growth. Here’s how you can fill the joints effectively:
- Select the jointing material: There are several options for filling the joints, including polymeric sand, regular sand, or mortar. Choose a material that suits your preferences and provides the desired level of stability and aesthetic appeal.
- Spread the jointing material: Pour the jointing material onto the surface of the patio and use a broom or a brush to sweep it into the joints. Ensure that the joints are filled completely and evenly, with the material reaching the desired depth.
- Compact the material: Using a plate compactor or by gently tamping, compact the jointing material down into the joints. This will help create a solid and secure joint, minimizing any potential movement or shifting of the pavers.
- Clean the surface: Once the joints are filled and compacted, use a leaf blower or a broom to remove any excess jointing material from the surface of the pavers. This will leave a clean and finished look.
- Moisten and cure the joints: Depending on the type of jointing material used, follow the manufacturer’s instructions for moistening and curing. This may involve lightly misting the patio with water to activate the jointing material and promote proper bonding.
Properly filling the joints between the bluestone pavers is essential for maintaining the structural integrity and aesthetic appeal of your patio. It helps prevent weed growth, minimizes water infiltration, and ensures a long-lasting surface. With the joints filled, your bluestone patio is almost complete!
However, there is one more important step to consider before you can fully enjoy your newly laid patio: sealing. Let’s explore the benefits of sealing and how to properly seal your bluestone patio in the next section.
Read more: How Much Does A Bluestone Patio Cost
Sealing the Patio
Sealing your bluestone patio is the final step in the installation process, and it offers several benefits. Sealing helps protect the surface of the bluestone from stains, UV damage, and the effects of weathering. It also enhances the natural color and beauty of the stone. Here’s how you can seal your bluestone patio:
- Clean the patio: Before applying the sealer, ensure that the patio is clean and free of any dirt, debris, or stains. Use a mild cleaner or pressure washer to remove any surface contaminants.
- Select the right sealer: There are different types of sealers available, including water-based and solvent-based options. Choose a sealer that is specifically designed for bluestone and compatible with the type of finish on your pavers.
- Apply the sealer: Follow the manufacturer’s instructions for applying the sealer to the bluestone patio. Use either a brush, roller, or sprayer to evenly coat the surface, ensuring complete coverage.
- Allow for drying and curing time: Depending on the type of sealer used, the drying and curing time may vary. Allow the sealer to dry completely before exposing the patio to foot traffic or other elements.
- Maintain the sealed patio: Regularly clean and maintain your sealed bluestone patio to prolong the life of the sealer and keep the surface looking its best. Use mild cleansers and avoid harsh chemicals or abrasive cleaning tools that could damage the sealer and the bluestone.
Sealing your bluestone patio not only protects it but also adds a beautiful sheen and enhances its natural colors. It provides an extra layer of defense against stains and weathering, ensuring that your patio remains in excellent condition for years to come. Once the sealer has dried and cured, your bluestone patio is ready to be enjoyed!
Proper maintenance is key to preserving the beauty and longevity of your patio. Let’s explore some essential maintenance tips to keep your bluestone patio in pristine condition.
Proper Maintenance Tips
Maintaining your bluestone patio is crucial to keep it looking beautiful and ensure its longevity. By following these proper maintenance tips, you can preserve the natural beauty and functionality of your patio for years to come:
- Sweep regularly: Regularly sweep your bluestone patio to remove dirt, leaves, and debris. This prevents them from accumulating and potentially causing stains or discoloration.
- Remove stains promptly: If you notice any stains on your patio, address them promptly. Blot spills or stains with a clean cloth and use a mild cleanser specifically formulated for bluestone. Avoid using harsh chemicals or abrasive scrub brushes that can damage the surface.
- Prevent weed growth: Keep an eye out for any weeds that may grow between the joints of the pavers. Pull them out by hand or use a weed killer specifically designed for use on bluestone patios. Regularly sweeping and maintaining the joints will also help prevent weed growth.
- Monitor for damage: Regularly inspect your patio for any signs of damage, such as chipped or cracked pavers. Address any issues immediately to prevent further damage and ensure the safety of your patio.
- Reapply sealer: Over time, the protective sealant on your bluestone patio may wear off. Check the manufacturer’s recommendations for the lifespan of the sealer and reapply it as needed to maintain its protective qualities.
- Protect from heavy furniture: When arranging furniture on your bluestone patio, use furniture pads to prevent scratching or scraping the surface. Avoid dragging heavy furniture across the patio, as this can cause damage. Consider using rugs or mats under furniture to provide additional protection.
- Keep the patio dry: Excess moisture can promote the growth of mold or mildew on your patio. Wipe up any spills or standing water promptly and ensure that the area is well-drained to prevent water accumulation.
By following these maintenance tips, you can keep your bluestone patio looking vibrant and ensure its longevity. Regular care and attention will help preserve its natural beauty and make it a welcoming space for outdoor living and entertainment.
Congratulations on creating a stunning bluestone patio! With proper maintenance, it will become a cherished feature of your outdoor space for years to come.
Conclusion
Congratulations on completing the installation of your bluestone patio! You’ve transformed your outdoor space into a stunning retreat that combines elegance and functionality. By following the steps outlined in this guide, you have laid a solid foundation, meticulously placed the bluestone pavers, filled the joints, sealed the patio, and learned how to properly maintain it. Your efforts have paid off, and now it’s time to enjoy the fruits of your labor.
A bluestone patio offers numerous benefits. Its natural beauty, durability, and versatility make it an excellent choice for any outdoor setting. Whether you’re hosting gatherings, lounging with a book, or simply enjoying a morning cup of coffee, your bluestone patio provides the perfect space to reconnect with nature and create lasting memories.
Remember, regular maintenance is essential to preserve the beauty and longevity of your patio. Stay vigilant in keeping it clean, taking prompt action against stains or damage, and reapplying the sealer as needed. By doing so, you’ll ensure that your bluestone patio remains vibrant and inviting for years to come.
Now it’s time to sit back, relax, and enjoy the outdoor living space you’ve created. Whether you’re basking in the sun, hosting a barbecue, or simply taking in the beauty of your surroundings, your bluestone patio reflects your personal style and enhances your outdoor lifestyle.
Thank you for choosing bluestone and taking the time to learn how to lay and care for your bluestone patio. We hope this guide has been helpful and that you have gained the knowledge and confidence to successfully create and maintain your own outdoor oasis. Cheers to many happy memories on your beautiful bluestone patio!
Frequently Asked Questions about How To Lay Bluestone Patio
Was this page helpful?
At Storables.com, we guarantee accurate and reliable information. Our content, validated by Expert Board Contributors, is crafted following stringent Editorial Policies. We're committed to providing you with well-researched, expert-backed insights for all your informational needs.


0 thoughts on “How To Lay Bluestone Patio”