Home>Furniture>Outdoor Furniture>How To Lay A Stepping Stone Patio

Outdoor Furniture
How To Lay A Stepping Stone Patio
Modified: October 18, 2024
Learn how to create a beautiful and functional outdoor space with our step-by-step guide on laying a stepping stone patio. Enhance your patio with durable and stylish outdoor furniture.
(Many of the links in this article redirect to a specific reviewed product. Your purchase of these products through affiliate links helps to generate commission for Storables.com, at no extra cost. Learn more)
Introduction
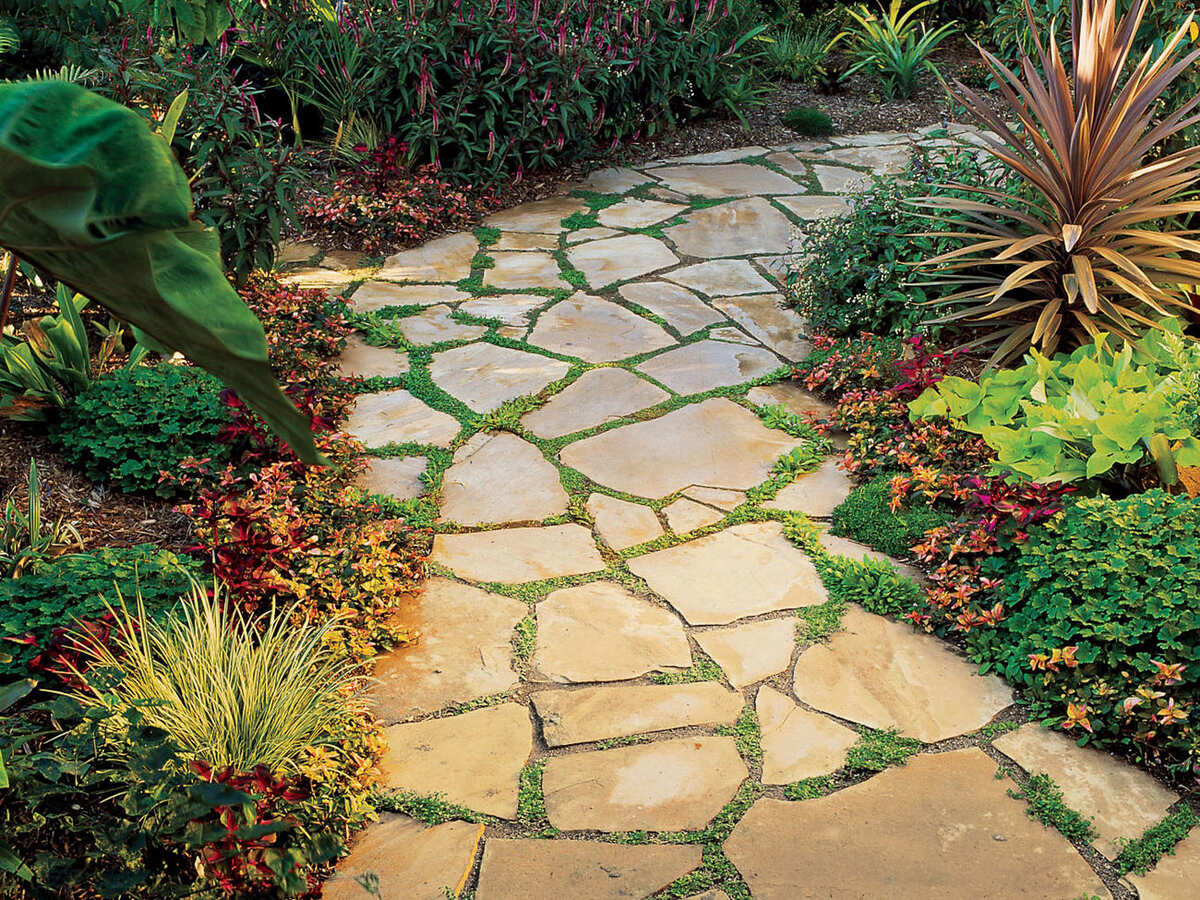
Creating a beautiful outdoor space is not only a great way to enhance the look and feel of your home, but it also provides a peaceful retreat to relax and entertain. One popular addition to outdoor areas is a stepping stone patio. Stepping stone patios not only add a touch of elegance to your outdoor space, but they also provide a practical and functional pathway to navigate through your garden or backyard.
Whether you want to create a cozy seating area, a charming garden pathway, or a unique focal point, laying a stepping stone patio is a relatively straightforward DIY project that can be accomplished with a few essential tools and some careful planning.
In this article, we will walk you through the step-by-step process of laying a stepping stone patio, from planning and preparation to the finishing touches. So, let’s get started and transform your outdoor space into a stunning oasis.
Key Takeaways:
- Planning and preparation are crucial for laying a stepping stone patio. Consider the location, type of stones, and necessary tools. Careful planning ensures a visually stunning and functional addition to your outdoor space.
- Setting the stepping stones and filling the gaps are creative and rewarding steps. Take your time to create a visually appealing layout and choose the right fill material for a polished and finished look. Regular maintenance will keep your patio beautiful and functional.
Read more: How To Lay Patio Stones On Grass
Step 1: Planning and Preparation
Before you start laying your stepping stone patio, it’s important to plan and prepare the area properly. This will ensure that your patio is not only visually appealing but also durable and long-lasting.
The first step is to determine the location and size of your patio. Consider factors such as the available space, the purpose of the patio, and how it will fit into the overall design of your outdoor area. Take measurements and mark out the area using stakes and string.
Next, consider the type of stepping stones you want to use. There are various materials to choose from, such as natural stone, concrete, or pavers. Each material has its own aesthetic appeal and maintenance requirements, so choose one that suits your style and budget.
Once you have chosen the type of stepping stones, calculate the quantity needed based on the dimensions of your patio. Keep in mind that you may need extra stones for replacement or future repairs.
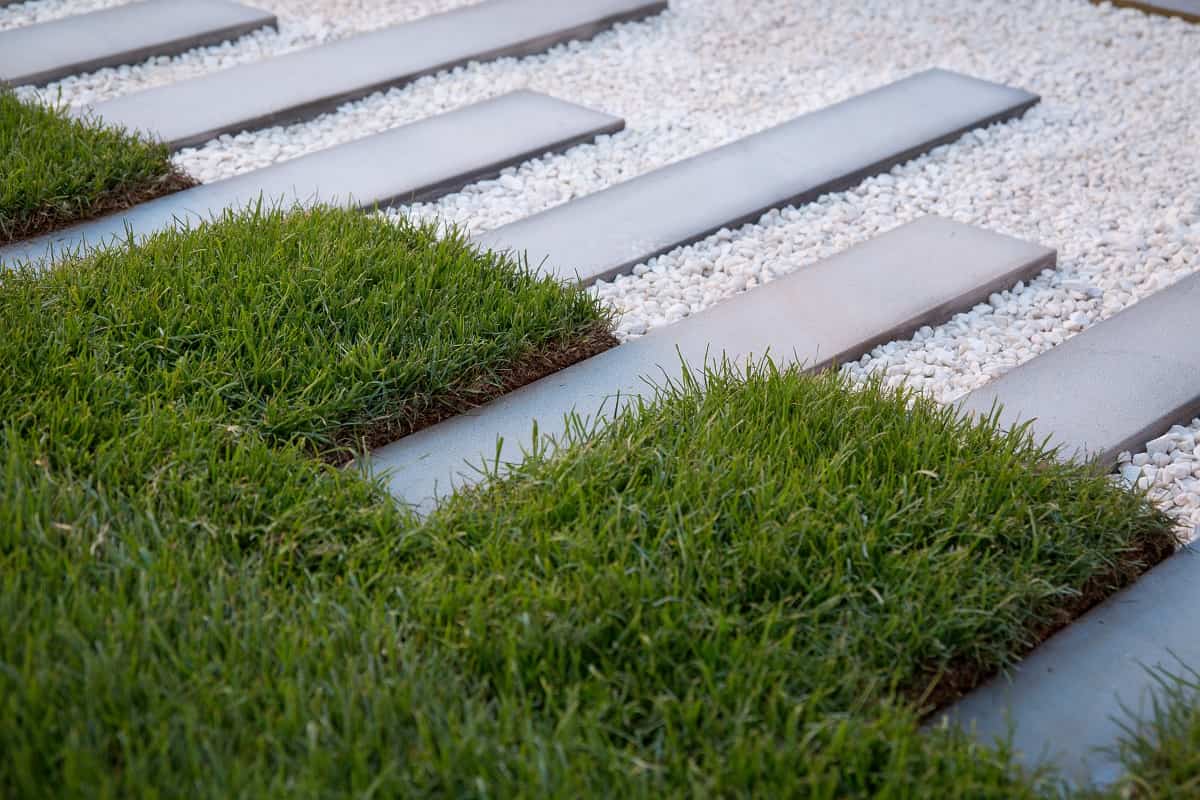
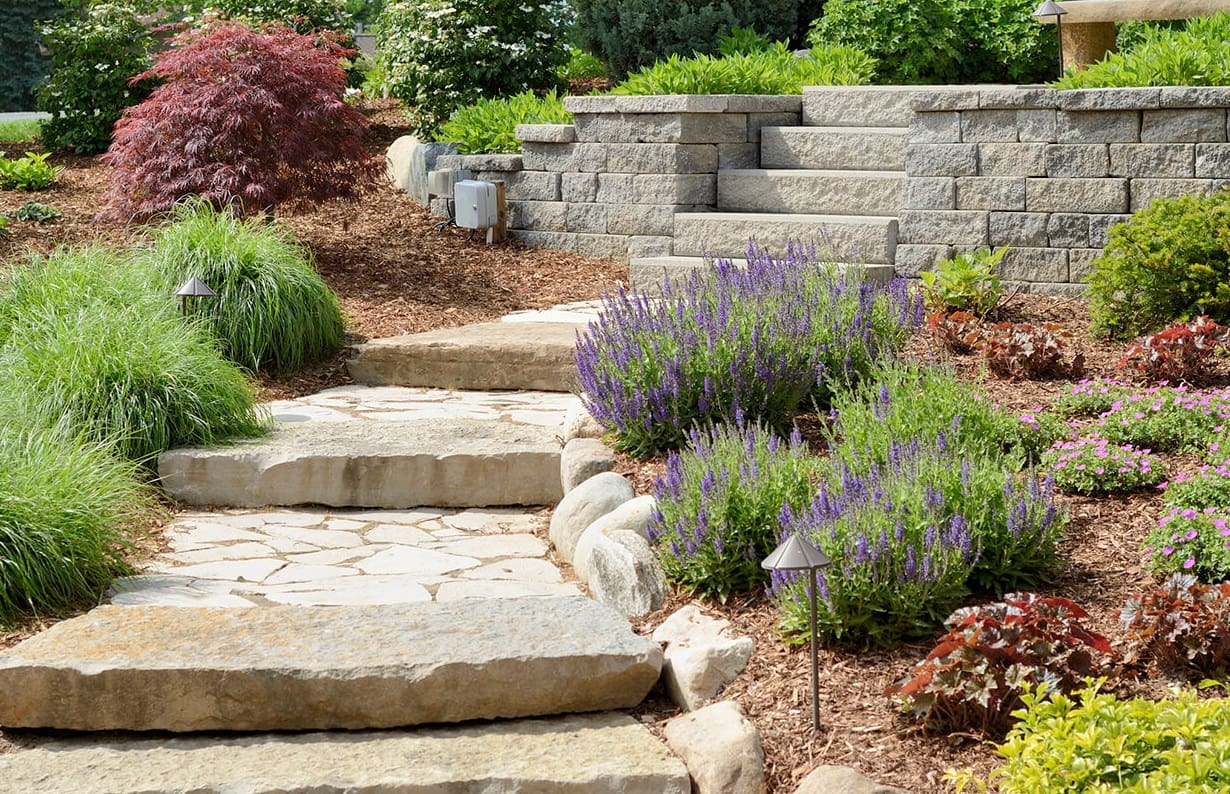
It’s also important to consider the layout and pattern of your stepping stones. You can opt for a uniform pattern with equally spaced stones or create a more organic look by placing them irregularly. Play around with different arrangements to find the one that appeals to you.
In addition to the stepping stones, you will need to gather the necessary tools and materials for the project. This may include a shovel, wheelbarrow, level, tape measure, landscape fabric, gravel or sand, and a rubber mallet. Having everything ready before you start will make the process smoother and more efficient.
Lastly, check for any underground utilities or obstacles in the area where you plan to lay the stepping stone patio. Contact your local utilities company to mark any utility lines to avoid causing any damages during the excavation process.
By carefully planning and preparing the area, you can ensure that your stepping stone patio will be a visually stunning and functional addition to your outdoor space.
Step 2: Clearing and Leveling the Area
Once you have completed the planning and preparation phase, it’s time to clear and level the area where you will be laying your stepping stone patio. This step is crucial as it provides a solid and even base for your patio.
Start by removing any vegetation, rocks, or debris from the area. Use a shovel or a rake to clear the surface and ensure that there are no obstructions that could interfere with the installation process.
Next, assess the slope of the area. It’s important to have a level surface for your stepping stone patio to prevent water pooling or uneven stones. If the area has a significant slope, you may need to consider adding or removing soil to create a more even surface. Use a level tool to check the slope and make adjustments as necessary.
It’s also a good idea to mark the perimeter of your patio using stakes and string. This will help you visualize the boundaries and ensure that you stay within the designated area as you clear and level the ground.
Once the area is cleared and the slope is adjusted, you can proceed to compact the soil. This can be done by using a tamper or by walking over the area repeatedly. Compact the soil evenly to create a stable and solid base for your stepping stone patio.
In cases where the soil is loose or prone to drainage issues, it’s recommended to lay down a layer of landscape fabric. This will help prevent weed growth and ensure better stability for your patio.
After the soil is compacted, use a level tool to check the evenness of the ground. Make any necessary adjustments by removing or adding soil until you achieve a level surface.
Clearing and leveling the area is a crucial step in the process of laying a stepping stone patio. By taking the time to properly prepare the ground, you will ensure a stable base that will support your patio for years to come.
Step 3: Marking the Layout of the Patio
Once you have cleared and leveled the area, the next step in laying a stepping stone patio is to mark the layout. This will help you visualize the placement of the stepping stones and ensure a symmetrical and aesthetically pleasing design.
Start by measuring and marking the dimensions of your patio using stakes and string. This will serve as a guide for laying out the stepping stones and give you a clear idea of the final shape and size of your patio.
Consider the overall layout of your outdoor space and how the stepping stone patio will fit into it. You may want to align the patio with existing features, such as a garden bed or a seating area, to create a cohesive design.
Once you have marked the outer perimeter of the patio, it’s time to plan the placement of the stepping stones. Consider the size and shape of the stones and how they will fit together to form a cohesive pattern. You can opt for a simple grid pattern with equally spaced stones, or create a more random or winding layout for a more natural look.
Use stakes and string to mark the individual locations where the stepping stones will be placed. This will help you visualize the design and make adjustments if needed.
Take your time to experiment with different layouts and patterns before finalizing the placement of the stepping stones. You can even temporarily place the stones on the ground to get a better idea of how they will look in the actual patio.
Remember to leave adequate spacing between the stones to allow for comfortable stepping. A spacing of about 2-3 inches is usually recommended, but you can adjust it to your preference.
Once you are satisfied with the layout and marking, take a step back and evaluate the overall design. Make any necessary adjustments to ensure a balanced and visually pleasing arrangement of the stepping stones.
By carefully marking the layout of your stepping stone patio, you will have a clear plan to follow during the installation process. This will result in a beautifully designed patio that seamlessly integrates with your outdoor space.
Step 4: Excavating the Area
Now that you have marked the layout of your stepping stone patio, it’s time to excavate the area. Excavation involves removing the top layer of soil and creating a space for the base layer materials that will support the stepping stones.
Start by digging out the marked area using a shovel or a garden spade. The depth of the excavation will depend on the thickness of the stepping stones and the base materials you plan to use. Typically, a depth of 4-6 inches is recommended.
As you excavate, pay attention to the edges and corners of the patio area. Ensure that they are straight and square to create a clean and professional finish. A string line or a level tool can help you maintain straight lines and right angles.
Remove any roots, rocks, or debris that may be present in the excavated area. This will ensure a smooth and level base for your patio. Take your time and be thorough in this step to ensure the longevity and stability of your stepping stone patio.
After the area is excavated, it’s a good idea to compact the soil to provide a stable foundation. You can use a hand tamper or a plate compactor to achieve this. Compact the soil evenly throughout the excavated area to create a firm base for the subsequent layers.
Excavating the area is a crucial step in the process of laying a stepping stone patio. It provides the space and stability needed for the base layer materials that will support the weight of the stepping stones. Take your time to ensure that the excavation is done accurately and meticulously.
Once the excavation is complete, you can move on to the next step, which involves creating a base layer for your stepping stone patio.
Before laying a stepping stone patio, make sure to properly prepare the area by leveling the ground, adding a base of sand or gravel, and laying the stones in a pattern that allows for easy walking.
Read more: How To Lay Stone Walkway
Step 5: Creating a Base Layer
With the area excavated, it’s time to create a solid base layer for your stepping stone patio. The base layer is essential as it provides stability, proper drainage, and prevents the shifting and settling of the stones over time.
Start by laying down a landscape fabric over the excavated area. This will prevent weed growth and help maintain the integrity of your patio. Trim the fabric to fit within the boundaries of your patio layout.
Next, add a layer of crushed gravel or sand on top of the landscape fabric. The gravel or sand should be compacted to create a stable and even base. Use a rake and a tamper to ensure the layer is evenly distributed and compacted.
The thickness of the base layer will depend on the size and type of the stepping stones. As a general guideline, aim for a base layer that is about 2-3 inches thick. Adjust the thickness as needed to achieve the desired height for your patio.
After compacting the base layer, use a level tool to ensure that it is even and sloped slightly away from structures or the foundation of your home. This will facilitate proper drainage and prevent water pooling on the patio surface.
As you create the base layer, periodically step on it to test for any areas that feel unstable or shift under your weight. If you notice any unevenness or movement, add more gravel or sand and recompact the area.
Creating a solid and well-compacted base layer is crucial for the longevity and stability of your stepping stone patio. Take your time to ensure that the base layer is firm, level, and properly drained before proceeding to the next step.
Once you’re satisfied with the base layer, you’re ready to move on to the exciting part of the process—setting the stepping stones in place.
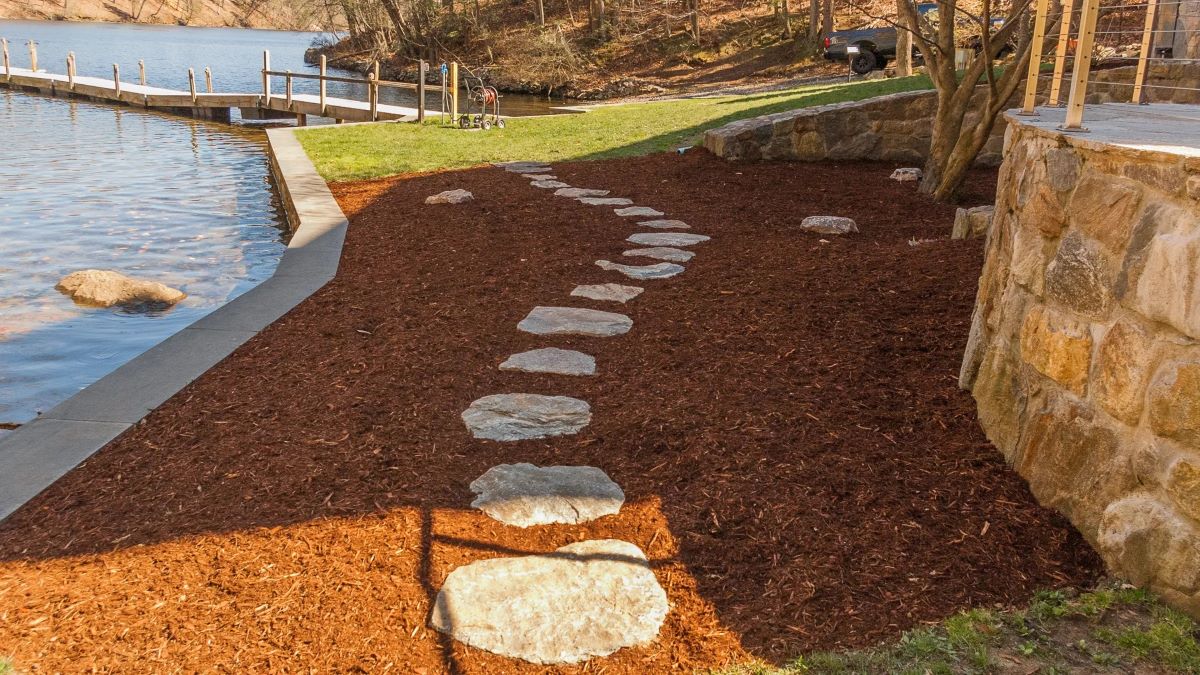
Step 6: Setting the Stepping Stones
Setting the stepping stones is where the visual appeal of your patio starts to take shape. This step involves carefully placing the stones in the designated locations and ensuring that they are level and stable.
Begin by placing the first stepping stone in the desired location. Gently wiggle and press down on the stone to embed it into the base layer. Use a level tool to check for any unevenness and adjust as necessary by adding or removing base material underneath the stone.
Continue placing the remaining stepping stones, following the layout and pattern you had previously marked. Leave a consistent spacing between the stones to allow for comfortable stepping. Adjust the position of the stones as needed to create a visually pleasing arrangement.
When setting the stones, ensure that they are installed at the same level or slightly below the surface of the surrounding ground. This will prevent tripping hazards and create a smooth and seamless pathway.
Avoid using excessive force when setting the stones as it may cause them to crack or break. Use a rubber mallet to gently tap the stones into place and make minor adjustments. Take your time and be careful during this step to maintain the integrity of the stones.
Periodically step on each stone to test its stability. If you notice any rocking or shifting, remove the stone and add or remove base material as necessary. It’s important to ensure that all the stones are firmly and securely set into place.
As you set the stepping stones, step back and evaluate the overall look of your patio. Make any final adjustments to the position of the stones, ensuring a visually appealing and symmetrical arrangement.
Once all the stepping stones are in place and you’re satisfied with their positioning, you can move on to the next step of filling the gaps between the stones.
Setting the stepping stones is a creative and rewarding step in the process of laying a stepping stone patio. Take your time and enjoy designing a pathway that will enhance the beauty of your outdoor space.
Step 7: Filling the Gaps
After setting the stepping stones in place, the next step is to fill the gaps between them. This not only adds stability to the patio but also provides a finished and polished look.
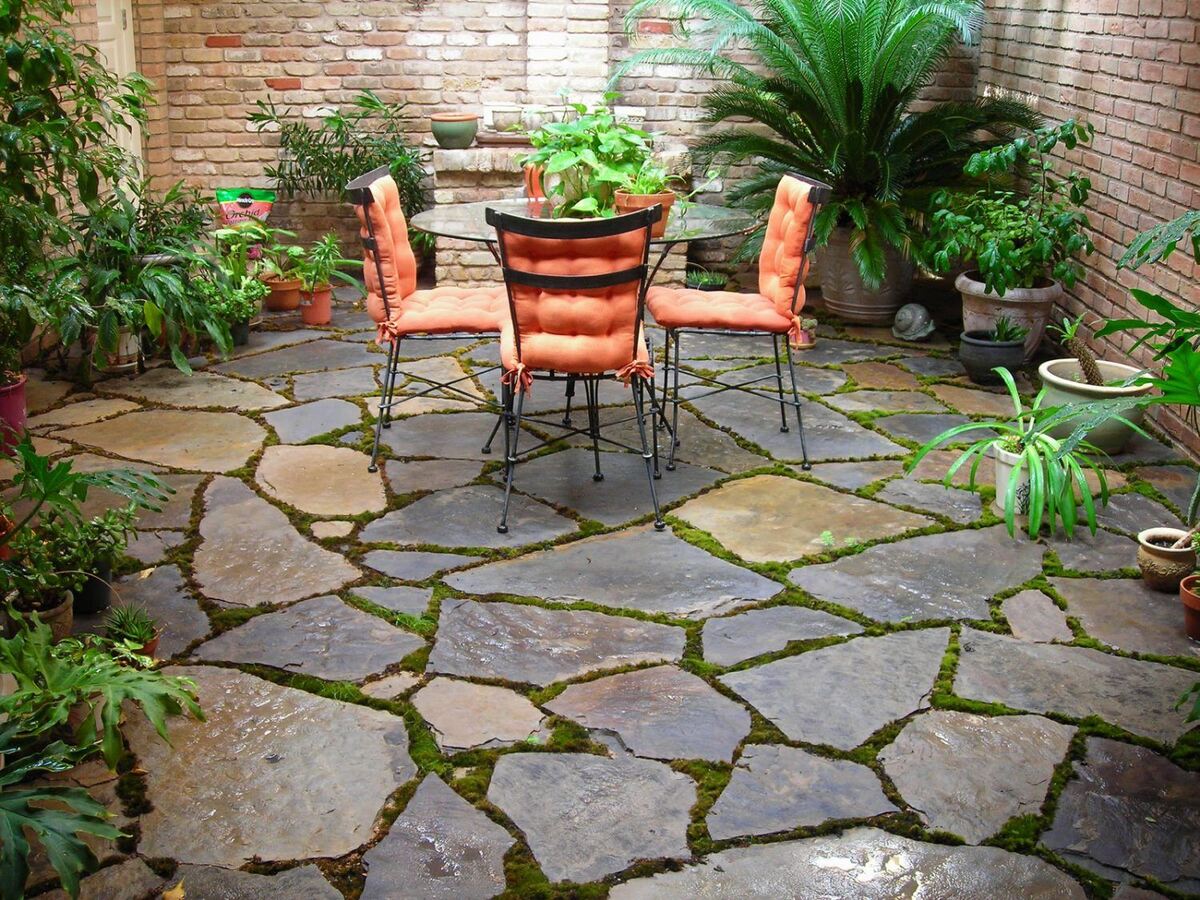
Start by choosing the appropriate material to fill the gaps. Common options include decorative gravel, pebbles, or fine sand. Consider the overall design and style of your patio to select a fill material that complements the stepping stones and enhances the aesthetic appeal.
If using gravel or pebbles, pour them into the gaps between the stepping stones. Use a broom or a brush to sweep the material into the gaps, ensuring they are fully filled. Gently tap on the stones with a rubber mallet to settle the material and create a firm and stable surface.
If using sand, sprinkle it over the stepping stones and into the gaps. Use a push broom to sweep the sand into the gaps, making sure they are fully filled. Lightly mist the sand with water to help settle it into place.
Continue filling the gaps and adjusting the fill material until all the spaces between the stepping stones are completely filled. Take your time and be meticulous in this step to achieve a professional and finished look.
Once the gaps are filled, use a broom or a brush to remove any excess material from the surface of the stones. This will create a clean and tidy appearance.
It’s important to note that over time, the fill material may settle or wash away due to weather conditions or foot traffic. Regularly inspect the patio and top up the gaps with additional material as needed to maintain the desired look and level of stability.
Filling the gaps is the final step in completing your stepping stone patio. It adds the finishing touch and enhances the overall aesthetic of the patio, turning it into a stunning and functional outdoor feature.
Once you’ve completed this step, your stepping stone patio is ready to be enjoyed. However, don’t forget to add some finishing touches and carry out regular maintenance to ensure its longevity and beauty.
Step 8: Finishing Touches and Maintenance Tips
Now that your stepping stone patio is complete, it’s time to add some finishing touches and learn how to maintain its beauty and functionality over time.
To enhance the overall appeal of your patio, consider adding some decorative elements. You can incorporate plants, such as potted flowers or small shrubs, around the edges of the patio to create a natural and inviting atmosphere. Additionally, adding outdoor lighting fixtures can illuminate the stepping stones at night, making your patio a charming and safe space to walk on after dark.
Regular maintenance is essential to keep your stepping stone patio looking its best. Here are some maintenance tips to follow:
– Sweep the patio regularly to remove leaves, debris, and dirt that can accumulate on the surface. This will help maintain its cleanliness and prevent stains.
– Trim any overhanging branches or plants to prevent them from encroaching on the patio and causing damage over time.
– Check the fill material in the gaps between the stepping stones periodically and top it up if needed. This will ensure that the stones remain stable and prevent weed growth.
– If the stones become dirty or stained, you can clean them with a mixture of mild soap and water and gently scrub with a soft brush. Avoid using harsh chemicals or abrasive cleaners that can damage the stones.
– Inspect the patio for any signs of shifting or unevenness. If you notice any stones that have become loose or shifted, carefully lift them, add or remove base material as necessary, and reposition them.
– Consider applying a sealant to the stepping stones to enhance their durability and protect them from stains or fading. Follow the manufacturer’s instructions for application and reapplication as needed.
By following these maintenance tips, your stepping stone patio will remain a beautiful and functional addition to your outdoor space for years to come.
Congratulations! You have successfully completed all the steps to lay a stunning stepping stone patio. Now, sit back, relax, and enjoy the beauty and tranquility of your outdoor oasis.
Remember, don’t be afraid to get creative and make the patio your own. Experiment with different layouts, materials, and design elements to create a unique and personalized space that reflects your style and brings joy to your outdoor living area.
Read more: How To Lay Paving Stones On Grass
Conclusion
Creating a stepping stone patio is a fantastic way to enhance your outdoor space and add a touch of elegance and functionality. By following the step-by-step process outlined in this article, you can transform your backyard or garden into a beautiful oasis.
From the initial planning and preparation to the final finishing touches, each step plays a crucial role in ensuring the success and longevity of your patio. Clearing and leveling the area provides a solid foundation, while marking the layout helps you visualize the design. Excavating and creating a base layer ensures stability, and setting the stepping stones brings the patio to life.
Don’t forget the importance of filling the gaps between the stones and adding those extra finishing touches that truly make your patio shine. Regular maintenance and care will help preserve its beauty and functionality for years to come.
Remember, don’t be afraid to infuse your personal style and creativity into the process. Whether you want a more formal arrangement or a whimsical and organic pattern, the choice is yours. Allow your patio to reflect your personality and become a space that brings you joy.
So, grab your tools, gather your materials, and embark on the journey of creating your own stunning stepping stone patio. The end result will be a beautiful outdoor space where you can relax, entertain, and enjoy the beauty of nature.
Frequently Asked Questions about How To Lay A Stepping Stone Patio
Was this page helpful?
At Storables.com, we guarantee accurate and reliable information. Our content, validated by Expert Board Contributors, is crafted following stringent Editorial Policies. We're committed to providing you with well-researched, expert-backed insights for all your informational needs.


0 thoughts on “How To Lay A Stepping Stone Patio”