Home>Garden Essentials>How To Install Turf Putting Green In Backyard
Garden Essentials
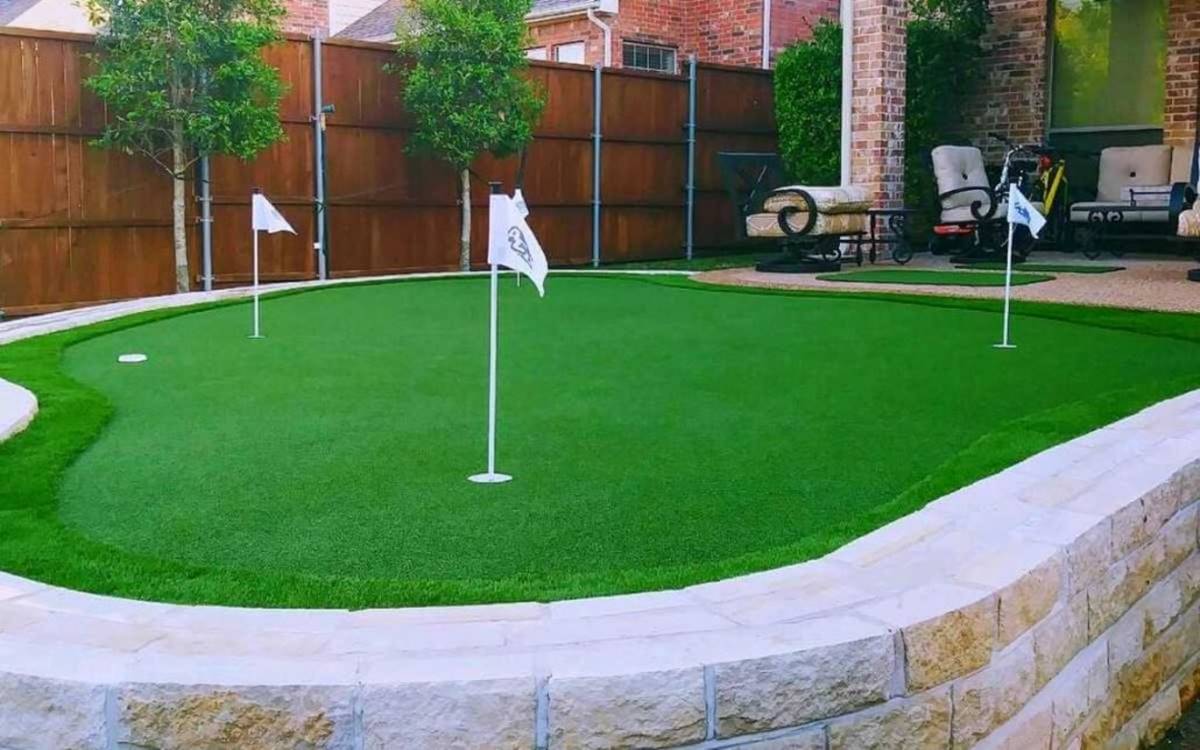
How To Install Turf Putting Green In Backyard
Modified: May 6, 2024
Learn how to transform your backyard into a golf-lover's paradise with our step-by-step guide on installing a turf putting green in your garden.
(Many of the links in this article redirect to a specific reviewed product. Your purchase of these products through affiliate links helps to generate commission for Storables.com, at no extra cost. Learn more)
Introduction
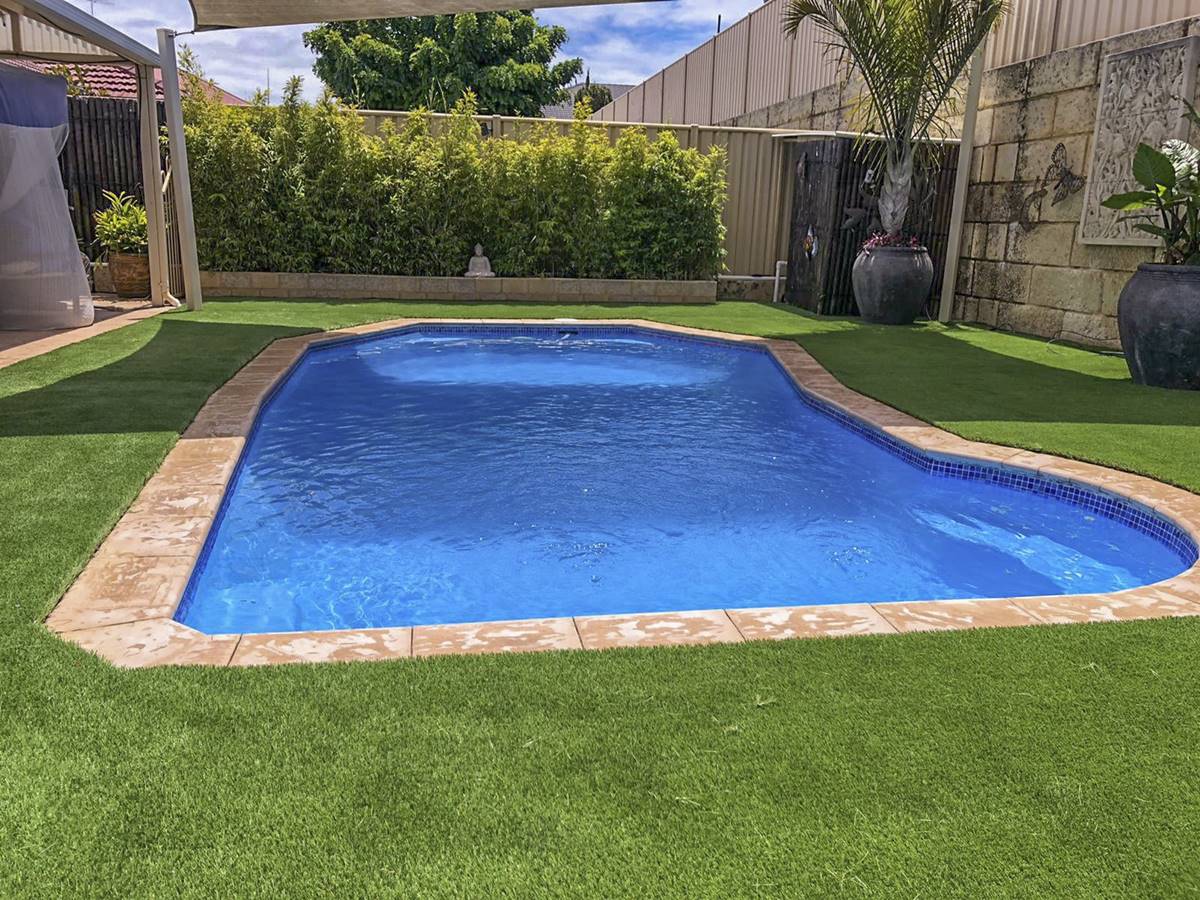
Welcome to the wonderful world of backyard putting greens! If you enjoy golf and want to improve your game without leaving the comfort of your home, installing a turf putting green in your backyard is a fantastic option. Not only can it provide hours of entertainment and practice, but it also adds a unique and attractive feature to your outdoor space.
Creating a putting green in your backyard may seem like a daunting task, but with the right knowledge and guidance, it can be a fun and rewarding project. This comprehensive guide will take you through each step of the installation process, from measuring and preparing the area to the proper maintenance and care required to keep your putting green in pristine condition.
Before we dive into the details, it’s important to note that there are different types of artificial turf available for putting greens, designed specifically to mimic the look and feel of real grass. These turfs are highly durable, low-maintenance, and provide a consistent playing surface. By using artificial turf, you can enjoy a lush green lawn that is perfect for practicing your putting skills without the need for extensive watering, mowing, or chemical treatments.
So, if you’re ready to transform your backyard into a golfer’s paradise, let’s get started on installing your very own turf putting green!
Key Takeaways:
- Transform your backyard into a golfer’s paradise with a turf putting green. Enjoy low-maintenance, realistic playability, and endless entertainment right at home.
- Follow step-by-step instructions to install and maintain your turf putting green. From measuring and preparing the area to securing the edges, create a beautiful and functional backyard oasis.
Step 1: Measure and Prepare the Area
The first step in installing a turf putting green is to measure and prepare the designated area in your backyard. This is a crucial step as it ensures that you have the right dimensions and sufficient space for your putting green.
Here’s how you can get started:
- Choose the Location: Select a flat and open area in your backyard where you want to install the putting green. Make sure there are no obstacles such as trees, rocks, or utility lines that could interfere with the installation process.
- Measure the Area: Use a measuring tape or a laser measurer to determine the length and width of the desired putting green. Take accurate measurements and make note of them.
- Mark the Boundaries: Use stakes or spray paint to mark the boundaries of the putting green. This will help you visualize the area and plan accordingly.
- Consider the Design: Think about the shape and layout you want for your putting green. It can be a traditional rectangular shape or a more unique design that fits your backyard aesthetics.
By taking the time to measure and prepare the area properly, you can ensure that the putting green installation process goes smoothly and that you have a well-defined space to work with. It’s important to note that the size of your putting green will depend on the available space in your backyard and your personal preferences.
Once you have measured and marked the boundaries of the area, you’re ready to move on to the next step: clearing the area and removing any obstacles.
Step 2: Clear the Area and Remove Any Obstacles
Now that you have measured and marked the boundaries of your putting green, it’s time to clear the area and remove any obstacles that may hinder the installation process.
Here’s what you need to do:
- Remove Vegetation: Clear away any grass, weeds, or plants within the marked boundaries of the putting green. Use a shovel, rake, or a turf cutter to strip away the existing vegetation. Make sure to remove the roots as well to prevent any regrowth.
- Inspect for Obstacles: Walk around the area and carefully examine for any rocks, tree roots, or other debris that could cause unevenness or damage to the putting green. Use a rake or a shovel to remove any visible obstacles.
- Address Drainage Issues: Check if there are any drainage issues in the area. Poor drainage can lead to water accumulation and affect the stability of the putting green. If needed, you may have to install a drainage system or improve the existing one.
Clearing the area and removing obstacles is essential to create a smooth and even surface for the installation of the putting green. It ensures that you have a solid foundation to work with and minimizes the risk of unevenness or damage to the turf in the long run.
Once the area is clear and obstacles have been removed, you’re ready to move on to the next step: leveling the ground.
Step 3: Level the Ground
After clearing the area and removing any obstacles, the next step in installing a turf putting green is to level the ground. This is an important step as it ensures a smooth and even surface for the turf to be installed on.
Here’s what you need to do:
- Use a Leveling Tool: Begin by using a leveling tool, such as a rake or a shovel, to distribute any excess soil or fill in low spots. You want to create an even surface without any large bumps or depressions.
- Check the Levelness: Take a long, straight board or a level and place it across the surface of the area to check for any slopes or unevenness. Adjust the soil accordingly to ensure that the ground is level in all directions.
- Compact the Soil: Once the ground is leveled, use a compactor or a tamper to firmly compact the soil. This will help to stabilize the ground and prevent future settling or shifting of the turf.
Leveling the ground is crucial to ensure a smooth and even playing surface for your putting green. It allows the turf to be installed properly, minimizing the risk of any lumps, bumps, or uneven areas that could impact the ball’s roll or your putting technique.
It’s important to note that the levelness of the ground is essential for the overall performance and aesthetics of your putting green. Take your time during this step to ensure that the ground is properly leveled before proceeding to the next step: installing a weed barrier.
Step 4: Install a Weed Barrier
Installing a weed barrier is an important step in the process of installing a turf putting green. A weed barrier helps prevent unwanted weeds and vegetation from growing through the turf, keeping your putting green looking neat and well-maintained.
Here’s how you can install a weed barrier:
- Clean the Area: Ensure that the ground is clear of any debris, rocks, or vegetation before installing the weed barrier. Use a rake or a broom to sweep away any loose particles.
- Measure and Cut: Measure the dimensions of the putting green and cut the weed barrier fabric accordingly, leaving a few extra inches on all sides for overlapping.
- Lay the Weed Barrier: Unroll the weed barrier fabric over the area of the putting green. Make sure it covers the entire surface, extending beyond the boundaries.
- Secure the Edges: Use landscape fabric pins or staples to secure the edges of the weed barrier. Space the pins or staples every few feet to ensure a secure and tight fit.
- Overlap the Seams: If necessary, overlap the seams of the weed barrier fabric to create a continuous barrier. Use landscape fabric adhesive or double-sided tape to secure the overlapping edges.
The weed barrier acts as a protective layer between the soil and the turf, preventing weed seeds from germinating and penetrating through the surface. This helps maintain the appearance and performance of your turf putting green by minimizing the need for weed control and maintenance.
Once the weed barrier is installed, you’re ready to move on to the next step: adding a base layer for the turf.
Read more: How To Clean Fake Turf In The Backyard
Step 5: Add a Base Layer
Adding a base layer is a crucial step in the installation process of a turf putting green. The base layer provides stability, drainage, and a solid foundation for the turf to be placed on.
Here’s how you can add a base layer:
- Select the Right Material: Choose a suitable material for the base layer, such as decomposed granite, crushed rock, or gravel. This material should be compactable, drain well, and provide a sturdy base for the turf.
- Distribute the Material: Spread the chosen material evenly over the entire area of the putting green. Use a rake or a shovel to distribute it and ensure a consistent thickness of the base layer.
- Compact the Base Layer: Use a compactor or a mechanical plate compactor to compress and compact the base layer. This will help create a stable and solid surface for the turf to be installed on.
- Check for Levelness: Use a level or a straight board to check if the base layer is level and even. Make any necessary adjustments by adding or removing the material as needed.
The base layer plays a crucial role in supporting the turf and maintaining its shape and structure. It helps ensure proper drainage, stability, and longevity of the putting green, allowing for consistent ball roll and optimal performance.
It’s important to note that the thickness of the base layer may vary depending on the specific requirements of your putting green and the type of material used. Follow the manufacturer’s instructions or consult with a professional to determine the appropriate thickness for your base layer.
With the base layer in place, you’re now ready to move on to the next step: compacting the base layer to create a solid foundation for the turf installation.
Step 6: Compact the Base Layer
Compacting the base layer is a crucial step in the installation process of a turf putting green. This step ensures that the base layer is firmly packed and provides a solid foundation for the turf to be installed on.
Here’s how you can compact the base layer:
- Choose the Right Compactor: Select a compactor suitable for the size of your putting green and the type of base material used. A plate compactor or a mechanical compactor is often recommended for this job.
- Begin Compacting: Start compacting the base layer by moving the compactor in straight lines across the entire area. Overlap each pass slightly to ensure even compaction.
- Repeat the Compaction: Make multiple passes over the base layer, gradually increasing the compaction force with each pass. This helps to ensure that the base layer is thoroughly compacted.
- Check for Stability: After compacting, check the stability and firmness of the base layer. Walk over it and ensure that it does not sink or shift under your weight.
Compacting the base layer is essential for creating a stable and level surface for your putting green. It helps to prevent future settling or unevenness, providing a solid foundation for the installation of the turf.
It’s important to note that proper compaction is crucial for the success and longevity of your turf putting green. Take your time during this step and make sure that the base layer is thoroughly compacted before moving on to the next step: measuring and cutting the turf.
When installing a turf putting green in your backyard, make sure to properly prepare the area by leveling the ground, compacting the soil, and adding a layer of crushed rock for drainage before laying the turf.
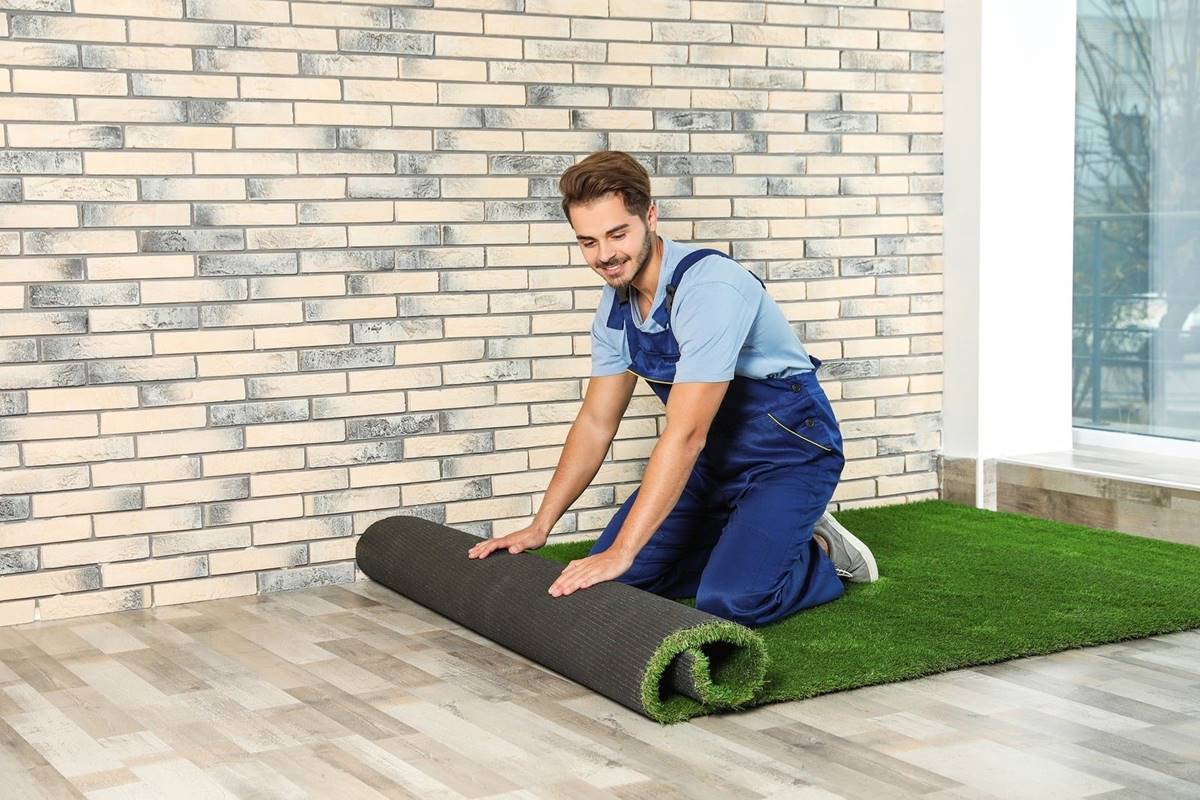
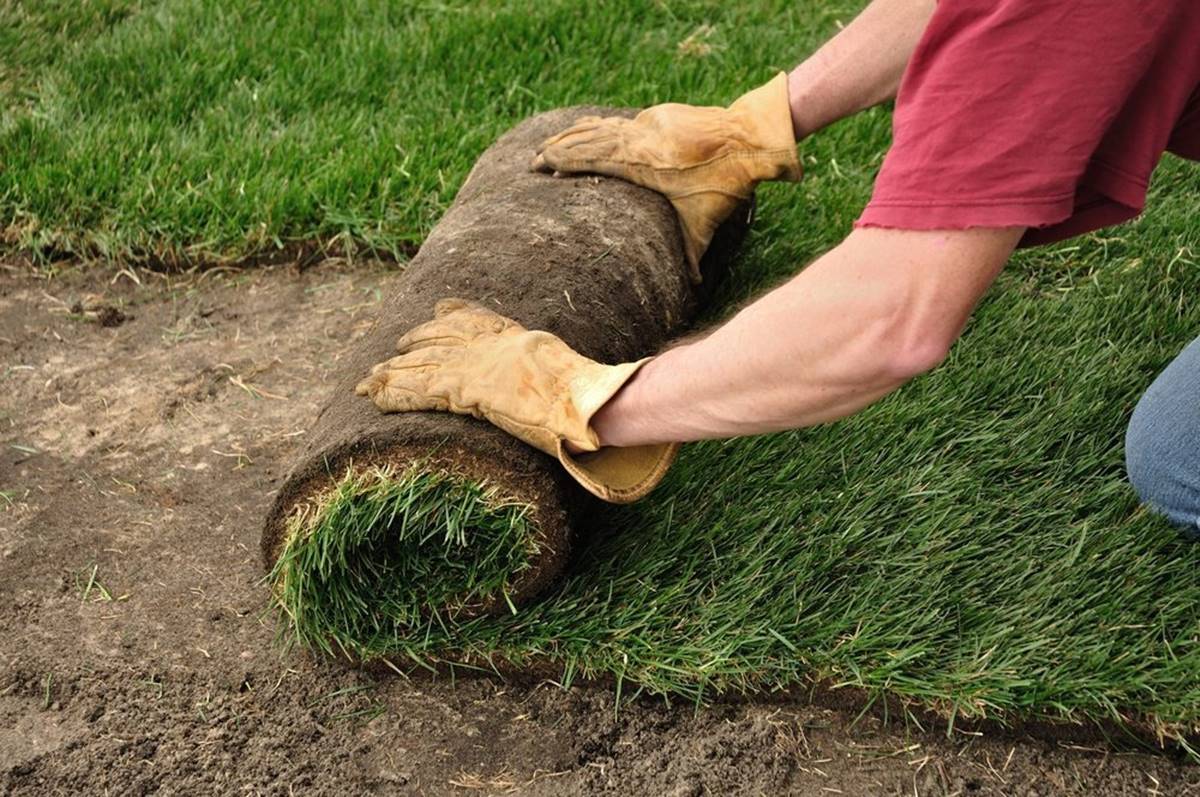
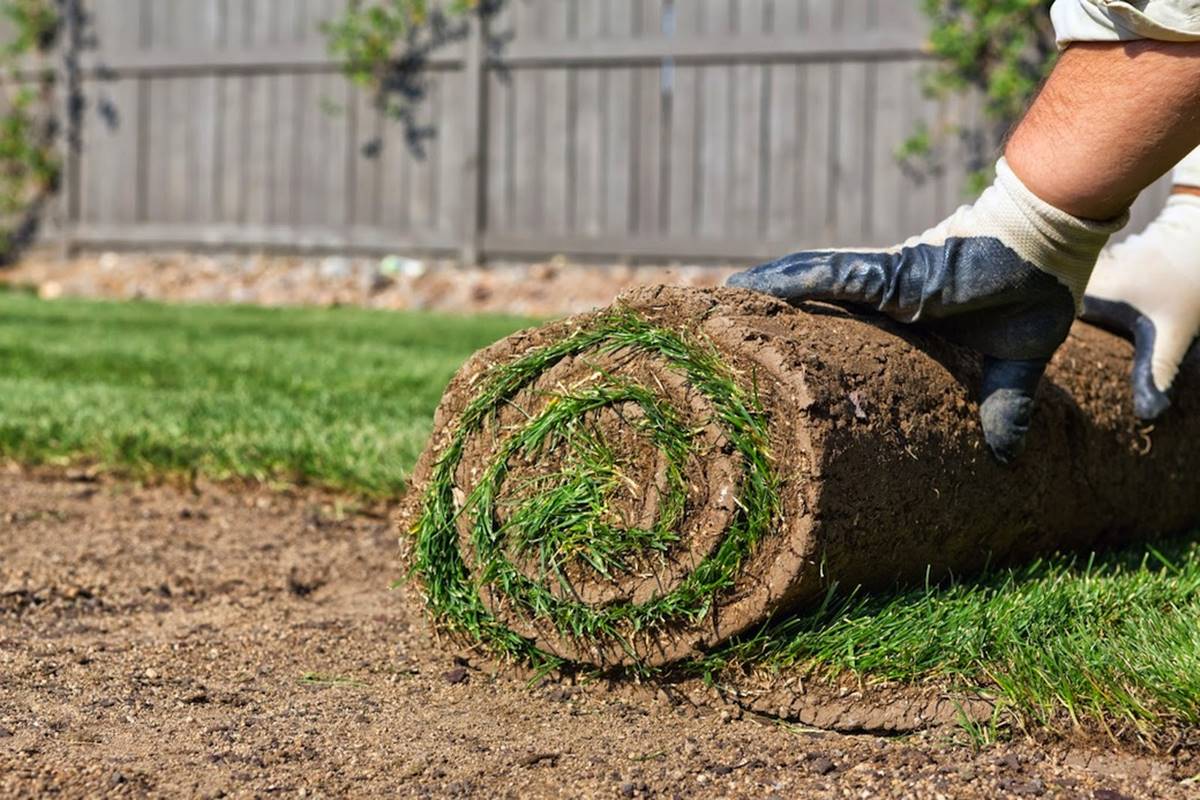
Step 7: Measure and Cut the Turf
Once you have prepared the base layer and ensured its stability, it’s time to measure and cut the turf for your putting green. This step is essential to ensure a proper fit and a seamless installation of the turf.
Here’s how you can measure and cut the turf:
- Measure the Area: Use a tape measure to determine the dimensions of the putting green. Measure the length and width accurately, taking into account any curves or irregularities in the shape.
- Roll Out the Turf: Roll out the turf on top of the prepared base layer, making sure it covers the entire area of the putting green. Allow the turf to relax and flatten for a few hours if it has been rolled tightly.
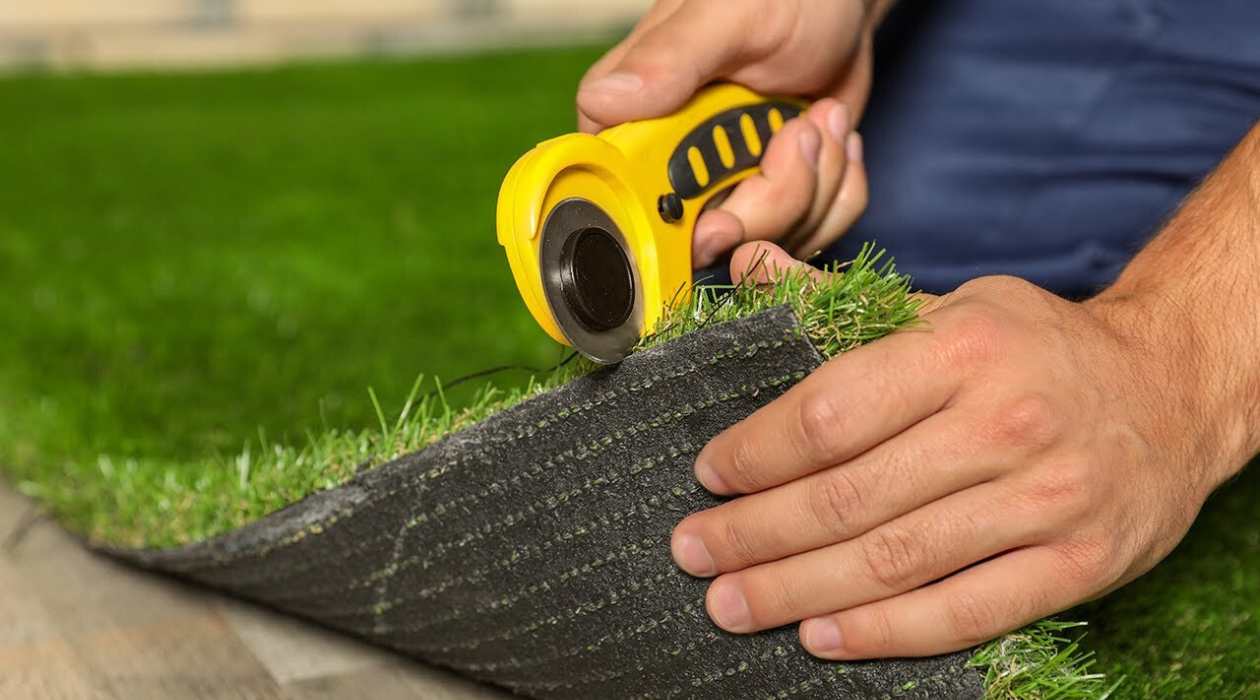
- Mark and Trim: Mark the desired shape and size of the putting green on the turf using chalk or a marker. Use a sharp utility knife or a carpet cutter to carefully cut along the marked lines.
- Trim the Edges: Trim any excess turf along the edges to ensure a clean and neat appearance. Use the utility knife or the carpet cutter to trim the turf carefully, following the shape of the putting green.
It’s important to be precise and accurate when measuring and cutting the turf to ensure a proper fit. Take your time during this step, and double-check your measurements and cuts before proceeding.
When cutting the turf, make sure to use a sharp blade and apply even pressure to achieve clean and precise cuts. Keep in mind that it’s better to slightly underestimate the size and trim the turf as needed rather than cutting it too short.
With the turf properly measured and cut, you’re now ready to move on to the exciting step of laying the turf on your putting green.
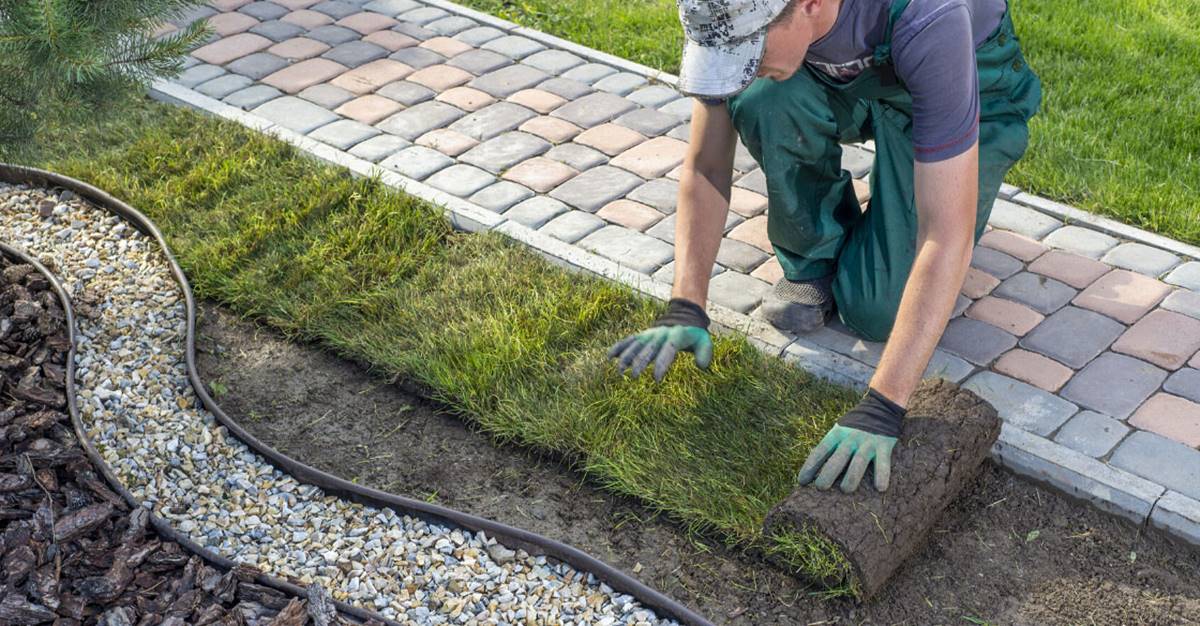
Step 8: Lay the Turf
Now that you have measured and cut the turf to fit your putting green, it’s time to start laying the turf. This step brings your project one step closer to completion, as you will see your putting green take shape.
Here’s how you can lay the turf:
- Start at One End: Begin by unrolling the first section of turf at one end of the putting green. Ensure that it aligns properly with the edges and any markings or patterns you desire.
- Smooth out the Turf: Smooth out any wrinkles or creases in the turf by gently pulling and adjusting it. Make sure the turf lies flat and is evenly spread across the entire area.
- Continue the Process: Repeat the process of unrolling and smoothing out the turf for the remaining sections. Butt the edges of the turf against each other tightly to avoid any gaps or visible seams.
- Trim Excess Turf: If necessary, trim any excess turf along the edges to achieve a clean and seamless finish. Use a utility knife or carpet cutter to make precise cuts.
As you lay the turf, pay attention to the direction of the grass blades and any patterns or designs you have chosen. Ensure that the turf is smooth and free from any visible imperfections or irregularities.
If your putting green has complex shapes or curves, you may need to make additional cuts or adjustments to ensure a proper fit. Take your time and make any necessary modifications to achieve the desired results.
By following these steps, you’ll have the turf laid out and your putting green will start to take shape. With the turf in place, it’s time to secure the edges to ensure a secure and long-lasting installation.
Read more: How To Install Turf Grass
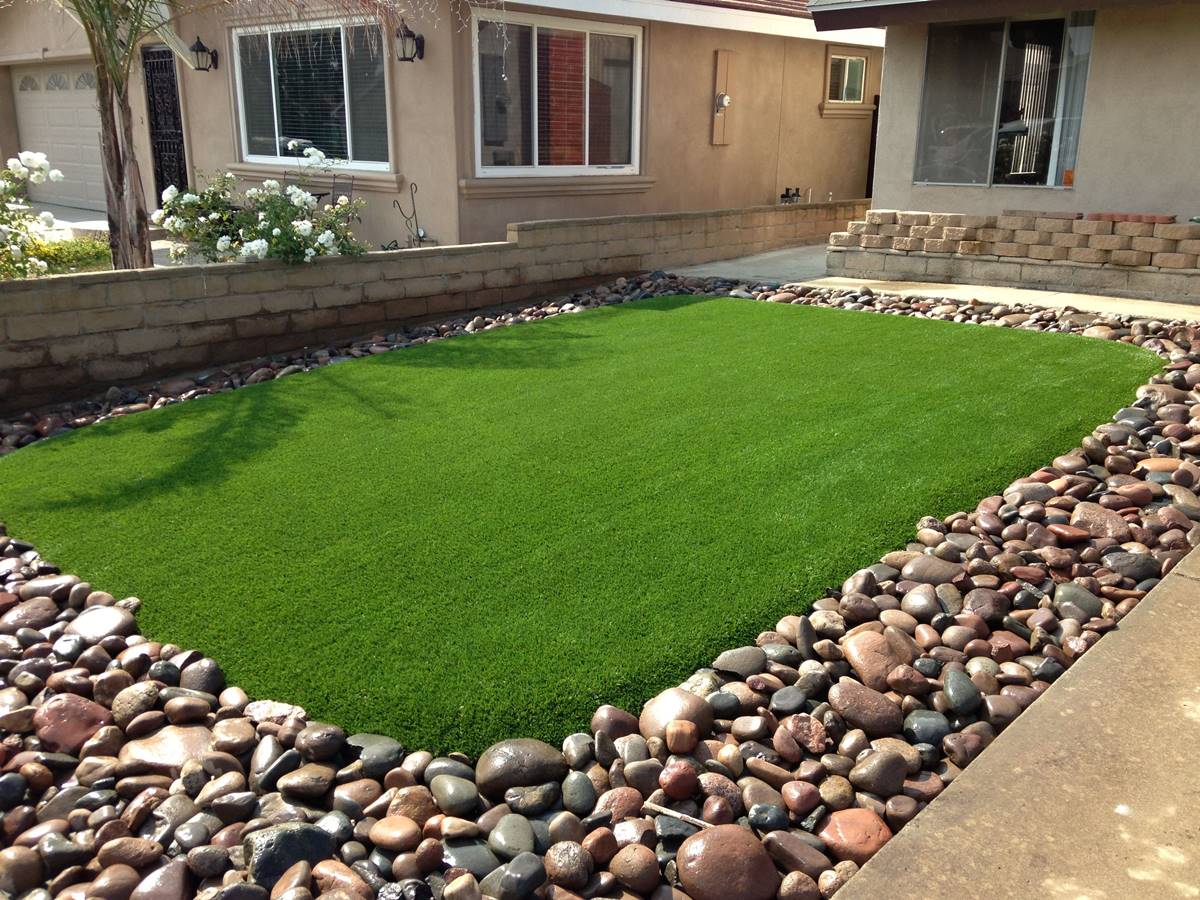
Step 9: Secure the Edges
Securing the edges of the turf is an important step in the installation process of your putting green. Properly securing the edges ensures that the turf remains in place and prevents it from shifting or becoming loose over time.
Here’s how you can secure the edges of the turf:
- Use Landscape Edging: Install landscape edging around the perimeter of the putting green. This can be made of plastic, metal, or wood, and serves as a barrier to hold the edges of the turf in place.
- Excavate the Edges: Dig a shallow trench along the edges of the putting green, following the shape of the landscape edging. The trench should be just deep enough to accommodate the edging material.
- Place the Edging: Set the landscape edging into the trench, ensuring it is level with the surface of the turf. Use stakes or anchors to secure the edging in place.
- Secure the Turf: Tuck the edges of the turf into the trench behind the landscape edging. Press down firmly to ensure a snug fit between the turf and the edging.
- Backfill and Compact: Fill the trench with soil or gravel, and compact it to further secure the edging and the turf. This will help ensure that the edges remain in place and maintain a clean and seamless look.
Securing the edges of the turf not only enhances the overall appearance of your putting green but also provides structural support and prevents tripping hazards. It helps maintain the integrity and longevity of the installation, keeping your turf in place for years to come.
With the edges secured, your turf putting green is almost ready for action! The next step is to brush and roll the turf to ensure a smooth and consistent surface.
Step 10: Brush and Roll the Turf
After securing the edges of the turf, the next step in the installation process is to brush and roll the turf. This step helps to achieve a uniform and smooth surface, ensuring optimal ball roll and playability on your putting green.
Here’s how you can brush and roll the turf:
- Brush the Turf: Use a stiff-bristled broom or a power brush to brush the turf against the grain. This helps to lift the grass blades and create a more natural and uniform appearance. Brush the entire surface of the putting green, paying extra attention to any areas that may appear flattened or compacted.
- Roll the Turf: Using a lawn roller filled with water or sand, roll the turf in different directions. This helps to evenly distribute the infill (if used) and ensures that the turf is firmly settled onto the base layer. Roll the entire putting green, focusing on high-traffic areas or any areas that may appear uneven.
- Inspect and Adjust: After brushing and rolling, inspect the turf for any imperfections or inconsistencies. Use your hands or a rake to adjust any uneven areas or wrinkles in the turf. Make sure the surface is smooth and the turf is evenly distributed across the entire putting green.
Brushing and rolling the turf not only enhances its appearance but also helps to maintain its integrity and performance. It helps to create consistent ball roll and rebound, ensuring a realistic and enjoyable putting experience.
It’s important to note that the brushing and rolling process may need to be repeated periodically to maintain the appearance and performance of the turf. Regular brushing can help to prevent matting and keep the grass blades upright.
With the turf brushed and rolled, you’re almost at the final stages of installing your putting green. The next step is to consider adding infill (optional) to enhance the feel and performance of the turf.
Step 11: Add Infill (Optional)
Adding infill to your turf is an optional step in the installation process of your putting green. Infill refers to the material that is placed between the grass blades to provide stability, support, and enhance the performance of the turf.
Here’s what you need to know about adding infill:
- Choose the Right Infill: There are various types of infill materials available, including silica sand, rubber granules, or a combination of both. Consider your playing preferences, budget, and maintenance requirements when selecting the appropriate infill for your putting green.
- Spread the Infill: Using a spreader or by hand, evenly distribute the infill over the surface of the putting green. Make sure to cover the entire area and work the infill into the turf using a broom or a power brush.
- Brush the Turf: After spreading the infill, use a broom or a power brush to brush the turf against the grain. This helps to evenly distribute the infill and ensure it reaches the base of the grass blades, providing stability and support.
- Adjust the Amount: Assess the performance and appearance of the turf after adding the infill. If necessary, you can add more or remove some of the infill to achieve the desired playability and aesthetics.
Adding infill can enhance the feel of the turf, provide cushioning, and simulate the characteristics of a natural putting green. It can improve ball roll, reduce the risk of injury, and help the turf maintain its shape and structure over time.
It’s important to follow the manufacturer’s guidelines and recommendations when adding infill to your turf. Consider consulting with a professional to determine the appropriate type and amount of infill for your specific putting green.
With infill (if used) added to your turf, you’re now ready to move on to the final step: proper maintenance and care to ensure the longevity and performance of your putting green.
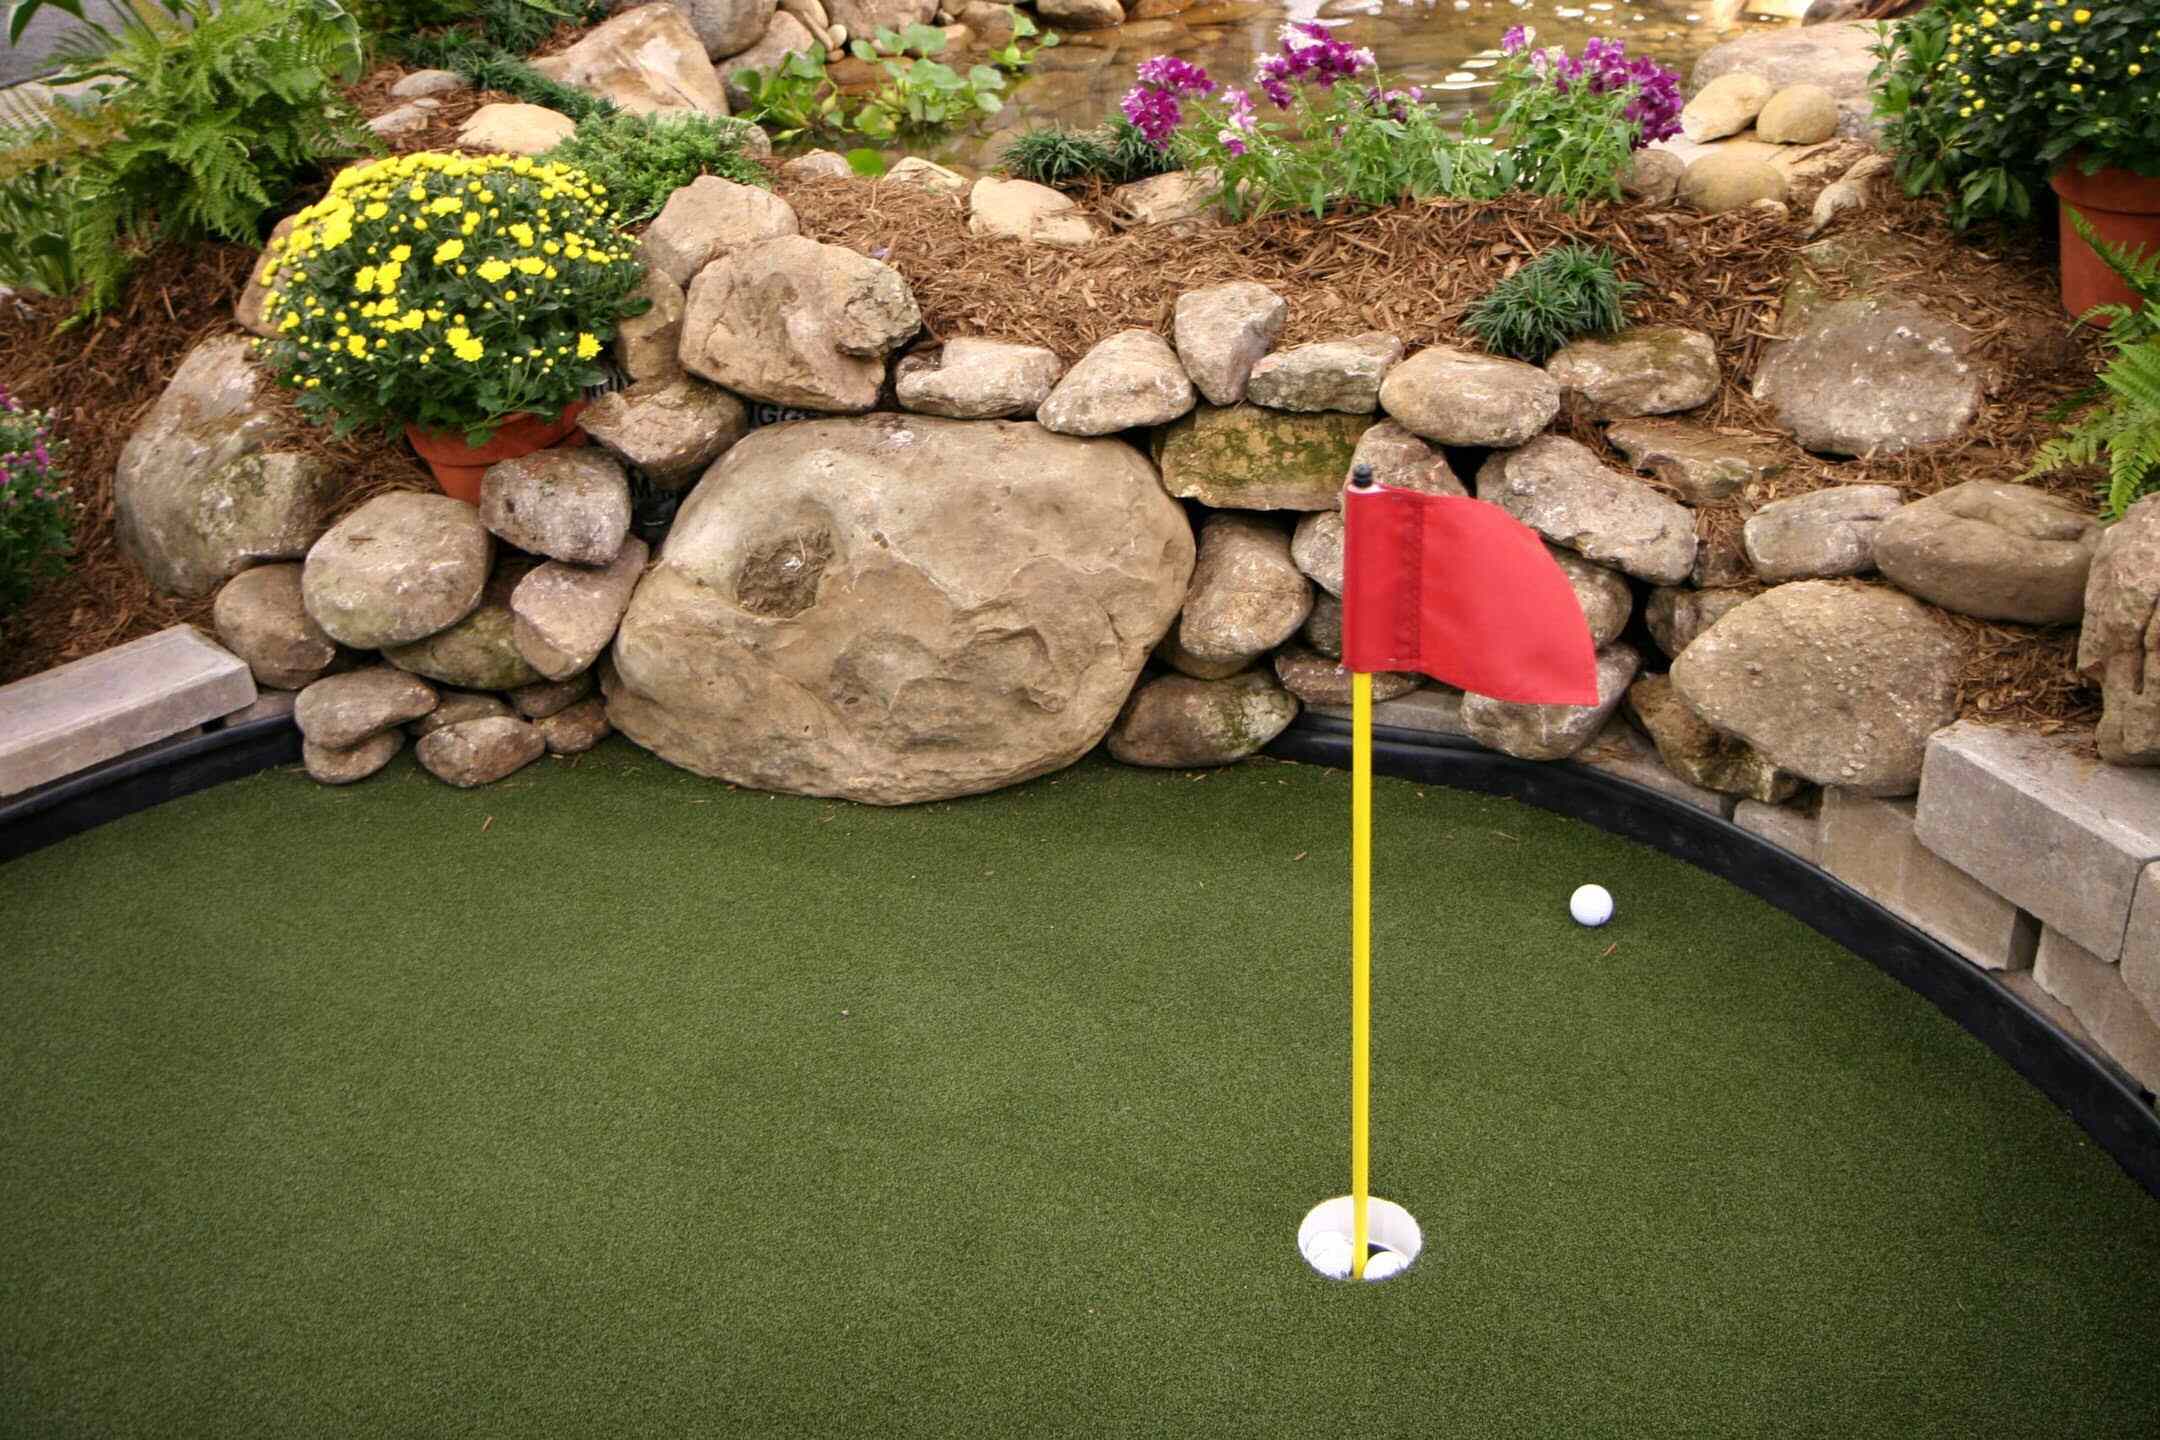
Step 12: Proper Maintenance and Care
Congratulations on completing the installation of your turf putting green! The final step in the process is to establish a proper maintenance and care routine to ensure the longevity and optimal performance of your putting green.
Here’s what you need to do to maintain and care for your turf putting green:
- Regular Brushing: Brush the turf regularly, preferably once a week or as needed. This helps to prevent matting, maintain the upright position of the grass blades, and keep the putting green looking well-groomed.
- Remove Debris: Remove any debris, such as leaves, twigs, or clippings, from the surface of the turf. This can be done with a leaf blower, a rake, or a gentle sweep with a broom. Keeping the turf clean ensures optimal playability and appearance.
- Proper Watering: Depending on the specific type of turf and your weather conditions, water your putting green as necessary to keep it hydrated. Avoid overwatering, as it can lead to issues such as mold or excessive wear on the turf.
- Address Stains and Spills: Clean up any spills or stains immediately to prevent permanent discoloration or damage to the turf. Blot the area gently with a clean cloth or sponge and use a mild detergent or turf cleaner if needed. Always follow manufacturer recommendations.
- Control Weed Growth: Even with a weed barrier in place, occasional weeds may sprout. Use a weed killer specifically designed for turf, following the instructions carefully to eliminate any weed growth without harming the turf.
- Regular Inspections: Inspect the putting green periodically for any signs of wear, damage, or maintenance needs. This includes checking the edges, infill levels (if used), and any visible seams. Address any issues promptly to keep your putting green in prime condition.
- Professional Maintenance: Consider scheduling regular maintenance appointments with a professional turf maintenance company. They can perform tasks such as deep cleaning, infill redistribution, and other specialized care to keep your putting green in top shape.
By following these maintenance and care practices, you can ensure that your turf putting green remains pristine and provides years of enjoyment. Regular upkeep will help maintain its appearance, playability, and overall performance.
Remember to refer to the manufacturer’s recommendations and guidelines for specific care instructions for your particular turf product. With proper maintenance, your putting green will continue to be a beautiful and functional addition to your backyard for years to come.
Enjoy practicing your putting skills and creating lasting memories on your very own turf putting green!
Read more: How To Install Fake Turf
Conclusion
Congratulations! You have successfully completed the installation of your very own turf putting green. By following these step-by-step instructions, you have transformed your backyard into a golfer’s paradise where you can practice your putting skills and enjoy countless hours of entertainment.
Installing a turf putting green may seem like a complex task, but with the right knowledge and guidance, it becomes an exciting and rewarding project. From measuring and preparing the area to securing the edges and implementing proper maintenance, each step plays a crucial role in creating a beautiful and functional putting green.
Remember, choosing high-quality artificial turf designed specifically for putting greens ensures a consistent and realistic playing experience. The low maintenance requirements of artificial turf also ensure that you can focus on perfecting your golf game rather than spending hours on yard work.
As you enjoy your new turf putting green, make sure to maintain regular upkeep. Regular brushing, removing debris, proper watering, and addressing stains or spills are all key to keeping your putting green in optimal condition.
Additionally, consider consulting with professionals for specialized care and periodic maintenance. They can provide deeper cleaning, infill redistribution, and other services to ensure that your putting green remains in top shape for years to come.
Now, get ready to hone your golf skills, challenge your friends to a friendly competition, or simply relax and enjoy the beauty of your backyard oasis. Your turf putting green is an investment in both your game and your outdoor space, providing endless enjoyment and adding value to your home.
So, grab your putter, step onto the pristine turf, and let the golfing adventures begin on your very own backyard putting green!
Now that you've mastered installing a turf putting green, why stop there? Transform your entire outdoor space into a sanctuary of creativity and fun. Dive into our collection of "Outdoor Projects" for a treasure of DIY ideas that will spruce up your garden, patio, or any outdoor area. Whether you're looking to build, renovate, or simply add a personal touch, these projects are perfect for hands-on homeowners eager to enhance their outdoor living spaces.
Frequently Asked Questions about How To Install Turf Putting Green In Backyard
Was this page helpful?
At Storables.com, we guarantee accurate and reliable information. Our content, validated by Expert Board Contributors, is crafted following stringent Editorial Policies. We're committed to providing you with well-researched, expert-backed insights for all your informational needs.
0 thoughts on “How To Install Turf Putting Green In Backyard”