Home>Interior Design>How To Make A Wreath With Mesh: 8 Easy Steps For Beginners
Interior Design
How To Make A Wreath With Mesh: 8 Easy Steps For Beginners
Modified: February 29, 2024
Learn how to make a stunning wreath with mesh in just 8 simple steps! Perfect for beginners interested in interior design.
(Many of the links in this article redirect to a specific reviewed product. Your purchase of these products through affiliate links helps to generate commission for Storables.com, at no extra cost. Learn more)
Introduction
Welcome to the world of wreath-making! If you’re looking for a fun and creative way to spruce up your home decor, making a wreath with mesh is a perfect choice. Mesh wreaths are not only beautiful but also versatile, allowing you to customize them to match any theme or style.
Whether you’re a seasoned wreath-maker or a beginner, this article will guide you through the process of creating a stunning mesh wreath. With a few easy-to-find materials and some creative inspiration, you’ll be amazed at the beautiful masterpiece you can create.
The great thing about making a wreath with mesh is that it requires minimal skill and can be done on a budget. You don’t need any fancy tools or expensive supplies – just a wreath form, some mesh, and a few additional embellishments if desired. Plus, by making your own wreath, you can personalize it to reflect your own unique style and taste.
In this step-by-step guide, we’ll walk you through the process of making a wreath with mesh. From choosing the right wreath form to adding the final touches, we’ll cover everything you need to know. So, let’s get started and dive into the world of wreath-making!
Key Takeaways:
- Create stunning mesh wreaths with minimal skill and budget-friendly materials. Personalize your wreath to reflect your unique style and enjoy the process of bringing beauty to your home decor.
- Unleash your creativity and transform a wreath form and mesh into a captivating piece of art. Enjoy the pride of showcasing your personalized mesh wreath and the festive atmosphere it brings to your space.
Materials Needed
Before we begin, let’s gather all the materials you’ll need to make your mesh wreath. The great thing about this project is that most of the items can be easily found at your local craft store or online. Here’s what you’ll need:
- Wreath Form: Choose a wreath form that suits your preferences. You can opt for a wire wreath frame, a foam wreath form, or even a grapevine wreath.
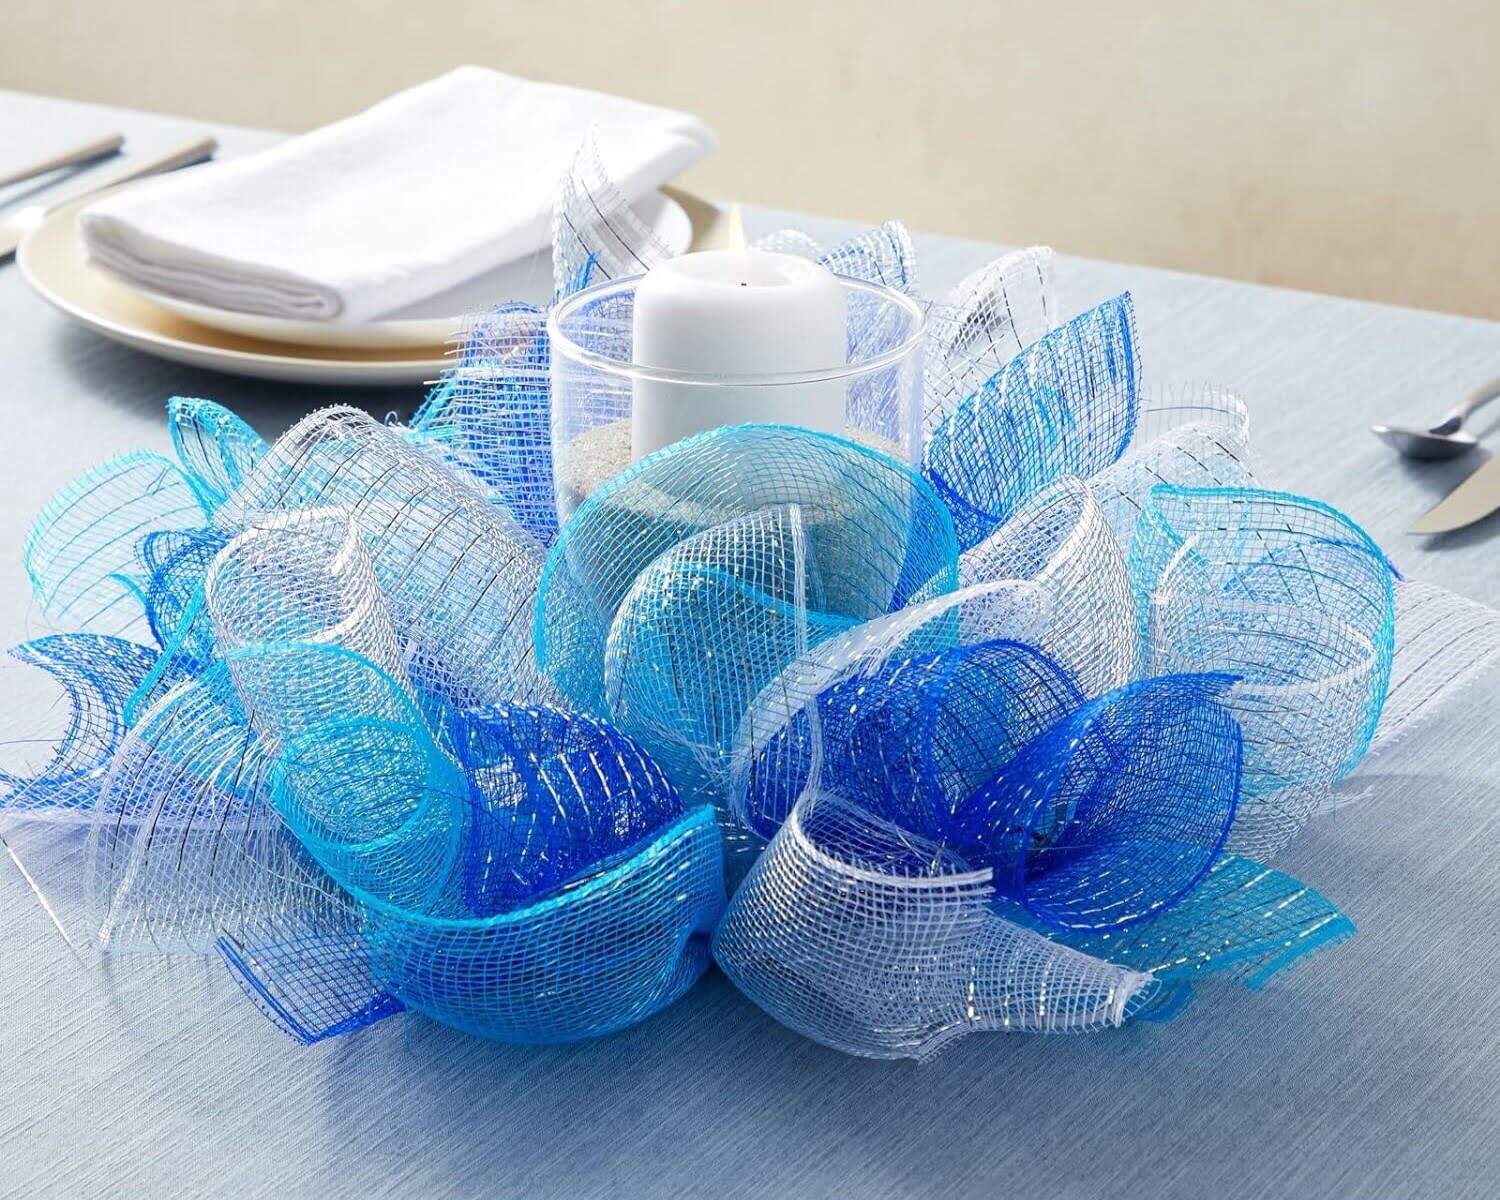
- Mesh: The star of the show! Select your preferred color and type of mesh. Deco mesh is typically used for mesh wreaths, and it comes in a variety of colors and patterns.
- Ribbon: Find some coordinating ribbon to add extra flair to your wreath. You can use wired ribbon, satin ribbon, burlap ribbon, or any other type that complements your mesh and overall design.
- Scissors: A trusty pair of scissors will come in handy for cutting the mesh and ribbon.
- Florist Wire or Pipe Cleaners: Use florist wire or pipe cleaners to attach the mesh to the wreath form securely.
- Embellishments: If desired, gather any additional embellishments you’d like to include, such as artificial flowers, ornaments, pinecones, or decorative picks.
- Hot Glue Gun: A hot glue gun will be useful for attaching any delicate embellishments or securing the ribbon.
- Hanging Mechanism: Lastly, consider how you’ll hang your wreath. You may need a wire wreath hanger, ribbon, or a door hook.
Once you have all these materials ready to go, you’re one step closer to creating your own beautiful and eye-catching mesh wreath. So, gather your supplies and let’s dive into the step-by-step process!
Step 1: Choose Your Wreath Form
The first step in making a wreath with mesh is to choose the right wreath form. This will serve as the base for your wreath and determine its shape and structure. There are various types of wreath forms available, so choose one that suits your style and the overall look you want to achieve.
Here are a few popular options for wreath forms:
- Wire Wreath Frame: This is a classic choice and commonly used for mesh wreaths. It is made of sturdy wire and has evenly spaced sections where you can attach the mesh and other embellishments.
- Foam Wreath Form: Foam wreath forms provide a solid base for your wreath. They are lightweight and allow for easy attachment of the mesh and other elements. You can choose a traditional circular foam form or opt for a different shape like a heart or star.
- Grapevine Wreath: If you’re looking for a more natural and rustic look, a grapevine wreath may be the perfect choice. Made from intertwined grapevine branches, this form adds a touch of organic charm to your wreath.
Consider the size of your wreath form as well. Depending on where you plan to display your wreath, you may want a smaller size for a door or a larger size for a wall or mantle.
Take your time to browse different options and choose a wreath form that aligns with your vision. Once you have your wreath form ready, you’re all set to move on to the next step: gathering your mesh and supplies.
Step 2: Gather Your Mesh and Supplies
Now that you have your wreath form selected, it’s time to gather your mesh and other supplies needed for your mesh wreath. Here’s what you’ll need:
- Mesh: Choose your desired color and type of mesh. Deco mesh is commonly used for mesh wreaths and comes in various colors and patterns. Consider the theme or style you have in mind for your wreath and select a mesh that complements it.
- Ribbon: Find coordinating ribbon to embellish your wreath. You can use wire-edged ribbon, satin ribbon, burlap ribbon, or any other type that matches your overall design. The ribbon will add texture and visual interest to your wreath.
- Scissors: A good pair of scissors is essential for cutting the mesh and ribbon. Make sure they’re sharp and easy to handle.
- Florist Wire or Pipe Cleaners: You’ll need florist wire or pipe cleaners to attach the mesh to the wreath form securely. These are flexible and easy to work with, providing a sturdy base for your mesh.
- Embellishments: If you want to add extra flair to your wreath, gather any embellishments you’d like to include. This could be artificial flowers, ornaments, pinecones, decorative picks, or anything that complements your wreath’s theme.
- Hot Glue Gun: A hot glue gun will come in handy for attaching delicate embellishments or securing the ribbon to the wreath. Make sure you have a supply of glue sticks as well.
- Hanging Mechanism: Consider how you’ll hang your wreath. You may need a wire wreath hanger, ribbon, or a door hook, depending on where you plan to display your wreath.
Once you have gathered all of these supplies, you’re ready to move on to the next step: attaching the mesh to the wreath form. Get ready to unleash your creativity and bring your wreath to life!
Step 3: Attach the Mesh to the Wreath Form
Now it’s time to bring your wreath to life by attaching the mesh to the wreath form. This step sets the foundation for your design and gives your wreath its distinctive appearance. Here’s how to attach the mesh:
- Prepare the Mesh: Start by unrolling your mesh and cutting it into manageable sections, about 10-12 inches in length. This will make it easier to work with.
- Secure the Mesh: Take one end of the mesh section and attach it to the wreath form using florist wire or pipe cleaners. Secure it by twisting the wire or wrapping it tightly around the mesh and the wreath frame. Flatten any sharp ends to prevent scratching or snagging.
- Create a Puff: Push the mesh towards the center of the wreath form, creating a puff or loop shape. Leave a little space between each puff to ensure your wreath looks full and well-distributed.
- Secure the Puff: Use another piece of wire or pipe cleaner to secure the puff, either by twisting it around the wreath frame or attaching it to the adjacent puff. This will hold the mesh in place and keep it from unraveling.
- Repeat the Process: Continue attaching and puffing the mesh all around the wreath form until you reach your starting point. Keep the puffs consistent in size and evenly spaced for a balanced and cohesive design.
As you work, be careful not to pull the mesh too tight or squash the puffs. The aim is to create a full and voluminous wreath, so allow the mesh to breathe and maintain its shape.
Feel free to experiment with different techniques, such as making smaller or larger puffs, or alternating between different colors of mesh. This will add dimension and visual interest to your wreath.
Once you have completed attaching the mesh to the wreath form, you’re ready to move on to the next step: adding more layers of mesh to enhance the fullness and texture of your wreath.
Step 4: Continue Adding Mesh to the Wreath
With the foundation of your wreath in place, it’s time to add more layers of mesh to enhance its fullness and texture. This step will bring depth and dimension to your wreath design. Here’s how to continue adding mesh:
- Cut More Mesh: Cut additional sections of mesh, similar in length to the initial ones. You can use the same color or mix in different colors or patterns for added visual interest.
- Attach and Puff: Attach the end of one mesh section to the wreath form, close to the previous puffs. Follow the same process you used in Step 3, securing the mesh and creating puffs. Make sure to alternate the placement of the puffs to create a balanced and visually appealing design.
- Fill the Gaps: As you continue adding mesh, pay attention to any gaps or areas that appear sparse. Fill these gaps by adding extra puffs of mesh or layering the mesh over existing puffs. This will create a lush and full appearance.
- Blend the Colors: If you’re using multiple colors of mesh, blend them together smoothly. Avoid clumping all the same colors in one area and distribute them evenly throughout the wreath for a cohesive look.
- Step Back and Assess: Periodically step back and assess your wreath to ensure that it’s taking shape the way you envisioned. Make any adjustments or add additional mesh as needed to achieve the desired fullness and balance.
Remember, there’s no right or wrong way to add the mesh. Feel free to get creative and experiment with different placement and arrangements. The goal is to create a wreath that reflects your personal style and aesthetic.
Continue this process until you have achieved the desired fullness and texture for your wreath. Once you’re satisfied with the mesh layers, you’re ready to move on to the next step: shaping and fluffing the mesh to add the finishing touches.
When working with mesh to make a wreath, be sure to fluff out the material to give the wreath a fuller and more vibrant look. This will help create a visually appealing and professional finish to your wreath.
Step 5: Shape and Fluff the Mesh
Now that you have added layers of mesh to your wreath, it’s time to shape and fluff it to bring out its full beauty. This step will give your wreath volume and help define its overall appearance. Here’s how to shape and fluff the mesh:
- Tug and Adjust: Start by gently tugging on the puffs of mesh to create more volume. Pull them away from the wreath form and towards the outer edges to make them stand out and give a fuller look. Be careful not to pull too hard and accidentally detach the mesh from the wreath form.
- Shape the Puffs: Take a moment to shape each puff of mesh to ensure they are symmetrical and uniform. Adjust any puffs that may look flat or misshapen, reshaping them into a round and fluffy form.
- Fluff and Separate: Separate the individual layers of the mesh to give them more dimension. Use your fingers to fluff each section, spreading out the mesh and creating a more airy and textured appearance.
- Step Back and Assess: Periodically step back and take a look at your wreath from a distance to gauge its overall shape and appearance. Make any additional adjustments to the puffs and mesh as needed to achieve the desired visual effect.
- Ensure Even Distribution: Ensure that the mesh is evenly distributed throughout the wreath, with no clumps or bare spots. Make any necessary adjustments by adding more mesh where needed to achieve a balanced and uniform look.
Remember to take your time during this step. Paying attention to the shape and fluffiness of the mesh will make a significant difference in the final result. Don’t be afraid to rearrange and readjust until you are satisfied with the overall appearance of your wreath.
Once you are happy with the shape and fluffiness of the mesh, you can move on to the next step: adding embellishments to enhance the visual appeal of your wreath (optional).
Step 6: Add Embellishments (Optional)
Now that your mesh wreath is taking shape, it’s time to add some extra flair with embellishments. Embellishments can be a fun and creative way to personalize your wreath and make it truly unique. Here’s how to add embellishments to your wreath:
- Select Your Embellishments: Decide on the type of embellishments you want to use based on your wreath’s theme or the look you’re going for. This could include artificial flowers, ornaments, pinecones, decorative picks, or any other items that complement your wreath’s style.
- Arrange and Assess: Lay out your embellishments on the wreath to determine their placement. Consider the balance of colors, shapes, and sizes to ensure they harmonize with the mesh and overall design. Rearrange them as needed until you’re satisfied with the arrangement.
- Attach with Hot Glue: Once you’re happy with the arrangement, use a hot glue gun to secure the embellishments to the wreath. Apply a small amount of glue to the back of each embellishment and press it firmly onto the mesh. Be cautious not to use too much glue to avoid making a mess or damaging the mesh.
- Play with Placement: Feel free to experiment with different placements and angles for your embellishments. Try clustering them together in a focal point or evenly dispersing them throughout the wreath for a balanced look. Don’t be afraid to get creative and add your personal touch.
- Step Back and Assess: Step back and take a look at your wreath from different angles to ensure the embellishments are well-placed and enhance the overall design. Make any necessary adjustments or add more embellishments if desired.
Adding embellishments to your wreath is optional but can take it to the next level. It adds depth, interest, and a personal touch. However, be mindful not to overcrowd the wreath with too many embellishments, as it may detract from the beauty of the mesh.
Once you’re satisfied with the placement of your embellishments, you’re ready to move on to the next step: attaching a hanging mechanism to your wreath.
Step 7: Attach a Hanging Mechanism
Now that your mesh wreath is complete, it’s time to think about how you’ll hang it and display it with pride. Attaching a hanging mechanism will ensure your wreath stays securely in place. Here’s how to attach a hanging mechanism:
- Choose Your Hanging Method: Decide on the hanging method that suits your needs and the location where you plan to display your wreath. Some common options include using a wire wreath hanger, a decorative ribbon, or a door hook.
- Wire Wreath Hanger: If you plan to hang your wreath on a door, you can use a wire wreath hanger that easily hooks onto the top of the door. Slide the wreath onto the hanger, making sure it is centered and secure.
- Decorative Ribbon: Another option is to use a decorative ribbon as a hanging mechanism. Choose a ribbon that complements your wreath’s design and color scheme. Attach the ends of the ribbon to the back of the wreath using hot glue or by tying secure knots.
- Door Hook: For a more versatile hanging option, you can use a door hook that fits securely over the top of your door. Hang the wreath on the hook, adjusting it to the desired height and positioning.
- Test the Hanging: After attaching the hanging mechanism, gently lift the wreath to ensure it is secure and balanced. Make any necessary adjustments to ensure the wreath hangs straight and at the desired height.
Consider the weight and size of your wreath when choosing a hanging mechanism. Ensure that the hanging method you select can support the weight of the wreath without causing any damage to your door or wall.
Once you’ve securely attached the hanging mechanism, step back and admire your beautiful wreath. You’re now ready to hang it and enjoy the fruits of your labor!
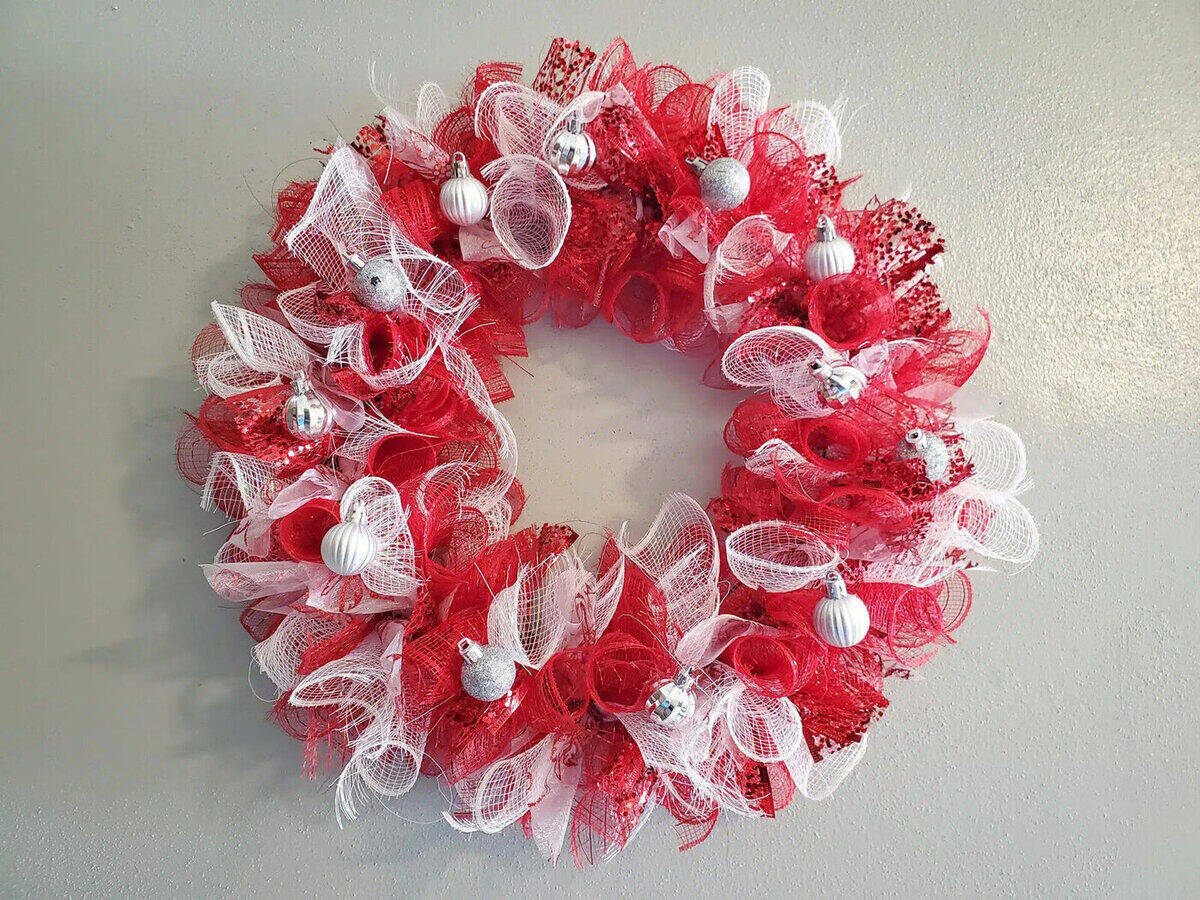
Step 8: Hang and Enjoy Your Mesh Wreath
Congratulations! You’ve reached the final step of making your mesh wreath. It’s time to hang it up and let it bring beauty and charm to your space. Here’s how to hang and enjoy your mesh wreath:
- Choose the Perfect Spot: Select the ideal location to showcase your wreath. It could be your front door, a wall in your home, over a fireplace, or anywhere else that catches your eye.
- Hang the Wreath: Use the hanging mechanism you attached in Step 7 to securely hang your wreath. Follow the instructions from the specific hanging method you chose, whether it’s a wire wreath hanger, a decorative ribbon, or a door hook.
- Ensure a Level Hang: Step back and make sure your wreath is hanging straight and level. Adjust as needed to achieve the desired positioning and balance. Take the time to get it just right, as a level hang will enhance the overall appearance of your wreath.
- Showcase Your Creation: Step back and admire your handiwork. Your mesh wreath is now a stunning visual centerpiece, adding a touch of elegance and style to your space. Take pride in your creation and enjoy the compliments from family and friends.
- Consider Seasonal Updates: As the seasons change, you can update your mesh wreath to reflect different themes or holidays. Simply remove or replace certain embellishments or use different colors of mesh to give your wreath a fresh new look throughout the year.
Remember to periodically check on your wreath to ensure it stays secure and intact. If any elements become loose or damaged, gently reposition or replace them to maintain the wreath’s beauty and longevity.
By following these steps, you’ve successfully created a stunning mesh wreath that adds a personalized touch to your home decor. With your creativity and attention to detail, your wreath will continue to bring joy and beauty for seasons to come. Enjoy the fruits of your labor and relish in the festive and welcoming atmosphere your wreath creates!
Conclusion
Congratulations on completing your journey into the world of wreath-making with mesh! By following the step-by-step guide in this article, you’ve learned how to create a beautiful and eye-catching mesh wreath. With a few simple materials and your creative touch, you have transformed a wreath form and mesh into a stunning piece of art.
The process of making a wreath with mesh is not only enjoyable, but it also allows you to customize your wreath to match your personal style and the theme of your home. From choosing the wreath form and gathering your supplies to attaching the mesh and adding embellishments, each step contributes to the creation of a unique and captivating piece of decor.
Remember to take your time and have fun during the process. Experiment with different colors, patterns, and arrangements to create a wreath that truly reflects your taste and creativity. Don’t be afraid to think outside the box and try new techniques or add your own personal touches with embellishments.
Once your mesh wreath is complete, it’s time to hang it up and enjoy the beauty it brings to your space. Whether it’s adorning your front door, a wall in your home, or serving as a centerpiece, your wreath will be a conversation starter and a source of pride. Enhance the festive atmosphere during the holidays or update the wreath with seasonal elements to keep it fresh and inviting throughout the year.
Take a moment to step back and admire your creation. Your mesh wreath is a testament to your creativity and DIY skills. Share your accomplishment with friends and family, and bask in the joy and satisfaction of bringing a touch of elegance and charm to your home.
Thank you for joining us on this wreath-making adventure. We hope this guide has inspired you to unleash your creativity and explore the endless possibilities of making wreaths with mesh. Keep creating and may your future wreath-making endeavors be filled with imagination and beauty!
Frequently Asked Questions about How To Make A Wreath With Mesh: 8 Easy Steps For Beginners
Was this page helpful?
At Storables.com, we guarantee accurate and reliable information. Our content, validated by Expert Board Contributors, is crafted following stringent Editorial Policies. We're committed to providing you with well-researched, expert-backed insights for all your informational needs.


0 thoughts on “How To Make A Wreath With Mesh: 8 Easy Steps For Beginners”