Home>Renovation & DIY>DIY Projects & Ideas>How To Cut Radial Tires For DIY Projects
DIY Projects & Ideas
How To Cut Radial Tires For DIY Projects
Modified: January 4, 2024
Learn how to cut radial tires for your DIY projects with our step-by-step guide. Get creative DIY project ideas and inspiration for your next tire upcycling project.
(Many of the links in this article redirect to a specific reviewed product. Your purchase of these products through affiliate links helps to generate commission for Storables.com, at no extra cost. Learn more)
Introduction
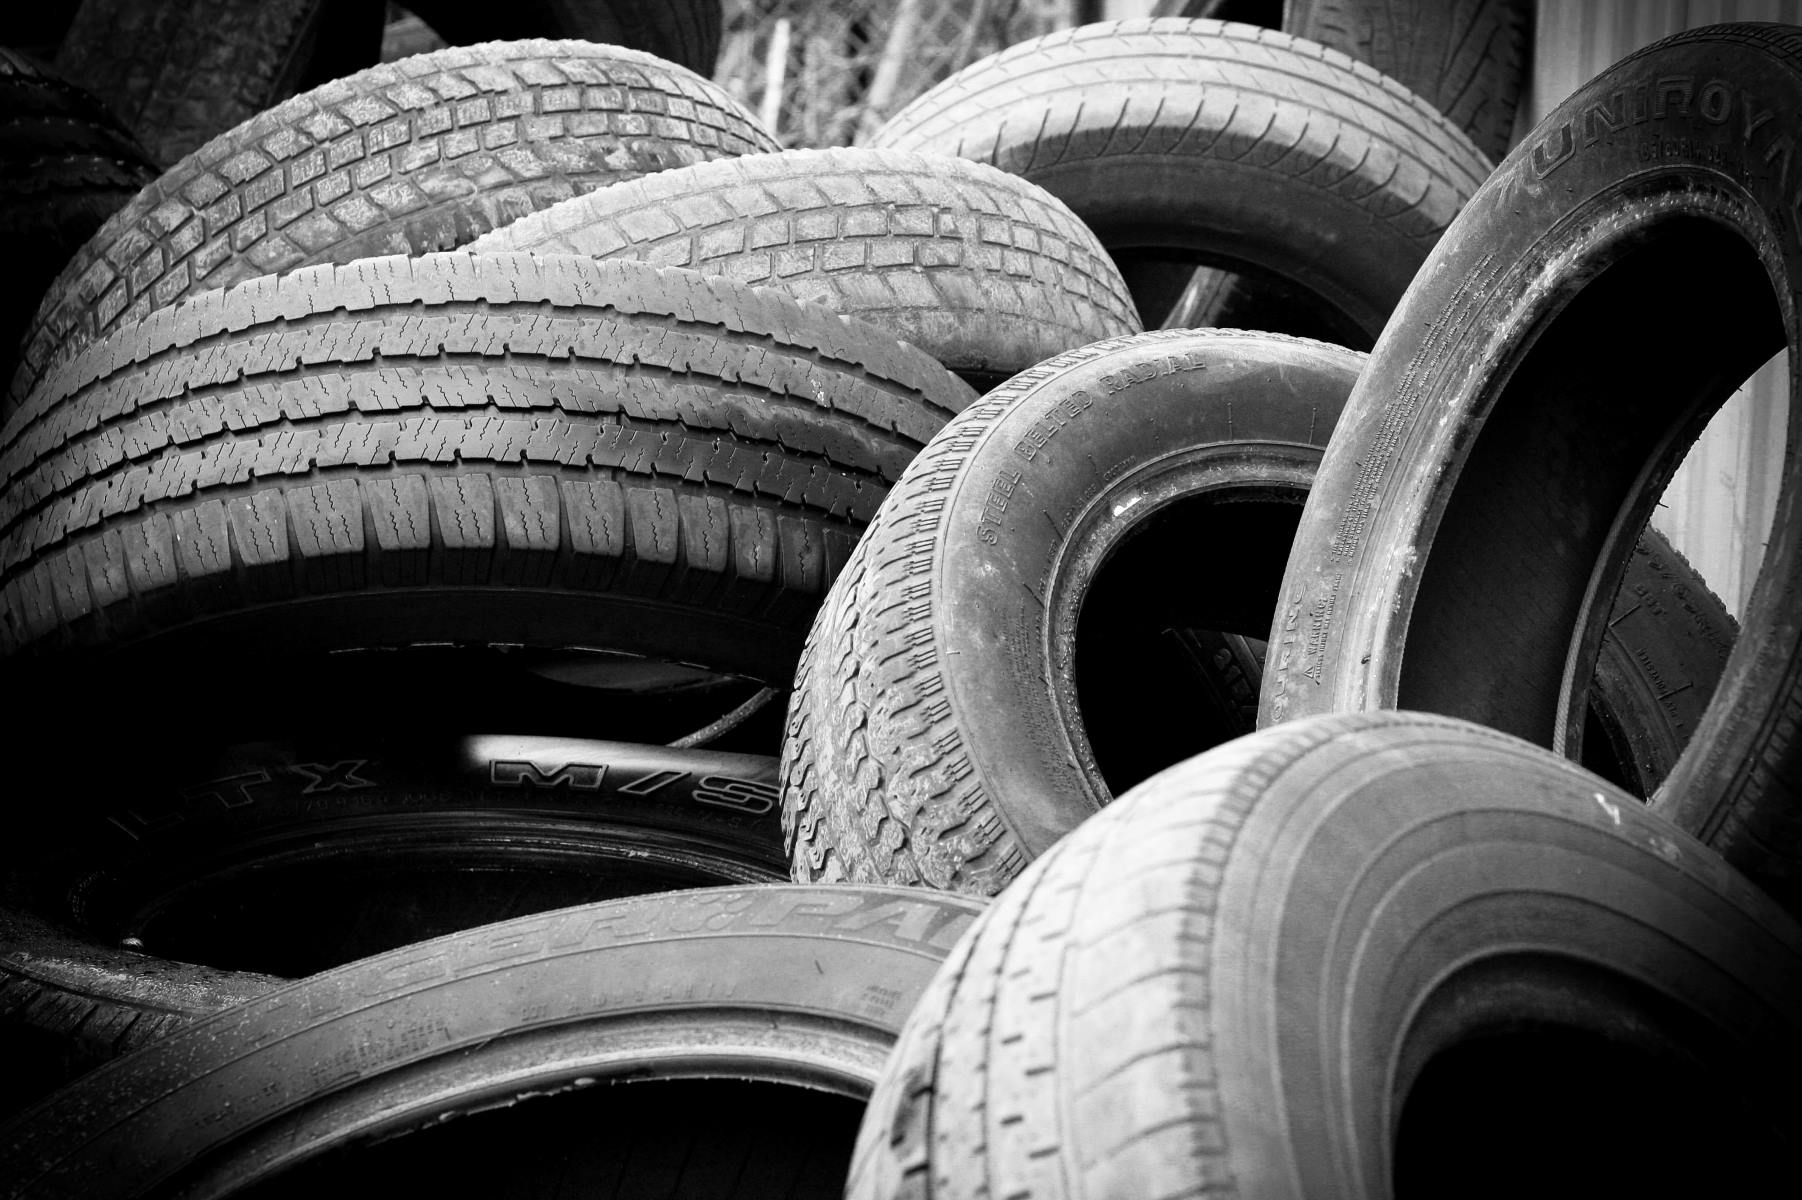
So, you've got a stack of old radial tires lying around and you're wondering what to do with them. Well, how about turning them into fantastic DIY projects? Whether it's for upcycling, crafting, or creating custom furniture, cutting radial tires can open up a world of creative possibilities. In this guide, you'll learn how to safely and effectively cut radial tires for your DIY endeavors.
By repurposing these tires, not only can you give them a new lease on life, but you'll also contribute to reducing environmental waste. From unique planters to durable flooring, the potential uses for cut radial tires are limited only by your imagination. So, grab your cutting tools and let's dive into the art of transforming old tires into something extraordinary!
Key Takeaways:
- Transform old radial tires into new DIY creations by following safety precautions and using essential tools like a jigsaw and sandpaper. Upcycling tires reduces waste and unleashes creativity.
- Prioritize safety, precision, and creativity when cutting radial tires for DIY projects. From unique planters to durable furniture, the possibilities are endless with repurposed tires.
Read more: How To Cut Shirts For DIY Projects
Tools and Materials Needed
Before you embark on cutting radial tires for your DIY projects, it’s essential to gather the necessary tools and materials. Here’s what you’ll need:
- Radial Tires: Choose the tires you want to repurpose. Ensure they are clean and free of any debris or sharp objects.
- Chalk or Marker: Use this to mark the cutting lines on the tire.
- Utility Knife: A sturdy utility knife with a sharp blade will be essential for making initial incisions in the tire.
- Jigsaw: A jigsaw equipped with a blade suitable for cutting through rubber is ideal for precision cutting.
- Safety Gear: Prioritize safety by wearing protective gloves and safety goggles to shield your hands and eyes from debris.
- Workbench or Clamp: Secure the tire in place during the cutting process to ensure stability and safety.
- Measuring Tape: Use this to accurately measure and mark the cutting lines on the tire.
- Sandpaper: Smooth out any rough edges on the cut tire to prevent splinters and ensure a polished finish.
By having these tools and materials on hand, you’ll be well-equipped to begin the process of transforming old radial tires into new, exciting DIY creations.
Step 1: Marking the Tire
Before you start cutting the radial tire, it’s crucial to mark the cutting lines accurately. This step ensures precision and helps you achieve the desired shapes for your DIY projects. Here’s a detailed guide on how to mark the tire effectively:
- Clean the Tire: Begin by thoroughly cleaning the tire to remove any dirt, grease, or debris. This will provide a clear surface for marking and cutting.
- Identify the Cutting Area: Determine the specific sections of the tire that you want to use for your DIY project. For example, if you’re creating a planter, you may choose to cut the tire horizontally, creating two circular halves.
- Measure and Mark: Use a measuring tape to mark the precise cutting lines on the tire. Whether you’re cutting the tire into halves, quarters, or intricate patterns, accurate measurements are essential for a successful outcome.
- Use Chalk or Marker: Once you’ve measured and determined the cutting lines, use chalk or a marker to clearly outline the areas to be cut. The visibility of these lines will guide you during the cutting process.
- Consider the Tread: If the tire’s tread has a distinctive pattern, consider incorporating it into your design. The tread can add an appealing aesthetic to your DIY creation.
By following these steps, you’ll ensure that the tire is accurately marked for cutting, setting the stage for the next phase of the transformation process.
Step 2: Cutting the Tire
Once the tire is accurately marked, it’s time to proceed with the cutting process. This step requires precision and attention to safety to achieve clean and accurate cuts. Follow these guidelines to effectively cut the radial tire for your DIY projects:
- Secure the Tire: Place the tire on a stable work surface or secure it in a clamp to prevent any movement during the cutting process. This stability is crucial for safety and precision.
- Initial Incision: Use a sharp utility knife to make an initial incision along the marked cutting lines. Apply steady pressure to penetrate the tire’s rubber material, creating a starting point for the subsequent cutting tool.
- Utilize a Jigsaw: A jigsaw equipped with a blade designed for cutting through rubber is an excellent tool for this task. Carefully maneuver the jigsaw along the marked lines, maintaining a steady hand and consistent speed for smooth cuts.
- Follow the Markings: Stay aligned with the marked cutting lines as you guide the jigsaw through the tire. Take your time to ensure accuracy, especially if you’re cutting intricate shapes or patterns.
- Adjust Speed and Pressure: Depending on the thickness of the tire and the intricacy of the cuts, adjust the jigsaw’s speed and pressure to achieve optimal results. Smooth, controlled movements will lead to clean and precise cuts.
- Take Breaks if Needed: If you’re working on a large or challenging cutting project, take occasional breaks to prevent fatigue and maintain focus. This will contribute to the overall quality of the cuts.
By following these steps and exercising patience and precision, you’ll successfully navigate the cutting process, transforming the radial tire into the desired components for your DIY projects.
When cutting radial tires for DIY projects, make sure to use a sharp utility knife or a specialized tire cutting tool to ensure clean and precise cuts. Always wear gloves and eye protection to stay safe while working with tires.
Step 3: Finishing Touches
After cutting the radial tire into the desired shapes for your DIY projects, it’s time to add the finishing touches to ensure a polished and professional outcome. This step involves refining the cut edges and preparing the tire components for their intended use. Here’s a comprehensive guide to completing the finishing touches:
- Smooth the Edges: Use sandpaper to smooth out any rough or jagged edges resulting from the cutting process. This step is essential for safety and aesthetics, as it prevents potential injuries and provides a clean, finished look.
- Remove Excess Rubber: If there are any protruding or uneven sections along the cut edges, carefully trim them with a utility knife or scissors. This meticulous approach ensures that the tire components fit seamlessly into your DIY projects.
- Clean and Inspect: Thoroughly clean the cut tire components to remove any debris or residue from the cutting process. Inspect the edges and surfaces to ensure they are free of imperfections and ready for use.
- Consider Surface Treatments: Depending on your DIY project, you may opt to apply surface treatments to the cut tire components. This could include painting, sealing, or adding protective coatings to enhance durability and visual appeal.
- Integrate Additional Elements: If your DIY project calls for additional elements such as hardware, embellishments, or attachments, this is the stage to incorporate them. Secure these elements firmly to the tire components according to your project’s specifications.
- Visualize the End Result: Before proceeding with the final assembly or installation of the tire components, take a moment to visualize how they will contribute to your overall DIY creation. This visualization can guide any additional adjustments or enhancements.
By attending to these finishing touches, you’ll elevate the cut radial tire components to a professional standard, ready to be integrated into your diverse range of DIY projects with confidence and flair.
Read more: How To Build A Window Seat
Safety Precautions
When embarking on the process of cutting radial tires for DIY projects, prioritizing safety is paramount to ensure a secure and enjoyable crafting experience. Here are essential safety precautions to observe throughout the tire-cutting endeavor:
- Protective Gear: Wear heavy-duty gloves to shield your hands from sharp edges and debris. Additionally, safety goggles are vital for safeguarding your eyes from potential splinters and particles during the cutting and finishing stages.
- Stable Work Surface: Ensure that the tire is placed on a stable workbench or secured in a clamp to prevent movement or instability during cutting. This minimizes the risk of accidents and promotes precise cutting.
- Sharp Cutting Tools: Use high-quality, sharp cutting tools to facilitate smooth and controlled cutting motions. Dull blades can lead to slipping and uneven cuts, posing a safety hazard.
- Caution with Power Tools: If utilizing power tools such as a jigsaw, exercise caution and familiarity with the tool’s operation. Follow the manufacturer’s guidelines and safety instructions to mitigate potential risks.
- Mindful Cutting Techniques: Maintain focus and mindfulness during the cutting process to prevent accidental slips or sudden movements that could compromise safety. Proceed with deliberate and controlled motions.
- Adequate Ventilation: If working in an enclosed space or using power tools that generate fumes or dust, ensure proper ventilation to maintain a healthy work environment.
- Proper Disposal of Waste: Dispose of any cut-off tire sections and waste materials responsibly. Sharp or jagged pieces should be carefully discarded to prevent injuries during handling.
- First Aid Preparedness: Have a first aid kit readily available in case of minor cuts or injuries. Being prepared ensures prompt attention to any unexpected mishaps.
By adhering to these safety precautions, you’ll create a secure and controlled environment for cutting radial tires, allowing you to focus on unleashing your creativity while safeguarding your well-being throughout the DIY process.
Conclusion
Transforming old radial tires into versatile components for DIY projects is a rewarding endeavor that not only unleashes your creativity but also contributes to sustainable and eco-friendly practices. By following the steps outlined in this guide and adhering to essential safety precautions, you can confidently embark on the process of cutting radial tires to suit your diverse crafting needs.
From crafting unique planters and sturdy outdoor furniture to innovative art installations and practical household items, the possibilities for repurposing cut radial tires are limited only by your imagination. By embracing this creative approach, you’ll not only breathe new life into discarded tires but also inspire others to explore the potential of upcycling and sustainable design.
As you venture into the realm of DIY projects utilizing cut radial tires, remember to approach each step with patience, precision, and a commitment to safety. Whether you’re creating decorative elements for your home or embarking on large-scale outdoor installations, the skills and techniques acquired through tire cutting will empower you to embark on a wide array of innovative and environmentally conscious endeavors.
So, gather your tools, select your old radial tires, and let your imagination soar as you embark on this transformative journey of repurposing and crafting. By embracing the art of cutting radial tires for DIY projects, you’re not only creating unique and functional pieces but also contributing to a more sustainable and imaginative world.
Frequently Asked Questions about How To Cut Radial Tires For DIY Projects
Was this page helpful?
At Storables.com, we guarantee accurate and reliable information. Our content, validated by Expert Board Contributors, is crafted following stringent Editorial Policies. We're committed to providing you with well-researched, expert-backed insights for all your informational needs.


0 thoughts on “How To Cut Radial Tires For DIY Projects”