Articles
How To Attach Conduit Body To House
Modified: October 19, 2024
Learn how to attach a conduit body to your house in this informative article. Find step-by-step instructions and tips to ensure a secure installation.
(Many of the links in this article redirect to a specific reviewed product. Your purchase of these products through affiliate links helps to generate commission for Storables.com, at no extra cost. Learn more)
Introduction
Attaching a conduit body to your house can be a crucial step in electrical installations and renovations. Conduit bodies, also known as conduit fittings or junction boxes, provide a safe and secure enclosure for electrical connections, protecting them from environmental elements and potential damage. Whether you’re adding a new circuit or extending an existing one, understanding how to properly attach a conduit body is essential for a successful electrical project.
In this article, we’ll guide you through the steps of attaching a conduit body to your house. We’ll cover everything from gathering the necessary tools and materials to securely connecting the wires. By following these step-by-step instructions, you’ll be able to confidently handle this task and ensure a reliable and safe electrical connection.
Before we jump into the process, let’s take a look at the tools and materials you’ll need for this project.
Key Takeaways:
- Properly attaching a conduit body to your house requires gathering the right tools, choosing the ideal location, accurately marking drilling points, and securing the conduit body with precision to ensure a reliable and safe electrical connection.
- After attaching the conduit body, it’s crucial to seal it effectively, connect the wires securely, and thoroughly test the electrical connection to guarantee proper functionality. Seeking professional assistance when in doubt is always advisable for safety.
Read more: How To Attach An Awning To A House
Tools and Materials Needed
Before you begin attaching a conduit body to your house, make sure you have the following tools and materials on hand:
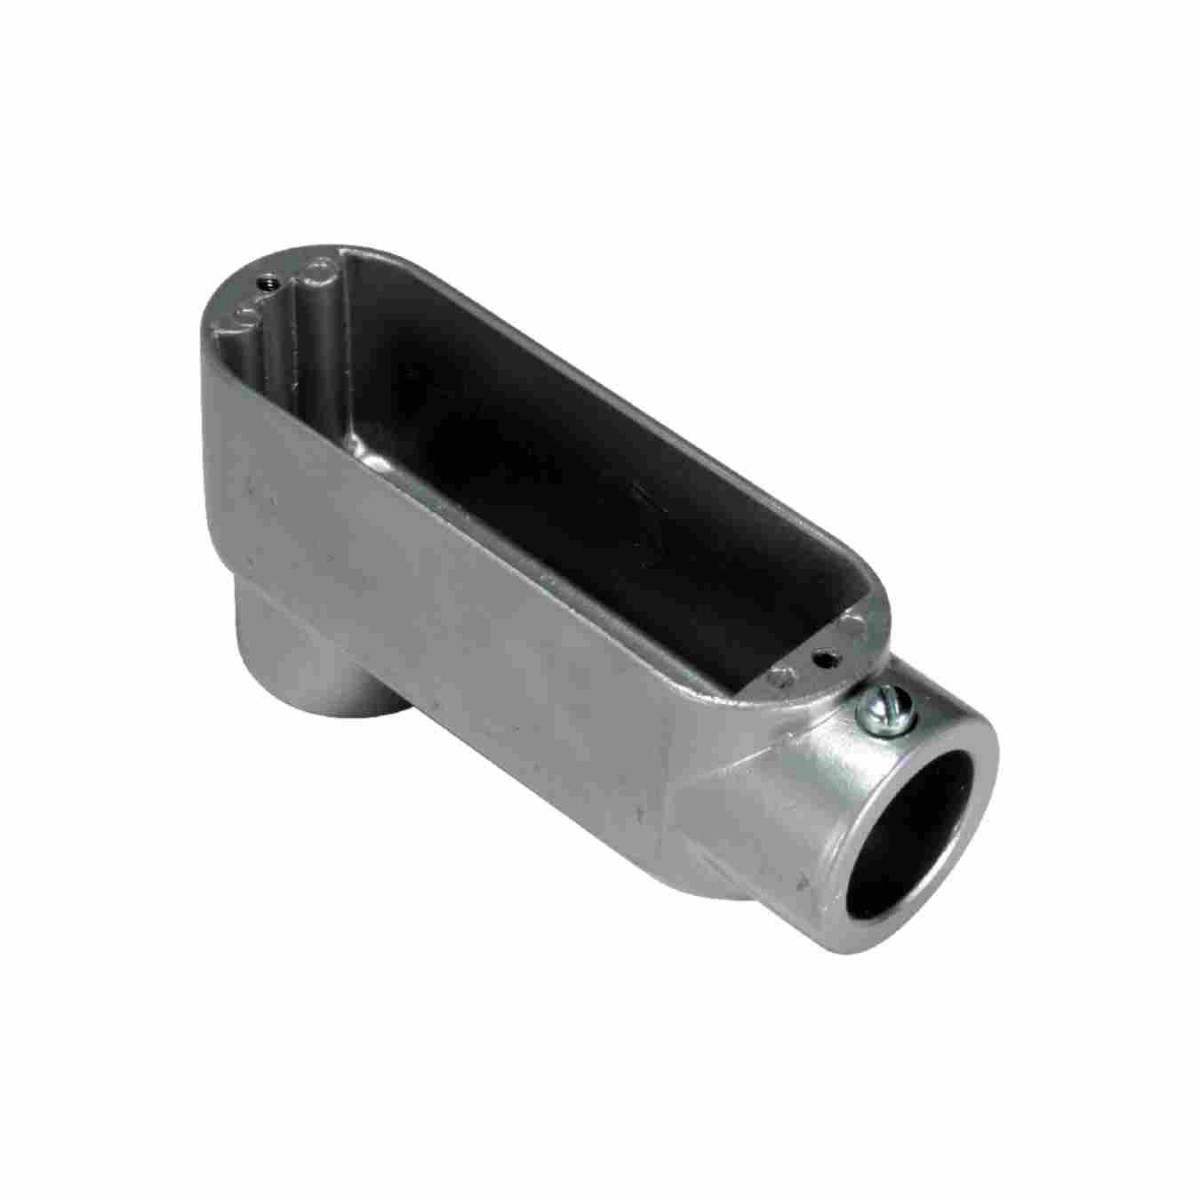
- Conduit body: Choose a conduit body that is suitable for the size and type of conduit you’ll be using. Make sure it meets all the necessary electrical code requirements.
- Conduit: Depending on your specific project, you’ll need the appropriate length and type of conduit. This can include PVC, metal, or flexible conduit.
- Drill: A power drill with the appropriate drill bit size for the conduit body installation.
- Screwdriver: Depending on the type of conduit body you’re using, you may need a screwdriver to secure it in place.
- Level: A level will help you ensure the conduit body is installed correctly and levelled.
- Electrical wires: Depending on the purpose of the conduit body, you’ll need the appropriate electrical wires to connect to it.
- Wire cutters/strippers: These tools will be necessary to cut and strip the wires to the appropriate length and make connections.
- Conduit connectors: You may need conduit connectors to join sections of conduit if your project requires it.
- Drill bit set: It’s always helpful to have a set of various drill bit sizes for different conduit body installations.
- Epoxy or caulk: To ensure a watertight seal, you may need epoxy or caulk to seal the conduit body.
- Safety glasses: Protect your eyes by wearing safety glasses when drilling or working with electrical components.
Having these tools and materials ready before you start will save you time and ensure a smoother installation process. Now that you have everything you need, let’s dive into the step-by-step process of attaching a conduit body to your house.
Step 1: Gather Necessary Supplies
Before you begin the process of attaching a conduit body to your house, it’s important to gather all the necessary supplies. By having everything ready, you can minimize interruptions and complete the installation efficiently. Here are the steps to gather the necessary supplies:
- Inspect the conduit body: Take a close look at the conduit body you’ll be using. Ensure that it is the correct size, type, and meets all the necessary electrical code requirements.
- Check the conduit: Determine the required length and type of conduit for your installation. Measure and cut the conduit to the appropriate size using a conduit cutter or hacksaw if necessary.
- Prepare the electrical wires: Depending on the purpose of the conduit body, you’ll need the appropriate electrical wires to connect to it. Measure and cut the wires to the required length, leaving some extra length for easier installation.
- Inspect and gather tools: Ensure that you have all the necessary tools mentioned in the previous section. Check that your power drill is charged and the drill bits are suitable for the conduit body installation.
- Prepare the work area: Clear the area around the installation site and organize your tools and supplies for easy access. This will help you stay organized and prevent any accidents or damage to materials.
- Put on safety gear: Before you begin any work, put on safety glasses to protect your eyes. If necessary, wear gloves to protect your hands.
By following these steps and gathering all the necessary supplies beforehand, you’ll be well-prepared to proceed with attaching the conduit body to your house. This will help minimize any disruptions or delays during the installation process. Now that you have all your supplies ready, let’s move on to choosing the location for your conduit body installation.
Step 2: Choose the Location
Choosing the right location to install your conduit body is crucial for the effectiveness and functionality of your electrical system. Here are the steps to consider when choosing the location:
- Review electrical plans: If you have electrical plans or blueprints for your house, refer to them to identify the best location for the conduit body. This will help ensure that the conduit body is installed in the most efficient and logical position for your electrical system.
- Consider accessibility: Choose a location that is easily accessible for future maintenance and repairs. Ensure that there is enough space around the conduit body to work comfortably and maneuver wires if needed.
- Assess environmental factors: Take into account any environmental factors that may affect the conduit body, such as moisture, temperature, or exposure to sunlight. You want to select a location where the conduit body will be protected from these elements and minimize the risk of damage.
- Check clearances: Verify that there are no obstructions such as plumbing pipes, HVAC ducts, or structural elements that might impede the installation of the conduit body.
- Consider aesthetic appeal: While functionality is paramount, it’s also important to consider the visual impact of the conduit body. Choose a location that is inconspicuous or can be easily concealed if aesthetics are a concern.
Once you have carefully considered these factors, identify the most suitable location for your conduit body installation. It’s a good idea to mark the spot with a pencil or tape to ensure accuracy during the next step of the installation process.
Now that you have chosen the location for your conduit body, it’s time to move on to marking the drilling points.
Step 3: Mark the Drilling Points
Accurately marking the drilling points is crucial to ensure proper alignment and placement of the conduit body. Follow these steps to mark the drilling points:
- Measure and mark: Using a measuring tape or ruler, carefully measure and mark the exact location where the conduit body will be installed. Use a pencil or marker to make clear and visible marks.
- Verify alignment: Use a level to double-check that the marks for the drilling points are level and straight. This will help ensure that the conduit body is installed correctly and aesthetically pleasing.
- Spacing: If you are installing multiple conduit bodies, make sure to measure and mark the appropriate spacing between each drilling point. This will maintain consistency and proper spacing throughout your installation.
- Double-check clearances: Verify that the drilling points are clear of any obstructions such as studs, pipes, or electrical wiring. This will prevent any potential damage or interference during the drilling process.
It’s important to take your time during this step to ensure accurate and precise markings. The success of the installation relies heavily on the accuracy of the drilling points. Once you are confident with the markings, it’s time to move on to drilling the holes for the conduit body.
Before drilling, make sure you have the necessary safety equipment such as safety glasses and gloves to protect yourself during the drilling process.
Now that the drilling points are marked, let’s proceed to the next step: drilling holes for the conduit body.
Read also: 13 Best Pvc Conduit Body for 2025
Step 4: Drill Holes
Drilling holes for the conduit body is a critical step in the installation process. Follow these steps to drill the holes accurately and safely:
- Choose the appropriate drill bit: Select a drill bit that matches the size of the conduit body. Refer to the manufacturer’s instructions or the size of the conduit body itself when choosing the drill bit.
- Secure the work area: Ensure that the area around the drilling points is clear and secure. If necessary, use clamps or other materials to stabilize the work area and prevent any movement.
- Put on safety gear: Prioritize your safety by wearing safety glasses to protect your eyes from any debris or flying particles.
- Start drilling: Position the drill bit at the first marked drilling point and start drilling. Apply gentle pressure and let the drill bit do the work. Be careful not to apply excessive force, as it can lead to material damage or an uneven hole.
- Use steady, even pressure: Maintain a steady and even pressure as you drill the hole. This will result in a clean and precise hole.
- Check depth: As you drill, periodically check the depth of the hole by comparing it to the length of the conduit body. This will help ensure that the hole is drilled to the appropriate depth.
- Clean the holes: Once the holes are drilled, use a brush or cloth to clean any debris or dust from the holes. This will ensure a proper fit for the conduit body.
Repeat these steps for each of the marked drilling points. Take your time and be patient during the drilling process to ensure accurate and precise holes. Once the holes are drilled, you’re ready to move on to the next step: attaching the conduit body.
Before proceeding, double-check your work area and safety gear to ensure they are in proper condition.
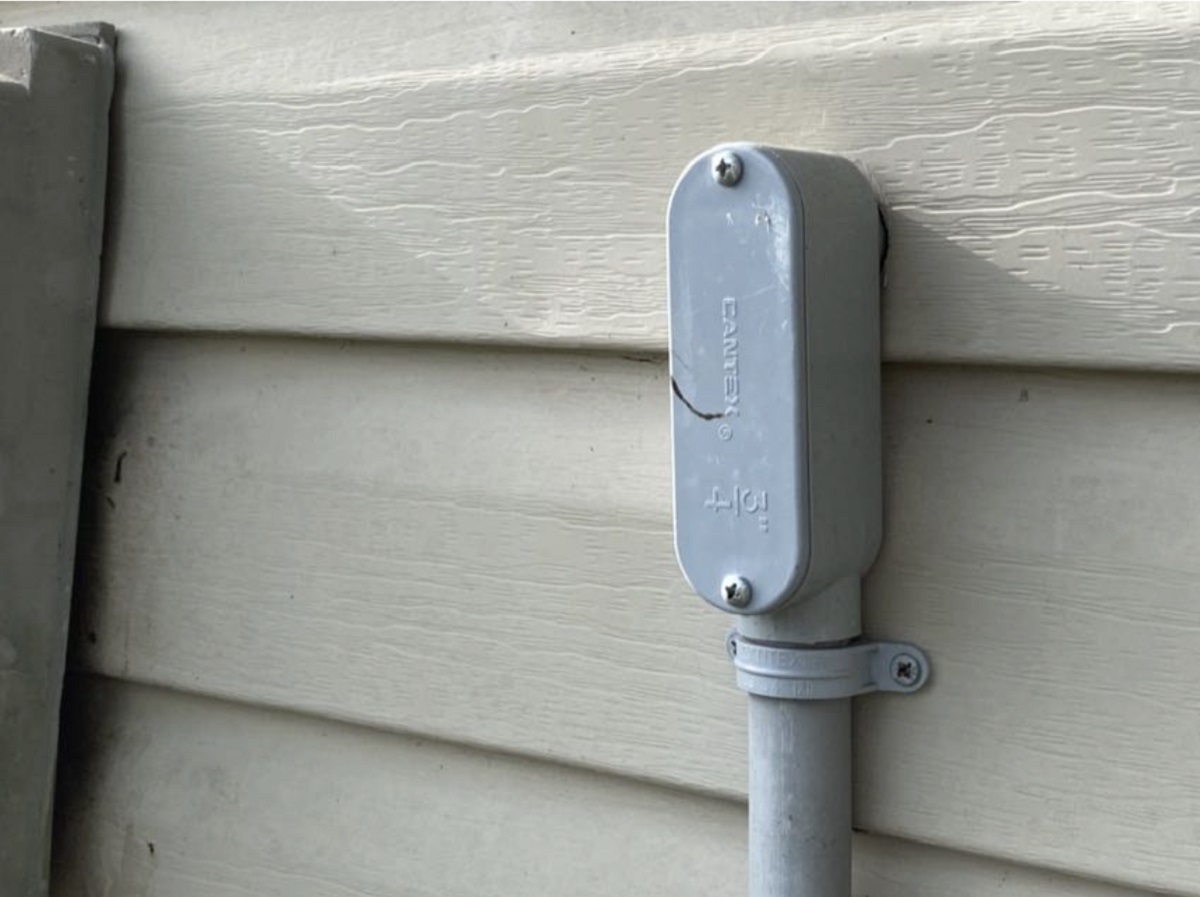
When attaching a conduit body to a house, make sure to use the appropriate size and type of conduit for the electrical wiring. Secure the conduit body to the house using the appropriate mounting hardware and ensure it is properly sealed to prevent water infiltration.
Step 5: Attach Conduit Body
Attaching the conduit body is a crucial step in the installation process. Follow these steps to properly attach the conduit body to your house:
- Position the conduit body: Take the conduit body and position it over the drilled holes. Ensure that it aligns properly with the markings and sits flush against the wall.
- Insert the conduit: Slide the ends of the conduit or pipes into the openings on the conduit body. Make sure they are securely inserted and aligned with the corresponding holes.
- Secure the conduit body: Depending on the type of conduit body you’re using, it may require securing with screws or other fasteners. Consult the manufacturer’s instructions to determine the appropriate method of securing the conduit body in place.
- Tighten the screws: If screws are needed to secure the conduit body, use a screwdriver or drill to tighten them. Be cautious not to overtighten, as it may cause damage to the conduit body or the surrounding structure.
- Ensure proper alignment: Check again for proper alignment and positioning of the conduit body. Adjust as needed to ensure it is straight and aligned with the markings.
By following these steps, you’ll be able to successfully attach the conduit body to your house. This step is crucial for a secure and reliable electrical connection. Now that the conduit body is securely attached, it’s time to move on to securing and sealing the conduit body.
Before proceeding, double-check that the conduit body is securely attached and aligned correctly.
Step 6: Secure and Seal Conduit Body
Securing and sealing the conduit body is an important step to ensure the integrity of your electrical connection and protect it from environmental elements. Follow these steps to properly secure and seal the conduit body:
- Inspect the conduit body: Examine the conduit body to make sure it is securely attached and aligned correctly. Verify that there are no gaps or loose components.
- Apply sealing material: Depending on the specific requirements of your installation, use an appropriate sealing material such as epoxy or caulk to seal any gaps between the conduit body and the wall. Apply the sealing material evenly and fill any voids or openings.
- Smooth the seal: Use a putty knife or your finger to smooth and shape the sealing material, ensuring a neat and tidy appearance. This will also help improve the effectiveness of the seal.
- Clean up excess material: Remove any excess sealing material using a damp cloth or sponge. Pay attention to details and ensure that the surrounding area is clean and free from any debris.
- Allow time for drying: Follow the manufacturer’s instructions to determine the drying time for the sealing material. Allow sufficient time for it to fully cure and dry before proceeding with the next steps of your electrical installation.
Properly securing and sealing the conduit body ensures a watertight and protective barrier, preventing moisture, dust, and other elements from entering the electrical connection. This step is essential for the longevity and reliability of your electrical system.
Now that the conduit body is securely sealed, it’s time to move on to the next step: connecting the wires.
Before proceeding, double-check the sealing of the conduit body and ensure that the sealing material is properly applied and allowed to dry.
Step 7: Connect Wires
Connecting the wires to the conduit body is a critical step in establishing the electrical connection. Follow these steps to properly connect the wires:
- Prepare the wires: Strip off a small portion of the insulation from the ends of the wires using wire cutters or strippers. Ensure that the length of the exposed wire is appropriate for making connections.
- Insert the wires: Carefully insert the stripped ends of the wires into the appropriate terminals or connectors on the conduit body. Follow the wiring diagram or manufacturer’s instructions to ensure the correct placement.
- Make the connections: Use wire connectors or terminal screws, depending on the type of conduit body, to secure the wires in place. Ensure that the connections are tight and secure to minimize the risk of loose or faulty connections.
- Tug test: To ensure a solid connection, gently tug on each wire to verify that it is securely attached. If any wires come loose, double-check the connection and tighten accordingly.
- Organize the wires: Arrange the wires inside the conduit body in an organized manner, avoiding any unnecessary clutter or strain on the connections. This will aid in future maintenance and ensure proper functioning of the electrical system.
It is essential to exercise caution throughout this step to prevent any damage or short circuits. Double-check your connections and ensure that the wires are properly inserted and securely fastened to maintain a reliable and safe electrical connection.
Now that the wires are connected, it’s time to move on to the final step: testing the connection.
Before proceeding, double-check the wire connections and ensure they are properly secured and organized.
Step 8: Test the Connection
Testing the electrical connection is the final step in the installation process. It is crucial to ensure that the connection is functioning properly and safely. Follow these steps to test the connection:
- Turn off the power: Before conducting any tests, ensure that the power to the circuit connected to the conduit body is turned off at the main electrical panel.
- Double-check the wiring: Inspect the wire connections one final time to ensure they are securely attached and properly organized.
- Turn on the power: Restore the power to the circuit by switching on the main electrical panel.
- Test the functionality: Use a voltage tester or multimeter to verify that power is flowing correctly through the circuit. Test each wire connected to the conduit body to confirm its functionality.
- Check for any issues: If there are any issues during the testing process or you notice abnormal readings, immediately turn off the power and reexamine the connections. Look for loose wires, damaged components, or any other signs of trouble.
- Seek professional assistance if necessary: If you encounter any difficulties or are unsure about the test results, it is advisable to seek assistance from a qualified electrician. They can provide expert guidance and address any electrical concerns.
By conducting thorough testing, you can ensure that the electrical connection is functioning safely and reliably. It is important not to skip or rush this step to avoid any potential hazards or malfunctioning circuits.
Once you have successfully tested the connection and confirmed its functionality, congratulate yourself on a job well done! You have now completed the process of attaching a conduit body to your house, providing a secure and reliable electrical connection.
Conclusion
Attaching a conduit body to your house is a crucial step in electrical installations and renovations. It provides a safe and secure enclosure for electrical connections, protecting them from environmental elements and potential damage. By following the step-by-step instructions provided in this article, you can confidently handle the task and ensure a reliable and safe electrical connection.
We started by gathering the necessary tools and materials, ensuring we have everything we need for the installation. Then, we moved on to choosing the location for the conduit body, considering factors such as accessibility, environmental conditions, and aesthetic appeal.
Next, we marked the drilling points accurately, ensuring proper alignment and placement. We then proceeded to drill the holes using the appropriate drill bit size for the conduit body installation, taking care to maintain steady and even pressure throughout.
With the holes drilled, we attached the conduit body securely, making sure it aligned properly with the markings. We then sealed the conduit body using an appropriate sealing material to prevent moisture and other elements from entering the electrical connection.
Once the conduit body was secured and sealed, we connected the wires to the conduit body, ensuring the proper placement and tight connections. We organized the wires to optimize functionality and ease of future maintenance.
Finally, we tested the connection to ensure its proper functioning, turning off the power, and using a voltage tester or multimeter to verify the flow of electricity. If any issues were encountered, we promptly addressed them or sought professional assistance if needed.
By following these steps, you have successfully attached a conduit body to your house, establishing a secure and reliable electrical connection. Be proud of your accomplishment and enjoy the benefits of a properly installed and functioning electrical system.
Remember, if you ever feel unsure or uncomfortable with the installation process, it is always recommended to seek assistance from a qualified electrician. Safety should be the top priority in all electrical installations.
Now, armed with the knowledge and skills you’ve gained, you can confidently tackle future electrical projects, knowing how to attach a conduit body to your house with ease and precision.
Frequently Asked Questions about How To Attach Conduit Body To House
Was this page helpful?
At Storables.com, we guarantee accurate and reliable information. Our content, validated by Expert Board Contributors, is crafted following stringent Editorial Policies. We're committed to providing you with well-researched, expert-backed insights for all your informational needs.


0 thoughts on “How To Attach Conduit Body To House”