Articles
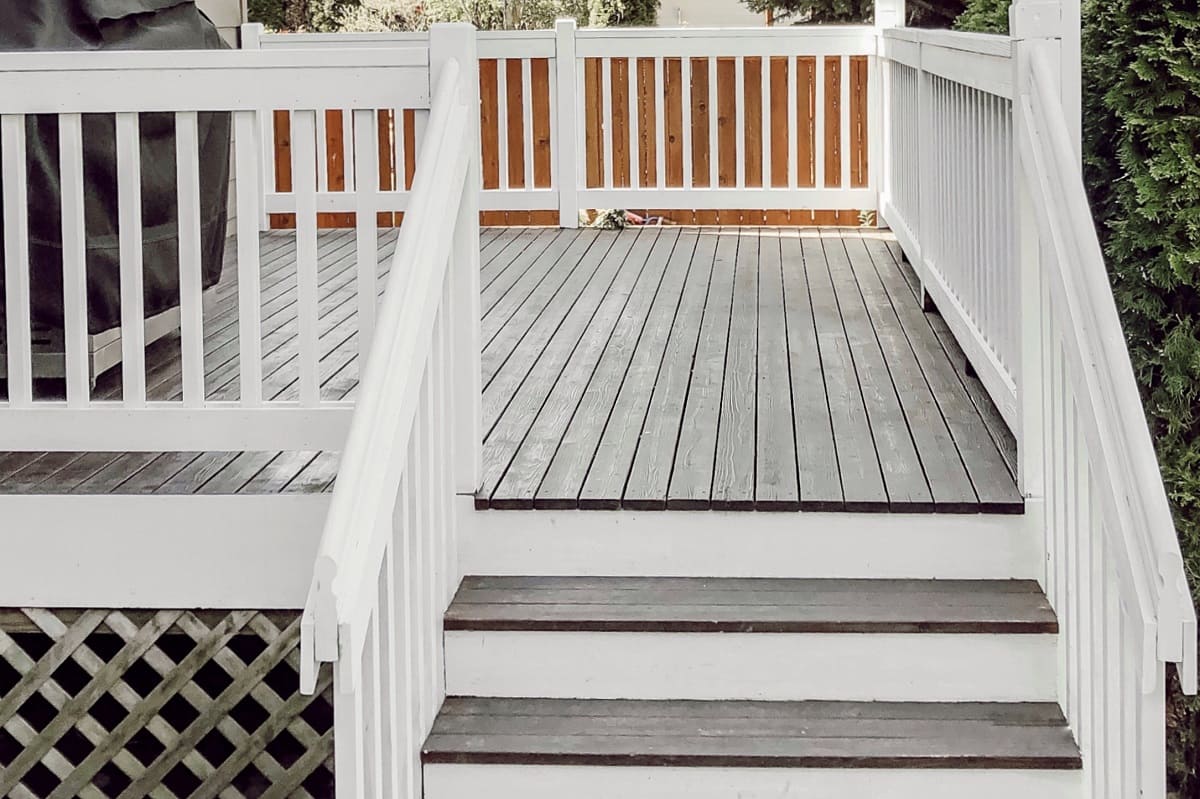
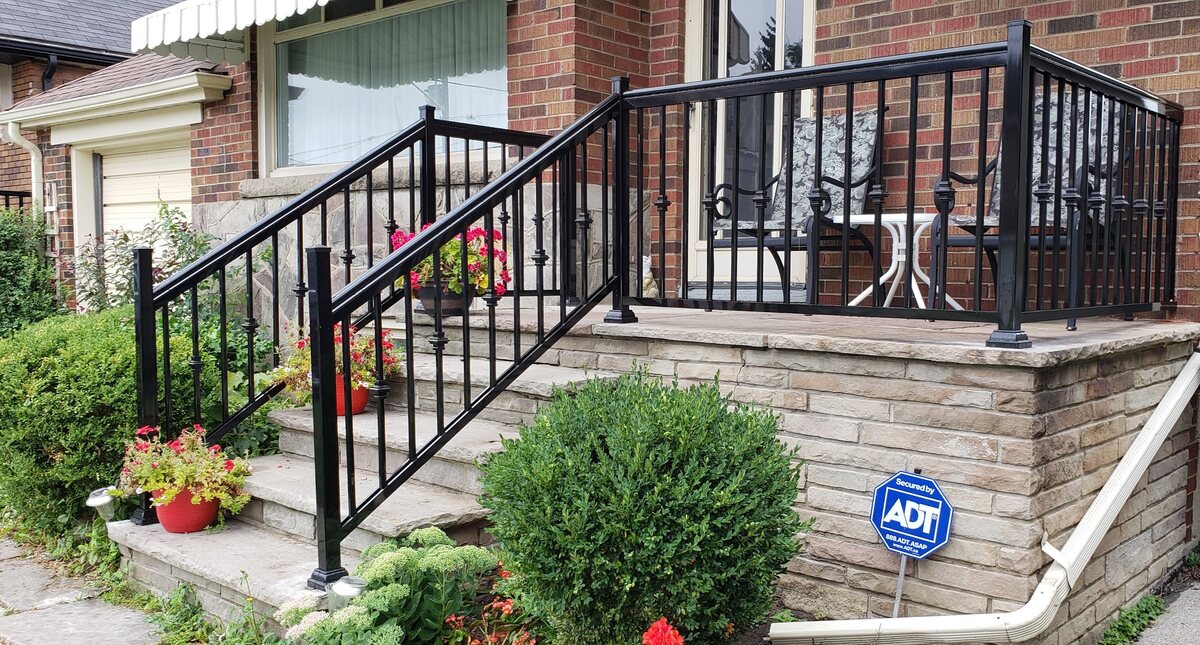
How To Build A Railing For Stairs Outdoors
Modified: December 7, 2023
Learn how to build a sturdy and stylish outdoor railing for stairs with our informative articles. Enhance the safety and aesthetics of your outdoor space today!
(Many of the links in this article redirect to a specific reviewed product. Your purchase of these products through affiliate links helps to generate commission for Storables.com, at no extra cost. Learn more)
Introduction
When it comes to outdoor stairs, safety and functionality are of utmost importance. Whether you have a deck, patio, or porch, installing a railing for your outdoor stairs will provide you with peace of mind and add a stylish touch to your space. Building a railing for stairs outdoors may seem like a daunting task, but with the right materials, tools, and a little bit of guidance, you can easily tackle this project.
In this article, we will walk you through the step-by-step process of building a railing for stairs outdoors. From measuring and planning to the finishing touches, we will cover everything you need to know to successfully complete this project. So grab your tools and let’s get started!
Subtitle: Materials and Tools Needed
Key Takeaways:
- Building a railing for outdoor stairs requires careful planning, precise measurements, and sturdy materials. By following the step-by-step process, you can create a safe and stylish addition to your outdoor space.
- Prioritizing safety and adhering to local building codes are crucial when building an outdoor stair railing. With the right tools and materials, this project can be accomplished by both beginners and experienced DIYers, adding both functionality and aesthetic appeal to your outdoor space.
Read more: How To Build Outdoor Railing For Stairs
Materials and Tools Needed
Before you begin building your outdoor stair railing, it’s important to gather all the necessary materials and tools. Here’s a list of items you’ll need:
- Pressure-treated lumber
- 4×4 posts
- Handrail brackets
- Handrail
- Spindles
- Galvanized screws
- Post hole digger
- Level
- Tape measure
- Saw
- Drill
- Wrench
- Paint or stain (optional)
Make sure to gather all of these materials and tools before you begin the construction process. This will ensure that you have everything you need to complete the project without any interruptions.
Key Takeaways:
- Building a railing for outdoor stairs requires careful planning, precise measurements, and sturdy materials. By following the step-by-step process, you can create a safe and stylish addition to your outdoor space.
- Prioritizing safety and adhering to local building codes are crucial when building an outdoor stair railing. With the right tools and materials, this project can be accomplished by both beginners and experienced DIYers, adding both functionality and aesthetic appeal to your outdoor space.
Read more: How To Build Outdoor Railing For Stairs
Materials and Tools Needed
Before you begin building your outdoor stair railing, it’s important to gather all the necessary materials and tools. Here’s a list of items you’ll need:
- Pressure-treated lumber: This type of lumber is resistant to rot and decay, making it ideal for outdoor use.
- 4×4 posts: These sturdy posts will serve as the main support for your railing.
- Handrail brackets: These brackets will secure the handrail to the posts and provide stability.
- Handrail: The handrail will act as a guide for people using the stairs, providing support and safety.
- Spindles: Spindles are the vertical components that go between the handrail and the bottom rail. They help prevent falls and add visual appeal.
- Galvanized screws: These screws are resistant to rust and corrosion, ensuring the longevity of your railing.
- Post hole digger: You will need a post hole digger to dig holes for the posts to be installed in.
- Level: A level will help you ensure that the railing is straight and properly aligned.
- Tape measure: This tool is essential for accurately measuring the dimensions of your stairs and the required lengths of the railing components.
- Saw: You will need a saw to cut the lumber and other materials to the desired lengths.
- Drill: A drill will be necessary for making holes and attaching the railing components to the posts.
- Wrench: A wrench will come in handy for tightening the bolts and screws.
- Paint or stain (optional): If you want to enhance the appearance of your railing and protect it from the elements, you may choose to paint or stain the wood.
Make sure to gather all of these materials and tools before you begin the construction process. This will ensure that you have everything you need to complete the project without any interruptions. Additionally, be sure to wear the appropriate safety gear, including gloves and safety glasses, while working with tools and materials.
Step 1: Measure and Plan
Before you start building the railing for your outdoor stairs, it’s crucial to take accurate measurements and create a detailed plan. This will help ensure that your railing fits properly and meets your specific needs. Follow these steps to measure and plan your railing:
- Measure the length and height: Use a tape measure to determine the length of the stair railing you’ll need. Measure from the top of the first step to the bottom of the last step to get the overall length. Next, measure the height from the base of the bottom step to the top of the landing or deck where the railing will be attached.
- Check local building codes: It’s important to familiarize yourself with the building codes and regulations in your area. Check with your local building department to ensure that your planned railing meets the necessary safety requirements.
- Sketch your design: Create a rough sketch of your railing design, including the number of posts, the positioning of the handrail, and the spacing of the spindles. This will help you visualize the final result and ensure that everything is properly planned.
- Calculate the number of materials needed: Based on your measurements and design, calculate the number of posts, spindles, handrail brackets, and other materials required for the project. Take into account any additional features you may want to incorporate, such as decorative elements or lighting.
- Choose the materials: Select the type of lumber you want to use for your railing. Pressure-treated lumber is a popular choice due to its durability and resistance to rot and decay.
By measuring and planning carefully, you can ensure that your outdoor stair railing will fit seamlessly into your space and comply with local building codes. This will save you time and effort in the construction process as well as provide a safe and aesthetically pleasing result.
Step 2: Prepare the Posts
Once you have your measurements and plan in place, it’s time to prepare the posts for your outdoor stair railing. The posts will serve as the main support structure for the railing, so it’s important to ensure they are sturdy and properly installed. Follow these steps to prepare the posts:
- Mark the post locations: Using a pencil or marker, mark the locations where the posts will be installed. Typically, you’ll want to place the posts at the top and bottom of the staircase, as well as at regular intervals along the length of the railing.
- Pre-treat the posts (optional): If you’re using pressure-treated lumber, you can skip this step. However, if you’re using untreated lumber, it’s a good idea to apply a wood preservative to protect the posts from moisture and rot. Follow the instructions on the preservative product for best results.
- Cut the posts to length: Use a saw to cut the posts to the desired height, based on your measurements. Make sure to cut them evenly and square at the top to ensure a clean and professional look.
- Create notches (optional): If you have a deck or landing where the railing will be attached, you may need to create notches in the posts to secure them to the surface. Measure and mark the location of the notches, and use a saw or chisel to carefully remove the wood.
- Smooth the edges: Use sandpaper or a sander to smooth any rough edges or splinters on the posts. This will help prevent any injuries when handling the posts or during the installation process.
By properly preparing the posts, you will ensure that they are strong, stable, and ready for installation. Taking the time to complete this step will contribute to the overall durability and longevity of your outdoor stair railing.
Read more: How To Build A Porch Stair Railing
Step 3: Install the Posts
With the posts prepared, it’s time to move on to the installation process. Proper installation of the posts is vital for the stability and structural integrity of your outdoor stair railing. Follow these steps to install the posts:
- Dig the post holes: Use a post hole digger to dig holes for the posts. The depth of the holes will depend on the height and size of the posts, as well as the soil conditions in your area. As a general guideline, the holes should be approximately one-third of the length of the posts.
- Place the posts in the holes: Carefully lower the prepared posts into the holes, ensuring they are aligned and level. Use a spirit level to check the vertical and horizontal alignment of the posts. Make any necessary adjustments to ensure they are perfectly straight.
- Secure the posts: Once the posts are properly positioned, fill the holes with concrete or gravel. Follow the manufacturer’s instructions for mixing and applying the concrete. Use a level to check the posts’ alignment one final time before allowing the concrete to set.
- Allow the concrete to cure: Depending on the type of concrete used, you may need to wait a few days for it to fully cure and harden. Follow the recommended curing time provided by the concrete manufacturer.
It’s worth noting that if you’re attaching the posts to a deck or landing, you may need to use specialized brackets or hardware for secure attachment. Consult the instructions provided by the manufacturer to ensure proper installation.
By following these steps, you’ll be able to successfully install the posts for your outdoor stair railing. Take your time during this step to ensure that the posts are securely set and aligned correctly. This will ensure the stability and longevity of your railing system.
When building a railing for stairs outdoors, make sure to use pressure-treated wood or a weather-resistant material to ensure durability and longevity in outdoor conditions. Additionally, ensure that the railing meets local building codes for safety and compliance.
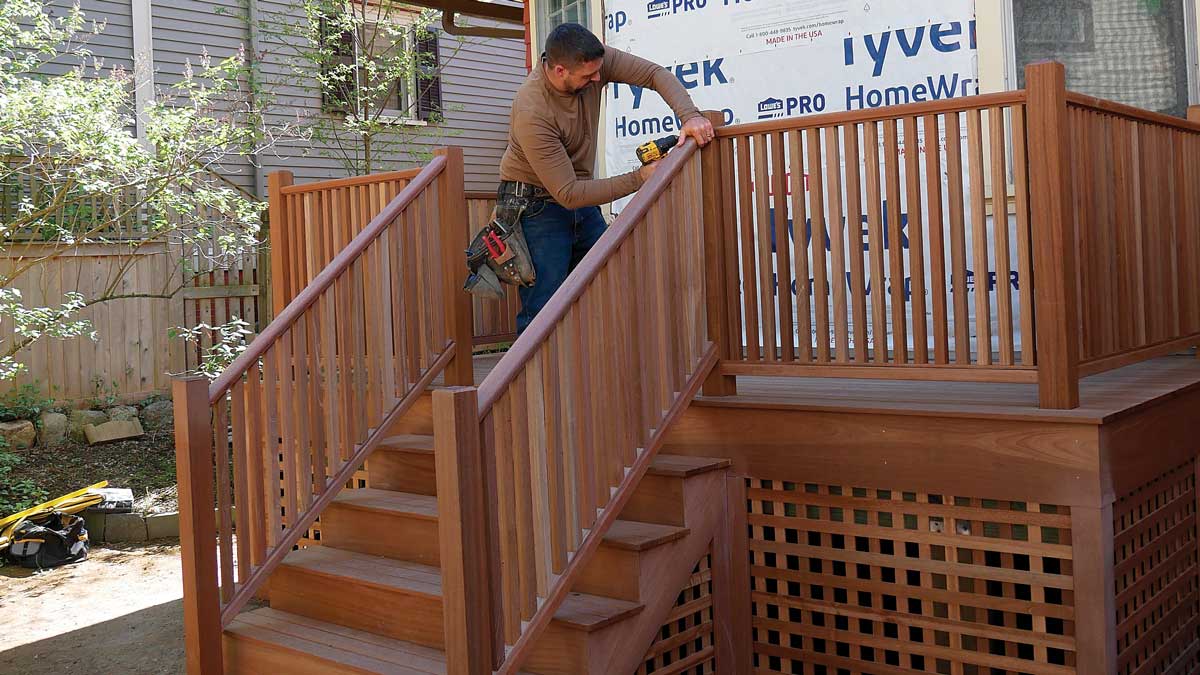
Step 4: Attach the Handrail Brackets
Now that the posts are securely installed, it’s time to move on to attaching the handrail brackets. These brackets will provide support and stability to the handrail, ensuring its strength and durability. Follow these steps to attach the handrail brackets:
- Measure and mark the bracket positions: Use a tape measure to determine the appropriate spacing for the brackets along the length of the railing. Mark the positions of the brackets on the posts, ensuring they are evenly spaced and aligned.
- Pre-drill pilot holes: Using a drill and a drill bit slightly smaller than the screws provided with the brackets, pre-drill pilot holes at the marked positions on the posts. This will help prevent the wood from splitting when you attach the brackets.
- Attach the brackets: Line up the brackets with the pilot holes and use a screwdriver or a drill to secure them to the posts. Make sure the brackets are level and firmly attached. Use the appropriate screws provided with the brackets to ensure a secure connection.
- Check the alignment: Double-check that the brackets are properly aligned and level. Use a spirit level to ensure that the handrail will be straight and even.
During this step, you may also choose to attach a bottom rail to the brackets, if desired. This will provide additional support and create a cohesive look for your outdoor stair railing.
By attaching the handrail brackets securely, you’ll ensure that the railing is strong, stable, and able to withstand regular use. Take your time during this step to ensure that the brackets are properly aligned and firmly attached to the posts. This will contribute to the overall safety and functionality of your outdoor stair railing.
Step 5: Install the Handrail
With the handrail brackets securely attached to the posts, it’s time to install the handrail itself. The handrail not only provides support and safety for those using the stairs, but it also adds a finishing touch to your outdoor stair railing. Follow these steps to install the handrail:
- Cut the handrail to size: Measure and mark the length of the handrail based on your previous measurements. Use a saw to cut the handrail to the desired length.
- Pre-drill pilot holes: Before attaching the handrail to the brackets, pre-drill pilot holes into the underside of the handrail. This will prevent the wood from splitting when you insert the screws.
- Align the handrail: Align the handrail with the brackets and insert the screws through the pilot holes. Use a screwdriver or a drill to secure the handrail to the brackets. Make sure the handrail is level and securely attached.
- Check the stability: Give the handrail a firm shake to ensure that it is properly attached and stable. Make any necessary adjustments or tighten the screws as needed.
It’s important to note that the handrail should extend past the top and bottom posts to ensure a secure grip when ascending or descending the stairs. This overhang should be approximately 12 inches on each end, but you can adjust it to suit your preference.
By installing the handrail properly, you’ll create a sturdy and functional support system for your outdoor stairs. Take your time during this step to ensure that the handrail is aligned correctly and securely attached to the brackets. This will contribute to the overall safety and aesthetics of your outdoor stair railing.
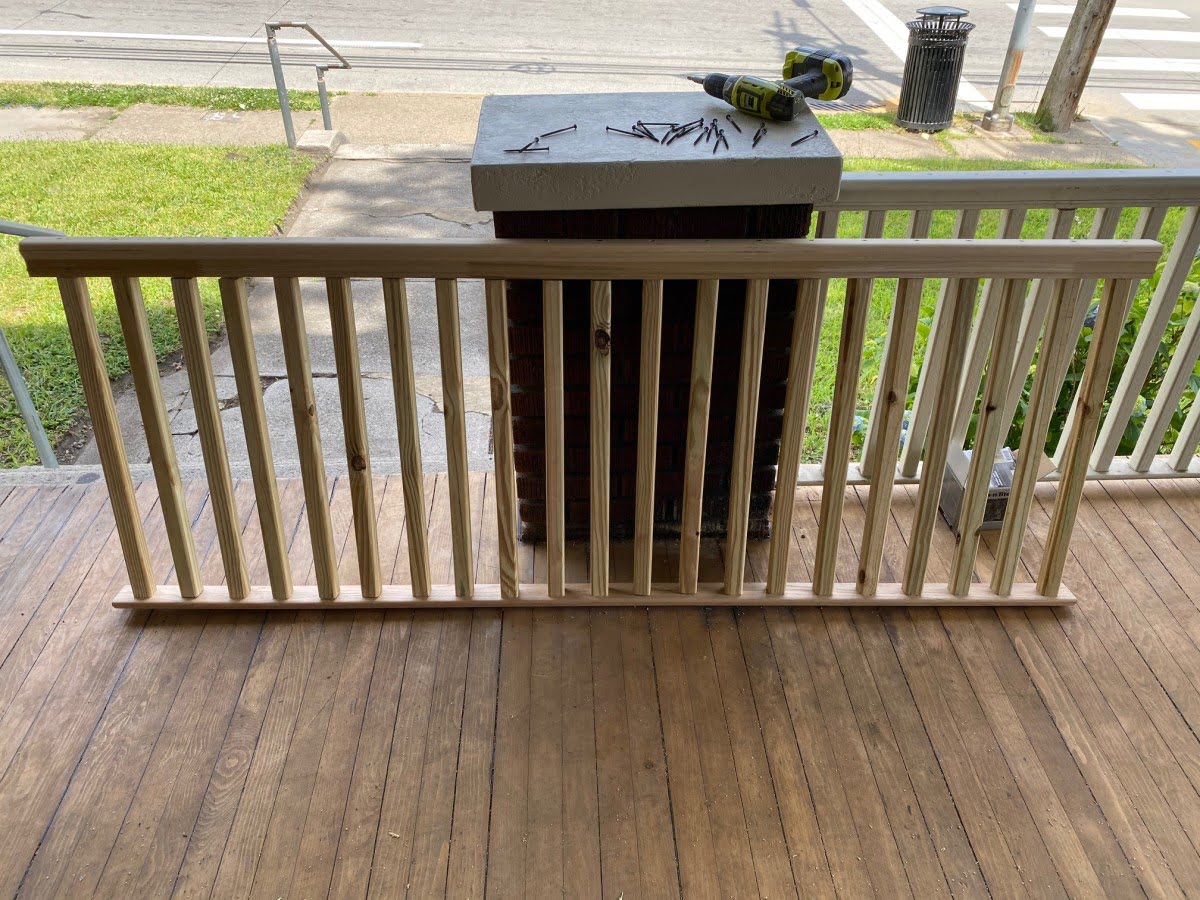
Step 6: Secure the Spindles
Now that the handrail is securely in place, it’s time to move on to securing the spindles. Spindles, also known as balusters, are the vertical components that go between the handrail and the bottom rail. They not only add visual appeal to your outdoor stair railing, but they also play a crucial role in preventing falls. Follow these steps to secure the spindles:
- Measure and mark the spacing: Determine the spacing between each spindle based on local building codes and your own aesthetic preferences. Mark the positions of each spindle on the top and bottom rails.
- Pre-drill pilot holes: Using a drill and a drill bit slightly smaller than the screws you’ll be using, pre-drill pilot holes at the marked positions on the top and bottom rails. This will help prevent the wood from splitting when you insert the screws.
- Attach the spindles: Line up the spindles with the pilot holes and insert the screws to secure them to the top and bottom rails. Use a screwdriver or a drill to tighten the screws, making sure the spindles are stable and securely attached.
- Check for stability: Give the spindles a gentle shake to ensure that they are properly attached and secure. Make any necessary adjustments or tighten the screws as needed.
It’s important to ensure that the spindles are evenly spaced and aligned properly with the handrail and bottom rail. Taking the time to measure and position the spindles accurately will contribute to the overall safety and visual appeal of your outdoor stair railing.
During this step, you may also choose to add decorative elements or patterns to the spindles for a personalized and unique look. Be creative and have fun with your design to make your outdoor stair railing truly stand out.
By securely attaching the spindles, you’ll create a sturdy barrier that ensures the safety of those using the outdoor stairs. Take your time during this step to ensure that the spindles are properly aligned and firmly attached. This will contribute to the overall functionality and aesthetics of your outdoor stair railing.
Read more: How To Paint Railings On Stairs
Step 7: Finishing Touches
Now that the main components of your outdoor stair railing are in place, it’s time to add the finishing touches. These final steps will help enhance the durability, aesthetics, and overall appeal of your railing. Follow these steps to complete your outdoor stair railing:
- Check for any loose screws or fittings: Before moving forward, thoroughly inspect the entire railing system for any loose screws or fittings. Tighten or replace any components as needed to ensure everything is secure.
- Seal or paint the railing (optional): If desired, you can protect the wood and enhance the appearance of your outdoor stair railing by applying a sealant or paint. Choose a product suitable for outdoor use and follow the manufacturer’s instructions for application.
- Apply a topcoat (optional): If you painted the railing, consider applying a clear topcoat to provide an extra layer of protection against the elements. This will help prevent fading, chipping, and peeling of the paint over time.
- Test the stability: Once the railing is completely installed and finished, give it a final test for stability. Apply pressure and ensure that there is no wobbling or movement. If any issues are detected, make the necessary adjustments to reinforce the stability of the railing.
In addition to these steps, you may also consider adding other decorative elements such as post caps or lighting to further enhance the appearance and functionality of your outdoor stair railing. Get creative and personalize your railing to suit your style and preferences.
Completing these finishing touches will provide the final polish to your outdoor stair railing project. By ensuring that all components are secure and well-maintained, you’ll have peace of mind knowing that your railing is both safe and visually pleasing.
Conclusion
Congratulations! You have successfully completed the process of building a railing for stairs outdoors. By following the steps outlined in this article, you have created a sturdy and functional railing that not only enhances the safety of your outdoor stairs but also adds a stylish touch to your space.
Throughout this project, you learned how to measure and plan for your railing, prepare and install the posts, attach the handrail brackets, install the handrail and secure the spindles. These steps were essential in creating a strong and reliable outdoor stair railing that meets your specific needs.
Remember, it’s important to always prioritize safety and adhere to local building codes when undertaking any construction project. Ensure that your railing is properly secured and that all components are firmly attached. Regularly inspect the railing for any signs of wear or damage, and make any necessary repairs or replacements to maintain its integrity.
Additionally, don’t be afraid to add your own personal touch to the design. You can choose different materials, colors, or decorative elements to create a railing that reflects your individual style and complements your outdoor space.
Building a railing for stairs outdoors may seem like a daunting task, but with the right materials, tools, and guidance, it is a project that can be accomplished by both beginners and experienced DIYers alike. Take your time, follow each step carefully, and always prioritize safety to ensure the success of your project.
Now, step back and admire your newly constructed outdoor stair railing. Not only does it provide the necessary support and safety for using the stairs, but it also adds a beautiful and functional element to your outdoor space. Enjoy your enhanced aesthetic appeal and the peace of mind that comes with having a secure and well-designed railing.
Frequently Asked Questions about How To Build A Railing For Stairs Outdoors
Was this page helpful?
At Storables.com, we guarantee accurate and reliable information. Our content, validated by Expert Board Contributors, is crafted following stringent Editorial Policies. We're committed to providing you with well-researched, expert-backed insights for all your informational needs.


0 thoughts on “How To Build A Railing For Stairs Outdoors”