Articles
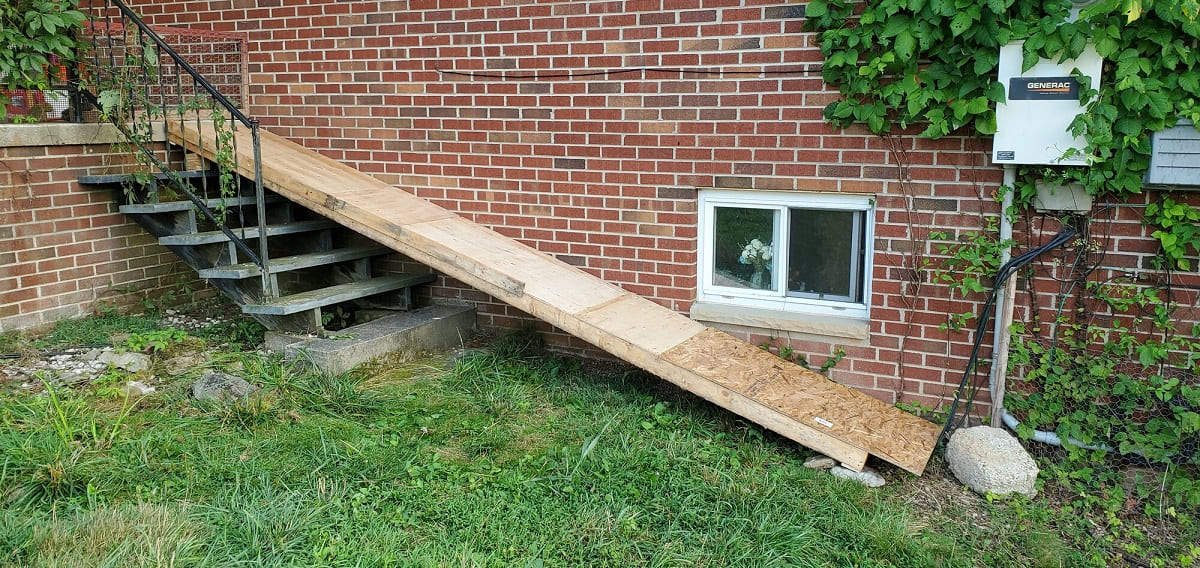
How To Build A Ramp Over Stairs
Modified: May 6, 2024
Discover informative articles on how to build a sturdy and practical ramp over stairs. Gain valuable insights and expert tips to simplify your construction project.
(Many of the links in this article redirect to a specific reviewed product. Your purchase of these products through affiliate links helps to generate commission for Storables.com, at no extra cost. Learn more)
Introduction
Building a ramp over stairs can be a practical solution for individuals with mobility challenges or for those who need easier access to their home or building. Whether you have a wheelchair, walker, or simply struggle with stairs, a well-designed ramp can greatly improve your daily life.
In this comprehensive guide, we will walk you through the step-by-step process of building a ramp over stairs. From gathering materials to ensuring safety and stability, we’ll cover everything you need to know to successfully complete this project.
Before we begin, it’s important to note that building a ramp requires careful planning, measurements, and adherence to local building codes and regulations. It’s recommended to consult with a professional or obtain necessary permits before starting any construction project. Safety should always be the top priority.
Now, let’s dive into the details of how to build a ramp over stairs and transform your space into a more accessible and inclusive environment.
Key Takeaways:
- Building a ramp over stairs requires careful planning, accurate measurements, and adherence to building codes. It’s a rewarding project that greatly improves accessibility and inclusivity in any space.
- Ensuring safety and stability is crucial for a well-constructed ramp. Regular maintenance and inspections are essential to prolong its lifespan and provide a reliable solution for individuals with mobility challenges.
Read more: How To Build A Dog Ramp Over Stairs
Step 1: Gather the Necessary Materials and Tools
Before you begin constructing your ramp, it’s essential to gather all the required materials and tools to ensure a smooth and efficient building process. Here’s a list of what you’ll need:
- Pressure-treated lumber: Depending on the size of the ramp, you’ll need 2×4 or 2×6 pressure-treated boards for the frame and support beams.
- Decking boards: These will serve as the walking surface of the ramp. Opt for durable and weather-resistant materials.
- Plywood: Use plywood sheets to create a smooth and stable ramp surface.
- Concrete or gravel: This will be used as a base for the ramp. Choose a suitable option based on your specific needs.
- Ramp brackets or connectors: These metal brackets or connectors will help secure the ramp frame and support beams together.
- Galvanized screws: Use weather-resistant screws to assemble the ramp frame and attach the decking boards.
- Level: A level is essential to ensure your ramp is properly aligned and balanced.
- Measuring tape: Accurate measurements are crucial for a well-designed ramp. A sturdy measuring tape will be your best friend throughout the process.
- Saw: You’ll need a saw to cut the lumber to the appropriate lengths and angles.
- Drill: A drill will be necessary to create pilot holes and secure the screws.
- Safety equipment: Don’t forget goggles, gloves, and a dust mask to protect yourself during the construction process.
Once you have all the materials and tools on hand, you can move on to the next step: measuring the area and planning the ramp design.
Step 2: Measure the Area and Plan the Ramp Design
Before you start building your ramp, it’s crucial to measure the area accurately and carefully plan the design. This step will ensure that your ramp fits the space and meets your specific accessibility needs. Here’s what you need to do:
- Measure the rise: Determine the height difference between the top of the stairs and the ground level. This measurement will help you calculate the length and angle of the ramp.
- Measure the available space: Assess the width and length of the space where you plan to install the ramp. Consider any obstructions such as doors, pathways, or landscaping elements that may affect the ramp’s design.
- Decide on the ramp’s configuration: Depending on the available space and your preferences, you can choose between a straight ramp or a switchback ramp that includes turns. Consider the ease of navigation for individuals using the ramp.
- Determine the slope and length: The slope of the ramp is determined by the rise and the overall length of the ramp. As a general guideline, a ramp should have a slope of 1:12, which means for every 1-inch rise, the ramp should extend 12 inches horizontally. However, local building codes may have specific requirements, so be sure to check them before finalizing your design.
- Schedule a professional assessment: If you’re unsure about the design or want to ensure maximum safety, it’s advisable to consult with a professional accessibility specialist or an architect. They can assess your specific needs and provide expert advice on the ramp’s design and construction.
Once you have measured the area and planned the ramp design, you’re ready to move on to the next step: removing any obstacles or hazards that might hinder the construction process.
Step 3: Remove any Obstacles or Hazards
Before you start building your ramp, it’s important to create a clear and safe workspace. This means removing any obstacles or hazards that could interfere with the construction process or pose a risk to the ramp’s stability. Here’s what you need to do:
- Clear the area: Remove any furniture, plants, or debris that may be in the way. This will give you a clean and open space to work with.
- Trim vegetation: If there are trees, bushes, or plants near the construction site, trim them back to prevent branches or foliage from obstructing the ramp or impeding access.
- Identify underground utilities: Before digging or installing any support beams, it’s crucial to identify the location of underground utilities such as water pipes, gas lines, or electrical cables. Contact your local utility companies to mark the area and ensure you avoid any accidental damage.
- Address drainage issues: Make sure there is proper drainage in the area to prevent water accumulation on the ramp. If necessary, install a drainage system or make adjustments to existing ones.
- Check for structural integrity: Inspect the stairs or the area where the ramp will connect to ensure that it is structurally sound. If there are any issues, such as loose or rotting boards, address them before proceeding with the ramp construction.
- Consider lighting: Assess the area’s lighting conditions, especially if the ramp will be used at night. Install adequate lighting to ensure visibility and safety for users.
By removing any obstacles or hazards, you create a clean and safe environment to build your ramp. Next, we’ll move on to Step 4: building a frame for the ramp.
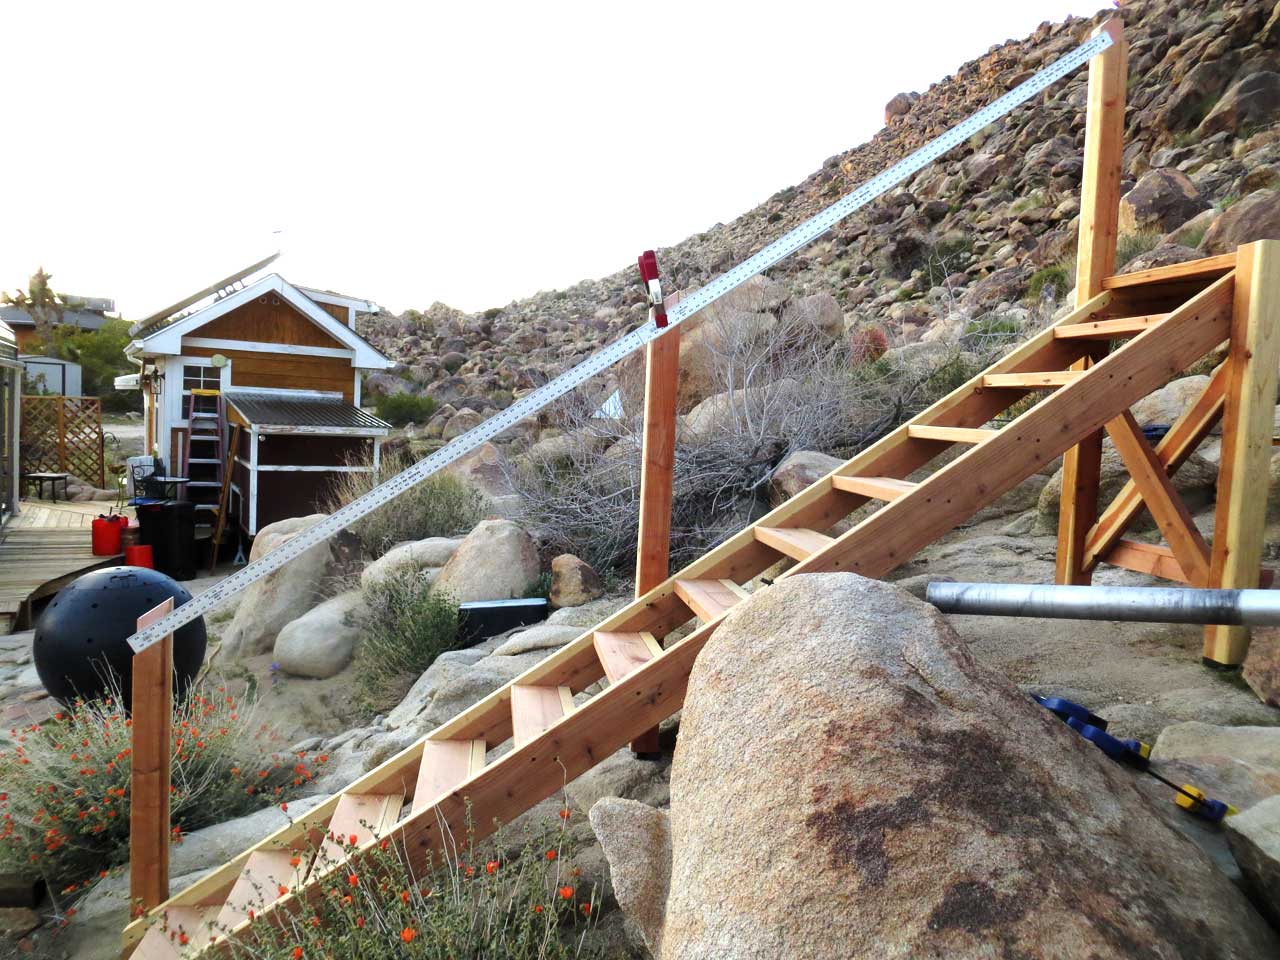
Step 4: Build a Frame for the Ramp
Building a sturdy and durable frame is vital for the stability and longevity of your ramp. The frame provides the structure and support for the ramp, ensuring it can safely accommodate users. Here’s how you can build a frame for your ramp:
- Mark the layout: Using the measurements and design plans you created in Step 2, mark the layout of the ramp on the ground. Use stakes and string to outline the edges of the ramp.
- Dig footings: Dig holes at the corners and at regular intervals along the marked layout to create the footings for the ramp frame. The depth and width of the footings will depend on the local building codes and the soil conditions in your area. It’s recommended to consult with a professional or a local building authority for guidance.
- Prepare the lumber: Cut the pressure-treated boards to the required lengths and angles based on your design. Ensure that they are straight and free from any defects.
- Align the frame: Install the wood boards along the outline of the ramp, connecting them with the appropriate connectors or brackets. Use a level to ensure the frame is straight and level as you progress.
- Secure the frame: Once the frame is aligned, secure the boards by drilling pilot holes and inserting galvanized screws. This will provide additional stability and prevent the frame from shifting over time.
- Install cross supports: To further strengthen the frame, add cross supports diagonally between the support beams. Secure them in place using screws or nails.
Building a solid frame sets the foundation for a strong and stable ramp. With the frame in place, you’re ready to move on to the next step: installing support beams.
When building a ramp over stairs, make sure to check local building codes and ADA requirements to ensure the ramp is compliant. Use sturdy materials and ensure a gradual slope for easy access.
Read more: How To Build A Ramp For A Deck
Step 5: Install Support Beams
Support beams play a crucial role in providing additional strength and stability to the ramp. They help distribute the weight evenly and prevent sagging or shifting over time. Follow these steps to install support beams for your ramp:
- Measure and cut the support beams: Cut pressure-treated boards to the appropriate length, ensuring they fit between the frame supports. These beams will run perpendicular to the frame.
- Secure the beams: Drill pilot holes and use galvanized screws or nails to attach the support beams to the frame supports. Make sure they are firmly secured and do not wobble or shift.
- Add diagonal supports: For added stability, consider adding diagonal supports between the support beams and the frame. Cut pieces of pressure-treated lumber at an angle and attach them securely using screws or nails.
- Check for levelness: Use a level to ensure that the support beams are level both horizontally and vertically. Adjust as needed by adding shims underneath the beams.
< li>Align and install the beams: Position the support beams evenly along the length of the ramp, spaced according to local building codes or the recommendations of a professional. Place them on top of the frame supports and align them correctly.
Installing support beams will provide the necessary reinforcement to your ramp, ensuring it can safely support the weight of users and any mobility devices. With the support beams in place, you’re ready to move on to the next step: attaching the decking boards to create the walking surface.
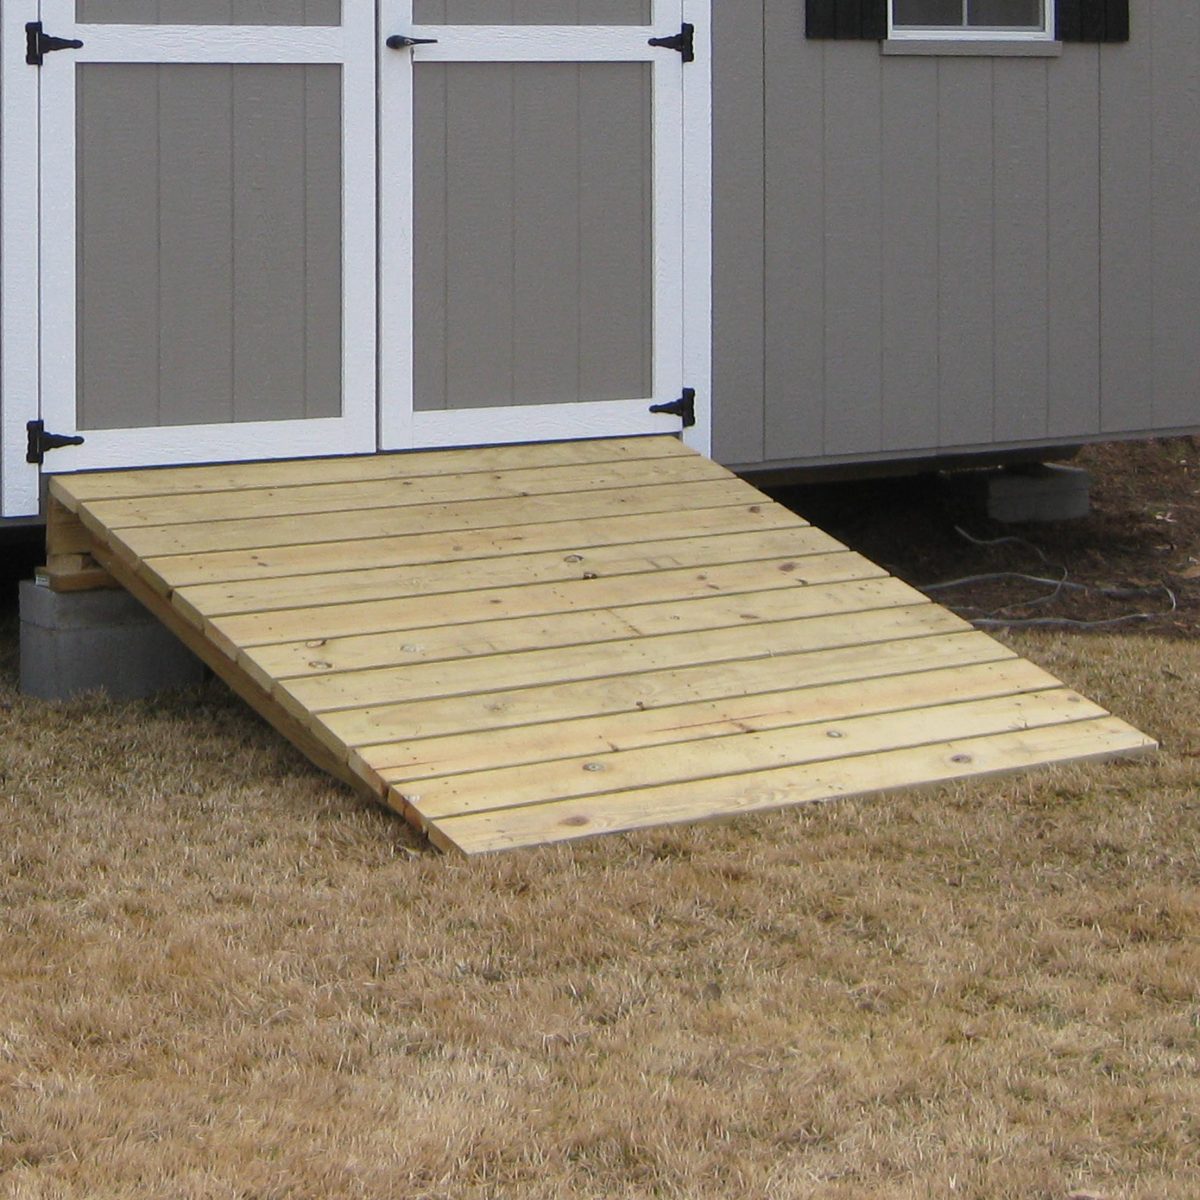
Step 6: Attach Decking Boards to the Ramp
The decking boards are what create the walking surface of the ramp, providing a smooth and safe path for users. Here’s how you can attach the decking boards to your ramp:
- Measure and cut the decking boards: Measure the length needed for each decking board and cut them to size. Ensure they fit snugly between the support beams.
- Start at the bottom: Begin installing the decking boards at the bottom of the ramp. Place the first board flush with the edge and secure it to the ramp frame using galvanized screws or nails.
- Space the boards: Leave a small gap, usually about 1/4 inch, between each decking board to allow for expansion and drainage. Use spacers or nails between boards to ensure consistent spacing.
- Continue installing: Move upwards and repeat the process, placing each subsequent board next to the previous one. Make sure they are aligned and secured to the support beams.
- Trim the last board: When you reach the top of the ramp, you may need to trim the last decking board to fit the available space. Measure and cut it accordingly, ensuring it is securely attached.
- Check for stability: Once all the decking boards are in place, walk along the ramp to test its stability. Ensure that the boards are securely fastened, and there is no excessive flexing or movement.
Attaching the decking boards is a crucial step in completing your ramp construction. They provide a solid and reliable walking surface for users. With the decking boards installed, you’re almost finished! The final step is to ensure the safety and stability of your ramp, which we’ll cover in the next step.
Step 7: Ensure Safety and Stability
Ensuring the safety and stability of your ramp is of utmost importance. Taking the time to thoroughly inspect and make necessary adjustments will ensure that your ramp is secure and user-friendly. Here are some essential steps to follow:
- Check for levelness: Use a level to confirm that the ramp is level both horizontally and vertically. Adjust the support beams or add shims as needed to achieve a level surface.
- Secure all connections: Double-check all screws, nails, and brackets to make sure they are tightly secured. Replace any loose or damaged hardware. This will prevent any wobbling or shifting of the ramp over time.
- Smooth out the surface: Sand down any rough or uneven areas on the decking boards to create a smooth and safe walking surface. Remove any splinters or protruding nails that could pose a hazard.
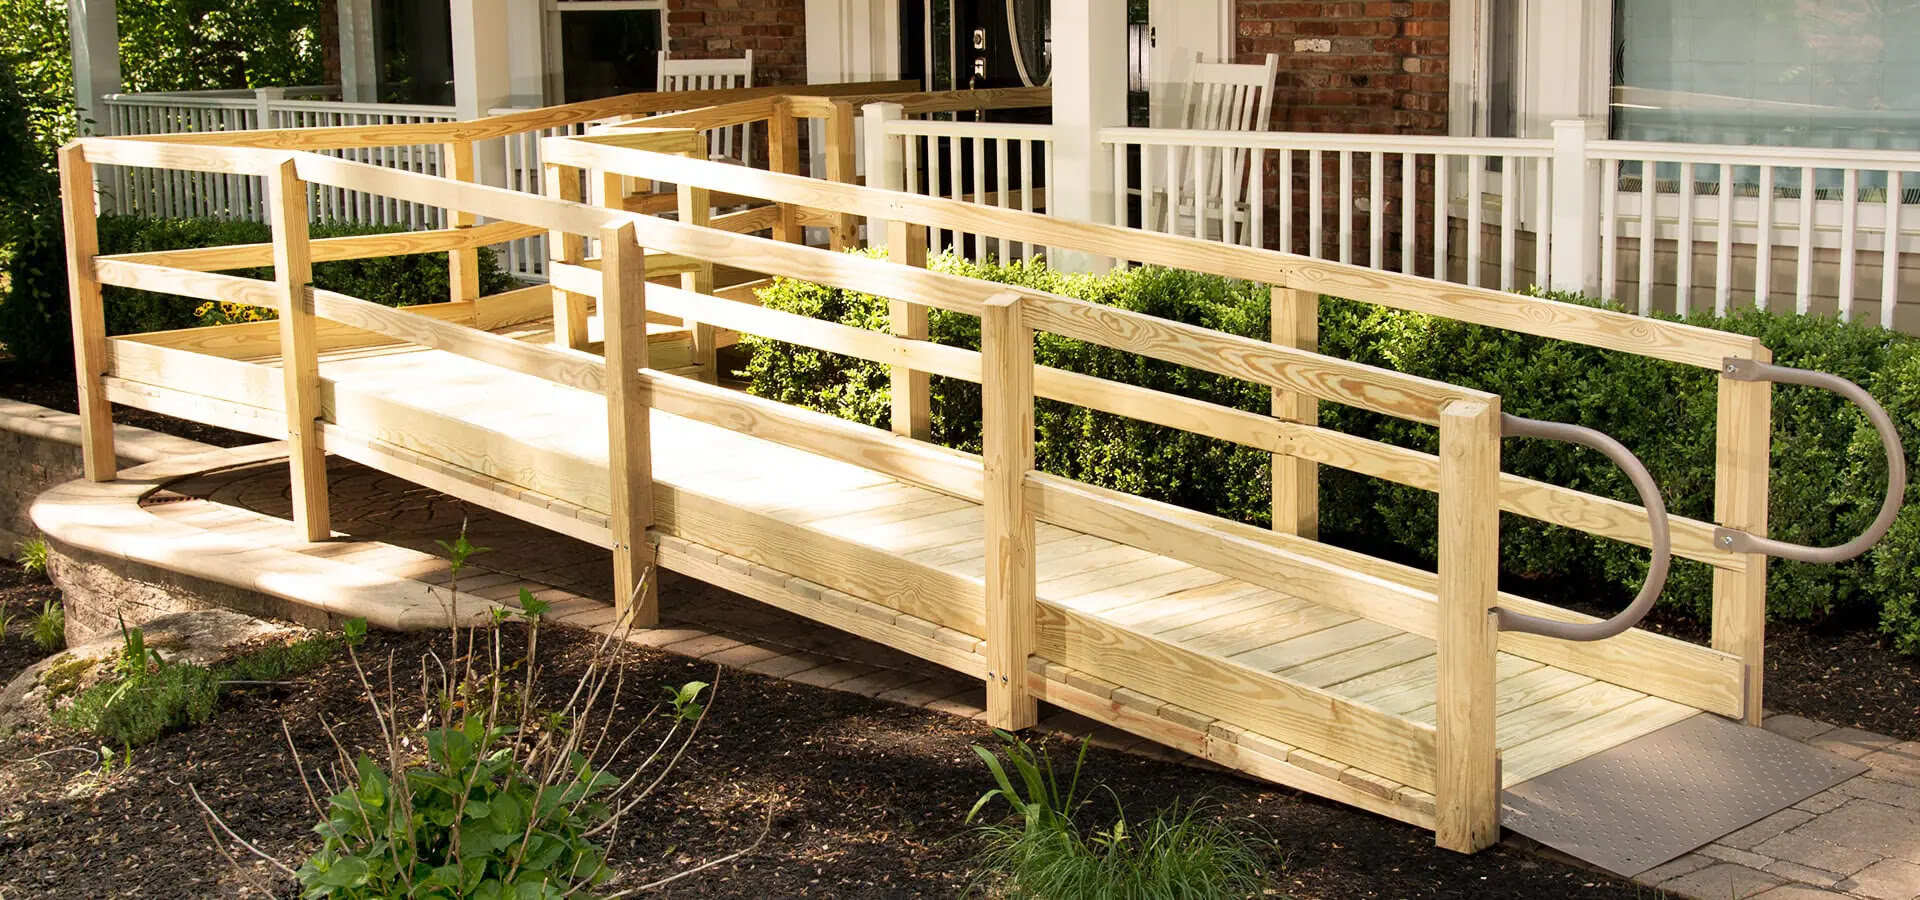
- Add handrails: Depending on the height and design of your ramp, it may be necessary to install handrails for additional support and safety. Follow the guidelines of local building codes to ensure compliance.
- Consider non-slip surfaces: If your ramp is exposed to wet or icy conditions, consider applying a non-slip coating or adding non-slip strips to the decking boards. This will increase traction and reduce the risk of slipping.
- Install reflective markers: If the ramp will be used during low-light conditions, such as in the evening or at night, consider installing reflective markers along the edges for enhanced visibility.
- Inspect regularly: Regularly inspect the ramp for any signs of wear, damage, or deterioration. Address any issues promptly to maintain the safety and integrity of the ramp.
By ensuring the safety and stability of your ramp, you can enjoy peace of mind knowing that it provides a secure and accessible pathway for all users. With the construction process completed, you have successfully built a ramp over stairs!
As a final note, it’s important to remember that building codes and regulations may vary depending on your location. It’s always recommended to consult with local authorities or professionals to ensure compliance with the relevant guidelines.
Congratulations on completing your ramp construction project. Your effort and dedication to accessibility will greatly benefit those who require easier access to your space!
Conclusion
Building a ramp over stairs is a rewarding and valuable project that can greatly improve accessibility and inclusivity in your home or building. By following the steps outlined in this guide, you have learned how to construct a ramp that is safe, sturdy, and functional.
Throughout the process, we emphasized the importance of careful planning, accurate measurements, and adherence to building codes. These considerations ensure that your ramp meets safety standards and provides a reliable solution for individuals with mobility challenges.
From gathering the necessary materials and tools to removing obstacles, building a frame, installing support beams, attaching decking boards, and ensuring safety and stability, each step has been essential in creating a ramp that will make a positive impact on the lives of its users.
Remember to consult with professionals or local authorities to ensure compliance with building codes and regulations specific to your area. It’s always better to seek expert advice and guidance to guarantee the highest level of safety and functionality for your ramp.
Now that you have completed your ramp construction, take a moment to appreciate the significant impact it will have on individuals with mobility challenges. Your effort and dedication to creating an accessible environment will make a difference in their lives.
Regular maintenance and inspections are essential to ensure the ongoing safety and integrity of your ramp. By staying vigilant and addressing any issues promptly, you can prolong the lifespan of your ramp and continue to provide a reliable solution for years to come.
Thank you for embarking on this journey to build a ramp over stairs. Your commitment to inclusivity and accessibility contributes to a world that is more accommodating and supportive of all individuals.
Now that you've mastered building a ramp over stairs, why not dive deeper into the world of crafting and creation? Our next feature, "What Is So Great About DIY Projects," offers a fresh perspective on self-made endeavors. From saving money to tailoring designs to personal taste, DIY projects empower creators to shape their environments with their own hands. If you enjoyed transforming those stairs, you'll definitely appreciate the insights and stories waiting in our discussion on the joys and benefits of DIY tasks.
Frequently Asked Questions about How To Build A Ramp Over Stairs
Was this page helpful?
At Storables.com, we guarantee accurate and reliable information. Our content, validated by Expert Board Contributors, is crafted following stringent Editorial Policies. We're committed to providing you with well-researched, expert-backed insights for all your informational needs.


0 thoughts on “How To Build A Ramp Over Stairs”