
Articles
How To Install An Electric Fence For Horses
Modified: October 18, 2024
Learn how to install an electric fence for horses with our informative and step-by-step articles. Ensure the safety and security of your horses with our expert advice.
(Many of the links in this article redirect to a specific reviewed product. Your purchase of these products through affiliate links helps to generate commission for Storables.com, at no extra cost. Learn more)
Introduction
Welcome to the world of electric fences for horses! If you’re a horse owner or enthusiast, you know how important it is to keep your horses safe and secure within their designated areas. An electric fence can be an effective and reliable solution to help you achieve just that.
Electric fences are designed to deter horses from crossing or leaning on the fence line by delivering a mild electric shock upon contact. This shock is harmless but serves as a powerful deterrent, teaching horses to respect the boundaries of their enclosure. Not only does it keep your horses safe, but it also helps protect your property from any potential damage caused by horses escaping.
Installing an electric fence for horses may seem like a daunting task, especially if you’re new to the concept. However, with proper planning, the right materials, and a little bit of know-how, you can successfully set up an electric fence system that meets your needs and keeps your horses secure.
In this article, we will guide you through the process of installing an electric fence for horses, step by step. We’ll cover everything from choosing the right system to troubleshooting common issues. By the end, you’ll have the knowledge and confidence to create a safe and effective electric fence for your horses.
Before we dive into the specifics, it’s important to note that safety should always be the top priority when working with electricity. Be sure to follow all manufacturer instructions and take necessary precautions to avoid injury. If you’re unsure about any aspect of the installation, consult a professional electric fence installer to ensure the job is done safely and correctly.
Now, let’s get started on your journey to creating a secure and reliable electric fence for your horses!
Key Takeaways:
- Ensure the safety and security of your horses by choosing the right electric fence system, planning the layout, and conducting regular maintenance to address any issues promptly and maintain a reliable containment solution.
- Follow the step-by-step process to install an electric fence for horses, from choosing the right system to connecting the electric components, ensuring a safe and effective containment solution for your equine companions.
Read more: How To Build Horse Fence
Choosing the Right Electric Fence System
When it comes to choosing the right electric fence system for your horses, several factors need to be considered. These factors include the size of your property, the number of horses you have, and the type of terrain you’re working with. By taking these factors into account, you can select a system that meets your specific needs and ensures the safety of your horses.
Here are some key considerations to keep in mind:
- Fence Type: There are different types of electric fences available, including wire, tape, and rope fences. Each type offers its own set of advantages and considerations. Wire fences are durable and provide a clear visual barrier, while tape fences are more visible to horses and can be easier to install. Rope fences are highly visible, making them suitable for horses that are new to electric fencing.
- Fence Height: The height of the fence is crucial in ensuring that horses are effectively contained. A recommended height for horse electric fences is typically around 4 to 5 feet. This height discourages horses from attempting to jump over the fence.
- Fence Voltage: The voltage of the fence charger is an important consideration. You’ll want to ensure that the charger provides enough voltage to deliver a mild yet effective shock to deter horses. A charger with a minimum output of 3,000 volts is typically recommended for horse electric fences.
- Power Source: Electric fences can be powered by either a mains power source or a battery. Mains-powered systems offer a continuous power supply but require access to an electrical outlet. Battery-powered systems are more flexible and can be used in remote areas, but they require regular monitoring and replacement of batteries.
- Fence Controller: The fence controller, also known as the energizer or charger, is the heart of the electric fence system. It’s responsible for delivering the electric shock to the fence wire. Choose a controller that is designed specifically for horse fencing and has the necessary power output for your fence length.
- Additional Features: Consider if you need any additional features for your electric fence system. This might include features like a lightning protection system, fence alarms, or a remote control for ease of operation.
Take the time to research and compare different electric fence systems available on the market. Read customer reviews, seek recommendations from fellow horse owners, and consult with experts in the field. By selecting the right electric fence system, you can ensure the safety and security of your horses while providing you with peace of mind.
Once you have chosen the right electric fence system for your horses, it’s time to move on to the next step – planning the fence layout.
Planning the Fence Layout
The success of your electric fence system largely depends on proper planning and designing of the fence layout. By carefully considering the size and shape of your property, as well as the needs and behavior of your horses, you can create an efficient and effective fence layout that maximizes safety and containment.
Here are some essential steps to help you plan your fence layout:
- Measure the Perimeter: Start by measuring the perimeter of the area where you want to install the fence. Take into account any existing structures, trees, or natural boundaries that need to be included in your fence design.
- Determine Number of Enclosures: Decide how many separate enclosures you need within the larger perimeter. This will depend on factors such as the number of horses you have and any specific needs or considerations for individual horses or groups of horses.
- Create Horse-Friendly Spaces: Designate specific areas within each enclosure to provide enough space for your horses to move comfortably. This includes areas for grazing, shelter, and water sources.
- Plan Entry and Exit Points: Identify where you want the entry and exit points to be located. This could be gates or openings that allow access to the enclosures. Consider ease of movement for both horses and humans, making sure to have a secure latch or lock mechanism for added safety.
- Consider Natural Barriers: If your property has natural barriers such as ditches, streams, or steep slopes, take advantage of these features when planning your fence layout. Incorporating natural barriers can help reduce the amount of fencing required and enhance the overall safety of the enclosure.
- Minimize Obstacles: Identify any potential obstacles within the fence line, such as trees, large rocks, or utility poles. These obstacles may require special consideration or adjustments in the fence design to ensure proper containment and safety.
- Maintain Clearances: Make sure there is enough clearance between the fence line and any nearby structures, such as buildings or barns. This will prevent horses from leaning on or damaging the fence and allow for easy maintenance and repairs.
- Consider Terrain: Take into account the terrain of your property when planning the fence layout. Make adjustments for any sloping or uneven areas to ensure the fence follows the natural contours of the land.
Once you have a clear plan in place, mark out the fence line using stakes or flags to visualize the layout before installation. This will allow you to make any necessary adjustments or modifications before committing to installing the fence.
By carefully planning your fence layout, you can create a safe and functional environment for your horses while ensuring efficient use of materials and resources. With the fence layout complete, it’s time to gather the necessary materials and tools for the installation process.
Gathering the Necessary Materials and Tools
Now that you have a well-planned fence layout, it’s time to gather all the materials and tools you’ll need for the installation of your electric fence system. Having everything prepared in advance will ensure a smooth and efficient installation process.
Here’s a list of the essential materials and tools you’ll need:
- Fence Posts: Select the appropriate type and quantity of fence posts based on your fence layout and the type of fence you’ll be installing. Common options include wooden posts, metal T-posts, or fiberglass posts. Ensure they are tall enough to support the desired fence height.
- Fence Wire or Tape: Choose the appropriate fence wire or tape for your specific needs. The choice will depend on factors such as visibility, durability, and the type of fence you’re installing. Measure the total length of fence needed to ensure you purchase enough.
- Fence Charger: Invest in a high-quality fence charger that meets the power output requirements for your fence length and voltage preferences. Consider factors such as power source availability, ease of installation, and any desired additional features.
- Insulators: Insulators are necessary to attach the fence wire or tape to the fence posts. Ensure you have enough insulators to cover the entire fence line, keeping in mind any corners, gates, or special sections of the fence.
- Gates and Latches: If you’ve planned for entry and exit points in your fence layout, purchase suitable gates and latches to provide easy access while maintaining security. Select gates and latches designed for electric fence systems.
- Grounding System: A grounding system is essential for your electric fence to work effectively. Gather the necessary materials, including grounding rods, clamps, and wire, to create a proper grounding setup.
- Wire Cutters and Crimping Tools: These tools are necessary for cutting and crimping fence wire or tape. Invest in a good-quality pair of wire cutters and crimping tools to ensure clean and secure connections.
- Measuring Tape or Wheel: Accurate measurements are important when installing the fence. Have a measuring tape or measuring wheel on hand to measure fence lengths, distances between posts, and the location of gates.
- Post Driver or Pounder: Depending on the type of fence posts you’re using, you may need a post driver or pounder to secure them firmly into the ground. These tools make the installation process faster and more efficient.
- Markers or Flags: Use markers or flags to mark the fence line and indicate the location of posts and gates. This will help you visualize the layout during installation and prevent any confusion or mistakes.
- PPE (Personal Protective Equipment): Safety should be a priority during the installation process. Wear appropriate PPE, including gloves, safety glasses, and sturdy footwear, to protect yourself from any potential hazards.
Before starting the installation, double-check your materials and tools to ensure that everything is accounted for and in good working condition. It’s also a good idea to have some extra supplies, such as extra wire or insulators, on hand in case of any unforeseen circumstances or repairs down the line.
With all the necessary materials and tools ready, you’re now fully prepared to begin the process of installing your electric fence system. The next step is to prepare the fence line, which involves clearing the area and marking the location of the fence posts.
Preparing the Fence Line
Before you can start installing the fence posts and electric components, it’s important to properly prepare the fence line. This step involves clearing the area and ensuring a smooth and obstacle-free path for the fence. By taking the time to prepare the fence line, you’ll make the installation process easier and ensure a more efficient and effective electric fence system.
Here are the key steps to follow when preparing the fence line:
- Clear Vegetation: Begin by removing any vegetation or obstacles along the fence line. Trim back branches, bushes, or tall grass that may interfere with the fence installation or come into contact with the wire or tape. This will help improve the visibility of the fence and prevent unwanted interference.
- Remove Debris: Clear away any rocks, debris, or other objects that may obstruct the path of the fence line. These obstructions can affect the integrity and alignment of the fence and potentially cause damage to the electric components.
- Level the Ground: Use a rake or shovel to level the ground along the fence line. Remove any bumps or uneven areas to ensure a smooth and even installation of the fence posts and wire. A level ground will also prevent the fence from sagging or leaning over time.
- Identify Underground Utilities: Before digging any holes for fence posts, it’s crucial to locate and mark any underground utilities, such as water pipes or electrical cables. This will help prevent accidental damage or disruption to these utilities during the installation process. Contact your local utility company if you need assistance in identifying underground utilities.
- Mark Post Locations: Use markers or flags to indicate the exact locations where the fence posts will be installed. Space the posts according to your fence layout plan, ensuring they are evenly spaced and aligned. This will provide a clear guide during the installation process.
- Take Into Account Soil Conditions: Consider the type of soil you’re working with when preparing the fence line. Soft or sandy soil may require additional measures to ensure proper stability and anchoring of the fence posts. Alternatively, rocky or compacted soil may need specialized equipment for digging holes.
- Check Local Regulations: It’s important to check with local authorities or homeowner associations regarding any regulations or permits required for installing fences on your property. Adhering to these regulations will help ensure that your fence is installed in compliance with local guidelines.
By following these steps, you’ll create a clear and ready-to-install fence line, setting the stage for the successful installation of your electric fence system. With the fence line prepared, it’s time to move on to the next step – installing the fence posts.
Read more: How Tall Should Horse Fence Be
Installing the Fence Posts
One of the most critical steps in installing an electric fence system is properly installing the fence posts. The fence posts provide the foundation and support for the entire fence, ensuring its stability and durability. By following the proper installation techniques, you’ll create a strong and reliable fence line that will effectively contain your horses.
Here’s a step-by-step guide on how to install the fence posts:
- Mark Post Locations: Begin by referring to your fence layout plan and the markers or flags you placed along the fence line. These markings will indicate where each fence post should be installed.
- Dig Post Holes: Using a post hole digger or auger, dig the holes for your fence posts. The depth and diameter of the holes will depend on the type of fence posts and the soil conditions. Make sure the holes are deep and wide enough to provide proper stability for the posts.
- Insert Fence Posts: Place the fence posts into the prepared holes, making sure they are properly aligned and level. Use a level to ensure the posts are straight and plumb. If needed, backfill the holes with soil or gravel to provide additional support and stability.
- Secure the Posts: Secure the fence posts in the ground by tamping the soil or packing it tightly around the base. This will help prevent the posts from shifting or leaning over time. If using wooden posts, you may need to brace them temporarily until the concrete or soil settles.
- Attach Insulators: Once the fence posts are firmly in place, attach insulators to each post. Insulators are needed to prevent the electric fence wire or tape from making direct contact with the posts, ensuring an effective and safe electrical barrier.
- Measure and Tie Off Wire or Tape: Measure and cut the electric fence wire or tape to the appropriate length, leaving some extra length for tensioning. Start at one end of the fence line and secure the wire or tape to the first fence post. Then, proceed to the remaining posts, pulling the wire or tape taut and attaching it securely with the insulators.
- Tension the Wire or Tape: Use a fence tensioning tool or a come-along to tension the wire or tape. This will ensure that the fence is properly tightened and prevent sagging or loose sections. Follow the manufacturer’s instructions on how to use the tensioning tool for your specific fence type.
- Repeat for Multiple Wires or Tapes: If you’re installing multiple wires or tapes in your fence system, repeat the process of attaching and tensioning each wire or tape. Ensure proper spacing between the wires or tapes to effectively contain your horses.
- Inspect and Adjust: Go along the fence line to inspect the installed posts and wires/tapes. Check for any loose or damaged components and make any necessary adjustments or repairs. This will ensure that the fence is secure and functioning properly.
Remember to follow all local regulations and guidelines when installing your fence posts. Some areas may require concrete footings or additional bracing for certain types of fence posts.
By taking the time to properly install the fence posts, you’ll establish a sturdy foundation for your electric fence system. With the posts securely in place, it’s time to move on to the next step – setting up the electric fence charger.
Setting Up the Electric Fence Charger
The electric fence charger, also known as the energizer, is a crucial component of your electric fence system. It delivers the necessary electric shock to the fence wire or tape, creating a deterrent for your horses. Properly setting up the electric fence charger is essential to ensure optimal effectiveness and safety of your electric fence.
Here’s a step-by-step guide on how to set up the electric fence charger:
- Select a Suitable Location: Choose a suitable location for the electric fence charger. It should be placed in a well-ventilated and sheltered area, protected from the elements and direct sunlight. Ideally, the charger should be installed near a power source or close to the fence line to minimize the length of the electrical connections.
- Mounting the Charger: Depending on the type of charger you have, follow the manufacturer’s instructions for mounting it securely on a wall or post. Ensure that the mounting location is stable and provides adequate support for the charger.
- Connect the Grounding System: The grounding system is crucial for the proper functioning of your electric fence. Connect the grounding system to the charger as per the manufacturer’s instructions. This typically involves attaching grounding rods to the charger and ensuring a good connection with the grounding clamps and wire.
- Connect the Fence Wires or Tapes: Connect the fence wires or tapes to the appropriate terminals on the charger. The charger will have clearly labeled terminals for the fence connections. Follow the manufacturer’s instructions to ensure the wires or tapes are securely connected.
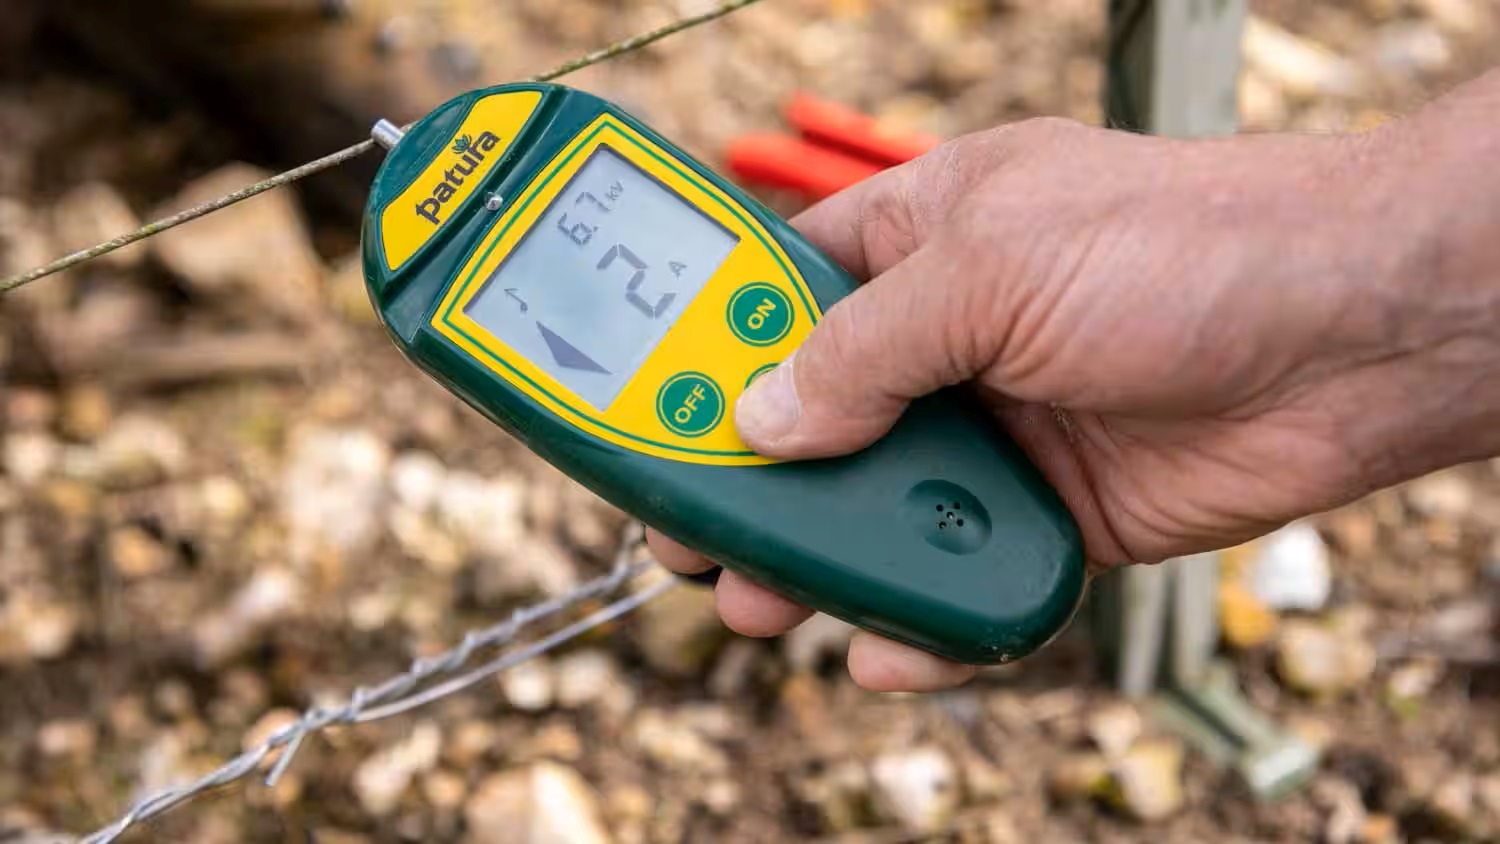
- Verify Voltage Output: Before turning on the charger, use a voltmeter or fence tester to verify the voltage output. This will ensure that the charger is functioning correctly and delivering the desired amount of voltage to the fence. Test the voltage at various points along the fence to ensure consistent voltage throughout.
- Connect to Power Source: If your electric fence charger is powered by mains electricity, connect it to a suitable power source. Ensure that the voltage requirements match the available power source. Follow the proper safety precautions and consult a licensed electrician if needed.
- Test the Electric Fence: With the charger powered on and properly connected, test the electric fence to ensure it’s functioning as intended. Make sure the wires or tapes are properly tensioned and that there are no loose connections or shorts. Use a fence tester to confirm that the fence is delivering an appropriate electric shock upon contact.
- Document Charger Settings: Take note of the settings and adjustments on the electric fence charger. This includes the voltage output, any specific settings for different weather conditions, and any other adjustable features. Having this information documented will be helpful for future reference or troubleshooting.
- Maintain and Monitor the Charger: Regularly inspect and maintain the electric fence charger to ensure optimal performance. Check for any signs of damage or wear and replace any faulty components. Monitor the voltage output periodically to ensure the fence is adequately powered.
Remember to follow all safety precautions and manufacturer’s instructions when setting up your electric fence charger. If you have any doubts or concerns about the installation or operation, consult a professional or the manufacturer for guidance.
With the electric fence charger properly set up, you’re one step closer to establishing a secure and effective electric fence system. The next step is to install the fence wire or tape along the fence line.
Make sure to properly ground the electric fence system to ensure it is effective in containing your horses. Use a minimum of three ground rods spaced at least 10 feet apart and install them in moist soil.
Installing the Fence Wire or Tape
Now that the electric fence charger is set up and ready to go, it’s time to install the fence wire or tape along the fence line. The type of wire or tape you use will depend on your specific needs and preferences, but regardless of the material, proper installation is crucial to ensure a functional and secure electric fence system.
Follow these steps to install the fence wire or tape:
- Unroll the Wire or Tape: Start at one end of the fence line and unroll the wire or tape, following the markings you made during the fence layout planning. Keep the wire or tape taut but avoid stretching it excessively to prevent future sagging or breakage.
- Attach the Wire or Tape to the Fence Posts: Using insulators, securely attach the wire or tape to each fence post along the fence line. Insulators specifically designed for the type of wire or tape you’re using should be used. Place the insulators at the appropriate height, depending on the intended purpose of the fence (e.g., keeping horses in or out).
- Ensure Proper Spacing: Maintain consistent spacing between the wires or tapes along the fence line. This spacing will depend on your specific needs and the type of fence you’re installing. Make sure the spacing is appropriate to prevent horses from escaping or getting entangled in the wires.
- Protect Corners and Gate Openings: When reaching a corner or gate opening, follow the proper technique for making turns. Use insulators specifically designed for corners or gates to maintain proper tension and prevent the wire or tape from sagging or becoming loose.
- Electrically Connect Each Wire or Tape: Ensure that each wire or tape is electrically connected to the charger terminal using appropriate connectors. The specific method will depend on the type of wire or tape you’re using. Follow the manufacturer’s instructions or consult an expert to ensure a proper electrical connection.
- Test the Electric Fence: Once the wire or tape is installed, use a fence tester or voltmeter to check the voltage along the fence line. Ensure that there are no breaks in the circuit and that the voltage is consistent throughout. Locate and fix any issues before proceeding.
- Adjust Wire or Tape Tension: Periodically check the tension of the wires or tapes and make any necessary adjustments. Over time, they may become loose or sag, compromising the effectiveness of the electric fence. Use tensioning tools to tighten or loosen the wires or tapes as needed.
- Regularly Inspect the Fence: Perform routine inspections of the fence to identify any damage, loose connections, or wear and tear. Replace any broken or damaged wires or tapes promptly to maintain the integrity of the fence system.
- Communicate the Fence to Others: If your electric fence is in a shared space or close to public areas, ensure that it is clearly marked and communicated to others for safety. Use warning signs or labels to indicate the presence of an electric fence.
Proper installation of the fence wire or tape is critical to the overall effectiveness of your electric fence system. Take the time to ensure that each wire or tape is properly tensioned and securely attached to the fence posts and charger. By doing so, you’ll create a safe and reliable barrier for your horses.
With the fence wire or tape installed, it’s time to connect the electric components and conduct a thorough testing of the electric fence system before allowing your horses near it.
Connecting the Electric Components
Connecting the electric components of your electric fence system is a critical step in ensuring its proper functionality and effectiveness. By carefully connecting all the components, you’ll create a complete circuit that delivers a safe and deterrent electric shock to the fence wire or tape. This step involves connecting the charger, grounding system, and fence wires or tapes in a precise and secure manner.
Follow these steps to connect the electric components:
- Ensure Safety First: Before connecting any electric components, ensure that the electric fence charger is turned off or disconnected from the power source to prevent the risk of electric shock. Always prioritize safety when working with electrical components.
- Connect Charger to Power Source: If your electric fence charger is not connected to a power source already, do so by following the manufacturer’s instructions and adhering to proper electrical safety protocols. Make sure the charger is properly grounded to protect against electrical hazards.
- Connect the Grounding System: Ensure that the grounding system is properly connected to the charger. This typically involves attaching grounding rods to the specified grounding terminals on the charger, using grounding clamps and wire. Double-check the connections for proper tightness and conductivity.
- Connect Wires or Tapes to Charger: Connect the fence wires or tapes to the designated terminals on the charger. Follow the manufacturer’s instructions provided with the charger to ensure the correct placement and connection of the wires or tapes. Use appropriate connectors or clips to establish a secure and proper electrical connection.
- Electrical Connections between Wires or Tapes: If your electric fence system consists of multiple wires or tapes, ensure electrical connections between them. This can be achieved by using specially designed connectors or clips that allow the electricity to flow smoothly from one wire or tape to the next, creating a continuous circuit.
- Inspect Connections: Once all the connections are made, inspect them thoroughly to ensure they are secure, tight, and properly insulated. Loose or faulty connections can result in a loss of voltage or pose a safety risk. Make any necessary adjustments or repairs as needed.
- Test the Electric Fence: Before allowing your horses near the electric fence, conduct a comprehensive test of the entire system. Use a fence tester or voltmeter to ensure that the voltage is consistent and within the desired range along the fence line. Verify that the electric shock delivered by the fence is effective but not excessive.
- Retest Periodically: It’s important to periodically test the electric fence system to ensure its ongoing functionality. Weather conditions, vegetation growth, or physical disturbances can affect the performance of the fence. Regularly test the voltage levels and inspect the connections to identify and address any issues.
By following these steps and paying attention to detail, you can ensure that all the electric components of your electric fence system are properly connected. This will provide a safe and reliable barrier for your horses, keeping them securely contained within their designated area.
With the electric components connected and the electric fence system tested, it’s time to move on to the next step – ongoing maintenance and troubleshooting to keep your electric fence in optimal condition.
Read more: How To Install Solar Electric Fence
Testing the Electric Fence
Testing the electric fence is a crucial step in ensuring its functionality and effectiveness in providing a safe containment for your horses. Regular testing allows you to identify any potential issues, such as weak voltage, shorts, or faulty connections, and address them promptly. By conducting thorough tests, you can have peace of mind knowing that your electric fence is working properly.
Follow these steps to effectively test your electric fence:
- Ensure Safety Precautions: Before conducting any tests, make sure that all safety precautions are in place. Turn off the charger or disconnect it from the power source to prevent electric shock while testing the fence.
- Obtain a Fence Tester: Use a fence tester specifically designed for electric fences. These testers typically have a probe that can be pressed against the fence wire or tape to measure the voltage. Ensure that the fence tester is in working condition and calibrated properly.
- Test Voltage Levels: Start by testing the voltage levels at different points along the fence line. Apply the fence tester probe to the wire or tape and record the voltage readings. Test multiple areas to ensure consistency in voltage throughout the entire fence system.
- Check for Voltage Drop: While testing the voltage, observe for any significant drops in voltage along the fence line. A drop in voltage may indicate a weak point in the fence, such as a loose connection or vegetation touching the wire or tape. These issues should be addressed and fixed promptly to maintain the effectiveness of the electric fence.
- Inspect Insulators and Connections: Along with the voltage testing, visually inspect the insulators and connections of the electric fence. Look for any signs of damage, corrosion, or loose connections. Ensure that all insulators are securely attached to the fence posts and that the wires or tapes are properly connected without any breaks.
- Test Grounding System: Testing the grounding system is equally important. Measure the voltage between the ground rod(s) and the fence using a grounding system tester or a voltage meter. Adequate grounding is crucial for the proper functioning of the electric fence, so make sure the grounding system is functioning effectively.
- Fixing Issues: If you encounter any issues during the testing phase, such as low voltage levels or faulty connections, take immediate action to address them. Check for loose or damaged wires, tighten connections, replace insulators if needed, and clear any vegetation that may be interfering with the fence. A properly functioning electric fence will provide optimal safety and containment for your horses.
- Maintain a Testing Schedule: Regularly schedule testing sessions for your electric fence, especially during the spring and fall seasons when vegetation growth and weather conditions may impact its performance. Make it a routine part of your maintenance plan to ensure ongoing effectiveness.
By following these testing procedures and conducting regular checks, you’ll be able to identify any issues or weaknesses in your electric fence system and address them promptly. This will help maintain a safe and secure environment for your horses, giving you peace of mind that they are properly contained within their designated area.
With the electric fence successfully tested and any necessary adjustments made, you can now focus on ongoing maintenance and troubleshooting to ensure the long-term functionality of your electric fence system.
Maintaining and Troubleshooting the Electric Fence
Regular maintenance and troubleshooting are essential for the proper functioning and longevity of your electric fence system. By following a consistent maintenance routine and promptly addressing any issues that arise, you can ensure that your electric fence provides a safe and efficient containment solution for your horses. Here are some key maintenance and troubleshooting practices to implement:
Maintenance:
- Inspect the Fence Regularly: Conduct routine inspections of the fence to check for any signs of damage, wear and tear, or loose connections. Look for broken wires or tapes, damaged insulators, or vegetation touching the fence. Address any issues immediately.
- Clear Vegetation: Regularly trim back vegetation near the fence line to prevent it from touching the wires or tapes. Overgrown vegetation can cause short circuits or lessen the effectiveness of the electric shock.
- Check Insulators: Ensure that all insulators are securely attached to the fence posts and free from cracks or damage. Replace any faulty or worn out insulators to maintain proper insulation between the wires or tapes and the fence posts.
- Monitor Grounding System: Regularly check the grounding system to ensure it is functioning effectively. Ensure that the ground rods are properly installed and have good conductivity. If necessary, add additional ground rods or consult an expert if you’re experiencing grounding issues.
- Test Voltage Levels: Periodically test the voltage levels along the fence line using a fence tester. Check for consistent voltage throughout the system and address any significant drops in voltage. This can help identify loose connections, damaged wires, or other issues that need attention.
- Repair or Replace Components: If you identify any damaged or faulty components during your inspections, promptly repair or replace them. This includes wires or tapes, insulators, connectors, and any other part of the electric fence system that is compromised.
- Keep Records: Maintain a record of maintenance activities, such as testing dates, voltage readings, repairs, and replacements. This record will help you track the performance of your electric fence system over time and provide valuable information for troubleshooting if issues arise.
- Protect Against Lightning: Install a lightning protection system if your area is prone to lightning strikes. This will help protect your electric fence system from potential damage caused by lightning surges.
Troubleshooting:
- Poor Shock: If your electric fence is not delivering a noticeable shock to your horses, check for any breaks or damage in the wires or tapes. Ensure that the charger is functioning properly and providing the correct voltage output. Test the grounding system and address any issues if necessary.
- Short Circuits: If your electric fence is experiencing frequent short circuits, carefully inspect the fence line for vegetation, wire, or tape that may be contacting the fence posts or other conductive surfaces. Remove any sources of contact and test for proper voltage flow along the fence line.
- Fence Breaks: If your horses are consistently escaping or there are gaps in your fence line, inspect for any breaks, damage, or loose connections in the wires or tapes. Repair or replace any compromised components and ensure proper tensioning of the fence to maintain a secure containment.
- Inconsistent Voltage: If you observe inconsistent voltage levels along the fence line, check for loose connections, damaged wires, or weak grounding. Ensure that all connections are secure and free from corrosion. Consider adding additional ground rods to improve grounding performance.
- Charger Issues: If you suspect a problem with your charger, check the power source and connections. Confirm that the charger is properly grounded and receiving electricity. If issues persist, consult the manufacturer or an electric fence expert for further troubleshooting or possible charger replacement.
- Consult Professionals: If you are unable to identify or resolve an issue with your electric fence system, do not hesitate to seek help from professionals. They have the expertise and knowledge to troubleshoot complex problems and provide guidance for proper resolution.
Remember to regularly conduct maintenance checks and promptly address any issues that arise. By practicing proactive maintenance and troubleshooting techniques, you can ensure that your electric fence system remains reliable, effective, and safe for your horses.
With ongoing maintenance and troubleshooting in place, you can have confidence in the performance and longevity of your electric fence system. Maintain a regular schedule for inspections and tests to address any concerns promptly and provide a secure environment for your horses.
Read more: How To Install Fence On A Slope
Conclusion
Installing an electric fence for horses is a valuable investment in creating a safe and secure environment for your beloved equines. By following the step-by-step process outlined in this guide, you can successfully install and maintain an electric fence system that provides effective containment while minimizing the risk of your horses escaping or experiencing harm.
Throughout this article, we covered the key aspects of installing an electric fence for horses. We discussed the importance of choosing the right electric fence system based on your specific needs, planning the fence layout to ensure optimal containment, and gathering the necessary materials and tools for installation. We delved into preparing the fence line, installing fence posts, setting up the electric fence charger, installing fence wire or tape, and connecting all the electric components.
We also emphasized the importance of regular maintenance and troubleshooting to ensure the ongoing functionality and safety of the electric fence system. By conducting routine checks, addressing any issues promptly, and following proper maintenance practices, you can keep your electric fence in optimal condition throughout the year.
Remember, safety should always be a top priority during the installation and maintenance of your electric fence. Adhere to manufacturer instructions, follow local regulations, and take necessary precautions to prevent accidents or injuries when working with electricity.
Installing an electric fence for horses is a significant step towards ensuring the well-being of your equine companions and the security of your property. With a properly installed and well-maintained electric fence system, you can have peace of mind knowing that your horses are contained within their designated areas, safe from harm, and free to graze and roam without straying.
Should you encounter any challenges or require assistance in the process, don’t hesitate to seek guidance from experts or professionals specializing in electric fences or horse husbandry. They can provide valuable insights and support throughout the installation and maintenance journey.
Now, armed with this comprehensive guide, you are well-equipped to embark on the installation of an electric fence for your horses. Create a secure and reliable electric fence system that will not only protect your horses but also enhance your peace of mind as a responsible horse owner.
Frequently Asked Questions about How To Install An Electric Fence For Horses
Was this page helpful?
At Storables.com, we guarantee accurate and reliable information. Our content, validated by Expert Board Contributors, is crafted following stringent Editorial Policies. We're committed to providing you with well-researched, expert-backed insights for all your informational needs.


0 thoughts on “How To Install An Electric Fence For Horses”