Articles
How To Install Conduit In Wall
Modified: October 20, 2024
Learn how to install conduit in the wall with our informative articles. Step-by-step instructions and expert tips to make the process easier and safer.
(Many of the links in this article redirect to a specific reviewed product. Your purchase of these products through affiliate links helps to generate commission for Storables.com, at no extra cost. Learn more)
Introduction
Installing conduit in a wall is a crucial step for ensuring a safe and organized electrical or data wiring system. Conduit acts as a protective sleeve that houses the wiring, preventing it from being damaged or exposed. Whether you are renovating your home or setting up a new office space, learning how to install conduit in a wall is a valuable skill that will help you maintain a clean and efficient wiring system.
In this article, we will guide you through the step-by-step process of installing conduit in a wall. We will cover everything from gathering the necessary tools and materials, to planning the conduit route, making the necessary markings, cutting openings in the wall, installing and securing the conduit, sealing the openings, and testing the functionality of the conduit.
By following these steps and best practices, you can ensure a successful conduit installation that meets safety standards and provides a reliable wiring system for your home or office.
Key Takeaways:
- Safely and efficiently install conduit in a wall by carefully planning the route, marking the location, and securing the conduit. This ensures a reliable and organized electrical or data wiring system for your home or office.
- Prioritize safety, precision, and thorough testing when installing conduit in a wall. This protects the wiring system, enhances aesthetics, and allows for future system expansion or modifications.
Read more: How To Install Conduit In Concrete Slab
Step 1: Gather the necessary tools and materials
Before you begin installing conduit in the wall, it is important to gather all the necessary tools and materials to ensure a smooth and efficient installation process. Here are the essential items you will need:
- Tape measure: To accurately measure the conduit length and wall dimensions.
- Pencil: For marking the conduit route and wall openings.
- Level: To ensure the conduit is installed straight and level.
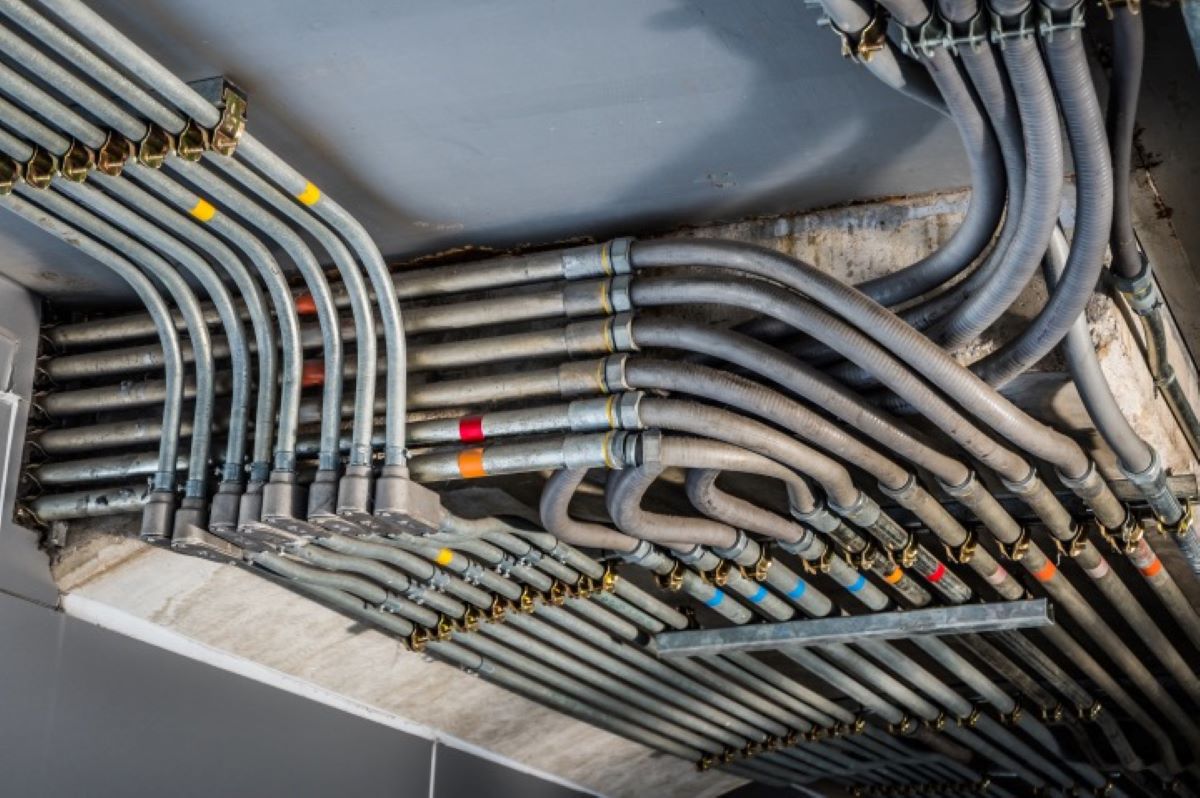
- Conduit: Choose the appropriate type and size of conduit for your specific needs. PVC conduit is commonly used for electrical wiring, while PVC or metal conduit is suitable for data and communication cables.
- Saw or rotary tool: Depending on the type of wall you are working with, you may need a saw or rotary tool to cut the openings for the conduit.
- Conduit connectors: These fittings will be used to join the segments of conduit together and connect the conduit to electrical boxes or outlets.
- Screwdriver or drill: For securing the conduit connectors and mounting accessories.
- Wall anchors: If your wall is made of drywall or other non-structural materials, wall anchors will be necessary to secure the conduit to the wall.
- Utility knife: To cut and trim the conduit as needed.
- Caulk or sealant: For sealing the conduit openings to prevent moisture or debris from entering.
Make sure you have all these tools and materials ready before you start the installation process. It will save you time and prevent unnecessary delays or interruptions.
Step 2: Plan the conduit route
Once you have gathered all the necessary tools and materials, it’s time to plan the route for your conduit. This step is crucial as it determines the efficiency and effectiveness of your wiring system. Here are a few guidelines to help you plan the conduit route:
- Identify the starting and ending points: Determine where your electrical panel or data source is located and where you want the conduit to end. This will help you map out the most direct and accessible route.
- Consider the wall structure: Take into account the type of wall you are working with. If it is a framed wall, you may need to follow the studs to ensure secure and stable installation. For solid walls, you may have to use special techniques or tools to cut through the material.
- Check for potential obstacles: Look for any existing wires, pipes, or other obstacles in the wall that may interfere with your conduit route. It’s important to avoid potential clashes or damage to existing infrastructure.
- Account for bends and corners: If your conduit route includes bends or corners, consider using elbows or conduit bodies to maintain a smooth and seamless path for the wiring.
- Plan for expansion: If you anticipate the need for future expansion or additional wiring, it’s a good idea to allocate extra space in your conduit route or install larger conduit to accommodate future needs.
By carefully planning the conduit route, you can ensure optimal functionality and ease of maintenance for your electrical or data wiring system. Take the time to assess the layout of your space, consider any specific requirements or restrictions, and create a detailed plan before moving on to the next steps.
Step 3: Mark the location of the conduit
Once you have planned the conduit route, the next step is to mark the location where the conduit will be installed. This will serve as a guide during the installation process and ensure accuracy. Here’s how to mark the location:
- Using a tape measure and pencil, measure and mark the starting point of the conduit near the electrical panel or data source.
- From the starting point, measure and mark the location of each bend, corner, or change in direction along the planned conduit route.
- Make marks on the wall or floor to indicate where the conduit will run. Use a level to ensure the marks are straight and level.
- Double-check your markings to ensure they align with the planned route and any obstacles have been accounted for.
- If necessary, use masking tape or painter’s tape to create a visual guide along the marked path. This can help you visualize the conduit route before cutting into the wall.
By accurately marking the location of the conduit, you will have a clear guideline to follow during the installation process. This will help you ensure the conduit is installed in the desired location and minimize the risk of errors or obstructions.
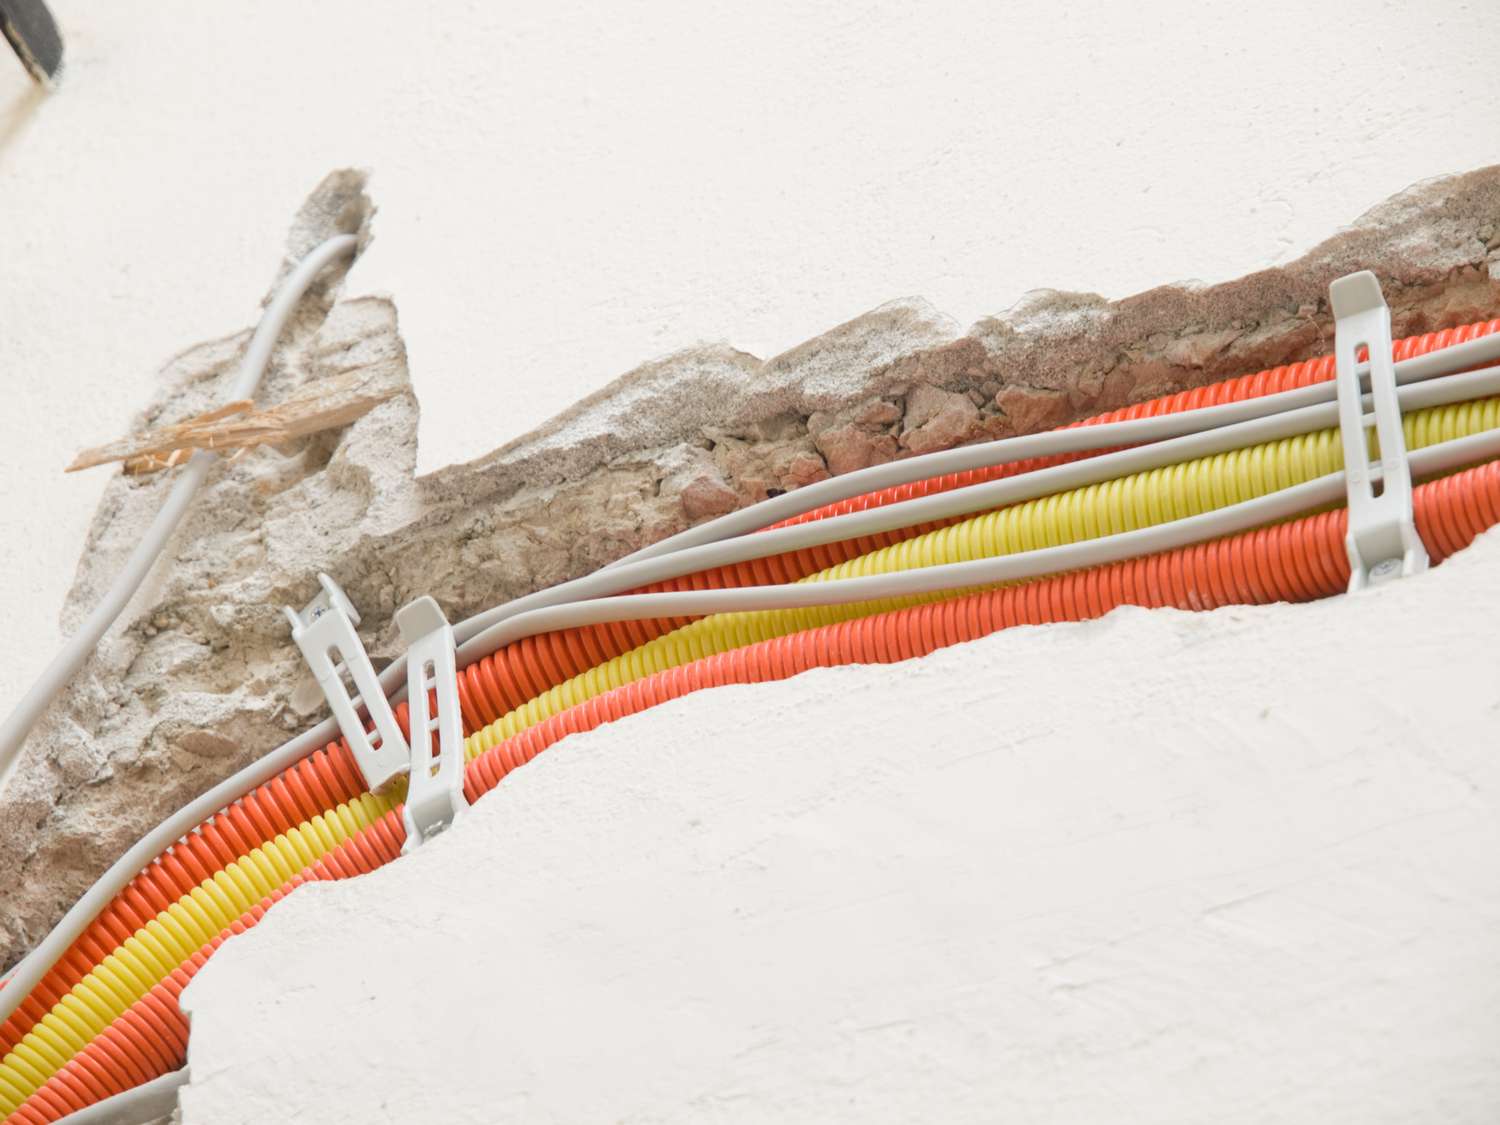
Step 4: Cut an opening in the wall
With the conduit route marked out, it’s time to cut openings in the wall to accommodate the conduit. This step requires precision and careful execution to avoid damaging the surrounding area. Here’s how to cut an opening in the wall:
- Put on safety goggles and gloves to protect yourself from any flying debris.
- If you are working with drywall, use a keyhole saw or drywall saw to carefully cut along the marked path. Start with a small pilot hole and gradually enlarge it to match the size of the conduit.
- If your wall is made of plaster or a more solid material, you may need to use a rotary tool with a cutting attachment to make the necessary openings. Take your time and work slowly to ensure a clean and precise cut.
- Keep a vacuum cleaner or dust collection system nearby to collect any dust or debris that may be generated during the cutting process. This will help keep the work area clean and prevent particles from entering the conduit.
- Once the opening is cut, check its size and shape to ensure it matches the dimensions of the conduit. Make any necessary adjustments or refinements as needed.
It’s important to exercise caution and work carefully when cutting openings in the wall. Take your time, follow the marked path, and double-check your measurements to ensure a proper fit for the conduit.
When installing conduit in a wall, be sure to use a stud finder to locate and mark the position of the studs. This will help you avoid drilling into them and ensure a secure installation.
Read more: How To Successfully Install An EMT Conduit
Step 5: Install the conduit
With the openings in the wall prepared, it’s time to install the conduit. This step involves fitting the conduit into the openings and securing it in place. Here’s how to install the conduit:
- Measure the length of conduit needed to span the distance between the openings. Use a tape measure and a pencil to mark the appropriate length.
- Trim the conduit to the marked length using a utility knife or a PVC pipe cutter. Ensure clean and straight cuts for a proper fit.
- Starting at one opening, insert one end of the conduit into the wall opening. Gently push and twist the conduit as needed to fit it securely into the opening.
- Repeat the process at the other opening, inserting the opposite end of the conduit into the second wall opening.
- If you have additional segments of conduit that need to be connected, use conduit connectors to join them together. Follow the manufacturer’s instructions for properly connecting the conduit segments.
It’s important to ensure that the conduit is fully inserted into the openings and securely connected if multiple segments are used. This will provide a stable pathway for the wiring and avoid any potential issues in the future.
When installing the conduit, make sure to follow the appropriate safety procedures and guidelines. Work carefully to avoid damaging the conduit or the surrounding area, and use proper tools to ensure a clean and accurate installation.
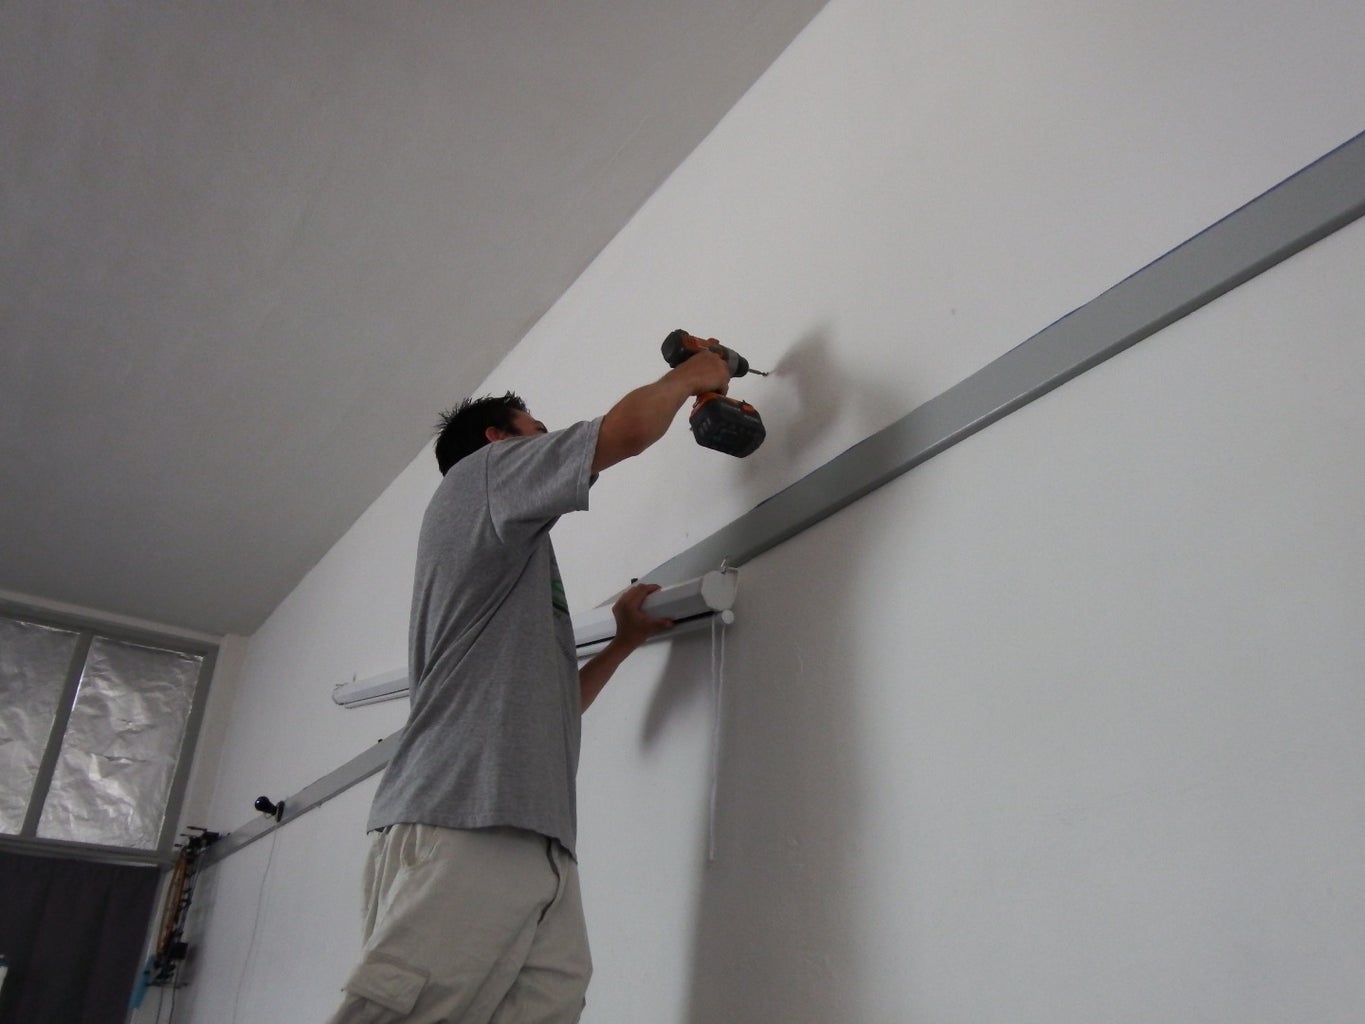
Step 6: Secure the conduit to the wall
Once the conduit is installed in the wall, it’s important to secure it in place to ensure stability and prevent any movement. Here’s how to secure the conduit to the wall:
- Determine the appropriate mounting method based on the type of wall you are working with. For drywall or other non-structural walls, you will need to use wall anchors to provide additional support. For stud walls, you can secure the conduit directly to the studs.
- If using wall anchors, start by drilling pilot holes into the wall at regular intervals along the length of the conduit. Make sure the diameter of the holes matches the size of the wall anchors.
- Insert the wall anchors into the pilot holes and tap them gently with a hammer until they are flush with the wall surface.
- Position the conduit over the wall anchors and align it with the pilot holes.
- Using a screwdriver or drill, insert screws through the conduit mounting holes and into the wall anchors or studs. Tighten the screws until the conduit is securely attached to the wall.
- If necessary, use additional mounting accessories such as conduit straps or clips to provide further support along the conduit route.
Ensure that the conduit is properly aligned with the wall openings and that the mounting screws are tightened securely. This will prevent the conduit from shifting or coming loose over time.
When securing the conduit to the wall, be mindful of any existing wires or cables that may be running through the conduit. Take precautions to avoid damaging or pinching them during the mounting process.
Step 7: Seal the conduit openings
After securing the conduit to the wall, it’s essential to seal the conduit openings to prevent the ingress of moisture, dust, and debris. Sealing the openings will also help maintain the integrity of the wiring system and protect it from potential damage. Here’s how to seal the conduit openings:
- Inspect the conduit openings to ensure they are free from any loose debris or sharp edges.
- Apply a generous bead of caulk or sealant around the edges of the conduit openings. Make sure to use a sealant that is recommended for use with the specific type of conduit and wall material.
- Smooth out the caulk using a caulk smoothing tool or your finger to create a neat and even seal.
- Allow the caulk or sealant to dry and cure completely according to the manufacturer’s instructions.
By sealing the conduit openings, you create a barrier that prevents the entry of moisture, insects, and other contaminants. This not only helps maintain the functionality of your wiring system but also ensures its longevity.
It’s important to choose a high-quality sealant that is compatible with the conduit material and wall type. This will provide a durable and long-lasting seal to protect your wiring system.
Step 8: Test the conduit for functionality
After completing the conduit installation and sealing the openings, it’s crucial to test the functionality of the conduit to ensure that it is working properly. Testing is an important step to verify that the wiring system is in good condition and ready for use. Here’s how to test the conduit for functionality:
- Turn off the power supply to the circuit or data source that will be connected to the conduit.
- Connect the appropriate wires or cables to the conduit using conduit connectors or other suitable fittings.
- Double-check that all connections are secure and properly aligned.
- Turn on the power supply and test the wiring system or data connection to ensure proper functionality.
- Check for any signs of electrical or data signal interruption, such as flickering lights or a loss of data transmission.
- If there are any issues or disruptions, inspect the conduit and connections to identify any potential problems. Make any necessary adjustments or repairs.
Testing the conduit ensures that the wiring system is functioning as intended and there are no issues with the connections or conduit installation. It allows you to address any potential problems before they escalate or cause further complications.
If you are not experienced with testing electrical systems or data connections, it is recommended to seek the assistance of a qualified professional to carry out the testing process. They will have the expertise and knowledge to accurately assess the functionality of the conduit and make any necessary adjustments or repairs.
Read more: How Much Does It Cost To Install Conduit
Conclusion
Installing conduit in a wall is a vital step in creating a safe and organized electrical or data wiring system. By following the step-by-step process outlined in this article, you can successfully install conduit in a wall and ensure the proper functioning of your wiring system.
From gathering the necessary tools and materials to planning the conduit route, marking the conduit location, cutting openings in the wall, installing and securing the conduit, sealing the openings, and testing the functionality, each step plays a crucial role in achieving a successful conduit installation.
Remember to prioritize safety throughout the installation process by wearing appropriate protective gear, working carefully to avoid damaging the conduit or surrounding area, and following all safety protocols. If you are unsure about any aspect of the installation, it is recommended to consult with a professional electrician or contractor for guidance.
By installing conduit in a wall, you protect the wiring or data cables from potential damage, enhance the aesthetics of your space, and ensure the longevity and reliability of your electrical or data system. It also provides flexibility for future expansion or modifications to the system.
Take the time to plan meticulously, measure accurately, and execute each step with care. By doing so, you will achieve a successful conduit installation that meets safety standards and provides a seamless and efficient wiring system for your home or office.
Frequently Asked Questions about How To Install Conduit In Wall
Was this page helpful?
At Storables.com, we guarantee accurate and reliable information. Our content, validated by Expert Board Contributors, is crafted following stringent Editorial Policies. We're committed to providing you with well-researched, expert-backed insights for all your informational needs.


0 thoughts on “How To Install Conduit In Wall”