Articles
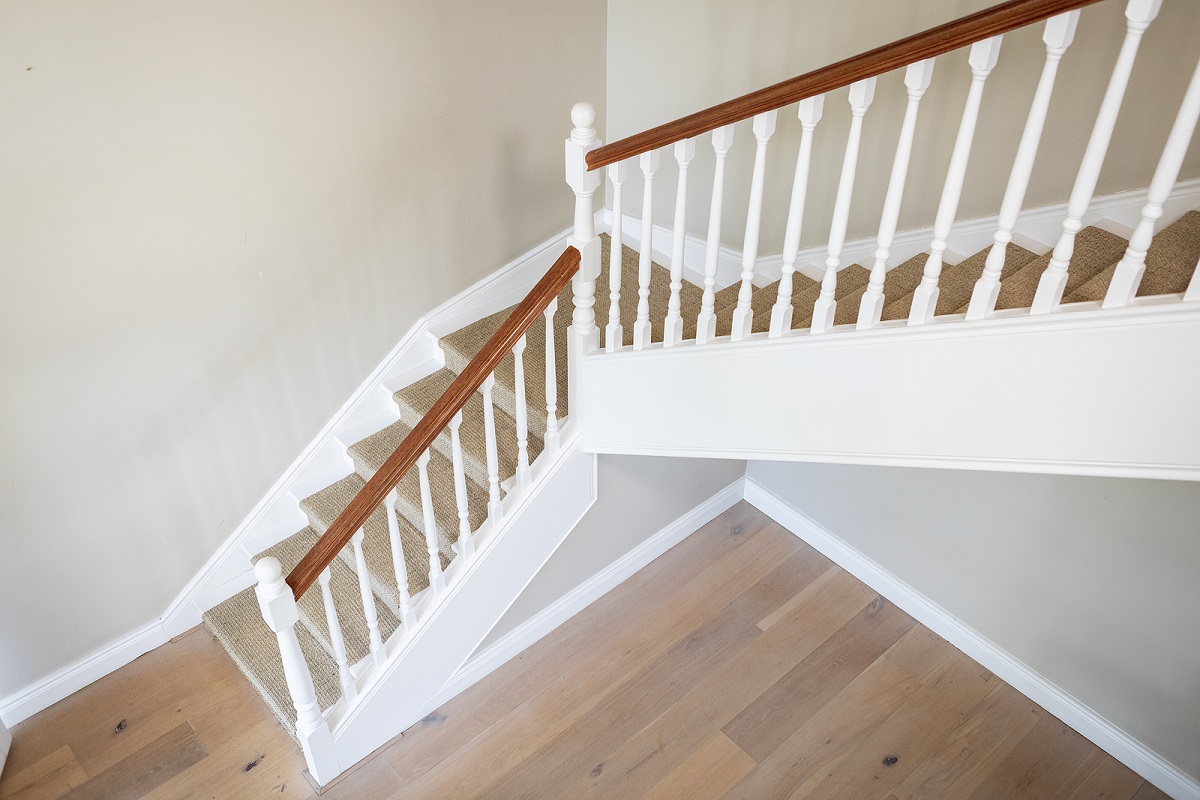
How To Install Metal Spindles On Stairs
Modified: May 6, 2024
Learn how to install metal spindles on stairs with our step-by-step guide. Increase the aesthetic appeal of your staircase with these helpful articles.
(Many of the links in this article redirect to a specific reviewed product. Your purchase of these products through affiliate links helps to generate commission for Storables.com, at no extra cost. Learn more)
Introduction
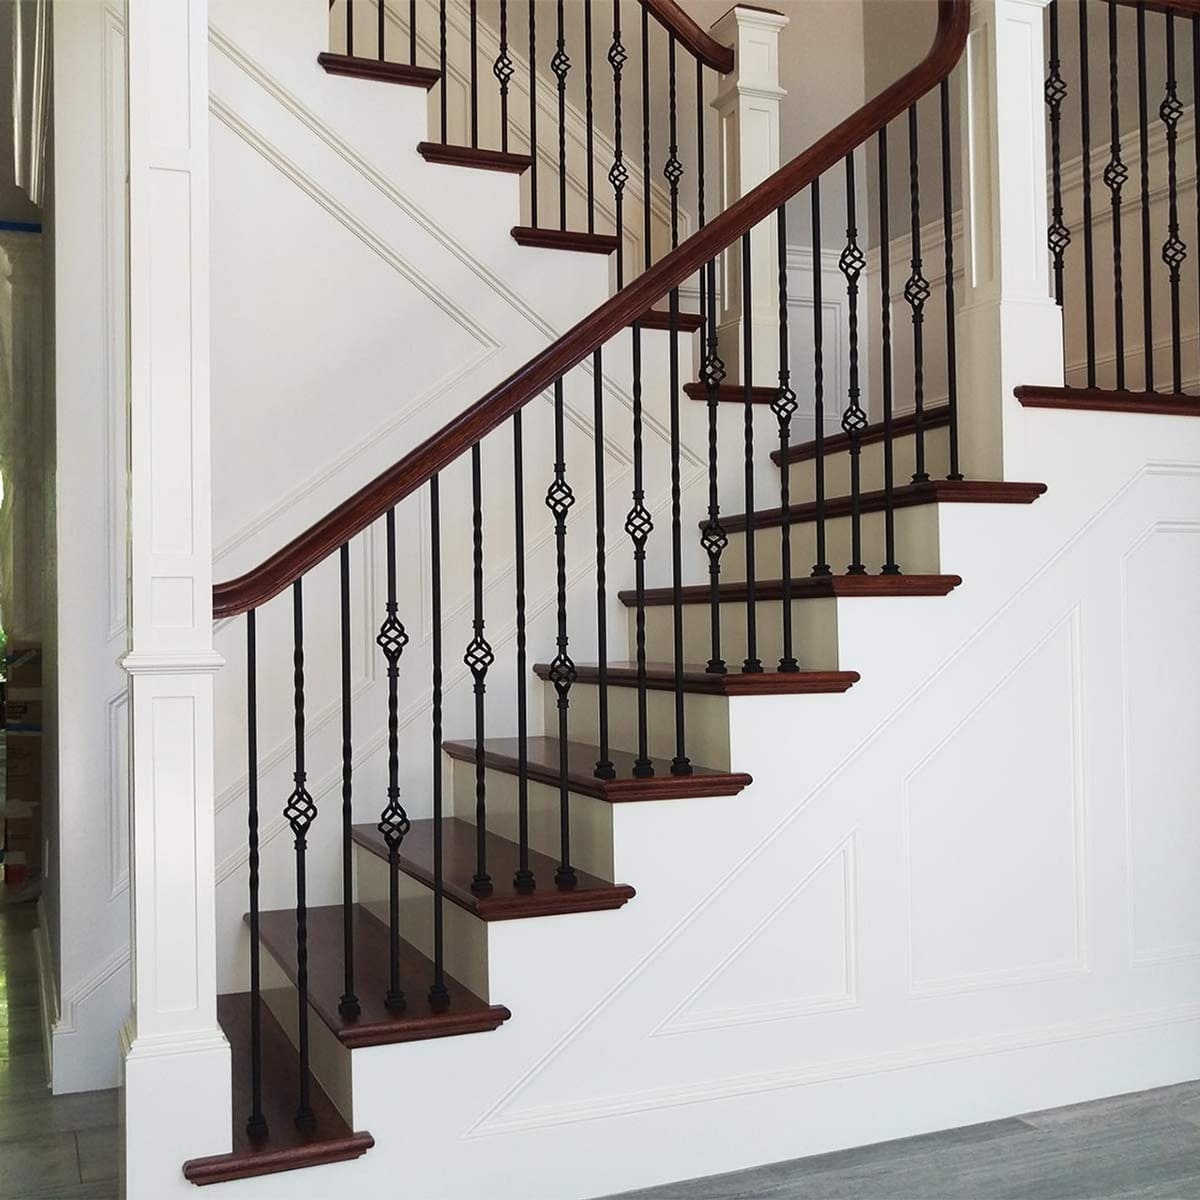
Installing metal spindles on stairs is a popular choice among homeowners looking to update the look and feel of their staircase. Not only do metal spindles add a touch of modern elegance, but they also offer durability and strength that can withstand years of use and traffic. Whether you’re replacing old wooden spindles or starting from scratch, this guide will walk you through the step-by-step process of installing metal spindles on your stairs.
Before you begin, it’s important to gather the necessary tools and materials for the project. You’ll need a measuring tape, a level, a drill with various drill bits, screws, a screwdriver or drill driver, a handrail bracket, a miter saw or hacksaw, and, of course, the metal spindles themselves. Make sure to choose spindles that match the design and style of your staircase, whether it’s a classic or contemporary look.
Now that you’re equipped with the right tools, let’s dive into the installation process. Keep in mind that every staircase is unique, so adjust the steps accordingly based on your specific stair design.
Key Takeaways:
- Transform your staircase with modern elegance and durability by installing metal spindles. Follow the step-by-step guide for a professional and visually appealing result.
- Customize the look of your staircase with optional painting or finishing of metal spindles, creating a stunning focal point in your home.
Read more: What Are Spindles On Stairs
Tools and Materials Needed
Before you begin installing the metal spindles on your stairs, it’s important to gather all the necessary tools and materials required for the job. Here’s a list of what you’ll need:
- Measuring tape: This essential tool will help you accurately measure the length and spacing of the spindles.
- Level: A level is necessary to ensure that the spindles are installed straight and level on the stairs.
- Drill: You’ll need a drill to create holes for the screws that will attach the spindles to the stair treads and the handrail.
- Drill bits: Use a variety of drill bits to accommodate the different sizes of screws and holes needed for the installation.
- Screws: Choose screws that are appropriate for attaching the spindles securely to both the stair treads and handrail.
- Screwdriver or drill driver: A screwdriver or a drill driver with a screwdriver bit will be needed to drive the screws into place.
- Handrail bracket: If your staircase has a handrail, you may need a handrail bracket to secure the spindles to the handrail.
- Miter saw or hacksaw: Depending on the design of your spindles and handrail, you may require a miter saw or a hacksaw to cut the spindles and handrail to the desired length.
- Metal spindles: The main component of the installation, make sure to choose metal spindles that match the style and design of your staircase.
Having these tools and materials ready before starting the installation process will ensure a smoother and more efficient process. It’s always a good idea to double-check that you have everything you need to avoid any unnecessary interruptions during the installation.
Step 1: Measure and Prepare the Spindles
The first step in installing metal spindles on your stairs is to measure and prepare the spindles for installation. Here’s what you need to do:
- Measure the length of the stair railing: Start by measuring the length of your stair railing. This will help you determine the number of spindles you’ll need for the installation.
- Calculate the spacing: Next, calculate the spacing between each spindle. As a general rule, the spacing should be no more than 4 inches, but be sure to check your local building codes for specific requirements.
- Prepare the spindles: If your metal spindles require any specific preparation, such as cutting them to size or sanding down any rough edges, now is the time to do it. Follow the manufacturer’s instructions for any necessary preparations.
- Mark the spots for the spindles: Using a pencil, mark the spots where each spindle will be installed on both the stair treads and the handrail. Make sure the marks are level and evenly spaced.
By taking the time to measure and prepare the spindles before installation, you’ll ensure that they fit correctly and create a visually appealing result. If you’re unsure about any measurements or preparations, consult the manufacturer’s instructions or seek guidance from a professional.
Step 2: Remove Existing Spindles or Balusters
Before you can install the metal spindles on your stairs, you’ll need to remove any existing spindles or balusters that are currently in place. Follow these steps to remove them:
- Protect the surrounding area: Place a drop cloth or protective covering over the surrounding area to catch any debris that may fall during the removal process.
- Inspect the current installation: Take a close look at how the existing spindles or balusters are attached to the stair treads and handrail. This will help you determine the best method for removal.
- Remove the screws or nails: Use a screwdriver or a pry bar to remove any screws or nails that are securing the spindles or balusters. Depending on the type of attachment, you may need to use different tools or techniques.
- Carefully pry the spindles or balusters loose: Once the screws or nails are removed, gently pry the spindles or balusters away from the stair treads and handrail. Take care not to damage the surrounding area or the existing stair structure.
- Dispose of the old spindles or balusters: Properly dispose of the removed spindles or balusters according to local regulations. Consider recycling them if possible.
Removing the existing spindles or balusters can be a delicate process, so take your time and proceed with caution. If you encounter any difficulties or aren’t confident in performing this step yourself, it’s best to seek professional assistance.
Step 3: Pre-drilling Holes for Spindle Installation
Once you’ve removed the existing spindles or balusters, it’s time to prepare the staircase for the installation of the metal spindles. This involves pre-drilling holes to ensure a secure and stable attachment. Follow these steps:
- Inspect the stair treads and handrail: Check the condition of the stair treads and handrail to ensure there are no damaged or weakened areas. If you notice any issues, address them before proceeding.
- Measure and mark the drill hole locations: Using a measuring tape and a pencil, mark the spots where you’ll be drilling holes for the spindles. The marks should align with the previously marked spots from Step 1.
- Choose the appropriate drill bit: Select a drill bit that matches the diameter of the screws you’ll be using to attach the spindles. It’s important to choose a bit that is slightly smaller than the screw size to provide a tight fit.
- Pre-drill the holes: Start drilling pilot holes at the marked spots on the stair treads and handrail. Make sure to hold the drill straight and steady, applying consistent pressure. Take care not to drill too deep, as you want the holes to accommodate the screws without compromising the structural integrity of the stairs.
- Repeat the process for all spindle locations: Continue pre-drilling holes for each marked spot until all the holes are complete.
By pre-drilling holes, you’ll ensure that the spindles are securely fastened to the stair treads and handrail. This step is crucial in preventing splitting or cracking of the wood and ensuring a long-lasting installation. Take your time and double-check your measurements to ensure accuracy.
When installing metal spindles on stairs, make sure to measure and mark the placement of each spindle accurately before drilling. This will ensure a professional and uniform appearance.
Read more: How To Build Metal Stairs
Step 4: Attach the Metal Spindles to the Stair Treads
Now that you’ve pre-drilled the holes, it’s time to proceed with attaching the metal spindles to the stair treads. Follow these steps:
- Align the first spindle: Start by aligning the first metal spindle with one of the pre-drilled holes on a stair tread. Ensure that the spindle is straight and level.
- Insert the screws: With the spindle in position, insert a screw through the pre-drilled hole and into the spindle. Use a screwdriver or drill driver to tighten the screw, but be careful not to overtighten it, as it could damage the spindle or the stair tread.
- Continue attaching the spindles: Move to the next pre-drilled hole and repeat the process for each metal spindle. Make sure to check the alignment and levelness of each spindle as you go along.
- Secure all the spindles: Once all the metal spindles are attached to the stair treads, go back and tighten any loose screws. Ensure that all the spindles are securely in place.
It’s important to be precise and careful during this step to ensure that the metal spindles are properly aligned and securely attached. Take your time and double-check the levelness and alignment after each spindle installation. This will ensure a professional and aesthetically pleasing result.
Step 5: Secure the Metal Spindles to the Handrail
After attaching the metal spindles to the stair treads, the next step is to secure them to the handrail. This will provide stability and ensure that the spindles are firmly in place. Follow these steps to complete this process:
- Position the handrail bracket: Start by positioning the handrail bracket at the desired location for the first spindle. Ensure that the bracket is aligned with the pre-drilled hole on the handrail.
- Attach the handrail bracket: Use screws to secure the handrail bracket to the handrail. Use a screwdriver or drill driver to tighten the screws, ensuring that the bracket is securely attached.
- Slide the spindle into the handrail bracket: Carefully slide the metal spindle into the handrail bracket, ensuring that it is positioned correctly and snugly fit. The spindle should be inserted through the bracket until it reaches the stair tread.
- Repeat the process for all remaining spindles: Move on to the next pre-drilled hole on the handrail and repeat the process for attaching the handrail bracket and sliding the metal spindle into place. Continue this process until all the metal spindles are securely attached to the handrail.
It’s crucial to verify the alignment and levelness of the spindles as you secure them to the handrail. This ensures a uniform and visually appealing result. Additionally, double-check that all screws are tightened properly to provide maximum stability.
Step 6: Check for Stability and Make Adjustments
Once you’ve installed the metal spindles on both the stair treads and the handrail, it’s important to check for stability and make any necessary adjustments. Follow these steps to ensure a secure and stable installation:
- Test the stability: Gently shake the handrail and apply pressure to the metal spindles to check for any wobbling or movement. If you notice any instability, further adjustments are needed.
- Tighten any loose screws: Carefully inspect all screws to ensure they are properly tightened. Use a screwdriver or drill driver to tighten any loose screws that may have caused instability.
- Adjust the alignment: If any of the metal spindles are misaligned or not level, you may need to make adjustments by loosening the screws and repositioning the spindles as needed.
- Check spacing consistency: Verify that the spacing between spindles is consistent throughout the staircase. Make any minor adjustments to achieve a uniform appearance.
- Verify handrail stability: Confirm that the handrail is secure and doesn’t move when pressure is applied. If needed, reinforce the mounting of the handrail bracket or make any necessary adjustments.
By thoroughly checking for stability and making necessary adjustments, you’ll ensure that your metal spindle installation is safe and secure. Taking the time to fine-tune the alignment, tighten loose screws, and verify handrail stability will help prevent any potential issues down the line.
Step 7: Paint or Finish the Metal Spindles (optional)
While metal spindles offer a sleek and modern aesthetic, you may choose to further enhance their appearance by painting or finishing them. This optional step allows you to customize the look of your staircase to match your personal style and décor. Follow these steps to paint or finish your metal spindles:
- Clean the spindles: Before painting or finishing, ensure that the metal spindles are clean and free from any dust or debris. Use a mild soap and water solution or a metal cleaning agent to clean the spindles thoroughly. Allow them to dry completely.
- Choose a paint or finish: Select a paint color or finish that aligns with your design preferences. Opt for a paint specifically formulated for metal surfaces or choose a powder coating for a durable and long-lasting finish.
- Prepare the work area: Cover the surrounding area with drop cloths or protective material to prevent any paint or finish from splattering onto other surfaces.
- Apply the paint or finish: Use a brush, roller, or spray applicator to evenly apply the paint or finish to the metal spindles. Apply multiple thin coats, allowing sufficient drying time between each coat, as recommended by the manufacturer.
- Ensure proper ventilation: If you’re using a paint or finish that emits fumes, ensure you’re working in a well-ventilated area or consider using a respirator mask for added safety.
- Allow for curing or drying: Once the final coat is applied, allow the paint or finish to cure or dry completely according to the manufacturer’s instructions. Avoid touching or placing any objects near the spindles during this time.
Painting or finishing the metal spindles can provide that extra touch of customization and make your staircase truly stand out. It’s important to choose high-quality products and follow the recommended application techniques to ensure a professional-looking finish.
Remember, this step is optional and entirely based on your personal preference. If you prefer the natural look of the metal spindles, you can skip this step and admire the beauty of the raw metal.
Read more: How To Install A Metal Shed
Conclusion
Installing metal spindles on your stairs is a fantastic way to update and transform the look of your staircase. The process may seem daunting at first, but by following the step-by-step guide outlined in this article, you can achieve a professional and visually appealing result. Here’s a quick recap of the installation process:
- Measure and prepare the spindles by determining the length, spacing, and making any necessary adjustments.
- Remove any existing spindles or balusters to create a clean slate for the metal spindles.
- Pre-drill holes in the stair treads for secure attachment of the metal spindles.
- Attach the metal spindles to the stair treads, ensuring proper alignment and stability.
- Secure the metal spindles to the handrail using handrail brackets.
- Check for stability and make any necessary adjustments to ensure a secure installation.
- Consider painting or finishing the metal spindles to achieve your desired aesthetic (optional).
By following these steps and paying attention to detail, you can transform your staircase into a stunning focal point in your home. Remember to always prioritize safety and consult local building codes or seek professional assistance if needed.
Now that you have a comprehensive understanding of how to install metal spindles on stairs, it’s time to gather your tools, get creative, and embark on this exciting home improvement project. Enjoy the process and revel in the beautiful results that metal spindles can bring to your staircase.
Ready to tackle more projects around your house? Check out our comprehensive guide on DIY home improvement for practical tips and creative tricks. Whether you're planning to revamp a room or tackle a larger project, this article provides all the necessary insights to make every step manageable and enjoyable.
Frequently Asked Questions about How To Install Metal Spindles On Stairs
Was this page helpful?
At Storables.com, we guarantee accurate and reliable information. Our content, validated by Expert Board Contributors, is crafted following stringent Editorial Policies. We're committed to providing you with well-researched, expert-backed insights for all your informational needs.


0 thoughts on “How To Install Metal Spindles On Stairs”