Articles
How To Install Newel Post On Flat Floor
Modified: May 6, 2024
Learn how to properly install a newel post on a flat floor in this informative article. Step-by-step instructions and helpful tips included.
(Many of the links in this article redirect to a specific reviewed product. Your purchase of these products through affiliate links helps to generate commission for Storables.com, at no extra cost. Learn more)
Introduction
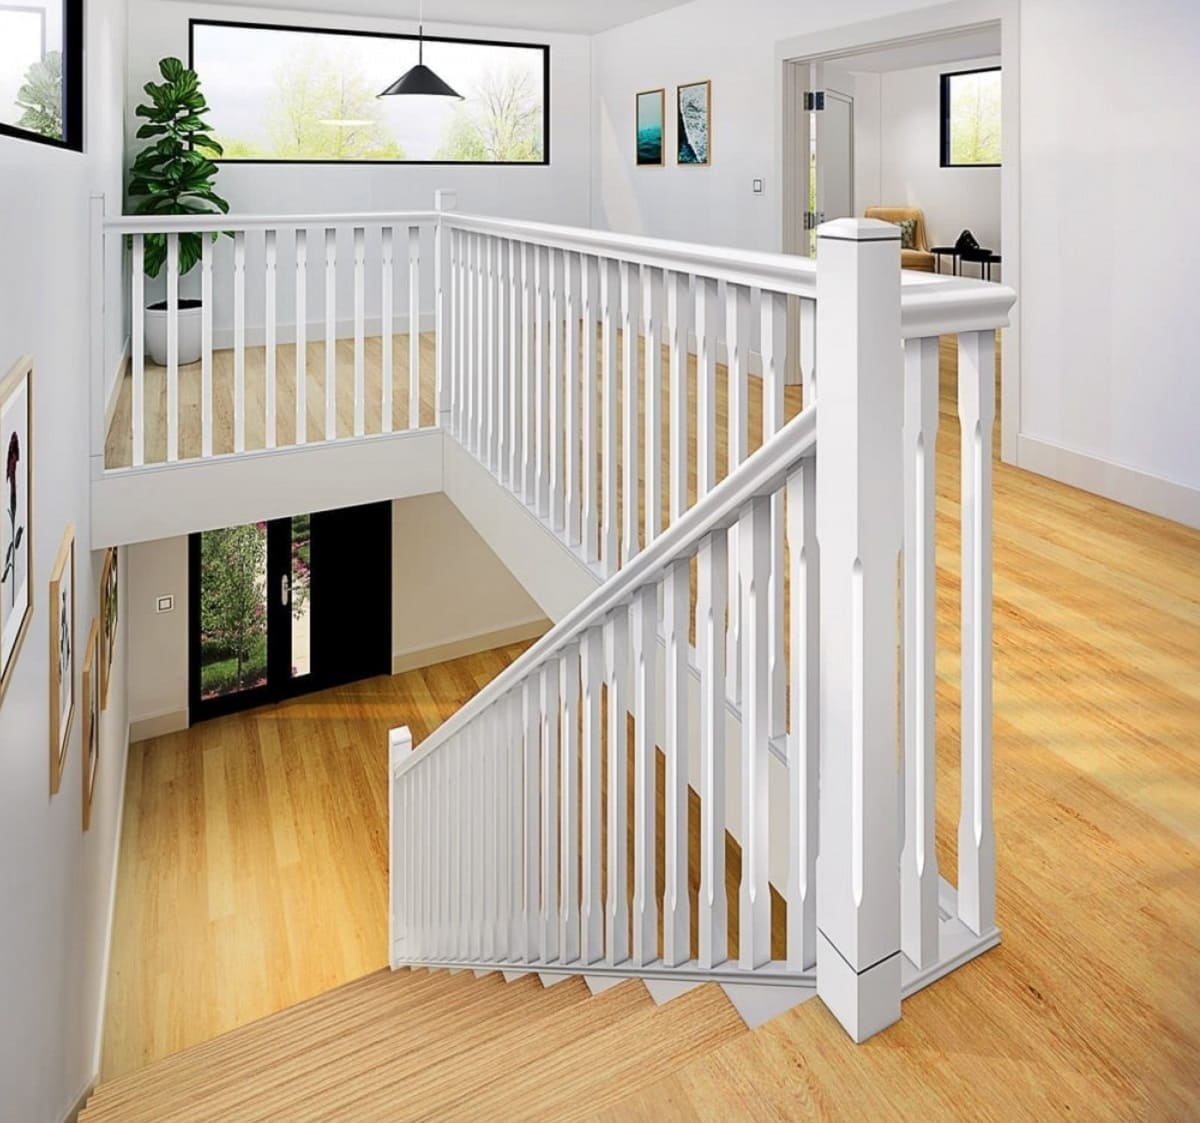
Welcome to this comprehensive guide on how to install a newel post on a flat floor. The newel post is an essential component of a staircase, providing support and stability to the handrail system. Whether you’re renovating your home or building a new staircase from scratch, knowing how to properly install a newel post is crucial for ensuring a secure and aesthetically pleasing staircase.
In this guide, we’ll walk you through the step-by-step process of installing a newel post on a flat floor. We’ll cover everything from gathering the necessary tools and materials to securing the newel post in place. By following these instructions, you’ll be able to confidently tackle this project and create a beautiful staircase that will stand the test of time.
Before we dive into the installation process, it’s important to note that this guide is intended for those who have basic knowledge of woodworking and are comfortable using power tools. If you’re a beginner or unsure about any of the steps involved, it’s always a good idea to consult with a professional or seek assistance to ensure the job is done correctly.
Now, let’s get started on installing your newel post and taking your staircase to the next level!
Key Takeaways:
- Elevate your staircase with confidence by following our step-by-step guide to installing a newel post on a flat floor. Create a sturdy and visually appealing centerpiece for your home with precision and stability.
- Ensure the safety and durability of your staircase by carefully checking the stability of the newel post and considering finishing touches such as trim, finish, and code compliance. Enjoy a transformed space with a job well done!
Read more: How To Install Newel Post On Stairs
Step 1: Gather the Required Tools and Materials
Before you begin the installation process, it’s important to gather all the necessary tools and materials. Having everything on hand will help streamline the process and prevent unnecessary delays. Here’s a list of the items you’ll need:
- Newel post: Choose a newel post that fits your desired style and matches the overall aesthetic of your staircase. It should be made of a durable material such as wood, metal, or composite.
- Tape measure: Use a tape measure to take accurate measurements of the placement and height of the newel post.
- Pencil: You’ll need a pencil to mark the placement of the newel post on the floor.
- Drill: A power drill will be necessary for making holes in the floor and attaching the newel post.
- Drill bits: Purchase drill bits that are suitable for the type of material your floor is made of.
- Screws and anchors: Choose the appropriate screws and anchors based on your floor type and the weight of the newel post.
- Level: A level tool will help ensure that the newel post is straight and properly aligned.
- Screwdriver: You’ll need a screwdriver to secure the screws in place.
- Safety goggles and gloves: Protect your eyes and hands by wearing safety goggles and gloves throughout the installation process.
It’s important to note that the specific tools and materials required may vary depending on the design of your staircase and the type of newel post you’re installing. Always consult the manufacturer’s instructions or seek expert advice if you’re unsure about the specific requirements for your project.
Once you have gathered all the necessary tools and materials, you’re ready to move on to the next step: measuring and marking the placement of the newel post.
Step 2: Measure and Mark the Placement of the Newel Post
Before proceeding with the installation of the newel post, it’s crucial to accurately measure and mark the placement on the flat floor. Follow these steps to ensure precise positioning:
- Determine the height: Measure the desired height of the newel post. This measurement should take into account the handrail’s height and any local building codes or regulations.
- Find the center: Locate the center point of the area where you plan to install the newel post. This is typically at the beginning or end of the staircase or at any turns.
- Mark the placement: Use a pencil to mark the center point on the floor. This will serve as your reference point for the installation.
- Measure the distance: Measure the distance from the center point to the edge of the newel post. This will determine how far the post will extend from the center point.
- Double-check the measurements: Verify that all measurements are accurate and aligned with your desired placement. It’s essential to be precise to ensure a stable and visually appealing result.
Keep in mind that the specific measurements and placement will vary depending on your staircase design and personal preferences. Additionally, you may need to adjust the measurements if you have existing balusters or handrail components that the newel post needs to align with.
Once you have marked the exact placement of the newel post on the floor, you’re ready to move on to the next step: preparing the flat floor for installation.
Step 3: Preparing the Flat Floor for Installation
Now that you have measured and marked the placement of the newel post, it’s time to prepare the flat floor for installation. This step ensures a solid and stable foundation for the newel post. Follow these guidelines:
- Clean the area: Begin by clearing the installation area of any obstructions, debris, or dust. A clean workspace will make the installation process easier and help prevent any damage to the newel post.
- Identify floor type: Determine the type of floor you are working with. The preparation process may vary depending on whether you have a wooden floor, concrete floor, or tile floor.
- Wooden floor: If you have a wooden floor, ensure that it is level and structurally sound. Address any squeaking or loose floorboards before proceeding with the installation.
- Concrete floor: For a concrete floor, you may need to use a masonry drill bit to make holes for anchoring the newel post. Consult the manufacturer’s instructions or seek professional advice for the best method of drilling into your specific type of concrete.
- Tile floor: If you have a tile floor, it’s important to protect the tiles during the installation process. Place a piece of cardboard or a soft, thick cloth beneath the area where you’ll be working to prevent any damage.
- Protect flooring: Regardless of the floor type, consider placing a protective layer such as a plastic sheet or a drop cloth over the surrounding area. This will safeguard the floor from potential scratches, dust, or dropped tools.
Take your time to ensure that the installation area is clean and the floor is properly prepared. This step will contribute to a successful and durable installation of the newel post. Now that the floor is ready, it’s time to move on to attaching the newel post in the next step.
Step 4: Attach the Newel Post to the Floor
With the floor prepared, it’s time to attach the newel post. Follow these steps to securely fasten the post to the floor:
- Position the newel post: Place the newel post on the marked placement on the floor. Ensure that it is aligned correctly and stands straight.
- Mark the mounting holes: Use a pencil or marker to mark the spots where you’ll be drilling the mounting holes. These holes will allow you to attach the newel post to the floor securely.
- Drill the holes: Using an appropriate drill bit, carefully drill the mounting holes on the marked spots. Make sure to drill to the depth specified in the newel post’s instructions.
- Clean the holes: Remove any debris or dust from the drilled holes to ensure a proper and secure fit for the fasteners.
- Apply adhesive (Optional): Depending on the type of newel post and floor, you may need to apply an adhesive or epoxy into the drilled holes before inserting the fasteners. This helps to create a strong bond between the post and the floor.
- Insert the fasteners: Place the appropriate anchors or screws into the drilled holes. Use a screwdriver or a drill to tighten them securely. Make sure not to overtighten, as this may damage the floor or the newel post.
It’s important to carefully follow the manufacturer’s instructions when attaching the newel post. The specific fasteners and techniques can vary depending on the materials used and the structural requirements. If you’re uncertain, consult with a professional or refer to the manufacturer’s documentation.
Once the newel post is firmly attached to the floor, proceed to the next step to ensure its stability and make any necessary adjustments.
When installing a newel post on a flat floor, make sure to use a level to ensure it is perfectly vertical. Use a drill to secure the post to the floor with screws or bolts for stability.
Read more: How To Install A Lamp Post
Step 5: Secure the Newel Post with Fasteners
Now that the newel post is attached to the floor, it’s time to ensure its stability by securely fastening it. Follow these steps to properly secure the newel post:
- Check for stability: Give the newel post a gentle shake to test its stability. If it wobbles or feels loose, you may need to make adjustments or reinforce the fasteners.
- Tighten the fasteners: Using a screwdriver or a drill, carefully tighten the screws or anchors that hold the newel post in place. Make sure to follow the manufacturer’s guidelines to avoid over-tightening or damaging the post.
- Align the post: Use a level to ensure that the newel post is perfectly vertical. Make any necessary adjustments by loosening the fasteners and repositioning the post as needed. Once it is level, retighten the fasteners.
- Trim excess screws (If applicable): If there are any screws that are protruding or sticking out, use a hacksaw or a suitable tool to trim them down. This will ensure a clean and finished appearance.
- Inspect the attachment: Carefully inspect the attachment of the newel post to ensure that it is securely fastened. Look for any gaps, loose sections, or signs of instability. If any issues are detected, address them promptly to maintain the safety of the staircase.
It’s crucial to take your time and ensure that the newel post is securely fastened and aligned properly. A stable and secure post is essential for the overall structural integrity of the staircase and the safety of those using it. Once the post is securely in place, move on to the next step to perform a final check of its stability before completing the installation process.
Step 6: Check the Stability of the Newel Post
Ensuring the stability of the newel post is crucial for the overall safety and durability of the staircase. Follow these steps to perform a thorough stability check:
- Apply pressure: Apply gentle pressure to the newel post from different angles to simulate normal use. Check for any excessive movement or wobbling. A stable newel post should not move or shift significantly.
- Listen for sounds: Pay attention to any creaking or squeaking sounds while applying pressure to the newel post. This could indicate loose fasteners that need to be tightened further.
- Inspect the base: Examine the base of the newel post where it meets the floor. Look for any gaps or unevenness that may affect its stability. If necessary, readjust or reinforce the fasteners as needed.
- Check the handrail connection: If you have a handrail attached to the newel post, ensure that the connection is secure. Make sure the handrail does not move when pressure is applied.
- Reinforce if necessary: If you discover any instability or issues during the stability check, take the necessary steps to reinforce the newel post. This may involve adding additional screws, anchors, or adhesive for extra support.
It’s essential to address any stability issues promptly to ensure the safety of anyone using the staircase. If you’re uncertain about the stability of the newel post, it’s recommended to consult with a professional or seek expert guidance.
Once you are satisfied with the stability of the newel post, it’s time to move on to the final step: adding the finishing touches and considering any additional factors for your installation.
Step 7: Finishing Touches and Considerations
With the newel post securely installed and checked for stability, it’s time to add the finishing touches to complete the installation. Consider the following factors to ensure a polished and professional-looking result:
- Trim and sand: If there are any rough edges or uneven surfaces on the newel post, use sandpaper or a wood file to smooth them out. This will give it a more finished appearance.
- Apply a finish: Depending on the material and desired look, consider applying a finish to protect and enhance the appearance of the newel post. This can include paint, stain, or varnish. Follow the manufacturer’s instructions and allow adequate drying time before touching or using the staircase.
- Consider balusters and handrail: Assess the need for balusters and a handrail system to accompany the newel post. Ensure they are compatible with the design and safety requirements of your staircase.
- Consider code compliance: Take into account any local building codes or regulations related to handrail height, spacing, and overall staircase safety. Compliance with these codes is essential for the well-being of those using the staircase.
- Regular maintenance: Keep in mind that regular maintenance is necessary to prolong the life and appearance of the newel post. Depending on the material, this may include periodic cleaning, refinishing, or tightening of fasteners.
By paying attention to these finishing touches and considerations, you can ensure that your newel post installation not only looks great but also meets safety standards and withstands everyday use.
Congratulations! You have successfully completed the installation of a newel post on a flat floor. Your staircase now boasts a sturdy and visually appealing centerpiece that will enhance the overall aesthetic of your home. Enjoy the transformed space and the satisfaction of a job well done!
If you have any further questions or require additional assistance, do not hesitate to seek professional guidance or consult with experts in the field.
Conclusion
Installing a newel post on a flat floor is a rewarding project that can elevate the design and functionality of your staircase. By following the step-by-step process outlined in this comprehensive guide, you have learned how to install a newel post with precision and stability.
From gathering the required tools and materials to measuring and marking the placement, and from preparing the floor to securely attaching the newel post, each step is crucial in ensuring a successful installation. By carefully checking the stability and considering the finishing touches, you can create a beautiful and safe staircase that will enhance the aesthetics and value of your home.
Remember to consider any local building codes or regulations and to consult with professionals when necessary. Regular maintenance and upkeep will help keep your newel post in great condition for years to come.
We hope this guide has equipped you with the knowledge and confidence to tackle your newel post installation project. Enjoy the process and the final result as you transform your staircase into a functional and visually appealing feature of your home.
If you have any further questions or require additional assistance, don’t hesitate to seek expert advice or consult with professionals who specialize in staircase installations. Happy crafting!
Now that you've mastered installing a newel post, why not tackle more projects around your home? Whether you're a seasoned handyman or just starting, our guide on DIY home improvement offers practical advice for transforming spaces with your own hands. Looking for a hobby that's both gratifying and creative? Dive into our roundup of the best woodworking projects for 2024, perfect for beginners and skilled craftspeople alike. These resources are brimming with ideas to keep you busy and enhance your skills.
Frequently Asked Questions about How To Install Newel Post On Flat Floor
Was this page helpful?
At Storables.com, we guarantee accurate and reliable information. Our content, validated by Expert Board Contributors, is crafted following stringent Editorial Policies. We're committed to providing you with well-researched, expert-backed insights for all your informational needs.


0 thoughts on “How To Install Newel Post On Flat Floor”