Articles
How To Install A Floor Safe
Modified: October 20, 2024
Learn step-by-step instructions on how to install a floor safe with informative articles. Ensure your valuables are securely stored with our expert guidance.
(Many of the links in this article redirect to a specific reviewed product. Your purchase of these products through affiliate links helps to generate commission for Storables.com, at no extra cost. Learn more)
Introduction
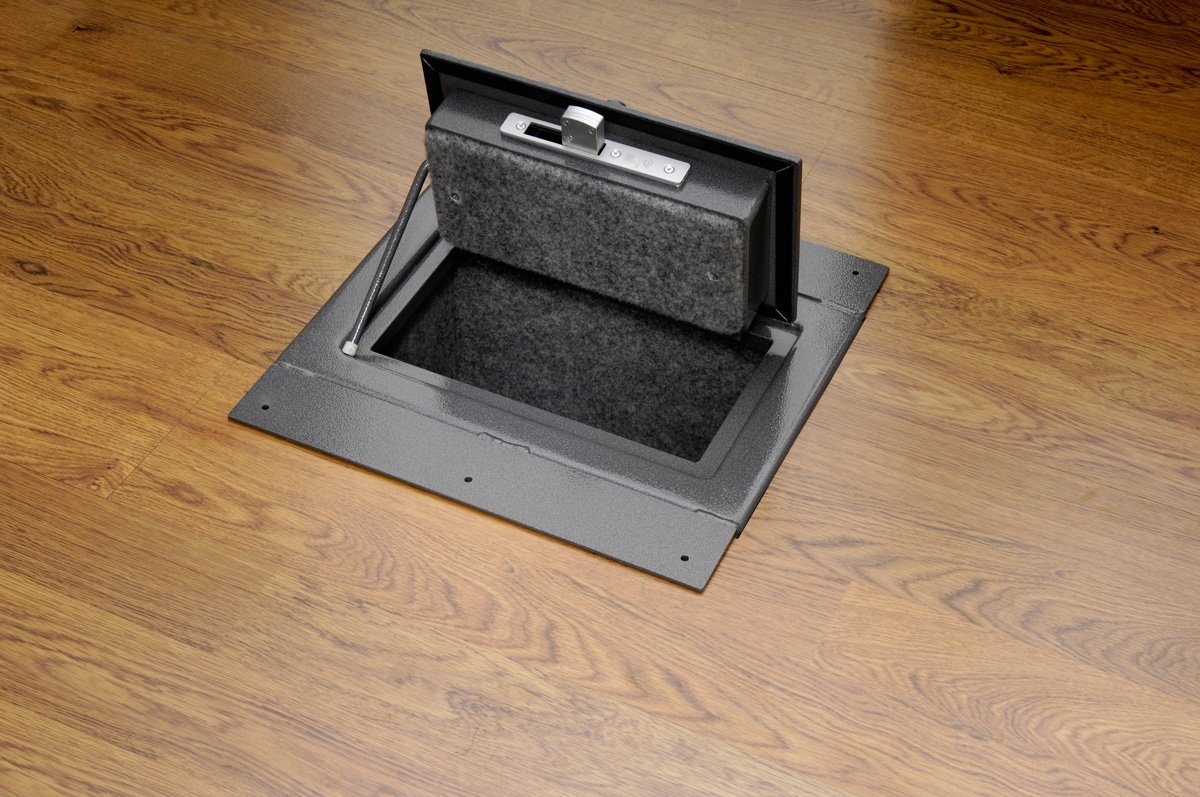
Welcome to our guide on how to install a floor safe! If you’re looking for a secure and discreet way to protect your valuable belongings, a floor safe is an excellent choice. This type of safe is specifically designed to be installed directly into your floor, providing a hidden and secure storage solution.
Whether you want to safeguard your important documents, jewelry, or cash, a floor safe offers a high level of protection against theft and home invasions. In this article, we’ll walk you through the step-by-step process of installing a floor safe, ensuring that you can complete the installation with ease and confidence.
Before we dive into the installation process, it’s important to note that choosing the right floor safe is a crucial first step. There are various factors to consider such as size, security features, and fire resistance. Make sure to take the time to research and select a floor safe that best meets your needs and provides the level of security you require.
Now, let’s get started with the installation process and ensure that your floor safe is installed securely and ready to protect your valuable possessions.
Key Takeaways:
- Choosing the right floor safe is crucial. Consider size, security features, fire resistance, installation requirements, and brand reputation to ensure your valuables are well-protected and seamlessly integrated into your space.
- Proper installation, securing, and testing of the floor safe are essential for its effectiveness. Prioritize stability, locking mechanism, and additional security measures to safeguard your prized possessions from potential threats.
Read more: How To Bolt Safe To Floor
Choosing the Right Floor Safe
When it comes to choosing the right floor safe, there are several factors to consider. It’s important to select a safe that not only fits your specific security needs but also seamlessly blends into your home or office environment. Here are some key considerations to keep in mind:
- Size and Capacity: The size of the floor safe should be determined by what you plan to store in it. Take into account the dimensions of your valuables and ensure that the safe’s interior dimensions are sufficient to accommodate them.
- Security Features: Look for safes that offer advanced security features such as a biometric lock, digital keypad, or combination lock. These features provide an extra layer of protection and make it more difficult for unauthorized individuals to access the safe.
- Fire Resistance: Consider a floor safe that offers fire resistance. This feature is particularly important if you plan to store important documents or irreplaceable items that could be damaged in the event of a fire.
- Installation Requirements: Before purchasing a floor safe, make sure to understand the installation requirements. Some safes may require professional installation, while others can be easily installed by following the manufacturer’s instructions.
- Brand Reputation: Research the reputation of the safe’s manufacturer. Look for brands that are well-known for producing durable and reliable safes. Reading customer reviews and testimonials can provide valuable insights.
By considering these factors, you can narrow down your options and find a floor safe that not only meets your security requirements but also fits seamlessly into your space.
Once you have chosen the right floor safe, it’s time to gather the necessary tools and materials for the installation process. Let’s move on to the next step.
Tools and Materials Needed
Before you begin the installation process, it’s important to gather all the necessary tools and materials. Having everything prepared will ensure a smooth and efficient installation. Here’s a list of the tools and materials you will need:
- Measuring tape
- Pencil
- Drill
- Hole saw or reciprocating saw
- Screwdriver
- Bolts or anchor bolts
- Level
- Concrete or floor patch compound (if needed)
- Protective eyewear and gloves
- Vacuum or broom (for clean-up)
Ensure that you have all these tools and materials readily available before you begin the installation. It’s always a good idea to double-check and make sure you haven’t missed anything.
Once you have everything prepared, you’re ready to move on to the next step: preparing the installation area. This step is crucial to ensure a proper and secure installation of your floor safe.
Preparing the Installation Area
Before you can install a floor safe, you need to properly prepare the area where the safe will be placed. This involves selecting an appropriate location and ensuring that the floor is ready for installation. Follow these steps to prepare the installation area:
- Selecting the Location: Choose a location for the floor safe that is discreet and easily accessible for you, but not easily noticeable or accessible to potential intruders. Consider areas such as closets, under furniture, or in a concealed corner of a room.
- Clearing the Area: Remove any furniture, rugs, or debris from the floor in the chosen location. It’s important to have a clear and clean space to work with during the installation process.
- Checking the Floor: Check the condition of the floor where the safe will be installed. Ensure that the floor is structurally sound and free from any damage or weak spots that could compromise the installation. If you notice any issues, consult a professional to address them before proceeding.
- Inspecting the Underfloor: If you plan to install the floor safe on a raised platform or above a basement or crawl space, inspect the underfloor area for any potential obstacles or obstructions. Clear away any wiring, pipes, or other objects that could interfere with the installation.
- Protecting Surrounding Surfaces: To prevent any damage to surrounding surfaces during the installation, cover nearby walls or floor areas with protective materials such as drop cloths or cardboard.
By taking the time to properly prepare the installation area, you’ll ensure a smooth and successful installation process. With the area ready, you can now move on to marking and cutting the floor for the installation of your floor safe.
Marking and Cutting the Floor
Once you have prepared the installation area, it’s time to mark and cut the floor to create a space for the floor safe. Follow these steps to ensure accurate marking and a clean cut:
- Measure and Mark: Use your measuring tape to determine the dimensions of the safe’s base. Mark the measurements on the floor using a pencil. Ensure that the marks are precise and align with the shape and size of the safe you are installing.
- Double-Check the Measurements: Before proceeding with cutting, double-check your measurements to ensure accuracy. You want to be certain that the opening you create will snugly fit the safe.
- Align the Cutting Tool: If you’re using a hole saw, attach it to your drill and make sure it aligns with the marked center of the safe’s base. If you’re using a reciprocating saw, place it near the edge of the marked area.
- Cut the Floor: With the cutting tool aligned, carefully cut along the marked lines. Take your time and apply steady pressure. If you’re using a reciprocating saw, use gentle back-and-forth motions. If you encounter any resistance or difficulties, stop and reassess to avoid causing damage.
- Finishing Touches: Once you’ve cut out the marked area, remove any loose debris or dust from the opening. Make sure the edges are smooth and even. If necessary, use a concrete or floor patch compound to level any irregularities and provide a secure base for the safe.
Remember to wear protective eyewear and gloves while cutting the floor to ensure your safety. Also, keep in mind that the cutting process may generate dust or debris, so it’s a good idea to have a vacuum or broom handy for clean-up.
With the floor cut and prepared, you’re ready to move on to the next step: setting up the floor safe.
When installing a floor safe, make sure to choose a location that is easily accessible but also hidden from view. It should be installed in a concrete floor to provide maximum security.
Read more: How To Install A SimpliSafe Doorbell
Setting Up the Floor Safe
Now that you have created the opening in the floor, it’s time to set up the floor safe. Follow these steps to ensure a proper installation:
- Positioning the Safe: Place the floor safe carefully into the opening you created. Make sure it fits securely and is level with the floor surface. Use a level to ensure that the safe is perfectly horizontal and does not tilt.
- Adjust the Anchoring Holes: Inspect the bottom of the safe to locate the anchoring holes. If necessary, adjust the depth or position of the holes to align with the anchor bolts or bolts that will secure the safe to the floor.
- Inserting the Anchor Bolts: Insert the anchor bolts or bolts through the anchoring holes, ensuring they are securely fastened to the floor. Use a screwdriver or wrench to tighten them, but be careful not to overtighten, as it may damage the safe or the floor.
- Testing the Safe’s Door: Open and close the safe’s door several times to ensure it operates smoothly and securely. It should close tightly and lock without any issues. If you encounter any difficulties, refer to the manufacturer’s instructions or seek professional assistance.
- Securing Any Additional Components: If your floor safe comes with additional components such as a keypad or biometric scanner, follow the manufacturer’s instructions to securely install and connect them.
During the installation process, always prioritize safety. If you’re unsure about any step or encounter any difficulties, don’t hesitate to seek guidance from a professional.
With the floor safe securely set up, it’s time to move on to the next step: ensuring the safe is properly secured in place.
Securing the Floor Safe
Securing the floor safe is crucial to ensure its stability and prevent unauthorized access or removal. Follow these steps to properly secure the floor safe:
- Checking the Stability: Verify that the floor safe is stable and not wobbly. If it feels unstable, adjust the anchor bolts or bolts to provide better support.
- Tightening the Anchor Bolts: Double-check the tightness of the anchor bolts or bolts that secure the safe to the floor. Use a screwdriver or wrench to ensure they are securely fastened, but avoid overtightening, as it may cause damage.
- Testing the Secure Connection: Try to gently move or shake the safe to test its connection to the floor. It should remain firmly in place without any significant movement. If you notice any looseness or instability, recheck the anchor bolts or seek professional assistance to address the issue.
- Securing the Door: If your floor safe has a locking mechanism, such as a combination lock or digital keypad, make sure it is set and functioning correctly. Test to ensure the door locks securely and cannot be easily manipulated without the proper access code.
- Reinforcing Security Measures: Consider additional security measures such as installing a motion sensor or connecting the safe to a home security system for added protection. These measures provide an extra layer of security and help to deter potential burglars.
It’s important to periodically check the floor safe’s security and perform maintenance as needed. Regularly inspect the anchor bolts or bolts to ensure they remain tight and secure. Additionally, test the locking mechanism to make sure it operates smoothly and reliably.
With the floor safe securely installed and properly secured, you’re ready to move on to the next and final step: testing the floor safe to ensure its functionality.
Testing the Floor Safe
Once you have installed and secured the floor safe, it’s crucial to thoroughly test its functionality before trusting it with your valuable belongings. Follow these steps to conduct a proper test of the floor safe:
- Double-Checking the Combination or Access Code: If your floor safe requires a combination or access code, ensure that you have it memorized or recorded in a secure place. Double-check that you have the correct code before proceeding with the test.
- Opening and Closing the Safe: Use the correct combination or access code to open the floor safe. Test the door multiple times to verify that it opens and closes smoothly without any hindrance or resistance. Ensure that the locking mechanism engages securely.
- Testing the Locking Mechanism: Lock the safe using the combination or access code. Attempt to manipulate the locking mechanism without the proper code to ensure that it cannot be easily bypassed or tampered with.
- Checking for Proper Storage Space: Place a sample item or a piece of cardboard inside the safe to confirm that there is enough space to comfortably store your valuables. Ensure that the item fits without any difficulty and doesn’t interfere with the closing of the door.
- Monitoring Fire and Water Resistance (if applicable): If your floor safe is designed to offer fire or water resistance, verify its effectiveness by reviewing the manufacturer’s specifications. This will help ensure that your valuable items are adequately protected in case of a fire or flood.
- Consulting the User Manual: If you encounter any issues or have questions during the testing process, consult the user manual provided by the manufacturer. It will contain important information specific to your floor safe model and may help resolve any concerns.
By conducting a thorough test, you can have peace of mind knowing that your floor safe is functioning correctly and ready to protect your valuable items. Remember to periodically perform maintenance checks and update your access code as an additional security measure.
Congratulations! You have successfully installed, secured, and tested your floor safe. Now you can rest assured that your prized possessions are well-protected and hidden from would-be intruders.
Conclusion
Installing a floor safe is a smart investment in the security and protection of your valuable belongings. By following the step-by-step process outlined in this guide, you can successfully install and secure a floor safe in your home or office.
Remember to carefully choose a floor safe that meets your specific security needs, considering factors such as size, security features, fire resistance, and brand reputation. Gather all the necessary tools and materials before starting the installation process to ensure a smooth experience.
Properly preparing the installation area and accurately marking and cutting the floor are key steps to ensure a secure and perfectly fitting floor safe. Take the time to securely set up the floor safe, double-checking the stability and ensuring a snug fit within the floor opening.
Securing the floor safe and testing its functionality are critical to its effectiveness. Make sure to tighten the anchor bolts, test the locking mechanism, and verify the storage space to ensure that your valuables are protected. Consider additional security measures such as motion sensors or connecting the safe to a home security system for enhanced protection.
Periodically check and maintain the floor safe, inspecting the anchor bolts and testing the locking mechanism to ensure continued security and functionality. Regularly update your access code for an additional layer of protection.
By following these guidelines, you can have peace of mind knowing that your valuable belongings are well-protected within your floor safe. Remember, security is a continuous process, and it’s important to stay vigilant and take preventive measures to safeguard your possessions.
Thank you for choosing our guide on how to install a floor safe. We hope this information has been helpful in ensuring the security and protection of your valuable items.
Frequently Asked Questions about How To Install A Floor Safe
Was this page helpful?
At Storables.com, we guarantee accurate and reliable information. Our content, validated by Expert Board Contributors, is crafted following stringent Editorial Policies. We're committed to providing you with well-researched, expert-backed insights for all your informational needs.


0 thoughts on “How To Install A Floor Safe”