Articles
How To Install Vinyl Soffit Ceiling
Modified: October 20, 2024
Learn how to install vinyl soffit ceiling with our helpful articles. Get step-by-step instructions and expert tips to ensure a professional finish.
(Many of the links in this article redirect to a specific reviewed product. Your purchase of these products through affiliate links helps to generate commission for Storables.com, at no extra cost. Learn more)
Introduction
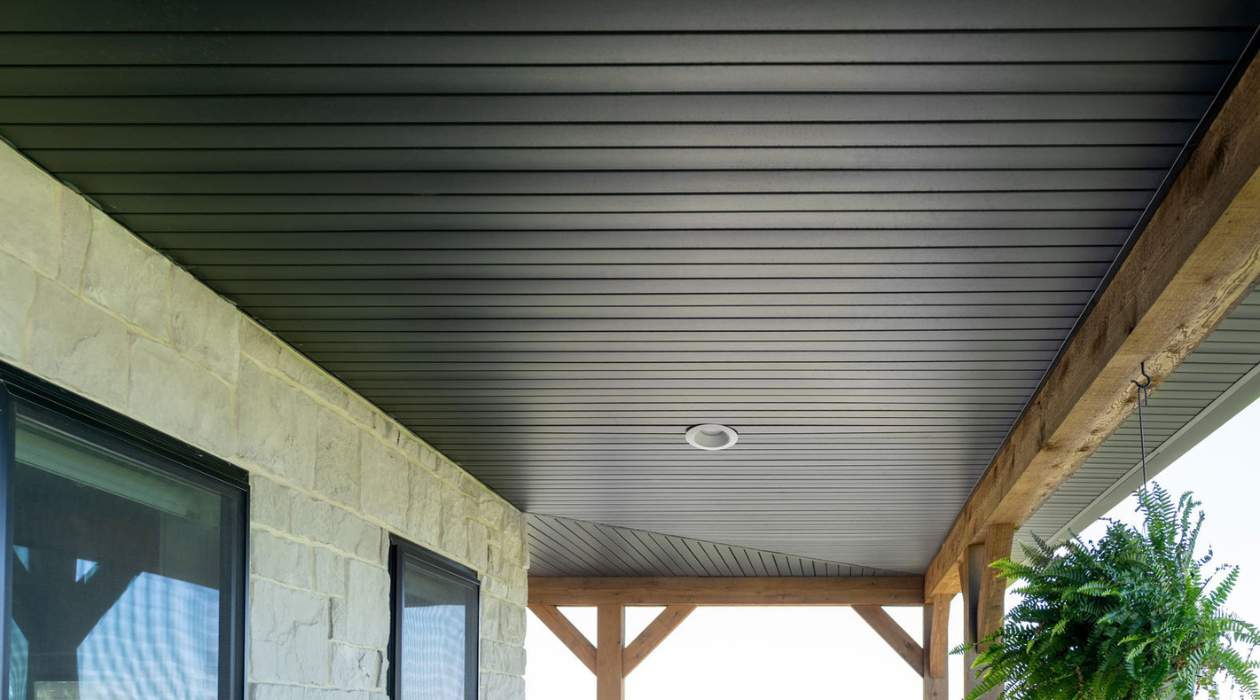
Welcome to the world of vinyl soffit ceilings! If you’re looking to enhance the aesthetic appeal and functionality of your space, installing a vinyl soffit ceiling is a fantastic option. Vinyl soffit ceilings not only offer a clean and attractive look, but they also provide excellent ventilation for your home or building.
In this article, we will guide you through the process of installing a vinyl soffit ceiling. Whether you’re a seasoned DIY enthusiast or a homeowner looking to take on a new project, we’ve got you covered. By following these step-by-step instructions, you’ll be able to transform your ceiling with ease and precision.
Before we dive into the installation process, let’s take a moment to familiarize ourselves with the materials needed for this project. Having everything ready beforehand will save you time and ensure a smooth installation.
Key Takeaways:
- Elevate your space with a visually appealing and well-ventilated vinyl soffit ceiling. Follow the step-by-step guide for a seamless DIY installation and enjoy the long-lasting benefits of this functional upgrade.
- Transform your space with a polished and professional-looking vinyl soffit ceiling. From preparation to finishing touches, create an inviting environment with this durable and attractive solution.
Materials Needed
Before you begin installing a vinyl soffit ceiling, it’s important to gather all the necessary materials. Here’s a list of what you’ll need:
- Vinyl soffit panels
- J-channels
- Screws
- Measuring tape
- Pencil
- Saw (circular saw or snips)
- Drill
- Screwdriver
- Ladder or scaffolding
- Level
- Trim pieces
- Adhesive (optional)
Ensure that you have all the necessary tools and materials before you begin the installation to avoid any delays or interruptions. Now that you have everything ready, let’s move on to the first step: preparing the ceiling.
Step 1: Prepare the Ceiling
Before you can install the vinyl soffit ceiling, it’s important to properly prepare the existing ceiling surface. Follow these steps to ensure a clean and smooth installation:
- Inspect the ceiling: Begin by checking the condition of the ceiling surface. Look for any signs of damage or decay, such as cracks, water stains, or mold. If you notice any issues, it’s essential to address them before proceeding with the installation.
- Clean the ceiling: Remove any dirt, dust, or debris from the ceiling. A broom or vacuum cleaner can be used for this purpose. Ensure that the surface is clean and free from any obstructions that may interfere with the installation process.
- Repair any damage: If you encountered any damage during the inspection, such as cracks or holes, make the necessary repairs. Fill any cracks or holes with an appropriate filler or patching compound, following the manufacturer’s instructions. Allow sufficient time for the repairs to dry and cure before moving on.
- Apply a primer (optional): If you’re working with a painted or textured ceiling, you may consider applying a primer before installing the vinyl soffit. This will not only provide better adhesion but also ensure a more uniform finish. Consult the product label for specific instructions on application and drying times.
By taking the time to prepare the ceiling, you’ll create an ideal surface for the vinyl soffit installation. Once you’ve completed these steps, it’s time to move on to the next phase: measuring and cutting the vinyl soffit panels.
Step 2: Measure and Cut the Vinyl Soffit
Accurate measurements are crucial for a precise installation of the vinyl soffit panels. Follow these steps to measure and cut the vinyl soffit:
- Measure the length: Using a measuring tape, determine the length of the area where you will install the vinyl soffit. Record this measurement.
- Measure the width: Next, measure the width of the space. If you’re installing the soffit in sections, measure the width of each section separately and record the measurements.
- Add a margin: To allow for any slight variations or adjustments during the installation, it’s advisable to add a margin of about 1/4″ to each measurement. This will ensure a better fit of the panels.
- Cut the panels: Using a saw, such as a circular saw or snips, cut the vinyl soffit panels according to your measurements. Make sure to follow the manufacturer’s instructions for cutting the panels accurately and safely. Take your time and make precise cuts to achieve a professional-looking result.
Once you’ve cut the vinyl soffit panels to the appropriate size, you’re ready to move on to the next step: installing the J-channels.
Step 3: Install J-Channels
The J-channels serve as a support system for holding the vinyl soffit panels in place. Follow these steps to install the J-channels:
- Measure and mark the placement: Use a measuring tape and pencil to mark the placement of the J-channels along the perimeter of the ceiling. Ensure that the marks are level and evenly spaced.
- Attach the J-channels: Starting at one corner, position the J-channel along the marked line and secure it to the ceiling using screws. Make sure the J-channel is level and tightly attached. Repeat this process for each side of the ceiling, connecting the J-channels together at the corners.
- Check for proper alignment: Once all the J-channels are installed, use a level to ensure that they are aligned correctly. Adjust and make any necessary corrections to ensure a straight and level installation.
Installing the J-channels provides a sturdy and secure foundation for the vinyl soffit panels. With the J-channels in place, you’re ready to move on to the next step: installing the first panel of vinyl soffit.
Read more: How To Install A Security Camera On Soffit
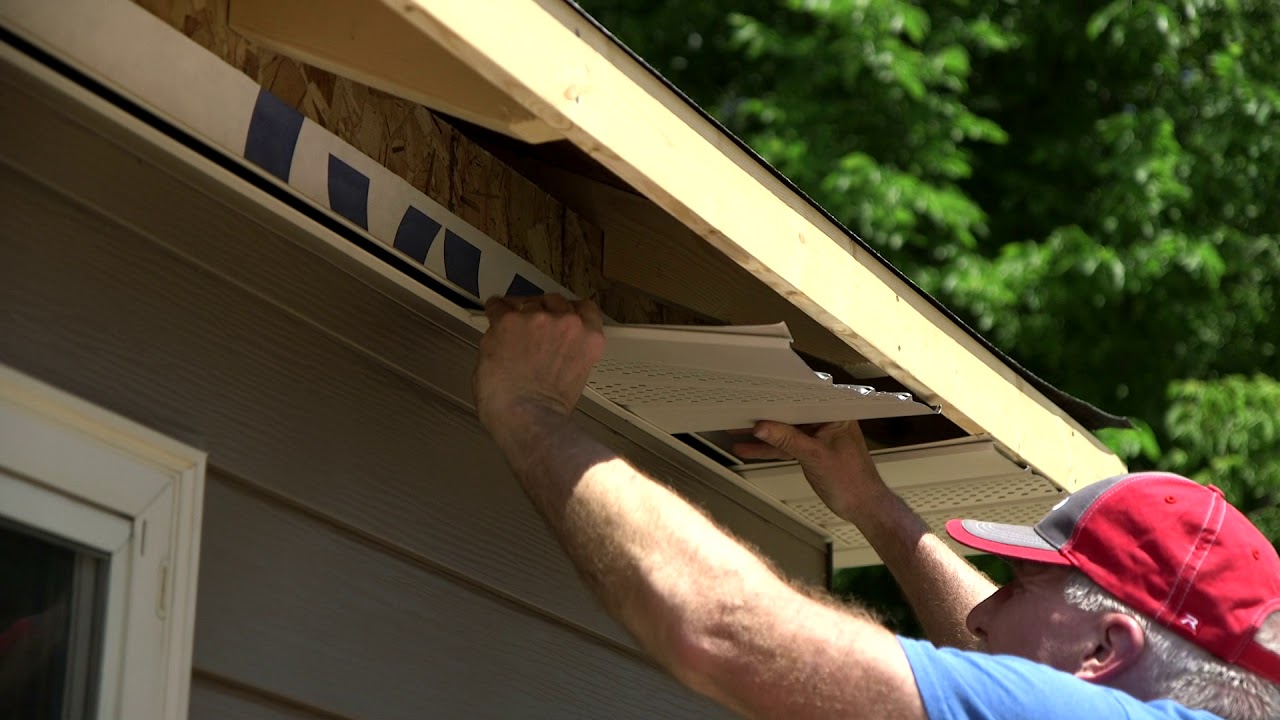
Step 4: Install the First Panel of Vinyl Soffit
With the J-channels securely in place, it’s time to start installing the vinyl soffit panels. Follow these steps to install the first panel:
- Slide the panel into the J-channel: Take the first panel of vinyl soffit that you cut to size and slide it into the J-channel at the starting point. Ensure that it fits snugly and is aligned with the J-channel.
- Secure the panel: Using screws, attach the panel to the J-channel. Place the screws in the pre-drilled holes provided by the manufacturer. Make sure to space the screws evenly along the panel to ensure secure attachment.
- Check for levelness: Use a level to ensure that the first panel is straight and level. Make any adjustments if necessary by loosening the screws and repositioning the panel.
Now that you have successfully installed the first panel, you can proceed to the next step: continuing to install the remaining vinyl soffit panels.
When installing vinyl soffit ceiling, make sure to properly measure and cut the panels to fit the space. Use a J-channel to secure the edges and ensure proper ventilation by installing vented soffit panels.
Step 5: Continue Installing the Vinyl Soffit Panels
With the first panel of vinyl soffit in place, it’s time to continue installing the remaining panels. Follow these steps to ensure a smooth and precise installation:
- Slide the next panel into the J-channel: Take the next panel and slide it into the J-channel adjacent to the first panel. Make sure it fits securely and aligns with the previous panel.
- Connect the panels together: If your panels have interlocking edges, align them properly and snap them together. If not, make sure there is a slight overlap between the panels to prevent any gaps.
- Secure the panel: Just like with the first panel, use screws to attach the second panel to the J-channel. Make sure the screws are evenly spaced and securely fastened.
- Repeat for the remaining panels: Continue this process of sliding the panels into the J-channel, connecting them together, and securing them with screws. Double-check the levelness and alignment of each panel as you go.
Continue installing the vinyl soffit panels one by one until the entire ceiling is covered. Ensure that each panel is securely attached and aligned with the previous panel. Once all the panels are in place, it’s time to move on to the next step: installing the final panel of vinyl soffit.
Step 6: Install the Final Panel of Vinyl Soffit
As you near the completion of your vinyl soffit ceiling installation, it’s time to install the final panel. Follow these steps to ensure a seamless finish:
- Measure and cut the final panel: Measure the remaining space where the final panel will be installed. Cut the last panel of vinyl soffit to fit the measured dimensions, leaving a small margin for adjustments.
- Slide the panel into the J-channel: Slide the final panel into the J-channel, making sure it fits snugly and aligns with the adjacent panels.
- Secure the panel: Use screws to attach the final panel to the J-channel, following the same procedure as for the previous panels. Ensure that the panel is securely fastened and level.
- Check for uniformity and alignment: Once the final panel is in place, step back and assess the overall appearance of the vinyl soffit ceiling. Check for any inconsistencies or misalignments and make any necessary adjustments.
Congratulations! You have successfully installed the final panel of vinyl soffit. Now, it’s time to move on to the next step: securing the soffit panels to ensure long-lasting durability.
Step 7: Secure the Soffit Panels
Once all the vinyl soffit panels are installed, it’s important to secure them properly to ensure they stay in place for years to come. Follow these steps to secure the soffit panels:
- Inspect the panels: Take a moment to inspect each panel to ensure they are all securely attached and aligned. Check for any loose screws or gaps between the panels.
- Tighten screws if needed: If you notice any screws that are not fully tightened or panels that seem slightly loose, use a screwdriver to tighten the screws and secure the panels in place.
- Consider using adhesive (optional): For added strength and stability, you may choose to apply an adhesive to the back of the panels before securing them with screws. Check the manufacturer’s instructions for the recommended adhesive and application process.
- Double-check levelness: Use a level to confirm that the entire soffit ceiling is level and even. Make any necessary adjustments by loosening screws and repositioning panels if needed.
By securing the soffit panels properly, you can ensure that they withstand the test of time and maintain their attractive appearance. With the panels securely in place, it’s time to move on to the final step: installing trim and adding the finishing touches.
Read more: How To Install Soffit Under A Porch
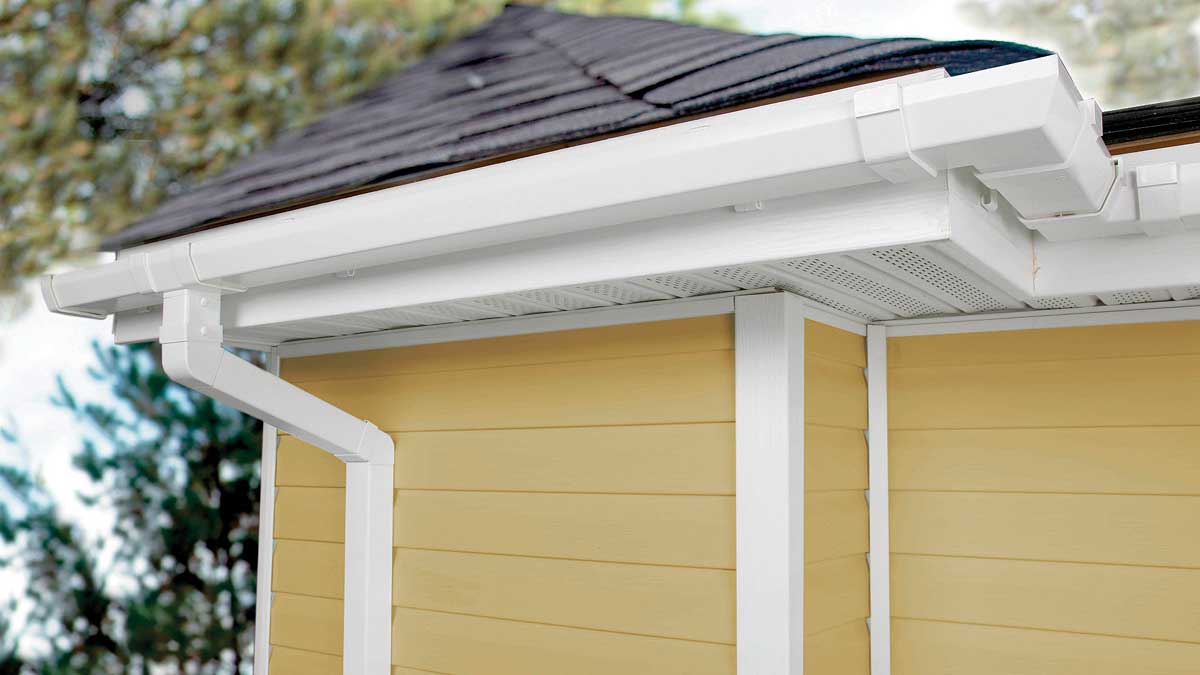
Step 8: Install Trim and Final Touches
The installation of trim and the final touches will give your vinyl soffit ceiling a polished and professional look. Follow these steps to complete the installation:
- Measure and cut the trim: Using a measuring tape, determine the length and width of the areas where trim is needed. Cut the trim pieces to fit the measurements accurately, ensuring clean and precise cuts.
- Attach the trim: Position the trim pieces in their designated locations, such as along the edges or corners of the soffit ceiling. Secure the trim pieces in place using screws or an appropriate adhesive, following the manufacturer’s instructions.
- Fill gaps and seams: If there are any noticeable gaps or seams between the soffit panels or trim pieces, use a caulking gun to fill them with a silicone-based caulk. Smooth out the caulk with a putty knife for a clean and seamless appearance.
- Touch-up paint (if necessary): If the soffit panels or trim pieces require touch-up paint, now is the time to apply it. Make sure to use a paint that is suitable for vinyl surfaces and matches the color of your existing ceiling.
- Clean up the area: Remove any debris or dust that may have accumulated during the installation process. Wipe down the soffit ceiling and surrounding areas to leave them clean and tidy.
With the trim installed and the final touches complete, step back and admire your newly installed vinyl soffit ceiling. Take pride in your accomplishment, knowing that you have transformed the space with a functional and visually appealing ceiling.
Remember to refer to the manufacturer’s instructions and safety guidelines throughout the installation process to ensure a successful and safe project. Enjoy the benefits of your newly installed vinyl soffit ceiling for years to come!
Conclusion
Installing a vinyl soffit ceiling is an excellent way to enhance the beauty and functionality of any space. With the step-by-step guide provided in this article, you now have the knowledge and confidence to tackle this DIY project.
By preparing the ceiling, measuring and cutting the vinyl soffit panels, installing J-channels, and securing the soffit panels, you can achieve a seamless and professional-looking ceiling. Remember to pay attention to detail, ensuring levelness and alignment throughout the installation process.
Completing the installation with trim pieces and adding the final touches will give your vinyl soffit ceiling a polished appearance. Don’t forget to clean up the area once you’re finished, leaving your newly transformed space looking pristine.
As with any DIY project, it’s important to follow the manufacturer’s instructions, exercise caution, and prioritize safety. Take your time and enjoy the process, knowing that you’re creating an inviting and visually appealing environment.
So, whether you’re looking to upgrade the appearance of your home or seeking to spruce up a commercial space, installing a vinyl soffit ceiling can provide a durable and attractive solution.
Get ready to enjoy the benefits of a well-ventilated and aesthetically pleasing ceiling that will elevate your space to new heights. Start your vinyl soffit ceiling installation project today!
Now that you've mastered installing a vinyl soffit ceiling, why not tackle more home improvement ventures? Engaging in DIY projects not only sharpens your skills but also brings a personal touch to every corner of your home. Our next guide details why taking on these tasks can be incredibly rewarding. Learn about the unique benefits that await every do-it-yourself enthusiast.
Frequently Asked Questions about How To Install Vinyl Soffit Ceiling
Was this page helpful?
At Storables.com, we guarantee accurate and reliable information. Our content, validated by Expert Board Contributors, is crafted following stringent Editorial Policies. We're committed to providing you with well-researched, expert-backed insights for all your informational needs.


0 thoughts on “How To Install Vinyl Soffit Ceiling”