
Articles
How To Level Floor For Tile
Modified: January 5, 2024
Learn how to level your floor for tile installation with these helpful articles. Ensure a smooth surface for your new tiles.
(Many of the links in this article redirect to a specific reviewed product. Your purchase of these products through affiliate links helps to generate commission for Storables.com, at no extra cost. Learn more)
Introduction
Welcome to our comprehensive guide on how to level a floor for tile installation. If you’re planning to install new tiles in your home, having a level floor is essential, as it ensures a smooth and visually appealing finish. Uneven flooring can cause tiles to crack, adhesive to fail, and create an unstable walking surface.
In this article, we will walk you through the step-by-step process of leveling a floor for tile installation. We will cover everything you need to know, from understanding the importance of level flooring to the tools and materials required. By following our guidelines, you can ensure a successful and long-lasting tile installation.
So, let’s dive in and explore the world of floor leveling!
Key Takeaways:
- Ensure a visually appealing and durable tile installation by leveling the floor. It prevents cracks, unevenness, and potential damage, enhancing the aesthetics and longevity of your tiled space.
- Proper preparation, use of high-quality materials, and attention to detail are crucial for a successful tile installation. Follow the step-by-step process and valuable tips to achieve a stunning and long-lasting tiled floor.
Read more: How To Level A Floor
Understanding the Importance of Level Flooring
When it comes to tile installation, having a level floor is crucial. Here’s why:
- Aesthetics: Level flooring is visually pleasing. With level surfaces, tiles lie flat and appear uniform, creating an attractive and professional look. On the other hand, if your floor is uneven, the tiles can be unevenly spaced or may not align properly, resulting in an unappealing and disjointed appearance.
- Tile Durability: Uneven flooring puts stress on tiles, leading to potential cracks and breakage over time. When tiles are subjected to pressure due to an uneven surface, they are more vulnerable to damage. This can result in costly repairs and replacements.
- Proper Water Drainage: Level flooring is essential for proper water drainage in areas such as bathrooms and kitchens. If the floor is not level, water can pool in certain areas, leading to potential water damage, mold growth, and even structural issues.
- Smooth Walking Surface: Walking on an uneven floor can be not only uncomfortable but also hazardous. Uneven surfaces can cause tripping and slipping hazards, especially in high-traffic areas or when tiles have varying heights.
Now that we understand the importance of having a level floor for tile installation, let’s move on to the next section, where we will discuss how to determine the current level of your floor before starting the leveling process.
Determining the Current Level of the Floor
Before you begin the process of leveling your floor, it’s crucial to determine the current level and identify any uneven areas. Here’s how you can do it:
- Visual Inspection: Start by visually inspecting the floor for any noticeable slopes, dips, or high points. Look for any visible cracks or gaps between tiles, as these can indicate unevenness.
- Using a Spirit Level: Use a long spirit level to check the levelness of the floor. Place the spirit level on various spots across the floor, including different corners and areas spanning multiple tiles. If the bubble on the spirit level consistently falls outside the center level line, it indicates an uneven floor.
- Using a Straightedge: Another method to determine the levelness of the floor is by using a straightedge, such as a long, straight board or a levelled string, stretched across the floor surface. If there are gaps between the straightedge and the floor at any point, it means that the floor is not level.
- Professional Assessment: In some cases, it may be necessary to seek professional help to assess the levelness of the floor, especially if the issues are complex or extensive. Professional contractors have specialized tools, such as laser levels, that can provide accurate measurements and identify areas that require leveling.
By examining the floor through these methods, you can get a clear understanding of its current level. This information will guide you in the leveling process and help you determine the necessary steps to achieve a level surface for your tile installation.
Next, let’s explore the tools and materials you’ll need to successfully level your floor.
Tools and Materials Required
Before you begin leveling your floor for tile installation, it’s important to gather all the necessary tools and materials. Here’s a list of what you’ll need:
Tools:
- Tape measure: Used for measuring the dimensions of the room and determining the amount of leveling compound required.
- Spirit level: Helps in checking the levelness of the floor.
- Straightedge: Used to identify uneven areas and gaps.
- Chalk line: Used for marking reference lines on the floor.
- Trowel: Essential for spreading leveling compound.
- Power drill: Needed for mixing self-leveling compound.
- Mixing paddle: Attaches to the power drill for efficient mixing of leveling compound.
- Primer: Used to prepare the floor surface for the application of leveling compound.
- Sanding tools: Such as a floor sander or sandpaper, for smoothening rough areas on the floor.
- Protective gear: Including gloves, goggles, and a dust mask to ensure safety during the leveling process.
Read more: How To Put Tile On Floor
Materials:
- Leveling compound: Also known as self-leveling underlayment, this is the main material used to level the floor surface.
- Primer: Used to enhance the bond between the leveling compound and the subfloor.
- Plywood or cement backer board: If there are significant dips or uneven areas, you may need to install a layer of plywood or cement backer board to create a level subfloor.
- Shims: Thin wedges that can be used to level small gaps or height differences beneath the plywood or cement backer board.
- Wood screws: Required to secure the plywood or cement backer board to the subfloor.
- Sandpaper: Used for smoothing any rough patches on the floor before applying the leveling compound.
- Cleaners: Such as a degreaser or adhesive remover, to thoroughly clean the floor surface before starting the leveling process.
Having all these tools and materials ready before you start will save you time and ensure a smooth leveling process. Now that you have everything prepared, let’s move on to the next step: the preparation before leveling the floor.
Preparation Before Leveling the Floor
Before you begin the process of leveling your floor, it’s important to prepare the area properly. Proper preparation ensures the success and longevity of your leveling project. Here are the essential steps to take before you start:
1. Clear the Area:
Remove all furniture, appliances, and any other objects from the room. This will provide you with a clear and unobstructed working area.
2. Clean the Floor:
Thoroughly clean the floor surface to remove any dirt, debris, or adhesive residue. Use a vacuum cleaner, broom, or mop to ensure a clean and dust-free surface. In case of stubborn stains or adhesive, you may need to use a specialized cleaner or adhesive remover.
Read more: How Thick Are Floor Tiles
3. Address Subfloor Issues:
If there are any structural or subfloor issues, such as rot, mold, or damaged sections, address them before proceeding with the leveling process. Repair or replace any damaged subflooring to create a solid and stable surface for the leveling compound.
4. Fill Gaps and Holes:
If there are any gaps, holes, or cracks in the floor, fill them in with an appropriate filler or patching compound. Smooth out the surface and let it dry completely before moving on to the next step.
5. Check for Levelness:
Before applying the leveling compound, check the levelness of the floor using a spirit level or straightedge. Identify any low or high spots that may require additional attention during the leveling process.
6. Apply Primer:
Apply a primer to the floor surface. The primer helps in enhancing the bond between the leveling compound and the subfloor. Follow the manufacturer’s instructions for the appropriate drying time of the primer.
Read more: How Much To Tile A Floor
7. Plan the Layout:
Plan the layout of your tiles, considering factors like the size of the room, tile size, and your preferred pattern. Mark reference lines using a chalk line to guide the installation process.
By following these preparation steps, you’ll ensure that your floor is ready for the leveling process. With a clean and stable surface, you’re now ready to move on to the next step: leveling the floor for tile installation.
How to Level the Floor for Tile Installation
Now that you’ve completed the necessary preparations, it’s time to level the floor for tile installation. Follow these step-by-step instructions to achieve a smooth and level surface:
1. Mix the Leveling Compound:
Start by mixing the self-leveling compound according to the manufacturer’s instructions. Use a power drill with a mixing paddle attachment to ensure a thorough and consistent mix. Take note of the recommended water-to-compound ratio and mixing time.
2. Pour the Leveling Compound:
Begin pouring the leveling compound onto the lowest spots or areas that require filling. Use a trowel to spread the compound evenly over the floor surface. Work in small sections at a time to ensure that the compound doesn’t dry out before you can spread it properly.
Read more: How To Use A Laser Level For Tile
3. Spread and Smoothen the Compound:
Using the trowel, spread the leveling compound in a thin, even layer, following the reference lines you marked earlier. Ensure that the compound fills all low spots and covers any imperfections. Smooth out the surface using long, sweeping motions, keeping it as level as possible.
4. Repeat the Process:
If there are still areas that require leveling, repeat the process of pouring and spreading the leveling compound until the entire floor is level. Take your time to ensure an even and consistent application of the compound.
5. Allow the Compound to Cure:
After completing the leveling process, let the compound cure according to the manufacturer’s instructions. This usually takes around 24 to 48 hours, but the drying time may vary depending on environmental conditions.
6. Check for Levelness:
Once the compound has dried, check the levelness of the floor using a spirit level or straightedge. Make any necessary adjustments by sanding or adding more leveling compound to achieve a perfectly level surface.
With the floor now leveled, you’ve laid a solid foundation for your tile installation. The next section will discuss how to check the levelness of the floor and provide tips and tricks for a successful tile installation.
Read more: How To Measure Floor For Tile
Checking the Levelness of the Floor
After leveling the floor, it’s important to ensure that it is indeed level before proceeding with tile installation. Here are a few methods to check the levelness of the floor:
1. Recheck with a Spirit Level:
Use a spirit level to assess the levelness of the floor. Place the spirit level on various spots across the floor, including different corners and areas spanning multiple tiles. If the bubble consistently falls within the center level line, it indicates that the floor is level.
2. Slide a Straightedge:
Take a straightedge, such as a long, straight board or a leveled string, and slide it across the floor. Pay close attention to whether the straightedge makes contact with the floor at all points or if there are any gaps. If there are no gaps, it indicates a level floor.
3. Check for Slopes:
Walk across the floor and observe if you feel any slopes or unevenness beneath your feet. If you notice any significant variations in the floor’s surface as you move around, it may indicate areas that require further attention for leveling.
Read more: How To Buff A Tile Floor
4. Roll a Marble:
Place a marble or small ball on the floor and gently nudge it to see if it rolls freely or gets trapped in any particular area. If the marble rolls smoothly without any hindrance, it suggests a level floor.
By using these methods, you can double-check the levelness of your floor. If you come across any areas that are still uneven, you may need to make additional adjustments by adding more leveling compound or sanding down certain areas.
Now that you have a level floor, let’s move on to the final section, where we’ll provide you with some tips and tricks for a successful tile installation.
Tips and Tricks for a Successful Tile Installation
As you embark on the exciting journey of tile installation, here are some valuable tips and tricks to ensure a successful and long-lasting result:
1. Use High-Quality Materials:
Invest in high-quality tiles, adhesives, and grout. Quality materials will not only enhance the overall appearance of your tiles but also offer durability and longevity, reducing the chances of cracks, chipping, or discoloration over time.
2. Plan the Tile Layout:
Before you start installing the tiles, carefully plan the layout. Consider factors such as the size and shape of the room, the pattern you want to achieve, and any focal points you want to highlight. This will help you avoid any uneven or unsightly cuts and ensure a visually appealing finish.
Read more: How To Prepare A Floor For Tile
3. Use Tile Spacers:
Always use tile spacers to maintain consistent spacing between the tiles. This will ensure that your tiles are evenly spaced and allow for proper grout application. It also helps to create straight grout lines, resulting in a professional-looking installation.
4. Proper Adhesive Application:
Follow the instructions provided by the adhesive manufacturer for proper application. Apply the adhesive evenly, using the recommended trowel size, and make sure it covers the back of each tile completely. This will ensure a strong bond and prevent tiles from coming loose over time.
5. Take Care of Expansion Joints:
When installing tiles, allow for expansion joints in areas where temperature, moisture, or substrate movement may occur. These joints will accommodate any expansion or contraction, preventing the tiles from cracking or buckling.
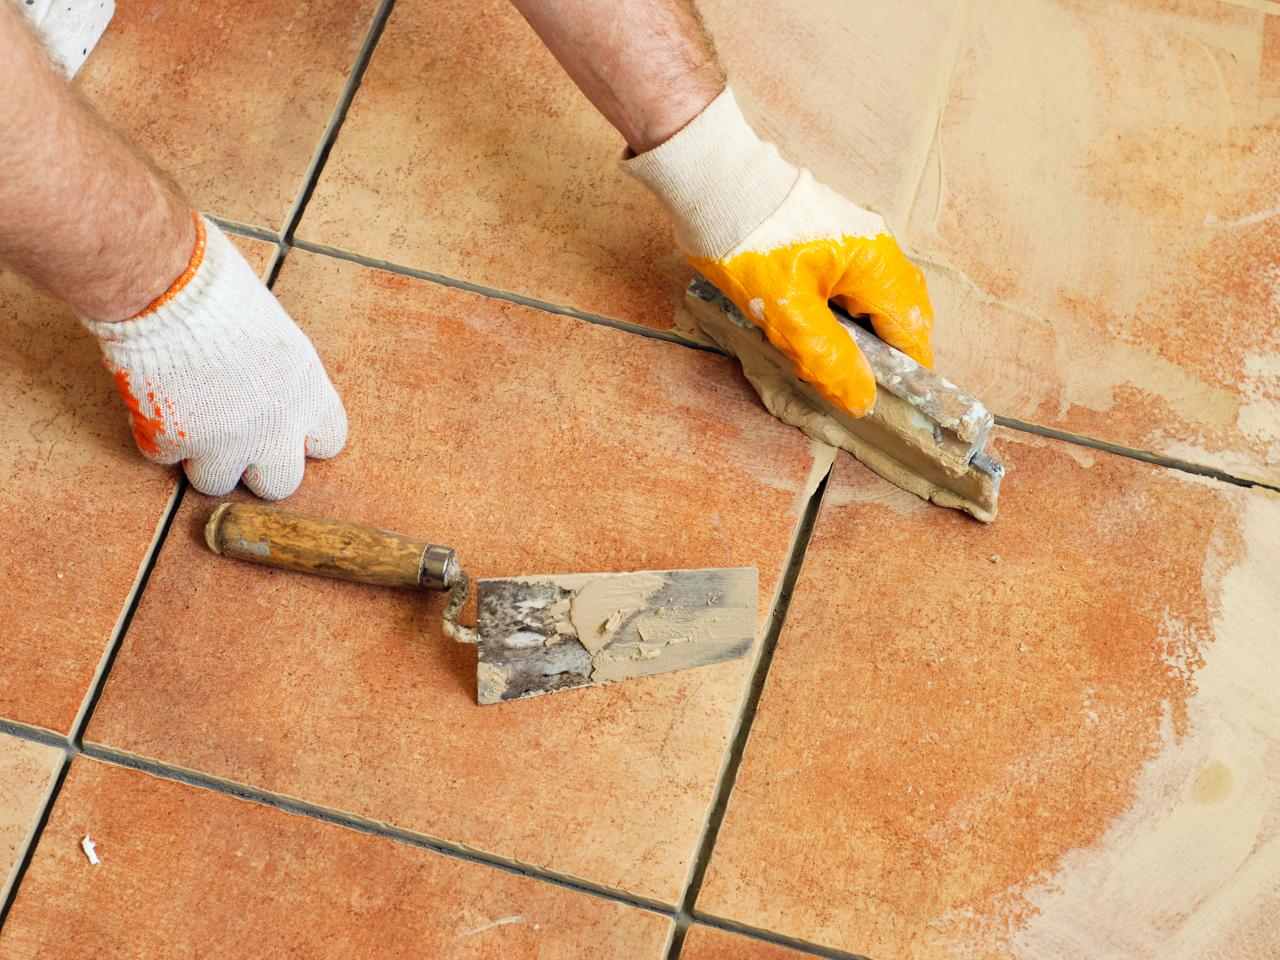
6. Pay Attention to Grout Application:
When applying grout, make sure to completely fill the gaps between tiles, using a grout float at a 45-degree angle to press the grout into the joints. Properly clean off excess grout before it dries to achieve clean and sharp grout lines.
Read more: How To Replace Floor Tile
7. Follow Proper Curing Time:
Allow the adhesive and grout to cure for the recommended period before walking on or applying any pressure to the tiles. Rushing the curing process can lead to weakened bonds, resulting in tiles that may come loose or grout that may crack prematurely.
8. Maintain and Seal the Tiles:
Regularly clean and maintain your tiles according to the manufacturer’s recommendations. Additionally, consider applying a sealant to protect the tiles from stains and moisture penetration, extending their lifespan and keeping them looking pristine.
By following these tips and tricks, you’ll be well-equipped to achieve a stunning and well-installed tile floor. Enjoy the process and revel in the beauty of your new tiled space!
With that, we conclude our guide on how to level the floor for tile installation. We hope you found this article helpful. Best of luck with your tile project!
Conclusion
Leveling the floor for tile installation is an essential step to ensure a visually appealing and durable end result. By following the steps outlined in this guide, you can achieve a level surface that will provide a solid foundation for your tiles, preventing issues such as cracking, unevenness, and potential damage.
We emphasized the importance of having a level floor, discussing how it affects the aesthetics, durability, water drainage, and safety of the tiled area. Determining the current level of the floor using visual inspection, spirit levels, and straightedges allows you to identify any areas that require leveling.
We provided a list of tools and materials necessary for the leveling process, emphasizing the significance of proper preparation before starting. Clearing the area, cleaning the floor, addressing subfloor issues, and filling gaps and holes are pivotal in achieving a successful leveling outcome.
The step-by-step instructions for leveling the floor, including mixing and pouring the leveling compound, spreading and smoothing the compound, and allowing it to cure, guide you to create a level surface that is ready for tile installation.
We then discussed how to check the levelness of the floor using different methods, ensuring that the floor is indeed level and ready for the next phase of tile installation.
To further enhance your tile installation, we shared tips and tricks, such as using high-quality materials, proper tile layout planning, using tile spacers, applying adhesive and grout correctly, and allowing for expansion joints. These insights will help you achieve a professional and long-lasting tile installation.
Lastly, we emphasized the importance of maintaining and sealing your tiles, ensuring their longevity and beauty over time.
With the knowledge and guidance provided in this comprehensive guide, you are now fully equipped to successfully level the floor for tile installation. Enjoy the process and the transformation of your space as you create a beautiful and level tiled floor!
Frequently Asked Questions about How To Level Floor For Tile
Was this page helpful?
At Storables.com, we guarantee accurate and reliable information. Our content, validated by Expert Board Contributors, is crafted following stringent Editorial Policies. We're committed to providing you with well-researched, expert-backed insights for all your informational needs.


0 thoughts on “How To Level Floor For Tile”