Articles
How To Make Picture Frames From Barn Wood
Modified: August 26, 2024
Learn how to create beautiful picture frames using reclaimed barn wood with our informative articles. Enhance your home decor with these rustic and unique frames.
(Many of the links in this article redirect to a specific reviewed product. Your purchase of these products through affiliate links helps to generate commission for Storables.com, at no extra cost. Learn more)
Introduction
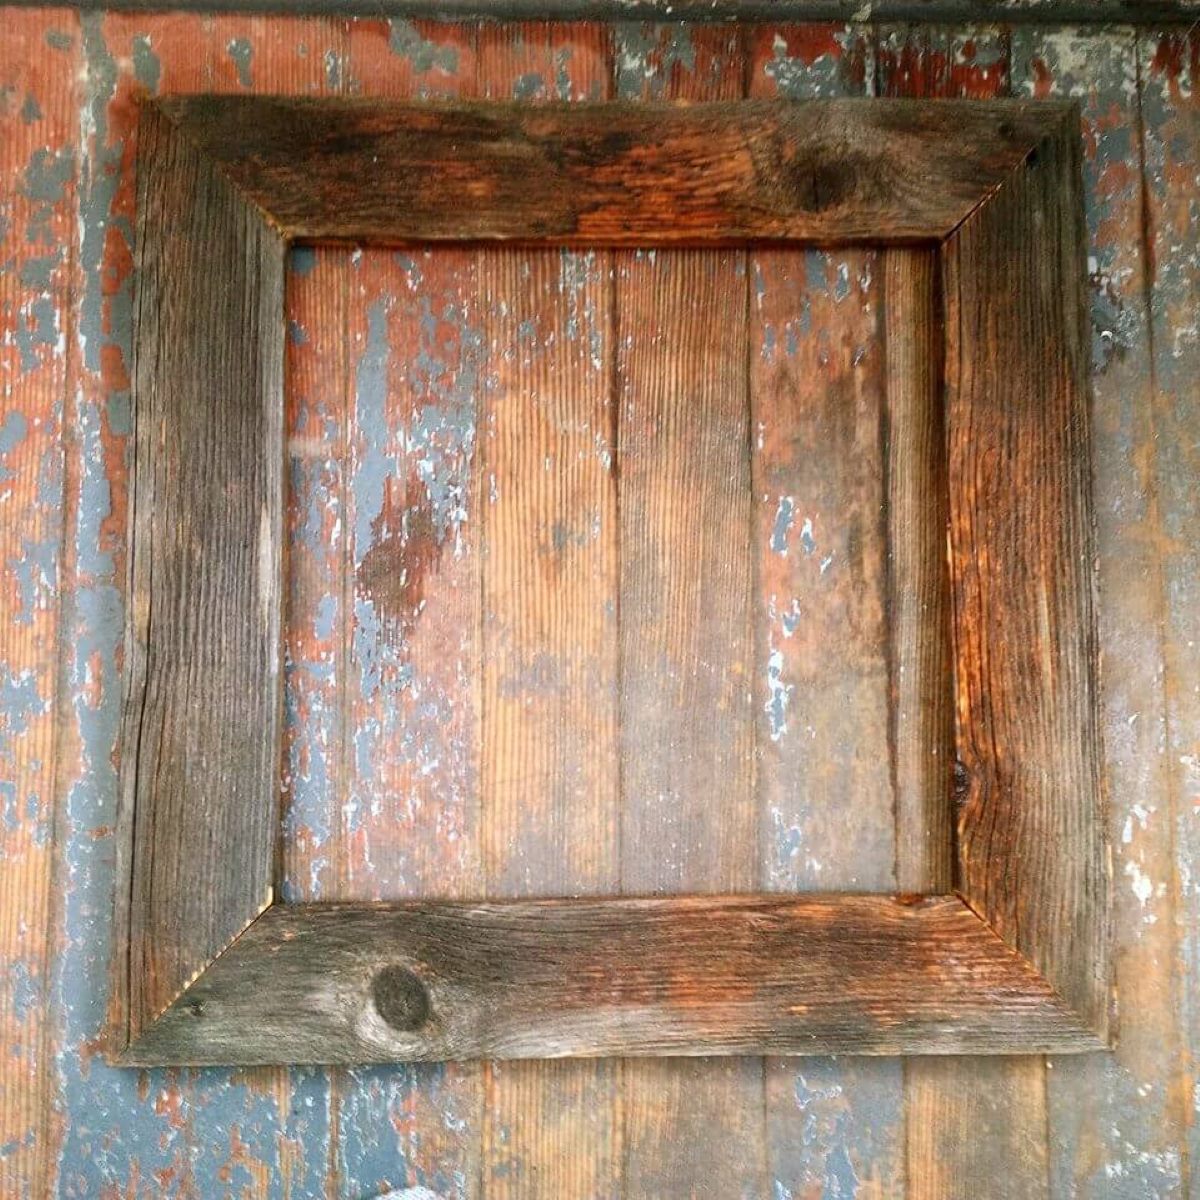
Welcome to the world of do-it-yourself (DIY) picture frames! If you’re looking to add a touch of rustic charm to your wall decor, making picture frames from barn wood can be a fantastic option. Not only does it allow you to repurpose old, weathered wood, but it also creates a unique and visually appealing frame that adds character to any artwork or photograph.
Barn wood, with its distressed texture and rich history, brings a sense of nostalgia and warmth to any space. By transforming this reclaimed material into custom picture frames, you can showcase your creativity and showcase your cherished memories in a truly one-of-a-kind way.
In this guide, we’ll walk you through the step-by-step process of making picture frames from barn wood, including selecting the right wood, measuring and cutting, assembling the frame, and adding finishing touches. So, grab your tools and get ready to embark on a fun and fulfilling DIY project that will result in beautiful, rustic picture frames.
Key Takeaways:
- Repurpose reclaimed barn wood to create unique, rustic picture frames that add character and warmth to any space, showcasing your creativity and cherished memories.
- Follow a step-by-step process to select, prepare, measure, cut, assemble, and add finishing touches to barn wood picture frames, creating personalized and visually appealing wall decor.
Materials Needed
Before you can get started on your barn wood picture frame project, you’ll need to gather a few essential materials. Here’s a list of what you’ll need:
- Barn wood planks: Look for reclaimed barn wood boards with interesting textures and character. You can often find these at salvage yards, antique shops, or online marketplaces.
- Measuring tape: This will be essential for accurately measuring the dimensions of your picture frame.
- Saw: A miter saw or a circular saw with a fine-toothed blade will be useful for cutting the barn wood to the desired lengths.
- Sandpaper or a sander: Use sandpaper or a sander to smooth out any rough edges or surfaces on the barn wood.
- Wood glue: This will be needed to join the corners of the frame together.
- Clamps: Clamps will help secure the corners of the frame while the glue dries.
- Picture hanging hardware: Depending on how you plan to hang your picture frames, you may need D-ring hangers, picture wire, or sawtooth hangers.
- Optional: Stain or sealant: If you want to enhance or preserve the natural color of the barn wood, you can consider applying a stain or sealant of your choice.
These materials should be readily available at your local home improvement store or online. Make sure to gather everything before you proceed with the project, as having all the necessary materials on hand will make the process much smoother.
Step 1: Selecting and Preparing Barn Wood
The first step in making picture frames from barn wood is to select the right pieces and prepare them for use. Here’s how you can do it:
- Inspect and clean the barn wood: Examine the barn wood boards for any nails, staples, or other debris that may be embedded in the wood. Use pliers or a nail punch to remove any protruding metal. Afterward, give the wood a thorough cleaning to remove dirt and grime. You can use a soft-bristle brush or a damp cloth for this purpose.
- Assess the condition of the wood: Check for any signs of rot or damage in the barn wood. While some minor imperfections can add to the charm, make sure the wood is structurally sound. Avoid using pieces that are severely warped, cracked, or decayed, as they may compromise the integrity of the picture frame.
- Measure and mark: Determine the desired dimensions of your picture frame. Measure and mark the lengths you’ll need for the top, bottom, and sides of the frame on the barn wood planks. Use a measuring tape and a pencil to make accurate marks for cutting.
- Cut the barn wood: With the help of a saw (such as a miter saw or circular saw), carefully cut the barn wood planks according to your marked measurements. Ensure that each cut is straight and precise.
- Smooth the edges and surfaces: Use sandpaper or a sander to smooth out any rough edges or surfaces on the cut pieces of barn wood. This will not only enhance the appearance of the frame but also prevent any splinters or rough spots.
By following these steps, you’ll be able to select the best pieces of barn wood and prepare them for the construction of your picture frames. Once you have completed this step, you’re ready to move on to the next phase of the project: measuring and cutting the wood.
Step 2: Measuring and Cutting the Wood
Now that you’ve selected and prepared the barn wood, it’s time to move on to measuring and cutting the pieces for your picture frame. Follow these steps to ensure accurate measurements and clean cuts:
- Measure the artwork or photograph: Determine the dimensions of the artwork or photograph that will be displayed in the frame. You’ll want to add a small margin to ensure the piece fits properly inside the frame.
- Account for the frame width: Decide on the desired width of the frame. This will determine how wide the barn wood pieces should be. Keep in mind that the width of the frame should be consistent on all sides.
- Mark the measurements on the barn wood: Using a measuring tape and a pencil, mark the measurements for each side of the frame on the appropriate barn wood piece. Double-check your measurements to ensure accuracy.
- Cut the barn wood: With a saw (such as a miter saw or circular saw), carefully cut each barn wood piece according to the marked measurements. Take your time and make precise cuts to ensure the frame pieces fit together perfectly.
- Dry-fit the frame pieces: After cutting the barn wood pieces, assemble them to check the fit. Place them together, without attaching them, to see if they align properly and if any adjustments need to be made.
- Trim or adjust if needed: If any of the frame pieces need slight trimming or adjustment for a better fit, use the saw to make the necessary modifications.
Remember to double-check your measurements at each step to ensure the frame will have the correct dimensions. Taking the time to accurately measure and cut the barn wood will result in a well-crafted and visually appealing picture frame.
With the wood pieces now measured and cut, you’re ready to move on to the next step: assembling the frame.
When making picture frames from barn wood, be sure to measure and cut the wood carefully to ensure a snug fit for the picture. Sand the edges to smooth out any rough spots before assembling the frame.
Step 3: Assembling the Frame
With the barn wood pieces measured and cut to size, it’s time to assemble your picture frame. Follow these steps to securely construct the frame:
- Apply wood glue to the ends: Using a small brush or your finger, apply a thin layer of wood glue to the ends of the barn wood pieces that will be joined together. Make sure to apply glue evenly for a strong bond.
- Join the corners: Align the corners of the frame, ensuring that the edges are flush. Press the glued ends together firmly and hold them in place.
- Secure with clamps: To keep the frame corners in place while the glue dries, use clamps to apply pressure. Place the clamps diagonally across the corners, tightening them just enough to hold the frame together without causing damage.
- Wipe off excess glue: Use a damp cloth or sponge to wipe away any excess glue that may have squeezed out from the corners. This will help prevent visible glue residue on the frame.
- Allow the glue to dry: Follow the manufacturer’s instructions for the wood glue regarding drying time. It is best to leave the clamps on until the glue has fully cured to ensure a secure bond.
Once the glue has dried and the corners are secure, your barn wood picture frame is ready for the finishing touches. Take care not to rush this step, as allowing the glue to fully dry will ensure a sturdy frame that will last for years to come.
Now that your frame is assembled, it’s time to add some final touches to enhance its appearance. Let’s move on to the next step: adding finishing touches.
Read more: How To Make Picture Frames
Step 4: Adding Finishing Touches
With the frame assembled, it’s time to add some final touches to bring out the beauty of the barn wood. Follow these steps to complete your picture frame:
- Sand and smooth the frame: Lightly sand the surface of the frame to remove any rough spots or imperfections. Use a fine-grit sandpaper or a sanding block to achieve a smooth finish. Be gentle to avoid removing too much of the natural texture and character of the barn wood.
- Apply stain or sealant (optional): If you wish to enhance or alter the color of the barn wood, you can apply a wood stain or sealant of your choice. Follow the instructions on the product for application and drying time. Let the stain or sealant fully dry before proceeding.
- Add picture hanging hardware: Depending on how you plan to hang your picture frame, attach the appropriate picture hanging hardware. This may include D-ring hangers, sawtooth hangers, or picture wire. Follow the instructions provided with the hardware to ensure proper installation.
- Insert the artwork or photograph: Carefully place your artwork or photograph into the frame. Ensure it fits properly and adjust if needed. Use small framing pins or brads to secure the piece in place if desired.
- Hang and enjoy: Once your picture frame is complete, hang it on a wall or display it on a shelf to showcase your artwork or photograph. Stand back and admire your handiwork, knowing that you have created a unique and meaningful piece of decor.
Adding these finishing touches will not only protect and preserve the barn wood but also enhance its aesthetic appeal. Take your time during this step to ensure a polished and professional-looking final product.
Now that you have completed the final step, you can step back and admire your beautiful barn wood picture frame. Congratulations on successfully making a unique and rustic piece of wall decor!
Remember, you can use these steps as a guide but feel free to adapt and personalize the process based on your preferences and the materials you have. Enjoy the satisfaction of creating something special with your own hands and showcasing your creativity!
Conclusion
Congratulations, you have now learned how to make picture frames from barn wood! By repurposing reclaimed wood and following the step-by-step process outlined in this guide, you have created rustic and charming frames that add a unique touch to your wall decor. Here’s a recap of the process:
- Select and prepare the barn wood by inspecting, cleaning, and measuring it.
- Measure and cut the wood pieces for the frame, taking into account the artwork or photograph size.
- Assemble the frame by applying wood glue, joining the corners, and securing them with clamps.
- Add finishing touches, such as sanding the frame, applying stain or sealant (optional), and attaching picture hanging hardware.
- Insert your artwork or photograph into the frame and hang it up to admire and enjoy.
Through this DIY project, you have not only created beautiful picture frames but also given new life to old barn wood, preserving its history and character. Each frame tells a story and adds a touch of rustic charm to your home or space.
Remember, this guide provides a basic framework for making barn wood picture frames, but there is room for personalization and creative expression. Feel free to experiment with different sizes, finishes, and design elements to make the frames truly your own.
Whether you’re displaying cherished photographs, capturing precious memories, or showcasing artwork, these barn wood picture frames will add a unique and captivating element to any room. So gather your materials, unleash your creativity, and enjoy the satisfaction of creating something beautiful from reclaimed wood.
Now it’s time to put your newly acquired skills to the test and start making your own barn wood picture frames. Happy crafting!
Frequently Asked Questions about How To Make Picture Frames From Barn Wood
Was this page helpful?
At Storables.com, we guarantee accurate and reliable information. Our content, validated by Expert Board Contributors, is crafted following stringent Editorial Policies. We're committed to providing you with well-researched, expert-backed insights for all your informational needs.


0 thoughts on “How To Make Picture Frames From Barn Wood”