Articles
How To Strip A Floor
Modified: August 28, 2024
Learn how to strip a floor with these informative articles, covering step-by-step instructions and expert tips!
(Many of the links in this article redirect to a specific reviewed product. Your purchase of these products through affiliate links helps to generate commission for Storables.com, at no extra cost. Learn more)
Introduction
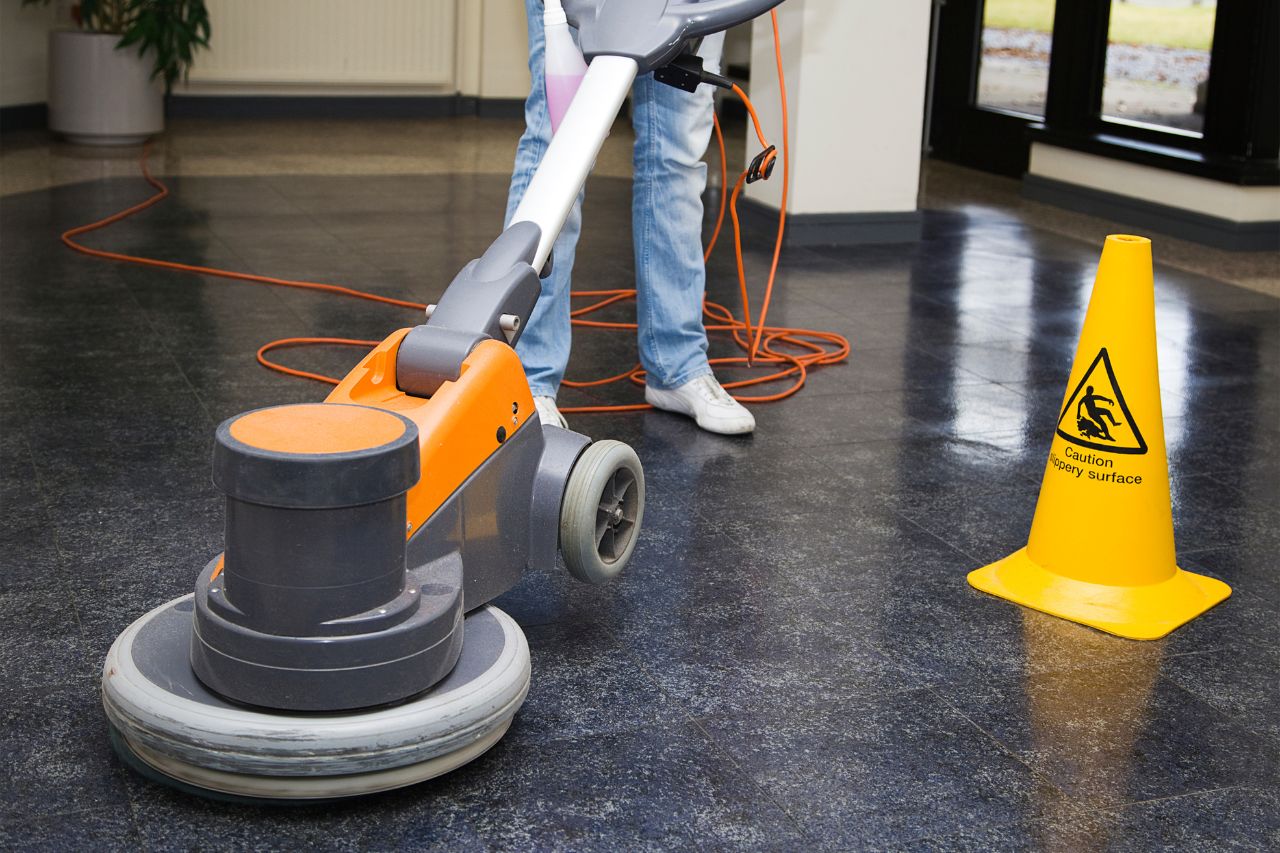
Stripping a floor is a necessary step when renovating or refinishing a space. Whether you are working on hardwood, vinyl, or linoleum flooring, knowing how to properly strip the existing finish is essential to achieve a clean and polished result. Stripping a floor involves removing the top layer of finish, which may be old, worn out, or damaged, allowing you to prepare the surface for a fresh new finish.
However, it is important to approach this task with caution, as it requires the use of chemical strippers and can be a labor-intensive process. This article will guide you through the step-by-step process of stripping a floor, while also providing valuable safety precautions and tips.
Before diving into the process, it’s worth noting that depending on the type of floor and the condition of the existing finish, you may opt to hire a professional to strip the floor for you. Professionals have the expertise and specialized equipment to efficiently complete the task, ensuring optimal results. However, if you’re up for the challenge and want to save some money, let’s proceed with the DIY approach.
So, let’s roll up our sleeves, gather our supplies, and get ready to transform that dull-looking floor into a clean, rejuvenated surface!
Key Takeaways:
- Safety First!
When stripping a floor, prioritize safety by wearing protective gear, ventilating the area, and following product instructions. Proper preparation and caution minimize risks and create a safe working environment. - Thorough Preparation Yields Results
Clearing the area, removing furniture, and properly preparing the floor are essential steps in achieving a successful floor stripping process. Attention to detail and thoroughness lead to a clean and rejuvenated surface ready for refinishing.
Safety Precautions
When it comes to any home improvement task, safety should always be the top priority. Stripping a floor involves working with chemicals and can be physically demanding. Therefore, taking the necessary precautions is crucial to protect yourself and others around you. Here are some safety measures to keep in mind:
- Wear Protective Gear: Before starting the floor stripping process, make sure to wear appropriate protective gear. This should include safety goggles, gloves, and a respiratory mask. These items will shield you from any potential splashes, fumes, or dust particles.
- Ventilate the Area: It’s important to work in a well-ventilated area. Open windows and doors to allow fresh air to circulate through the space. This will help dissipate any fumes emitted by the chemical strippers and ensure you’re not inhaling harmful substances.
- Read the Instructions: Familiarize yourself with the instructions and warnings provided by the manufacturer of the floor stripper product. Ensure you understand how to use the product safely and follow the recommended application and clean-up procedures.
- Protect Surrounding Surfaces: Take the time to cover any nearby surfaces or objects that could be damaged by the stripping solution or accidental spills. Use plastic sheeting or drop cloths to create a barrier and avoid unnecessary damage to your furniture or walls.
- Avoid Contact with Skin and Eyes: Chemical strippers can be harsh on the skin and eyes. Always exercise caution when handling these products, and avoid direct contact. In case of accidental contact, rinse the affected area with water immediately and seek medical attention if necessary.
- Handle Tools Properly: When using tools such as scrapers or floor machines, be mindful of proper handling techniques to prevent injuries. Maintain a firm grip and stable footing while operating these tools.
- Dispose of Waste Properly: Once you have finished stripping the floor, dispose of the waste materials and residue in accordance with local regulations. Follow the manufacturer’s instructions for proper disposal of any chemical products.
- Keep Children and Pets Away: During the floor stripping process, it’s important to keep children and pets away from the work area. This ensures their safety and avoids any potential accidents or exposure to toxic substances.
By adhering to these safety precautions, you can minimize the risks associated with floor stripping and create a safe working environment for yourself and others involved in the process.
Gathering Supplies
Before you begin the floor stripping process, it’s important to gather all the necessary supplies and equipment. Having everything on hand will help streamline the process and ensure you can work efficiently. Here are the supplies you will need:
- Chemical Stripper: Choose a high-quality floor stripper that is suitable for the type of flooring you are working on. Consider factors such as the level of finish buildup and the type of finish you want to remove. Read reviews and choose a reputable brand to ensure effective results.
- Protective Gear: As mentioned earlier, it’s crucial to have the necessary protective gear. This includes safety goggles, gloves, and a respiratory mask. Ensure that these items fit well and provide adequate protection.
- Scrubbing Tools: Depending on the size and condition of the floor, you may need a variety of scrubbing tools. A scrub brush or scrub pad attached to a handle can be used for manual scrubbing, while a floor machine with a stripping pad is ideal for larger areas.
- Scraper: A scraper will be helpful in removing any stubborn or layered finish. Choose a scraper with a sharp blade to make the process easier.
- Buckets: You will need several buckets for different purposes. One can be used for mixing the floor stripper solution, while another can be used for rinsing the scrubbing tools. Having separate buckets ensures that you don’t contaminate the clean water with the stripping solution.
- Plastic Sheeting/Drop Cloths: Use plastic sheeting or drop cloths to protect surrounding surfaces, furniture, and fixtures from accidental spills or splashes.
- Neutralizer: Some floor strippers require the use of a neutralizer to stop the stripping action and prepare the floor for the next steps. Check the product instructions to see if a neutralizer is recommended.
- Cleaning Supplies: After stripping the floor, you will need cleaning supplies to remove any residue or cleaner from the surface. This can include a mop, bucket, and floor cleaner suitable for your specific flooring type.
- Towels or Rags: Keep some towels or rags handy for cleaning up any spills or for wiping down surfaces after completing the stripping process.
- Trash Bags: Have a few large trash bags available to dispose of waste materials, such as used stripping pads and any other debris.
Take the time to gather all these supplies before starting the floor stripping process. This will save you from unnecessary interruptions and ensure that you have everything you need to complete the task efficiently.
Clearing the Area
Before you can begin the floor stripping process, it’s important to clear the area of any obstacles or furniture that may hinder your progress. Clearing the space will provide you with a clean and unobstructed working environment. Here are the steps to effectively clear the area:
- Remove Furniture: Start by removing all furniture from the room or area you will be working in. This includes chairs, tables, rugs, and any other movable items. Place them in a safe and designated area away from the work zone to protect them from accidental damage or exposure to chemicals.
- Secure Electrical Outlets: If there are any electrical outlets or switches near the floor, make sure to cover them with electrical tape or plastic outlet covers. This will prevent any moisture or stripping solution from coming into contact with the electrical components and potentially causing damage or injury.
- Clear the Floors: Remove any loose debris, such as dirt, dust, or small objects from the floor. Use a broom or vacuum cleaner to thoroughly sweep or vacuum the area. This will make it easier to see the condition of the floor and ensure a more effective stripping process.
- Protect Baseboards and Walls: Use painter’s tape or masking tape to protect the baseboards and walls from accidental spills or splashes. Apply the tape along the edges of these surfaces to create a barrier and prevent any damage or staining.
- Cover Vents and HVAC Systems: If there are floor vents or HVAC systems in the area, cover them with plastic sheeting or tape them shut using plastic wrap. This will prevent dust or debris from entering and potentially causing damage to the system.
By taking the time to clear the area properly, you’ll create a safe and clutter-free space for the floor stripping process. This will make it easier to maneuver and ensure that you can work efficiently without any unnecessary obstacles in your way.
Removing Furniture
Before you can begin the floor stripping process, it’s important to remove all furniture from the room or area you will be working in. Removing furniture ensures that it doesn’t get in the way and prevents accidental damage or exposure to the stripping solution. Follow these steps to safely remove furniture:
- Create a Plan: Start by creating a plan for where you will temporarily store the furniture. Identify a safe and secure area within your home or consider renting a storage unit if needed. Ensure that the chosen space has enough room to accommodate all the furniture being removed.
- Clear a Pathway: Clear a pathway from the room to the storage area by moving any obstacles or items that may obstruct the path. This includes rugs, plants, and decorative objects. Make sure there is ample space to maneuver when carrying furniture out of the room.
- Get Assistance: Depending on the size and weight of the furniture, you may require assistance to safely move it. Enlist the help of family members or friends to avoid straining yourself or causing damage to the furniture.
- Protect Furniture: Before moving any furniture, take steps to protect it from potential scratches or damage. Use furniture pads, blankets, or old sheets to cover the surfaces and corners of items that are prone to damage.
- Dismantle if Necessary: If you have large or bulky furniture that cannot be easily moved as a whole, consider dismantling it to make transportation easier. Carefully disassemble the furniture, keeping track of all the necessary hardware and screws.
- Move Furniture Carefully: When moving furniture, use proper lifting techniques and avoid dragging or sliding it on the floor. Lift with your legs, not your back, and ensure a secure grip on the item. If needed, use furniture sliders or dollies to make the process smoother.
- Organize Storage Area: Once the furniture is safely removed from the room, organize the storage area to maximize space and protect the items from damage. Place larger items at the back and stack smaller and lighter ones on top.
- Label and Document: To make the process of returning the furniture to its original place easier, consider labeling each piece or taking photos of the arrangement before removing them. This will help you remember their original positions and prevent any confusion later on.
Remember to take your time when moving furniture and prioritize safety. By properly removing and storing furniture, you’ll create a clear and unobstructed space to successfully carry out the floor stripping process without the risk of damaging your valuable possessions.
Read also: 12 Superior Soundproofing Floor for 2025
Preparing the Floor
Once the area is cleared of furniture and any other obstacles, it’s time to prepare the floor for the stripping process. Proper preparation ensures that the floor is ready to receive the stripping solution and allows for effective removal of the existing finish. Follow these steps to prepare the floor:
- Sweep or Vacuum: Start by thoroughly sweeping or vacuuming the floor to remove any loose debris, such as dirt, dust, and small particles. This step is essential to ensure that the stripping solution can penetrate the finish without obstruction.
- Spot Test: Before applying the stripping solution to the entire floor, it’s crucial to perform a spot test in an inconspicuous area. Apply a small amount of the stripper to a small section and let it sit for the recommended time. This will help determine the effectiveness of the product and ensure it does not cause any damage or discoloration to the flooring material.
- Protect Adjacent Surfaces: Use painter’s tape or masking tape to protect any adjacent surfaces, such as baseboards or walls, from accidental contact with the stripping solution. Apply the tape along the edges to create a clean barrier and prevent any potential damage or staining.
- Ensure Proper Ventilation: Proper ventilation is essential during the floor stripping process. Open windows and doors to allow fresh air to circulate and ensure that any fumes emitted by the stripping solution are effectively dispersed.
- Read the Instructions: Carefully read and follow the manufacturer’s instructions provided with the floor stripper. Pay attention to the recommended application method, dilution ratio (if applicable), and dwell time. Following the instructions will ensure that you achieve the best results.
- Protect Yourself: Put on the necessary protective gear, such as safety goggles, gloves, and respiratory mask, before handling or applying the stripping solution. This will safeguard you from any potential skin irritations or respiratory issues.
- Apply the Stripper Solution: Use a brush or mop to apply the stripping solution evenly onto the floor. Start in a small area to test the product’s effectiveness before proceeding with the entire floor. Work in manageable sections to ensure that the solution does not dry out before you have a chance to scrub it.
- Allow Dwell Time: Allow the stripping solution to sit on the floor for the specified dwell time mentioned in the manufacturer’s instructions. This time allows the solution to penetrate and loosen the existing finish for effective removal.
- Do Not Over-Soak: Avoid over-soaking the floor with the stripping solution, as this can cause damage or discoloration. Apply just enough to cover the surface and let it work its magic.
By properly preparing the floor, you’ll ensure that the stripping process goes smoothly and achieves the desired results. Taking the time to follow these steps will set the stage for successfully removing the finish and revealing a fresh surface ready for refinishing.
When stripping a floor, always follow the manufacturer’s instructions for the stripping solution and use the appropriate protective gear such as gloves and goggles. Test a small area first to ensure compatibility with the flooring material.
Applying the Stripper Solution
Now that the floor is properly prepared, it’s time to apply the stripper solution. The stripper solution is designed to break down the existing finish, making it easier to remove. Follow these steps to apply the stripper solution effectively:
- Mix the Solution: If the stripper solution requires dilution, carefully follow the manufacturer’s instructions to achieve the correct ratio. Use a clean bucket and mix the stripper solution with water as directed. This step ensures that the solution is well-mixed and ready for application.
- Start in a Corner: Begin applying the stripper solution in a corner of the room or in an inconspicuous area. This allows you to test the solution’s effectiveness and evaluate the time needed for it to work on your specific floor.
- Apply Evenly: Use a brush, mop, or sprayer to apply the stripper solution evenly over the floor surface. Work in small sections, ensuring the solution covers the area without oversaturation. It’s important to follow the manufacturer’s instructions regarding the appropriate application method for the specific product you’re using.
- Allow Dwell Time: Allow the stripper solution to sit on the floor for the recommended dwell time. This period allows the solution to penetrate and break down the existing finish. Consult the product instructions to determine the appropriate amount of time needed for optimal results.
- Scrub the Floor: After the dwell time has passed, use a scrub brush or a floor machine with a stripping pad to agitate the floor surface. The goal is to loosen the stripped finish and remove it. Work in small sections, scrubbing in a back-and-forth motion to ensure thorough coverage.
- Pay Attention to Stubborn Areas: Some areas may require additional scrubbing or scraping to completely remove the stripped finish. Use a scraper or a scrub brush with more pressure to tackle any stubborn spots or layers of finish that are harder to remove.
- Work in Sections: To avoid the stripping solution from drying out too quickly, work in manageable sections. This ensures that the solution remains active and effective while you scrub the floor. It’s important to maintain a wet or damp surface.
- Keep the Area Ventilated: Throughout the application process, ensure that the area is well-ventilated. Open windows and doors to allow fresh air to circulate, minimizing exposure to fumes and maintaining a healthy working environment.
- Follow Safety Precautions: While applying the stripper solution, continue to wear the necessary protective gear, including gloves, safety goggles, and a respiratory mask. Avoid any skin or eye contact with the solution, as it can be harsh and may cause irritation.
By following these steps, you’ll be able to effectively apply the stripper solution, allowing it to break down the existing finish and prepare the surface for the next stage of the floor stripping process. Remember to read and follow the instructions provided by the manufacturer for the specific product you’re using.
Scrubbing the Floor
With the stripper solution applied and allowed to dwell, it’s time to scrub the floor to effectively remove the stripped finish. Scrubbing the floor helps to agitate and lift the loosened finish, revealing a clean surface underneath. Follow these steps to scrub the floor properly:
- Select the Right Equipment: Choose the appropriate scrubbing tool for your floor type and the size of the area you’re working on. A scrub brush attached to a handle works well for smaller areas, while a floor machine with a stripping pad is more efficient for larger spaces. If using a machine, ensure it is set to the appropriate speed for your floor type.
- Work in Sections: Divide the floor into manageable sections to ensure thorough cleaning. This will help you maintain control and focus on one area at a time. It’s best to start in a corner and work your way towards an exit to avoid stepping on freshly stripped areas.
- Scrub in a Back-and-Forth Motion: Use the scrub brush or floor machine to scrub the floor in a back-and-forth motion, applying even pressure. This motion helps to effectively agitate the surface and remove the loosened finish. Pay extra attention to any stubborn areas or spots with a greater buildup of finish.
- Change or Rinse the Scrubbing Pad: If you’re using a floor machine with a stripping pad, make sure to periodically check the pad’s condition. If it becomes too worn out or coated with residue, replace it with a fresh pad or rinse it off thoroughly before continuing. This ensures that the pad remains effective and doesn’t spread the stripped finish around.
- Monitor the Progress: As you scrub the floor, keep an eye on the progress. Take note of areas that may require additional attention or areas where the stripped finish has been completely removed. Adjust your technique or pressure as needed to achieve the desired results.
- Rinse the Floor: Once you have completed scrubbing a section, rinse the floor thoroughly with clean water to remove any stripping solution residue and loosened finish. This step helps to ensure that no traces of the solution remain on the floor surface.
- Repeat if Necessary: Depending on the condition and thickness of the finish, you may need to repeat the scrubbing process in certain areas to completely remove all traces of the stripped finish. Take your time and give special attention to areas with a stubborn residue.
- Dry the Floor: After rinsing the floor, use clean towels, rags, or a wet/dry vacuum cleaner to dry the surface. This step prevents any moisture from seeping into the floor and prepares it for the next stage of the floor stripping process.
- Dispose of Waste Properly: Properly dispose of any waste materials, such as used stripping pads, cleaning rags, or the rinsed water containing stripping solution residue. Follow local regulations and guidelines for the disposal of these materials to prevent environmental harm.
By following these steps and taking your time to scrub the floor thoroughly, you’ll be able to effectively remove the stripped finish and leave behind a clean and prepared surface. Remember to adjust your technique as needed, focus on stubborn areas, and ensure proper drying before moving on to the next step.
Removing the Stripped Finish
With the floor scrubbed and the loosened finish agitated, it’s time to remove the stripped finish from the surface. This step is crucial to reveal a clean and bare floor, ready for refinishing or applying a new finish. Follow these steps to effectively remove the stripped finish:
- Scrape the Surface: Start by using a scraper to remove any loose or stubborn pieces of the stripped finish. Hold the scraper at a shallow angle and apply even pressure as you gently scrape the surface. Be careful not to damage or gouge the floor while doing so.
- Collect Scrapped Residue: As you scrape, collect the stripped finish residue using a dustpan or a vacuum cleaner. Dispose of the collected residue properly to prevent it from spreading or causing a mess.
- Inspect the Floor: After scraping, take a moment to inspect the floor and assess the effectiveness of the stripping process. Look for any remaining areas with a finish residue and remove them using the scraper or by continuing to scrub with the appropriate tool.
- Rinse the Floor: Once the majority of the stripped finish has been scraped off, rinse the floor thoroughly with clean water. This step helps to remove any residue or stripping solution that may still be present on the surface.
- Dry the Floor: After rinsing, use clean towels, rags, or a wet/dry vacuum cleaner to dry the floor. Ensure that the surface is completely dry before proceeding to the next steps. This will prevent any moisture from affecting the application of a new finish or causing damage to the floor.
- Feel for Smoothness: Run your hand across the surface of the floor to feel for any rough or uneven areas. If you encounter any, use a finer-grit sandpaper or a sanding block to gently smooth them out. Be careful not to oversand or damage the floor.
- Vacuum or Sweep Again: Once the surface is dry and smooth, give it a final vacuuming or sweeping to remove any remaining dust or debris. This step is important to ensure a clean surface for the next stage of the refinishing process.
- Assess the Result: Take a step back and assess the overall result of removing the stripped finish. Look for any remaining stubborn areas or spots that may require further attention. Address these areas accordingly before moving on to the next step.
- Proceed with Refinishing: With the stripped finish successfully removed, you are now ready to proceed with refinishing the floor or applying a new finish. Follow the appropriate steps and techniques based on your desired finish and the type of flooring you have.
By following these steps and ensuring that the floor is free of the stripped finish, you’ll have a clean and prepared surface for the next stage of the refinishing process. Take your time, be thorough, and enjoy the satisfaction of a beautifully stripped and renewed floor.
Cleaning Up
After successfully removing the stripped finish and preparing the floor for the next steps, it’s important to clean up the work area. Proper cleaning ensures that any residue, debris, or cleaning materials are properly disposed of and that the area is left tidy. Follow these steps to effectively clean up:
- Dispose of Waste Materials: Start by disposing of any waste materials properly. This includes used stripping pads, cleaning rags, and any debris or residue collected during the stripping process. Follow local regulations and guidelines for the disposal of these materials to minimize environmental impact.
- Clean Tools and Equipment: Clean and rinse any brushes, scrapers, or other tools used during the floor stripping process. Ensure that they are free from any residue or stripping solution by washing them with warm soapy water. Rinse thoroughly and allow them to dry completely before storing them.
- Mop the Floor: Give the floor a final cleaning by mopping it with a mild floor cleaner suitable for your specific flooring type. Follow the product instructions for dilution ratios and application methods. Mop the floor in a back-and-forth motion, taking care to remove any remaining dirt or residue.
- Rinse the Floor: After mopping, rinse the floor with clean water to remove any residual cleaner. This step helps to ensure that no cleaning solution is left behind, which could potentially interfere with the application of a new finish.
- Dry the Floor: Use clean towels or rags to dry the floor thoroughly. Ensure that it is completely free of moisture before proceeding with the next stage of the refinishing process. This step is important to prevent any water damage or improper adhesion of the new finish.
- Remove Protective Coverings: If you used plastic sheeting or drop cloths to protect surrounding surfaces, carefully remove them and dispose of them properly. Check for any accidental spills or splashes and clean them up as needed.
- Clean Surrounding Areas: Take a moment to clean any surfaces that may have accumulated dust, residue, or cleaning solution during the floor stripping process. Wipe down baseboards, walls, and nearby fixtures to ensure a clean and polished surrounding area.
- Inspect and Touch Up: Take a final walk around the room to inspect for any missed spots or areas that may require touch-up. Use the appropriate tools or cleaning products to address these areas and ensure a uniformly clean and prepared space.
- Store Supplies and Equipment: Once you have completed the cleaning process and are satisfied with the result, properly store all the supplies and equipment used during the floor stripping process. This will keep them organized and in good condition for future use.
By following these steps and thoroughly cleaning up the work area, you’ll leave behind a clean and polished space ready for the next stage of the refinishing process. Take pride in your accomplishment and enjoy the renewed beauty of your floor as you move forward with the final steps of your project.
Final Thoughts
Stripping a floor may seem like a daunting task, but with the right knowledge and preparation, it can be a rewarding and satisfying project. By following the step-by-step process outlined in this article, you’ll be able to effectively remove the old finish and prepare the floor for a fresh new look.
Remember to always prioritize safety by wearing the necessary protective gear and working in a well-ventilated area. Read and follow the instructions provided by the manufacturer for the specific floor stripper product you’re using, and perform a spot test to ensure compatibility with your flooring material.
Take your time during each stage of the floor stripping process and pay attention to detail. Scrubbing the floor thoroughly, removing any stripped finish residue, and properly cleaning up the work area will result in a clean and pristine surface ready for refinishing or applying a new finish.
If at any point you feel unsure or overwhelmed, don’t hesitate to seek professional assistance. Hiring a professional who specializes in floor stripping can ensure optimal results and save you time and effort.
Finally, enjoy the process and appreciate the transformation you’re making. Stripping a floor is a laborious task, but it’s one that can breathe new life into your space. Whether you’re refinishing a hardwood floor for a classic look or reviving a vinyl or linoleum floor with a modern touch, the end result will be a floor that you can be proud of.
So gather your supplies, clear the area, and embark on the journey of stripping your floor to reveal its true beauty. Happy floor stripping!
Frequently Asked Questions about How To Strip A Floor
Was this page helpful?
At Storables.com, we guarantee accurate and reliable information. Our content, validated by Expert Board Contributors, is crafted following stringent Editorial Policies. We're committed to providing you with well-researched, expert-backed insights for all your informational needs.

0 thoughts on “How To Strip A Floor”