Home>Construction & Tools>Building Materials>How To Insert A Nail Into A Brick Wall
Building Materials
How To Insert A Nail Into A Brick Wall
Modified: October 22, 2024
Learn the best techniques for inserting a nail into a brick wall with our comprehensive guide. Find out how to work with building materials effectively.
(Many of the links in this article redirect to a specific reviewed product. Your purchase of these products through affiliate links helps to generate commission for Storables.com, at no extra cost. Learn more)
Introduction
Inserting a nail into a brick wall may seem like a daunting task, but with the right tools and techniques, it can be accomplished with ease. Whether you're looking to hang a picture frame, a shelf, or any other decorative item, understanding the proper steps for securing a nail in a brick wall is essential. This comprehensive guide will walk you through the process, providing you with the knowledge and confidence to tackle this project successfully.
Brick walls are known for their durability and strength, which can pose a challenge when attempting to insert a nail. Unlike drywall or wood, brick requires a different approach due to its dense and solid nature. By following the steps outlined in this guide, you'll be equipped to navigate the unique characteristics of brick and achieve a secure and stable placement for your nail.
Whether you're a seasoned DIY enthusiast or a novice looking to expand your home improvement skills, mastering the art of inserting a nail into a brick wall is a valuable skill to have in your repertoire. With the right guidance and a willingness to learn, you'll be able to complete this task efficiently and effectively, adding a touch of personalization and functionality to your living space.
Now, let's dive into the step-by-step process of inserting a nail into a brick wall, starting with gathering the necessary tools for the job.
Key Takeaways:
- Inserting a nail into a brick wall requires the right tools, precise marking, and careful hammering. It’s a meticulous process that ensures stability and reliability for hanging items or decorations.
- After hammering the nail into the wall, it’s important to check its stability by visually inspecting, testing for movement, conducting a load-bearing test, and reinforcing if necessary. This ensures a secure and reliable anchor for hanging fixtures.
Read more: How To Render A Brick Wall
Step 1: Gather the necessary tools
Before embarking on the task of inserting a nail into a brick wall, it's crucial to gather the essential tools that will facilitate a smooth and successful process. The following items are indispensable for this undertaking:
-
Masonry Drill Bit: Select a high-quality masonry drill bit specifically designed for drilling into brick or concrete. The drill bit should be suitable for the diameter of the nail you intend to use, typically ranging from 1/8 inch to 1/4 inch.
-
Power Drill: A reliable power drill with variable speed settings is essential for effectively drilling into the tough surface of the brick. Ensure that the drill is equipped with a hammer function, which is specifically designed for masonry work.
-
Hammer: A sturdy hammer will be required for driving the nail into the pilot hole once it has been drilled. Opt for a hammer with a comfortable grip and sufficient weight to provide the necessary force for securing the nail in place.
-
Nails: Select nails that are suitable for masonry applications, such as hardened steel or masonry nails. These nails are designed to withstand the hardness of brick and provide a secure anchor for hanging items.
-
Tape Measure and Pencil: Accurate measurements are crucial for determining the precise placement of the nail. A tape measure and pencil will enable you to mark the spot on the brick wall where the nail will be inserted.
-
Safety Gear: When working with power tools, it's essential to prioritize safety. Wear protective eyewear to shield your eyes from any debris that may result from drilling into the brick.
By ensuring that you have these tools readily available, you'll be well-prepared to initiate the process of inserting a nail into a brick wall. With the right equipment at your disposal, you can proceed to the next step with confidence, knowing that you have everything necessary to accomplish the task effectively.
Step 2: Mark the spot for the nail
Before commencing the drilling process, it is crucial to accurately mark the spot on the brick wall where the nail will be inserted. This step is essential for ensuring precision and stability in securing the nail. Here's a detailed guide on how to mark the spot for the nail:
-
Select the Location: Determine the specific location on the brick wall where you intend to insert the nail. Consider factors such as the weight of the item you plan to hang and the desired height for placement. Using a tape measure, take precise measurements to identify the exact spot for the nail.
-
Mark the Position: Once the location has been determined, use a pencil to make a small mark on the brick surface. Ensure that the mark is clearly visible and accurately represents the center point where the nail will be inserted. Taking the time to mark the spot with care will contribute to the overall stability and alignment of the nail.
-
Consider Spacing: If you plan to insert multiple nails for hanging a larger item or creating a decorative arrangement, it's important to consider the spacing between the nails. Use a level or measuring tape to ensure uniformity and balance in the placement of multiple nails, especially for symmetrical or evenly spaced designs.
-
Double-Check the Position: Before proceeding to the next step, take a moment to review the marked spot and confirm that it aligns with your intended placement. Making any necessary adjustments at this stage will help avoid potential errors during the drilling and nailing process.
By meticulously marking the spot for the nail, you establish a solid foundation for the subsequent steps in the process. This attention to detail and precision will contribute to the overall success of inserting a nail into the brick wall, ensuring that the final result is both secure and visually appealing. With the spot accurately marked, you are now ready to proceed to the next step of drilling a pilot hole.
Step 3: Drill a pilot hole
Drilling a pilot hole in the brick wall is a critical step that sets the stage for securely inserting the nail. This preparatory hole not only facilitates the insertion of the nail but also helps prevent the brick from cracking or splitting during the process. Here's a detailed guide on how to drill a pilot hole effectively:
-
Select the Appropriate Drill Bit: Begin by choosing a masonry drill bit that matches the diameter of the nail you plan to use. The drill bit should be designed for use with brick or concrete and should be of sufficient length to penetrate the depth required for the nail.
-
Secure the Brick Surface: To prevent any unnecessary movement or damage to the brick wall, it's advisable to secure the surface by applying gentle pressure against the area where the pilot hole will be drilled. This can be achieved by using a steady hand or enlisting the assistance of a helper to support the brick during the drilling process.
-
Set the Drill to the Correct Speed: Adjust the power drill to the appropriate speed setting for masonry work. The hammer function should be engaged to provide the necessary impact for drilling into the tough surface of the brick. It's important to maintain a steady and controlled pace while drilling to ensure precision and avoid overheating the drill bit.
-
Initiate the Drilling Process: Position the tip of the masonry drill bit directly on the marked spot for the pilot hole. Apply gentle pressure and begin drilling into the brick wall, maintaining a perpendicular angle to the surface. As the drill bit penetrates the brick, you may encounter resistance due to the density of the material. Exercise patience and continue drilling with a consistent, steady motion.
-
Monitor the Depth: As you drill, periodically withdraw the drill bit to remove any accumulated debris and assess the depth of the hole. The pilot hole should be slightly deeper than the length of the nail to ensure a secure fit. Use caution to avoid drilling too deeply, as this can compromise the stability of the nail.
By following these detailed steps, you can effectively drill a pilot hole in the brick wall, laying the groundwork for securely inserting the nail. This meticulous approach ensures that the subsequent steps in the process proceed smoothly, ultimately leading to a stable and reliable placement of the nail in the brick wall. With the pilot hole successfully drilled, you are now prepared to proceed to the next step of inserting the nail into the wall.
Use a masonry drill bit to create a pilot hole in the brick. Then, gently tap the nail into the hole using a hammer. Be sure to use the correct size and type of nail for the job.
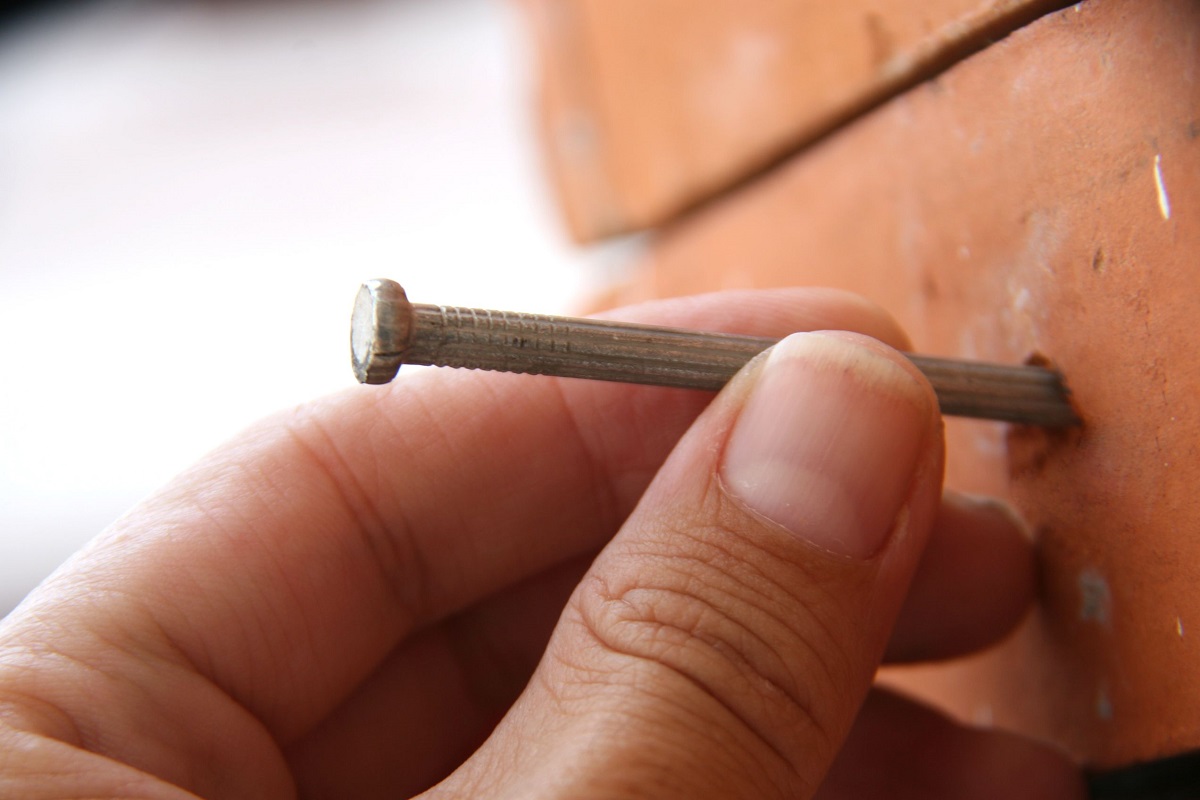
Step 4: Insert the nail
With the pilot hole successfully drilled, the next crucial step is to insert the nail into the brick wall. This process requires precision and care to ensure that the nail is securely anchored and provides a stable foundation for the item you intend to hang. Here's a detailed guide on how to insert the nail effectively:
-
Select the Appropriate Nail: Choose a nail that is specifically designed for masonry applications, such as hardened steel or masonry nails. The length of the nail should correspond to the depth of the pilot hole, ensuring a snug fit without protruding excessively from the surface of the brick.
-
Position the Nail: With the nail in hand, align the tip with the entrance of the pilot hole on the brick wall. Apply gentle pressure to the nail, guiding it into the hole with a twisting motion if necessary. It's essential to maintain a steady and controlled approach to prevent any damage to the brick or the nail itself.
-
Utilize a Hammer: Once the nail is positioned within the pilot hole, utilize a sturdy hammer to drive the nail further into the brick. Begin with light taps to establish the initial placement of the nail, ensuring that it remains aligned with the marked spot. Gradually increase the force of the hammer strikes, driving the nail deeper into the brick with each carefully measured impact.
-
Monitor the Alignment: Throughout the process of inserting the nail, it's important to monitor the alignment and stability of the nail. Ensure that the nail remains perpendicular to the surface of the brick, maintaining a straight and uniform appearance. This attention to detail contributes to the overall aesthetic appeal and functionality of the nail placement.
-
Assess the Depth: As the nail is driven into the brick, periodically assess the depth to confirm that it corresponds to the intended length of the nail. Avoid excessive force that may cause the nail to penetrate too deeply, as this can compromise its stability. The goal is to achieve a secure and flush placement of the nail within the brick wall.
By following these detailed steps, you can effectively insert the nail into the brick wall, establishing a solid anchor for hanging items or decorations. This meticulous approach ensures that the nail is securely positioned, providing a reliable foundation for enhancing the functionality and visual appeal of your living space. With the nail successfully inserted, you are now prepared to proceed to the final step of hammering the nail into the wall.
Read more: How To Point A Brick Wall
Step 5: Hammer the nail into the wall
Hammering the nail into the wall is the pivotal step that solidifies its placement within the brick, ensuring stability and reliability for hanging items or decorations. This process requires precision and controlled force to achieve a secure and flush position for the nail. Here's a detailed guide on how to hammer the nail into the wall effectively:
-
Secure Positioning: With the nail inserted into the pilot hole, hold the hammer firmly and position it perpendicular to the head of the nail. Ensuring a stable grip on the hammer is essential for maintaining control and accuracy during the hammering process.
-
Commence Hammering: Begin the hammering process by delivering controlled strikes to the head of the nail. Start with light taps to set the nail in place, gradually increasing the force to drive it further into the brick. The goal is to achieve a secure and flush placement without causing damage to the surrounding area.
-
Uniform Strikes: Maintain a consistent rhythm and distribution of strikes across the head of the nail. This approach ensures that the force is evenly applied, allowing the nail to penetrate the brick steadily and uniformly. Avoid erratic or uneven hammering, as this can lead to instability and potential damage to the nail or the brick surface.
-
Assess Stability: As the nail is hammered into the wall, periodically assess its stability and alignment. Confirm that the nail remains perpendicular to the surface of the brick, maintaining a straight and uniform appearance. This visual inspection allows for adjustments to be made during the hammering process, ensuring an optimal outcome.
-
Final Placement: Continue hammering the nail until it is securely positioned and the head is flush with the surface of the brick. Achieving a level and uniform placement is essential for both the visual appeal and the functional stability of the nail. Exercise caution to avoid overdriving the nail, which can compromise its integrity.
By following these detailed steps, you can effectively hammer the nail into the wall, establishing a secure and stable anchor for hanging items or decorations. This meticulous approach ensures that the nail is firmly positioned, providing a reliable foundation for enhancing the functionality and visual appeal of your living space. With the nail successfully hammered into the wall, you have completed the essential steps for inserting a nail into a brick wall, achieving a secure and visually pleasing outcome.
Step 6: Check the stability of the nail
After hammering the nail into the brick wall, it is essential to perform a thorough assessment of its stability to ensure that it provides a secure and reliable anchor for hanging items or decorations. Checking the stability of the nail is a critical step that verifies the effectiveness of the insertion process and contributes to the overall success of the project. Here's a detailed guide on how to assess the stability of the nail effectively:
-
Visual Inspection: Begin by conducting a visual inspection of the nail to evaluate its alignment and positioning within the brick wall. Ensure that the nail is perpendicular to the surface of the brick and that the head is flush with the wall. Any deviations from the intended placement should be addressed promptly to maintain stability and visual appeal.
-
Manual Testing: Gently apply pressure to the head of the nail and attempt to wiggle it from side to side. A stable and securely inserted nail should exhibit minimal to no movement within the pilot hole. Any noticeable shifting or looseness indicates a lack of stability and may necessitate corrective measures.
-
Load-Bearing Test: If the nail is intended to support a specific weight, such as a picture frame or shelf, consider conducting a load-bearing test to assess its stability. Carefully hang the item on the nail and observe its behavior. The nail should remain firmly anchored, with no signs of shifting or strain. This test validates the stability of the nail under practical conditions.
-
Sound and Vibration: Lightly tap the head of the nail with a small hammer or a solid object and listen for any unusual sounds or vibrations. A stable and secure nail will produce a solid and consistent sound, indicating its firm attachment within the brick. Any hollow or rattling noises may signify instability and require further attention.
-
Reinforcement, if Necessary: If the stability assessment reveals any concerns regarding the nail's secure placement, consider reinforcing it by driving an additional nail adjacent to the original one or utilizing alternative anchoring methods, such as wall anchors or masonry screws. This proactive approach ensures the long-term stability and reliability of the hanging fixture.
By meticulously checking the stability of the nail, you can confirm that it provides a secure and reliable anchor within the brick wall, capable of supporting the intended items or decorations. This comprehensive assessment ensures that the insertion process has been executed effectively, resulting in a stable and visually appealing outcome. With the stability of the nail confirmed, you can proceed with confidence, knowing that your hanging fixture is securely and reliably anchored to the brick wall.
Frequently Asked Questions about How To Insert A Nail Into A Brick Wall
Was this page helpful?
At Storables.com, we guarantee accurate and reliable information. Our content, validated by Expert Board Contributors, is crafted following stringent Editorial Policies. We're committed to providing you with well-researched, expert-backed insights for all your informational needs.


0 thoughts on “How To Insert A Nail Into A Brick Wall”