Home>Construction & Tools>Building Materials>How To Make Footing For A Brick Wall
Building Materials
How To Make Footing For A Brick Wall
Modified: August 18, 2024
Learn how to make a solid footing for your brick wall using essential building materials. Follow our step-by-step guide for a sturdy foundation.
(Many of the links in this article redirect to a specific reviewed product. Your purchase of these products through affiliate links helps to generate commission for Storables.com, at no extra cost. Learn more)
Introduction
Building a sturdy and durable brick wall starts with a solid footing. The footing provides essential support and stability, ensuring that the wall can withstand the test of time and the elements. Whether you’re embarking on a DIY project or working with a professional contractor, understanding the process of creating a footing for a brick wall is invaluable.
In this comprehensive guide, we’ll walk through the step-by-step process of making a footing for a brick wall. From preparing the site to pouring and curing the concrete, each stage plays a crucial role in establishing a strong foundation for your brick wall. By following these guidelines and using the right materials and tools, you can lay the groundwork for a structurally sound and visually appealing brick wall.
So, roll up your sleeves, gather your tools, and let’s dive into the intricacies of creating a footing that will form the backbone of your brick wall project.
Key Takeaways:
- Building a sturdy brick wall starts with a solid footing. Prepare the site, mark the layout, excavate the trench, create a stable base, and install reinforcement for a durable foundation.
- Pour and finish the concrete with precision, then initiate the curing process for a resilient footing. Each step is crucial in creating a strong and enduring brick wall foundation.
Read more: How To Make A Miniature Brick Wall
Materials and Tools Needed
Before you commence the process of making a footing for your brick wall, it’s essential to gather the necessary materials and tools. Having the right supplies on hand will streamline the construction process and ensure that you can proceed smoothly from one step to the next. Here’s a rundown of the materials and tools you’ll need:
Materials:
- Concrete mix: Choose a high-quality concrete mix suitable for footings, ensuring it provides the necessary strength and durability.
- Reinforcement bars (rebar): These are essential for reinforcing the concrete and enhancing the structural integrity of the footing.
- Gravel: Utilized as a base material, gravel aids in drainage and provides a stable foundation for the concrete.
- Forming material: You'll need wood or metal forms to contain the poured concrete and shape the footing according to your desired dimensions.
- Water: A crucial component in the concrete mixing process, water is needed to achieve the appropriate consistency for the concrete mix.
- Release agent: If using wooden forms, a release agent helps prevent the concrete from adhering to the forms, facilitating easy removal.
Tools:
- Shovel: Essential for excavating the trench and moving materials during the construction process.
- Tape measure and string: These tools are used to mark and layout the dimensions of the footing accurately.
- Level: Ensures that the forms are positioned correctly and that the footing surface is even and uniform.
- Trowel: A versatile tool for shaping and smoothing the concrete during the pouring and finishing stages.
- Concrete mixer or mixing tools: Depending on the scale of your project, you may need a concrete mixer or mixing tools such as a wheelbarrow and hoe.
- Wire cutters: Necessary for cutting and shaping the reinforcement bars to fit the dimensions of the footing.
- Broom or brush: Used for finishing and texturing the surface of the concrete once it has been poured.
By ensuring that you have these materials and tools at your disposal, you can proceed with confidence, knowing that you’re well-equipped to tackle each phase of the footing construction process effectively.
Step 1: Prepare the Site
Before delving into the physical construction of the footing, it’s crucial to prepare the site meticulously. This preparatory phase sets the stage for the subsequent steps and ensures that the construction process unfolds seamlessly. Here’s a detailed overview of how to prepare the site for the footing:
Clear the Area: Begin by clearing the designated area where the brick wall will be constructed. Remove any vegetation, debris, or obstructions to create a clean and unobstructed workspace. This step is essential for establishing a level surface and preventing potential interference during the construction process.
Mark the Boundaries: Use stakes and string to mark the boundaries of the footing. By outlining the precise dimensions of the footing, you can ensure that the construction stays within the intended parameters, resulting in a well-proportioned and structurally sound foundation.
Check for Utility Lines: Before excavating the trench for the footing, it’s imperative to check for the presence of any underground utility lines. Contact the relevant authorities or utilize specialized equipment to identify and mark the locations of utility lines, such as electrical cables, water pipes, or gas lines. This precautionary measure helps prevent accidental damage and ensures a safe working environment.
Obtain Permits: Depending on your location and the scale of the project, you may need to obtain permits or adhere to specific building regulations. Check with local authorities to ascertain the necessary permits and ensure compliance with any relevant codes or regulations governing construction projects.
By meticulously preparing the site, you lay the groundwork for a smooth and organized construction process. This initial phase sets the stage for the subsequent steps, allowing you to proceed with confidence and precision as you embark on the journey of creating a solid and enduring footing for your brick wall.
Read more: How Many Brick Pavers In A Square Foot
Step 2: Mark the Footing Layout
Once the site is prepared, the next crucial step in creating a footing for a brick wall is marking the footing layout. This phase involves translating the planned dimensions of the footing onto the prepared site, ensuring accuracy and adherence to the intended design. Here’s a detailed guide on how to mark the footing layout effectively:
Utilize Measurements: Using a tape measure and the predetermined dimensions of the footing, mark the layout on the ground with precision. Ensure that the corners and edges of the footing are clearly delineated, providing a visual guide for the subsequent excavation and construction stages.
Establish Levels and Grades: Employ a level and string to establish the desired levels and grades for the footing. This step is crucial for ensuring that the footing will be level and properly aligned, laying the foundation for a structurally sound brick wall. Pay close attention to the accuracy of the levels and grades, as they will directly impact the overall integrity of the construction.
Double-Check Alignment: Verify that the marked layout aligns with the intended position and orientation of the brick wall. Confirm that the dimensions and angles are consistent with the architectural plans or design specifications, making any necessary adjustments to ensure precision and alignment.
Marking the footing layout accurately is a pivotal stage in the construction process, serving as a visual blueprint for the subsequent excavation and concrete pouring. By meticulously marking the layout, you establish a clear framework for the construction of the footing, setting the stage for the next phases of the project.
Step 3: Excavate the Trench
With the footing layout marked and confirmed, the next critical phase in the construction process is excavating the trench. This step involves digging a trench to the specified depth and dimensions, creating the space in which the concrete footing will be poured. Here’s a comprehensive guide on how to excavate the trench effectively:
Begin Digging: Utilizing a shovel, commence digging the trench along the marked layout of the footing. Exercise caution and precision to ensure that the dimensions and depth of the trench align with the intended design. Remove the excavated soil from the trench, keeping the workspace tidy and facilitating clear access during the construction process.
Verify Depth and Alignment: Periodically check the depth and alignment of the trench as you progress, ensuring that it corresponds to the required specifications. Utilize a tape measure and level to confirm that the trench meets the prescribed depth and maintains uniform alignment throughout its length. This meticulous approach is essential for achieving a consistent and structurally sound footing.
Accommodate Reinforcement: If reinforcement bars (rebar) are to be incorporated into the footing, ensure that the trench accommodates the placement of the reinforcement according to the project’s requirements. Position the rebar securely within the trench, adhering to the specified spacing and configuration to enhance the strength and durability of the footing.
Remove Debris and Obstructions: As you excavate the trench, promptly remove any debris, rocks, or obstructions that may impede the construction process or compromise the integrity of the footing. Maintaining a clean and clear trench environment is essential for the subsequent phases of the construction.
By meticulously excavating the trench, you establish the foundational space for pouring the concrete footing. This phase sets the stage for the subsequent steps, ensuring that the footing will be structurally sound and capable of providing robust support for the brick wall.
Step 4: Create a Base
With the trench excavated to the specified dimensions, the next pivotal step in constructing the footing for a brick wall is creating a solid base within the trench. The base serves as the foundation upon which the concrete footing will be poured, providing stability and support. Here’s a comprehensive guide on how to create a base for the footing:
Layer Gravel: Begin by layering gravel at the bottom of the trench to establish a stable and well-draining base. The gravel aids in promoting proper drainage and mitigating the risk of moisture-related issues, contributing to the longevity of the footing and the overall integrity of the brick wall.
Compact the Gravel: Utilize a compactor or tamper to compact the layer of gravel thoroughly. Compaction is essential for achieving a firm and uniform base, minimizing the potential for settling or shifting once the concrete footing is poured. Pay careful attention to achieving consistent compaction across the entire base of the trench.
Verify Level and Grade: Use a level to ensure that the compacted gravel base is level and uniformly graded. This step is crucial for establishing a solid and even foundation, laying the groundwork for a structurally sound footing. Address any irregularities in the level and grade to achieve optimal uniformity and stability.
Inspect for Debris: Prior to proceeding with the next phase, inspect the compacted gravel base for any debris or irregularities. Remove any foreign objects or materials that may compromise the integrity of the base, ensuring a clean and uniform foundation for the concrete footing.
By creating a robust base within the excavated trench, you establish a solid foundation for the subsequent pouring of the concrete footing. This phase is pivotal in ensuring the stability and longevity of the brick wall, setting the stage for the installation of reinforcement and the pouring of the concrete.
Before pouring the concrete footing for a brick wall, make sure to dig a trench that is at least 12 inches deep and wider than the width of the wall. This will provide a stable base for the wall to sit on.
Step 5: Install Reinforcement
As you progress in the construction of the footing for your brick wall, the installation of reinforcement bars (rebar) plays a crucial role in enhancing the structural integrity and load-bearing capacity of the concrete footing. Properly installed reinforcement ensures that the footing can effectively withstand the forces exerted upon it. Here’s a detailed guide on how to install reinforcement for the footing:
Cut and Shape Rebar: Begin by cutting the reinforcement bars to the required lengths using wire cutters. Shape the rebar as per the predetermined specifications, ensuring that it aligns with the dimensions and configuration of the footing. Attention to detail in cutting and shaping the rebar is essential for achieving optimal reinforcement effectiveness.
Position Rebar in Trench: Place the cut and shaped reinforcement bars within the trench, adhering to the designated spacing and layout. Ensure that the rebar is positioned at the appropriate depth within the trench, providing comprehensive reinforcement coverage throughout the footing. Secure the rebar in place to prevent displacement during the concrete pouring phase.
Overlap Joints: In cases where multiple lengths of rebar are required to span the full length of the footing, overlap the joints of the reinforcement bars as per the project’s specifications. Overlapping the rebar joints facilitates the continuity of reinforcement, enhancing the overall strength and load-bearing capacity of the footing.
Elevate Rebar if Required: If the design or engineering specifications call for the rebar to be elevated within the footing, utilize chairs or supports to maintain the appropriate positioning of the reinforcement. Ensuring that the rebar is correctly elevated within the concrete helps optimize its effectiveness in reinforcing the footing.
By meticulously installing reinforcement within the trench, you significantly enhance the structural robustness and durability of the concrete footing. The reinforcement bars fortify the footing, enabling it to effectively withstand the loads and pressures it will encounter, ultimately contributing to the resilience and longevity of the brick wall.
Read more: How To Make A Brick
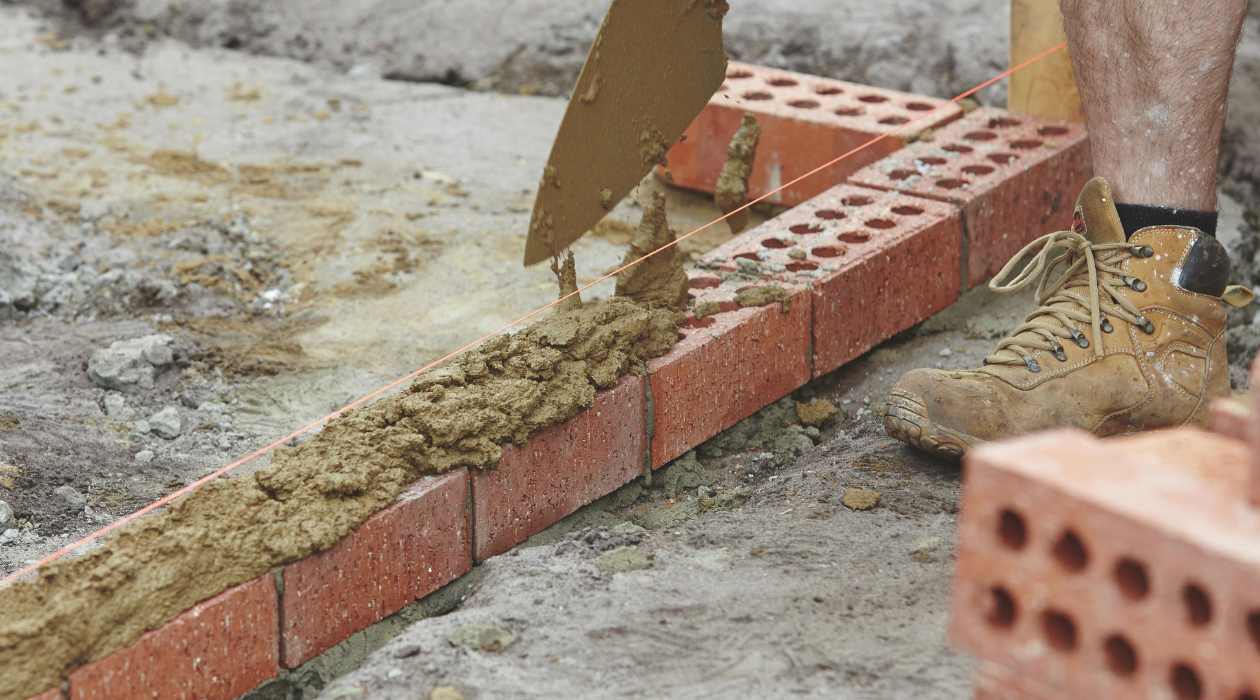
Step 6: Pour the Concrete
As you approach the pivotal stage of pouring the concrete for the footing of your brick wall, meticulous attention to detail and precision is essential to ensure the creation of a robust and enduring foundation. The pouring of the concrete marks a significant milestone in the construction process, setting the stage for the formation of a solid and resilient footing. Here’s a comprehensive guide on how to pour the concrete effectively:
Prepare the Concrete Mix: Begin by preparing the concrete mix according to the manufacturer’s instructions, ensuring the appropriate ratio of water to concrete mix for optimal consistency and strength. Thoroughly blend the components to achieve a homogeneous mixture, free from lumps or inconsistencies.
Pour the Concrete: Carefully pour the mixed concrete into the prepared trench, ensuring a consistent and even distribution along the entire length and width of the footing. Exercise caution to prevent segregation or uneven settling of the concrete, maintaining a uniform and level surface throughout the pouring process.
Consolidate the Concrete: Utilize a concrete vibrator or a tamping tool to consolidate the poured concrete, eliminating air pockets and ensuring proper compaction. This step is crucial for enhancing the density and strength of the concrete footing, minimizing the risk of voids or weak points within the structure.
Smooth and Level the Surface: Employ a trowel to smooth and level the surface of the poured concrete, achieving a uniform and visually appealing finish. Pay meticulous attention to achieving a consistent surface texture and eliminating any irregularities, creating a solid and aesthetically pleasing foundation for the brick wall.
Cure the Concrete: Following the pouring and finishing of the concrete, implement a comprehensive curing process to optimize the strength and durability of the footing. Utilize curing compounds, coverings, or moisture-retaining methods to facilitate the proper hydration and hardening of the concrete, ensuring long-term resilience.
By executing the concrete pouring process with precision and care, you establish a resilient and enduring footing that forms the cornerstone of the brick wall’s structural integrity. The pouring and curing of the concrete are pivotal steps in the construction process, laying the foundation for the successful realization of your brick wall project.
Step 7: Finish and Cure the Footing
Upon completing the pouring of the concrete for the footing of your brick wall, the subsequent steps of finishing and curing are essential to ensure the strength, durability, and longevity of the foundation. The finishing process refines the surface of the concrete, while the curing phase optimizes its structural integrity. Here’s a comprehensive guide on how to finish and cure the footing effectively:
Smooth the Surface: Use a trowel to smooth and refine the surface of the poured concrete footing. Pay meticulous attention to achieving a uniform and visually appealing finish, eliminating any imperfections or irregularities. A smooth surface not only enhances the aesthetic appeal but also contributes to the overall integrity of the footing.
Texture the Surface (Optional): If desired, texture the surface of the concrete to enhance its visual appeal and provide additional traction. Various techniques, such as broom finishing or stamping, can be employed to impart texture to the surface, adding a decorative element while maintaining functionality.
Implement Control Joints (If Applicable): Depending on the size and layout of the footing, consider incorporating control joints to mitigate the potential for cracking. Strategically placed control joints help control the natural shrinkage of the concrete, minimizing the risk of unsightly and structurally compromising cracks.
Initiate the Curing Process: Commence the curing process promptly after finishing the concrete. Employ curing compounds, moist curing methods, or protective coverings to maintain adequate moisture levels and temperature conditions, facilitating the proper hydration and hardening of the concrete. Consistent and thorough curing is essential for optimizing the strength and durability of the footing.
Monitor the Curing Period: Adhere to the prescribed curing period, ensuring that the concrete footing receives the necessary care and attention during this critical phase. Regularly inspect the curing conditions and make any adjustments as needed to uphold an optimal environment for the concrete to cure effectively.
By meticulously finishing and curing the concrete footing, you ensure that it attains its full structural potential, capable of providing robust support for the brick wall. The finishing and curing phases are integral to the construction process, contributing to the resilience and longevity of the foundation, and ultimately, the entire brick wall structure.
Conclusion
Embarking on the construction of a brick wall entails the meticulous creation of a solid and durable footing, laying the groundwork for a structure that exudes strength and longevity. Each step in the process, from site preparation to finishing and curing the concrete, plays a pivotal role in establishing a foundation capable of withstanding the test of time and environmental pressures.
By meticulously preparing the site, marking the footing layout, excavating the trench, creating a stable base, and installing reinforcement, you set the stage for the pivotal phase of pouring and finishing the concrete. The pouring process, executed with precision and care, culminates in the formation of a robust footing, while the finishing and curing stages refine and fortify the foundation, ensuring its resilience and durability.
Throughout this comprehensive guide, attention to detail, precision, and adherence to best practices are emphasized, underscoring the importance of each phase in the construction process. From the selection of materials and tools to the execution of key steps, the creation of a footing for a brick wall is a harmonious blend of art and engineering, resulting in a foundation that is both structurally sound and visually appealing.
As you venture into the realm of brick wall construction, the knowledge and expertise gained from this guide will serve as a valuable compass, guiding you through the intricacies of creating a footing that forms the backbone of your project. Whether you’re a seasoned contractor or a DIY enthusiast, the journey of crafting a robust and enduring brick wall begins with the meticulous construction of its foundation.
Armed with this comprehensive understanding, you are well-equipped to embark on the construction of a brick wall, knowing that the footing you create will serve as a testament to your commitment to quality, longevity, and structural integrity.
Frequently Asked Questions about How To Make Footing For A Brick Wall
Was this page helpful?
At Storables.com, we guarantee accurate and reliable information. Our content, validated by Expert Board Contributors, is crafted following stringent Editorial Policies. We're committed to providing you with well-researched, expert-backed insights for all your informational needs.


0 thoughts on “How To Make Footing For A Brick Wall”