Home>Construction & Tools>Building Materials>How To Cement Bag A Brick Wall
Building Materials
How To Cement Bag A Brick Wall
Modified: August 28, 2024
Learn how to cement bag a brick wall using high-quality building materials. Discover the best techniques for a sturdy and durable construction project.
(Many of the links in this article redirect to a specific reviewed product. Your purchase of these products through affiliate links helps to generate commission for Storables.com, at no extra cost. Learn more)
Introduction
Building a brick wall can add timeless charm and durability to any property. One of the crucial steps in this construction process is cement bagging the brick wall, which involves applying a layer of cement to the surface of the bricks to enhance their strength and longevity. This method not only fortifies the structure but also contributes to its aesthetic appeal.
Cement bagging, also known as parging, involves skillfully applying a cement mixture to the brick wall, creating a smooth and uniform surface. This process not only improves the wall's appearance but also provides an additional layer of protection against the elements. In this comprehensive guide, we will walk you through the essential steps and techniques required to cement bag a brick wall effectively.
Whether you are a seasoned construction professional or a passionate DIY enthusiast, mastering the art of cement bagging can elevate the quality and resilience of your brick wall projects. By learning the proper methods and gaining an understanding of the necessary materials, you can confidently undertake this task and achieve remarkable results.
Join us as we delve into the world of cement bagging, exploring the materials needed, preparing the wall, mixing the cement, applying the mixture to the brick wall, adding finishing touches, and ultimately, creating a robust and visually appealing brick wall that stands the test of time. Let's embark on this insightful journey and uncover the secrets of cement bagging for brick walls.
Key Takeaways:
- Cement bagging a brick wall involves applying a cement mixture to enhance strength and appearance. Proper preparation, mixing, and application are crucial for a durable and visually appealing result.
- Attention to detail and a methodical approach are key to mastering the art of cement bagging. Each step, from preparation to finishing touches, contributes to the integrity and aesthetics of the brick wall.
Read more: How To Remove Cement From Brick
Materials Needed
Before embarking on the process of cement bagging a brick wall, it is essential to gather the necessary materials to ensure a smooth and efficient workflow. The following items are indispensable for this undertaking:
- Brick wall surface in need of cement bagging
- Cement mixture (consisting of cement, sand, and water)
- Masonry trowel for applying the cement mixture
- Wire brush for cleaning the brick wall surface
- Bucket for mixing the cement
- Protective gear, including gloves and safety goggles
- Water source for mixing the cement
- Drop cloths or plastic sheeting to protect the surrounding area
- Stiff brush for texturing the cement surface (optional)
By ensuring that these materials are readily available, you can streamline the cement bagging process and achieve optimal results. It is crucial to prioritize safety by using protective gear and to prepare the work area by covering and protecting the surrounding surfaces. With these materials at your disposal, you are well-equipped to commence the cement bagging process and transform the appearance and durability of your brick wall.
Preparing the Wall
Before applying the cement mixture to the brick wall, it is imperative to prepare the surface adequately to ensure optimal adhesion and a flawless finish. Follow these essential steps to prepare the wall for cement bagging:
- Clean the Surface: Begin by thoroughly cleaning the brick wall surface using a wire brush to remove any dirt, debris, or loose particles. This process is crucial for promoting strong adhesion and preventing the cement mixture from bonding to unwanted contaminants.
- Moisten the Surface: Lightly moisten the cleaned brick wall surface with water. This step helps to create a suitable environment for the cement mixture to adhere effectively. However, it is essential to avoid oversaturating the surface, as excessive moisture can hinder the bonding process.
- Repair Any Damage: Inspect the brick wall for any cracks, holes, or imperfections. Repair any damage using suitable masonry repair products to ensure a smooth and uniform surface for the application of the cement mixture.
- Protect Surrounding Areas: Cover the ground and any adjacent surfaces with drop cloths or plastic sheeting to prevent the cement mixture from spilling onto unwanted areas. This precautionary measure helps maintain a tidy work environment and simplifies the cleanup process.
By meticulously preparing the wall according to these guidelines, you can create an ideal foundation for the cement bagging process. Adequate surface preparation is crucial for achieving a professional-quality finish and ensuring the long-term integrity of the cemented brick wall.
Mixing the Cement
Creating the perfect cement mixture is a critical aspect of cement bagging a brick wall. Follow these steps to ensure that the cement is mixed to the ideal consistency for application:
- Measure the Ingredients: Begin by accurately measuring the required amounts of cement and sand. The typical ratio for a cement bagging mixture is one part cement to three parts sand. This ratio can be adjusted based on the specific requirements of your project.
- Combine the Materials: In a clean bucket, combine the measured cement and sand, ensuring that they are thoroughly mixed to achieve a uniform blend. This step is essential for creating a cohesive and well-balanced mixture.
- Add Water Gradually: Slowly add water to the dry mixture while continuously stirring. It is crucial to add the water gradually to achieve the desired consistency. The goal is to attain a workable, paste-like texture that is neither too dry nor too runny.
- Test the Consistency: To ensure that the cement mixture is at the optimal consistency for application, use the masonry trowel to scoop up a small amount. The mixture should hold its shape without being excessively stiff or overly fluid.
By meticulously following these steps, you can achieve a well-balanced and workable cement mixture that is perfectly suited for bagging the brick wall. The quality of the cement mixture significantly influences the overall outcome of the project, making this stage a crucial determinant of the final result.
When cement bagging a brick wall, make sure to mix the cement according to the instructions on the bag. Apply a thick layer of cement to the wall using a trowel, then press the bricks into the cement and use a level to ensure they are straight. Allow the cement to dry completely before removing any excess.
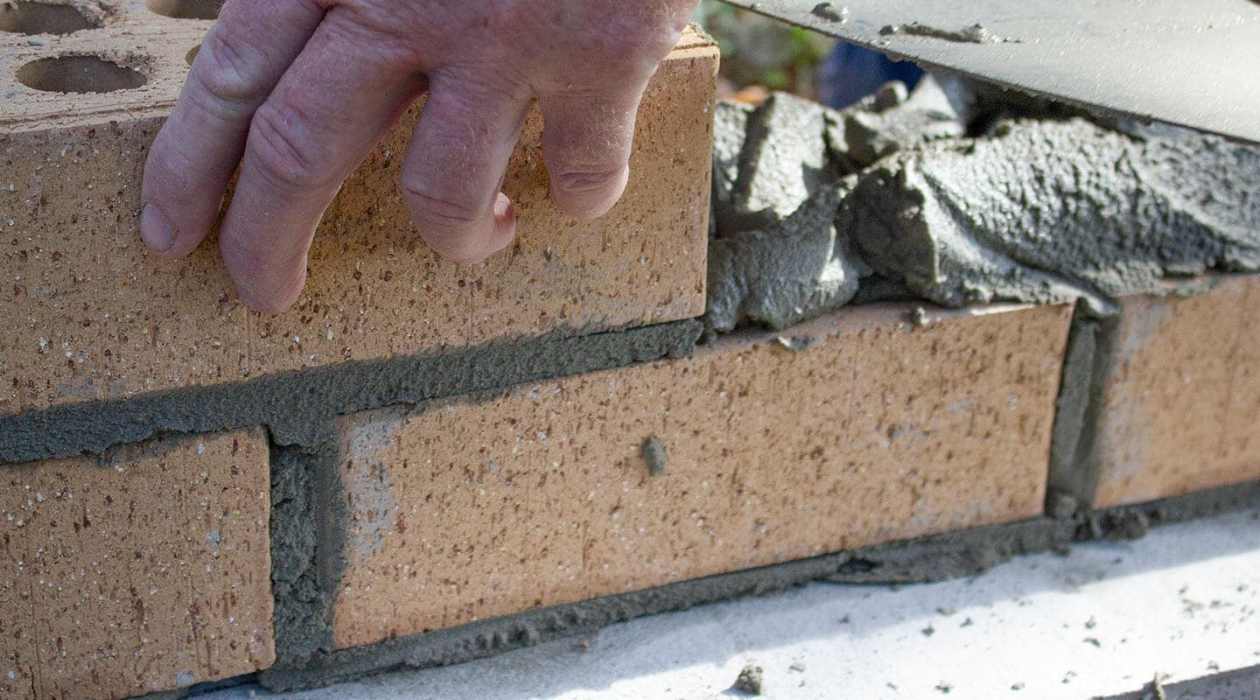
Bagging the Brick Wall
Bagging the brick wall with the prepared cement mixture is a pivotal stage in the process of enhancing both the structural integrity and visual appeal of the wall. Follow these steps to effectively apply the cement mixture to the brick surface:
- Begin Application: Using a masonry trowel, start applying the cement mixture to the moistened brick wall surface. Work in small sections to ensure thorough coverage and uniform thickness.
- Spread Evenly: Spread the cement mixture evenly across the brick surface, ensuring that it adheres firmly and creates a smooth, consistent layer. Pay close attention to achieving a uniform thickness throughout the application process.
- Work Methodically: Approach the bagging process methodically, moving from one section to the next in a systematic manner. This approach helps maintain consistency and allows for adjustments as needed.
- Smooth the Surface: After applying the cement mixture to a section of the wall, use the masonry trowel to smooth the surface, eliminating any excess material and creating a uniform appearance. This step is crucial for achieving a professional finish.
- Optional Texturing: If desired, use a stiff brush or specialized texturing tool to add texture to the cement surface. This step can enhance the visual appeal of the wall and contribute to its unique aesthetic.
By meticulously following these steps and exercising precision and care during the bagging process, you can effectively transform the brick wall, imparting it with enhanced durability and a polished, refined appearance. The art of bagging the brick wall with cement is a skillful process that significantly contributes to the overall quality and longevity of the structure.
Read more: How To Cover Cement Walls In Basement
Finishing Touches
Completing the cement bagging process involves adding the finishing touches to ensure a professional and refined outcome. These final steps are essential for perfecting the appearance and durability of the brick wall. Follow these guidelines to add the finishing touches to your cement bagged brick wall:
- Inspect for Imperfections: Carefully inspect the cement bagged surface for any imperfections, such as uneven areas or protruding material. Address any discrepancies by smoothing out the surface with the masonry trowel.
- Allow for Drying: After completing the bagging process, allow the cement mixture to dry thoroughly. The drying time may vary depending on environmental conditions, but it is essential to ensure that the surface is completely dry before proceeding.
- Apply Sealant (Optional): Consider applying a suitable sealant to the cement bagged surface for added protection and longevity. The sealant can help safeguard the wall against moisture and other environmental factors, enhancing its resilience.
- Inspect the Final Result: Once the cement bagged surface has dried, carefully assess the final result. Ensure that the surface is uniform, visually appealing, and free from any defects. Make any necessary adjustments to achieve the desired outcome.
- Clean Up: Remove any protective coverings and clean up the work area, ensuring that any debris or excess materials are properly disposed of. A tidy work area signifies the completion of the project and adds a professional touch to the overall endeavor.
By meticulously attending to these finishing touches, you can elevate the quality and visual appeal of the cement bagged brick wall, ensuring that it stands as a testament to craftsmanship and attention to detail. These final steps are instrumental in achieving a flawless and enduring result, reinforcing the structural integrity and aesthetic allure of the brick wall.
Conclusion
Embarking on the journey of cement bagging a brick wall is a gratifying endeavor that encompasses both artistry and structural fortification. By following the steps outlined in this guide and investing care and precision into the process, you can elevate the quality and longevity of your brick wall while enhancing its visual appeal.
From meticulously preparing the wall surface to skillfully mixing and applying the cement mixture, each stage of the cement bagging process contributes to the overall integrity and aesthetics of the structure. The finishing touches, including thorough inspection, proper drying, and optional sealing, serve to perfect the outcome, ensuring a result that is both durable and visually striking.
As you engage in the art of cement bagging, remember that attention to detail and a methodical approach are key to achieving exceptional results. Whether you are rejuvenating an existing brick wall or embarking on a new construction project, the skills and knowledge acquired through cement bagging can significantly enhance your endeavors.
Ultimately, cement bagging a brick wall is a testament to the marriage of craftsmanship and functionality, where the application of a simple mixture transforms into a sturdy, visually appealing surface. Embrace the artistry of cement bagging, and witness the remarkable metamorphosis of a humble brick wall into a resilient and captivating feature of your architectural landscape.
With dedication, practice, and a keen eye for detail, you can master the art of cement bagging, enriching your construction projects with enduring strength and timeless allure.
Frequently Asked Questions about How To Cement Bag A Brick Wall
Was this page helpful?
At Storables.com, we guarantee accurate and reliable information. Our content, validated by Expert Board Contributors, is crafted following stringent Editorial Policies. We're committed to providing you with well-researched, expert-backed insights for all your informational needs.


0 thoughts on “How To Cement Bag A Brick Wall”