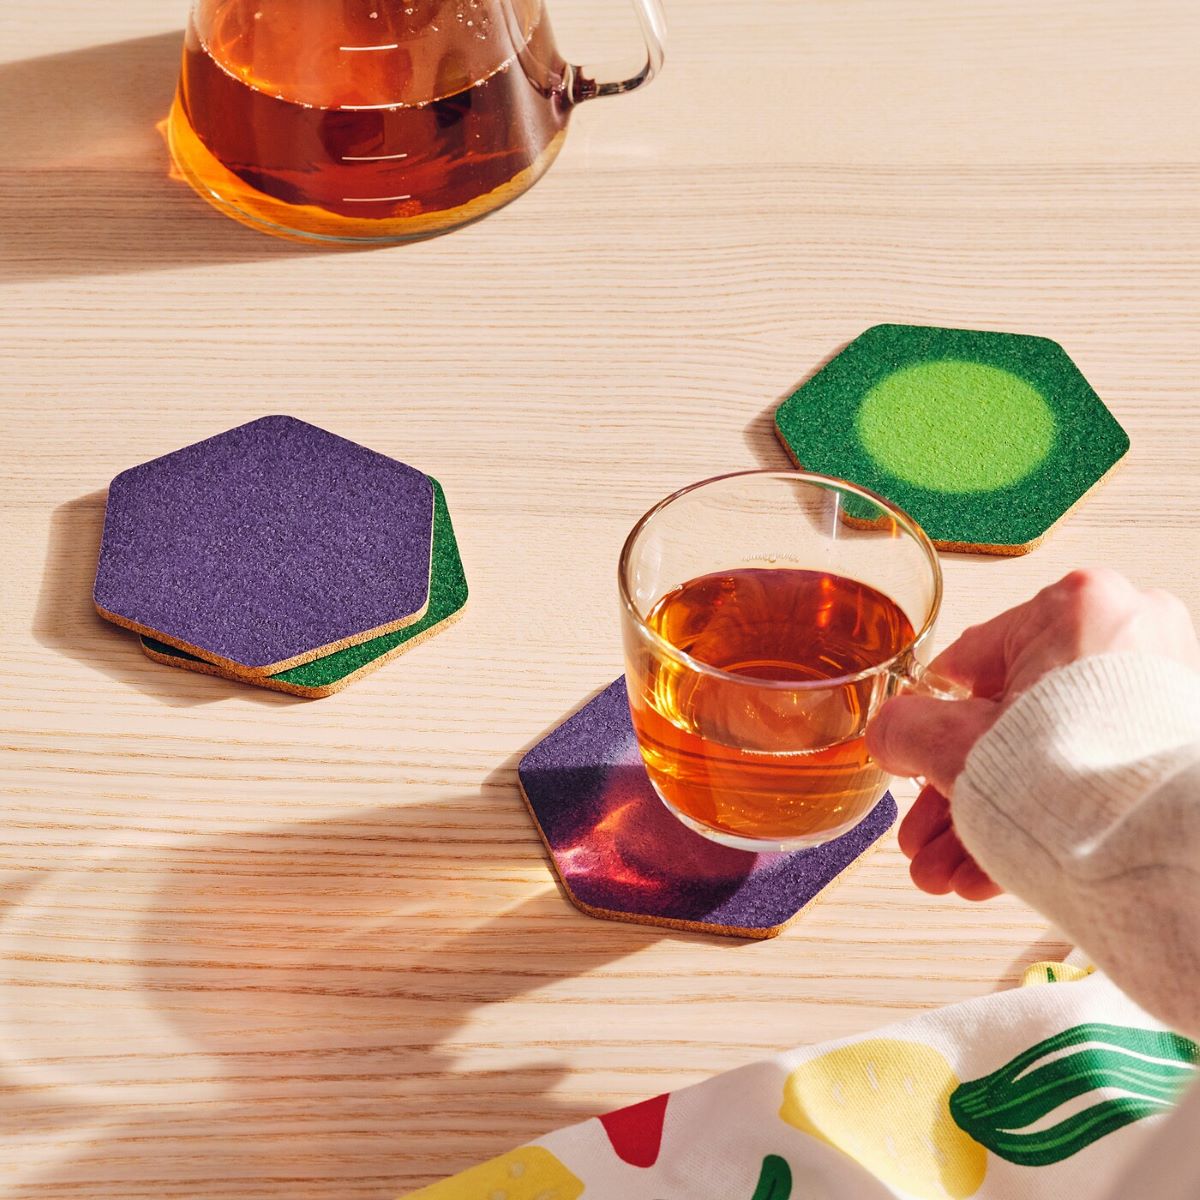
Tableware
How To Make Alcohol Ink Coasters
Modified: January 4, 2024
Learn how to create stunning tableware with alcohol ink. Follow our step-by-step guide to make beautiful coasters that will impress your guests.
(Many of the links in this article redirect to a specific reviewed product. Your purchase of these products through affiliate links helps to generate commission for Storables.com, at no extra cost. Learn more)
Introduction
Welcome to the fascinating world of alcohol ink coasters! Making alcohol ink coasters is not only a great way to unleash your creativity but also a fantastic opportunity to personalize your tableware. Whether you’re a seasoned artisan or a beginner, this step-by-step guide will take you through the process of creating stunning coasters that will be a standout feature on any table.
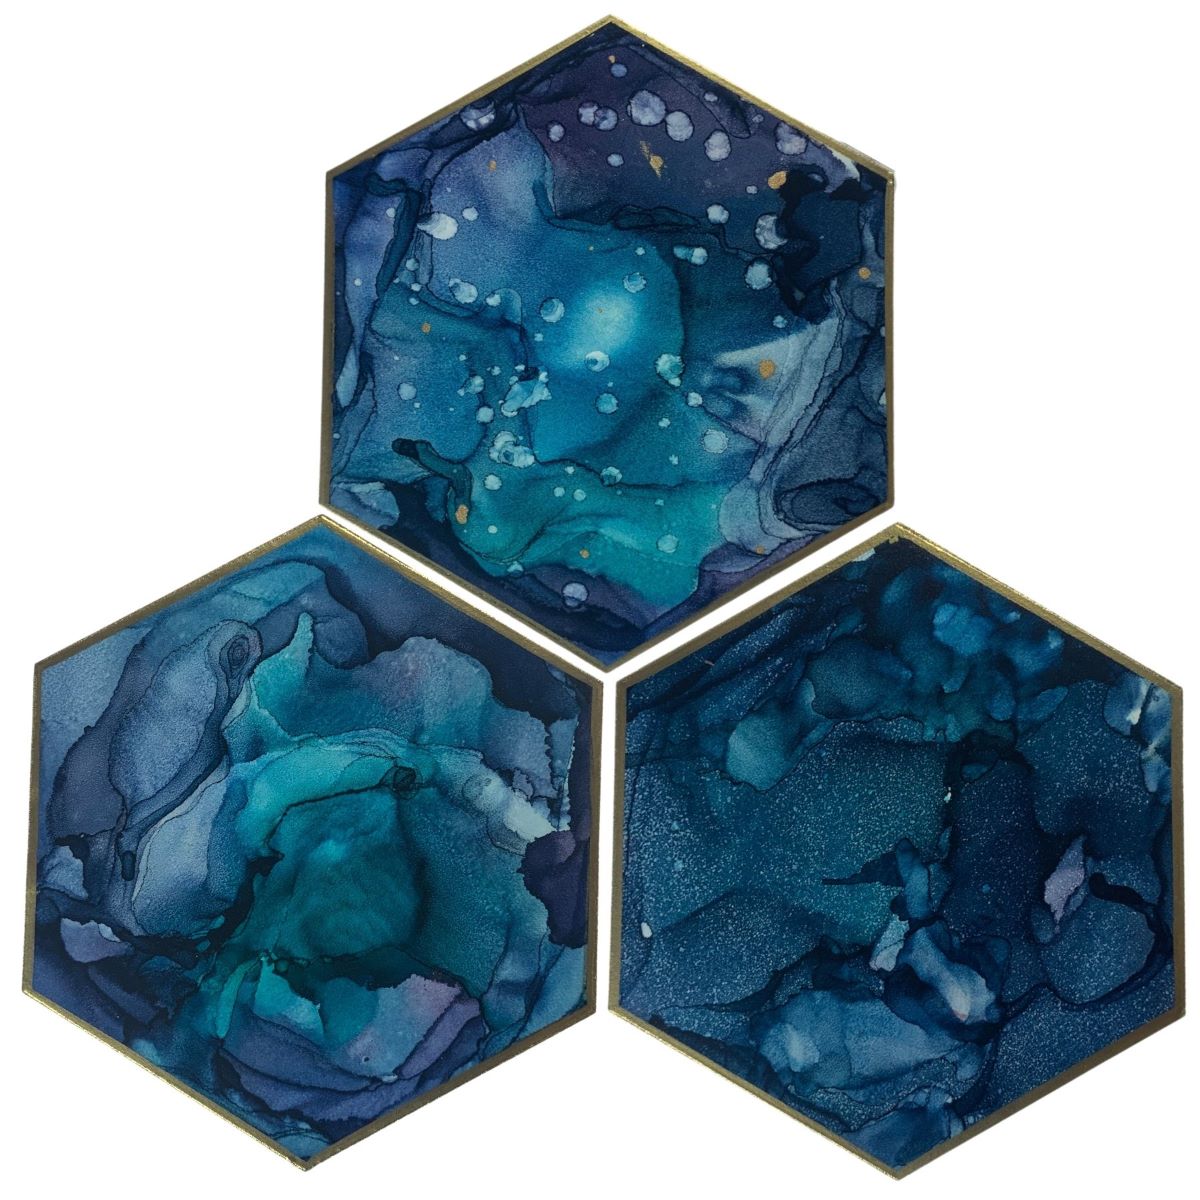
Alcohol ink coasters are unique pieces of functional art. The vibrant and unpredictable nature of alcohol ink, combined with the smooth surface of the coaster, results in mesmerizing patterns and designs. With a few basic supplies and a dash of imagination, you can create coasters that reflect your personal style and aesthetic.
In this article, we will explore the materials needed, guide you through the process of preparing the coasters, applying the alcohol ink, creating beautiful designs, and adding the finishing touches. We will also share tips on how to seal your coasters to ensure their longevity, so let’s dive in!
Key Takeaways:
- Unleash your creativity and personalize your tableware with vibrant alcohol ink coasters. Follow the step-by-step guide to create stunning, one-of-a-kind pieces that will be a standout feature on any table.
- Embrace the unpredictable nature of alcohol ink, experiment with different techniques, and let your creativity flow. Each coaster is a unique work of art, adding a special touch to any table setting. Cheers to your artistic adventures in alcohol ink coaster-making!
Materials Needed
Before you embark on your alcohol ink coaster-making journey, it’s important to gather all the necessary materials. Here’s a list of what you’ll need:
- Coasters: Choose porous coasters made of materials such as ceramic, stone, or absorbent paper. Avoid plastic or non-porous surfaces, as alcohol ink won’t adhere well to them.
- Alcohol Ink: Select a variety of alcohol ink colors that you find appealing. Experiment with different shades and brands to achieve the desired effect. Some popular alcohol ink brands include Tim Holtz, Ranger, and Copic.
- Isopropyl Alcohol: This is essential for diluting alcohol ink, creating interesting textures, and cleaning your brushes or tools. Opt for a higher percentage, such as 91% or 99% isopropyl alcohol.
- Applicator Brushes: Use synthetic brushes or fine-tip applicators designed specifically for alcohol ink. These brushes allow for better control and precision when applying the ink.
- Protective Gloves: Alcohol ink can stain your skin, so wearing gloves will help keep your hands clean during the process.
- Protective Surface: Lay down a protective covering such as a plastic tablecloth or old newspapers to prevent any accidental spills or stains on your work area.
- Blending Solution: This is a helpful addition to your toolkit if you want to achieve more intricate designs or blend different colors together. Blending solution helps to create a smoother finish and more subtle transitions.
- Sealer: To ensure the longevity of your alcohol ink coasters, consider using a sealer to protect the designs from fading or smudging. Choose a sealer that is compatible with alcohol ink and suitable for the coaster material.
Having these materials ready will enable you to fully immerse yourself in the alcohol ink coaster-making process and create beautiful, one-of-a-kind pieces. Once you have everything on hand, it’s time to move on to the next step: preparing your coasters.
Step 1: Preparing Your Coasters
Before you start applying alcohol ink to your coasters, it’s essential to prepare them properly. Follow these steps to ensure a smooth and successful coaster-making process:
- Clean the Coasters: Begin by cleaning the surface of your coasters to remove any dust, dirt, or oils. Use a mild detergent or rubbing alcohol and a soft cloth or sponge to gently wipe down the coasters. This will help the alcohol ink adhere better and create a clean canvas for your designs.
- Protect the Back: If your coasters have a cork or foam backing, cover it with painter’s tape or any other protective material. This will prevent the ink from bleeding onto the backside of the coaster.
- Set Up Your Workspace: Find a well-ventilated area and lay down a protective surface. Make sure you have enough space to comfortably work with your materials. Organize your alcohol ink bottles, brushes, and other supplies within easy reach.
- Prime Non-Porous Coasters (if necessary): If you’re using non-porous coasters such as ceramic or glass, you may need to prime them before applying alcohol ink. Check the instructions on the primer product and follow the recommended steps to prepare the surface.
By taking the time to properly prepare your coasters, you’ll ensure that the alcohol ink adheres well and your designs turn out vibrant and long-lasting. Once your coasters are clean and ready, it’s time to move on to the next step: applying the alcohol ink!
Step 2: Applying the Alcohol Ink
Now that your coasters are prepared, it’s time to dive into the exciting process of applying alcohol ink. Follow these steps to achieve stunning and vibrant designs:
- Dilute the Ink (Optional): If you want to create lighter shades or achieve a more translucent effect, you can dilute the alcohol ink with isopropyl alcohol. Start by pouring a small amount of alcohol ink into a palette or non-porous surface, and gradually add a few drops of isopropyl alcohol until you achieve the desired consistency.
- Apply the First Color: Choose your first color of alcohol ink and apply a few drops directly onto the coaster. You can apply the drops randomly or in a specific pattern, depending on the design you want to achieve.
- Spread the Ink: Use a brush, blending solution, or even a straw to spread the ink across the coaster’s surface. Experiment with different techniques such as stippling, swirling, or dragging the ink to create unique patterns and textures.
- Layering Colors: Once the first layer of ink has dried or become tacky, you can add more colors to enhance the design. Apply a few drops of another color and gently blend it with the existing ink using your brush or tool. Continue layering and blending colors until you achieve the desired effect.
- Create Texture: For added interest, you can create texture by blowing air onto the ink using a straw or by adding drops of isopropyl alcohol to create interesting patterns. This will give your coasters a dynamic and organic look.
Remember to experiment and play around with different color combinations and techniques. The beauty of alcohol ink is its spontaneity and unpredictability, so embrace the happy accidents and let your creativity flow.
Once you’re satisfied with the alcohol ink application, let the coasters dry completely before moving on to the next step: creating designs.
When working with alcohol inks, make sure to use a well-ventilated area and protect your work surface with a non-porous material like plastic or glass to prevent the inks from seeping through.
Step 3: Creating Designs
With the alcohol ink base applied to your coasters, it’s time to let your creativity soar by creating unique and intriguing designs. Here are some ideas and techniques to inspire you:
- Marbling: Use a toothpick or a fine detail brush to gently swirl the ink on the coaster’s surface, creating a marbled effect. Experiment with different color combinations and patterns to achieve striking designs.
- Abstract Art: Embrace the fluidity of alcohol ink by letting the colors blend and mix organically. You can tilt the coaster to encourage the ink to move and create fascinating abstract patterns and shapes.
- Geometric Designs: If you prefer more precise and structured designs, use painter’s tape or stencils to create geometric shapes on the coaster. Apply the alcohol ink within the taped-off areas and remove the tape once the ink has dried to reveal clean lines and defined shapes.
- Dotting Technique: Dip the end of a brush or a dotting tool into the alcohol ink and create intricate dot patterns on the coaster’s surface. Vary the dot sizes and colors to add depth and visual interest.
- Blending and Fading: Use blending solution or isopropyl alcohol to blend different colors together, creating smooth transitions and subtle gradients. This technique is ideal for achieving dreamy and ethereal designs.
Remember, there are no limits to your creativity when it comes to designing your alcohol ink coasters. Don’t be afraid to experiment, blend colors, and try different techniques. Each coaster can have its own unique design, or you can create a complementary set. Take your time to explore various design possibilities until you achieve a result that truly speaks to your artistic vision.
Once you’re satisfied with your designs, allow the coasters to fully dry before adding the finishing touches in the next step.
Read more: How To Make Concrete Coasters
Step 4: Adding Finishing Touches
Now that your alcohol ink designs have dried, it’s time to add those final touches that will take your coasters to the next level. Here are some ideas to consider:
- Embellishments: Consider adding additional elements to enhance your coaster designs. You can use metallic markers or paints to add fine details or metallic accents. Experiment with adding small gems, beads, or glitter for a touch of sparkle.
- Resin Coating: For an extra layer of protection and a glossy finish, you may choose to add a resin coating to your coasters. Follow the instructions on the resin product carefully, as it often requires mixing and precise application. This will give your coasters a professional and polished look.
- Personalization: If you’re making these coasters as gifts or for a special occasion, consider adding personal touches. You can write names, quotes, or special messages using a fine-tipped permanent marker to make the coasters extra meaningful.
Adding these finishing touches allows you to further customize your coasters and make them truly unique. Remember that subtlety can go a long way, so exercise restraint and let your designs shine through.
After you’ve added the finishing touches, allow any additional coatings or embellishments to dry completely. Then, it’s time to seal your coasters to protect the designs and ensure their longevity.
Step 5: Sealing Your Coasters
Sealing your alcohol ink coasters is an important step to protect the vibrant designs and ensure their durability over time. By sealing the coasters, you’ll create a barrier that guards against moisture, fading, and potential damage. Here’s how to seal your coasters:
- Choose a Suitable Sealer: Select a sealer that is compatible with alcohol ink and suitable for the coaster material. Some popular sealers include clear spray varnish, epoxy resin, or brush-on sealers. Read the instructions on the sealer product carefully before proceeding.
- Prepare Your Workspace: Set up a well-ventilated area and protect your work surface with a plastic tablecloth or old newspapers.
- Apply the Sealer: Depending on the sealer you’ve chosen, follow the instructions for application. If using a spray varnish, hold the can at a distance and apply several thin coats, allowing each coat to dry before applying the next. If using a brush-on sealer or epoxy resin, carefully brush the sealer onto the coaster’s surface, ensuring even coverage.
- Let it Dry Completely: Allow the sealer to dry according to the manufacturer’s instructions. This usually takes a few hours or overnight.
- Apply Additional Coats (optional): For added protection, you may choose to apply multiple coats of sealer. Always follow the recommended drying times between coats.
Sealing your coasters will not only protect the designs but also make them easier to clean and maintain. Once the sealer is fully dry, your alcohol ink coasters are ready to be used and displayed.
Congratulations on completing the process of creating your own stunning alcohol ink coasters! Each coaster is a unique piece of art, showcasing your creativity and personal style. Whether you keep them for yourself or give them as thoughtful gifts, these coasters are sure to add a special touch to any table setting.
Now that you’ve mastered the art of alcohol ink coasters, feel free to continue exploring and experimenting with different techniques, colors, and designs. The possibilities are endless, and there’s no limit to what you can create. Enjoy your coaster-making journey, and have a blast expressing your artistic flair!
Conclusion
It’s time to raise a glass to your newfound expertise in creating beautiful alcohol ink coasters! Through this guide, you’ve learned the step-by-step process of preparing your coasters, applying alcohol ink, creating unique designs, adding finishing touches, and sealing them for lasting beauty and functionality.
Alcohol ink coasters offer a wonderful platform for self-expression and creativity. The vibrant colors, fluid movements, and endless design possibilities make each coaster a captivating work of art. Whether you’re making them for yourself, as gifts for loved ones, or even to sell, these coasters are sure to be appreciated and admired.
Remember, when diving into alcohol ink coaster-making, embrace the unpredictable nature of the medium. Let go of perfectionism and allow the colors and ink to blend and flow organically. Embrace the happy accidents and unique patterns that emerge.
As you continue to create more alcohol ink coasters, feel free to experiment with different techniques, colors, and designs. Each coaster is an opportunity to explore and push your creative boundaries. Share your creations with others, seek inspiration from fellow artists, and continue to develop your own unique style.
Lastly, have fun with the process! Alcohol ink coasters are not just functional pieces of tableware; they’re expressions of your creativity and passion. Take pride in every coaster you create, and enjoy the journey of making something truly special.
Cheers to your artistic adventures in alcohol ink coaster-making, and may your tables always be adorned with these stunning and personalized works of functional art!
Frequently Asked Questions about How To Make Alcohol Ink Coasters
Was this page helpful?
At Storables.com, we guarantee accurate and reliable information. Our content, validated by Expert Board Contributors, is crafted following stringent Editorial Policies. We're committed to providing you with well-researched, expert-backed insights for all your informational needs.

0 thoughts on “How To Make Alcohol Ink Coasters”