Tableware
How To Make Beach Resin Coasters
Modified: February 4, 2024
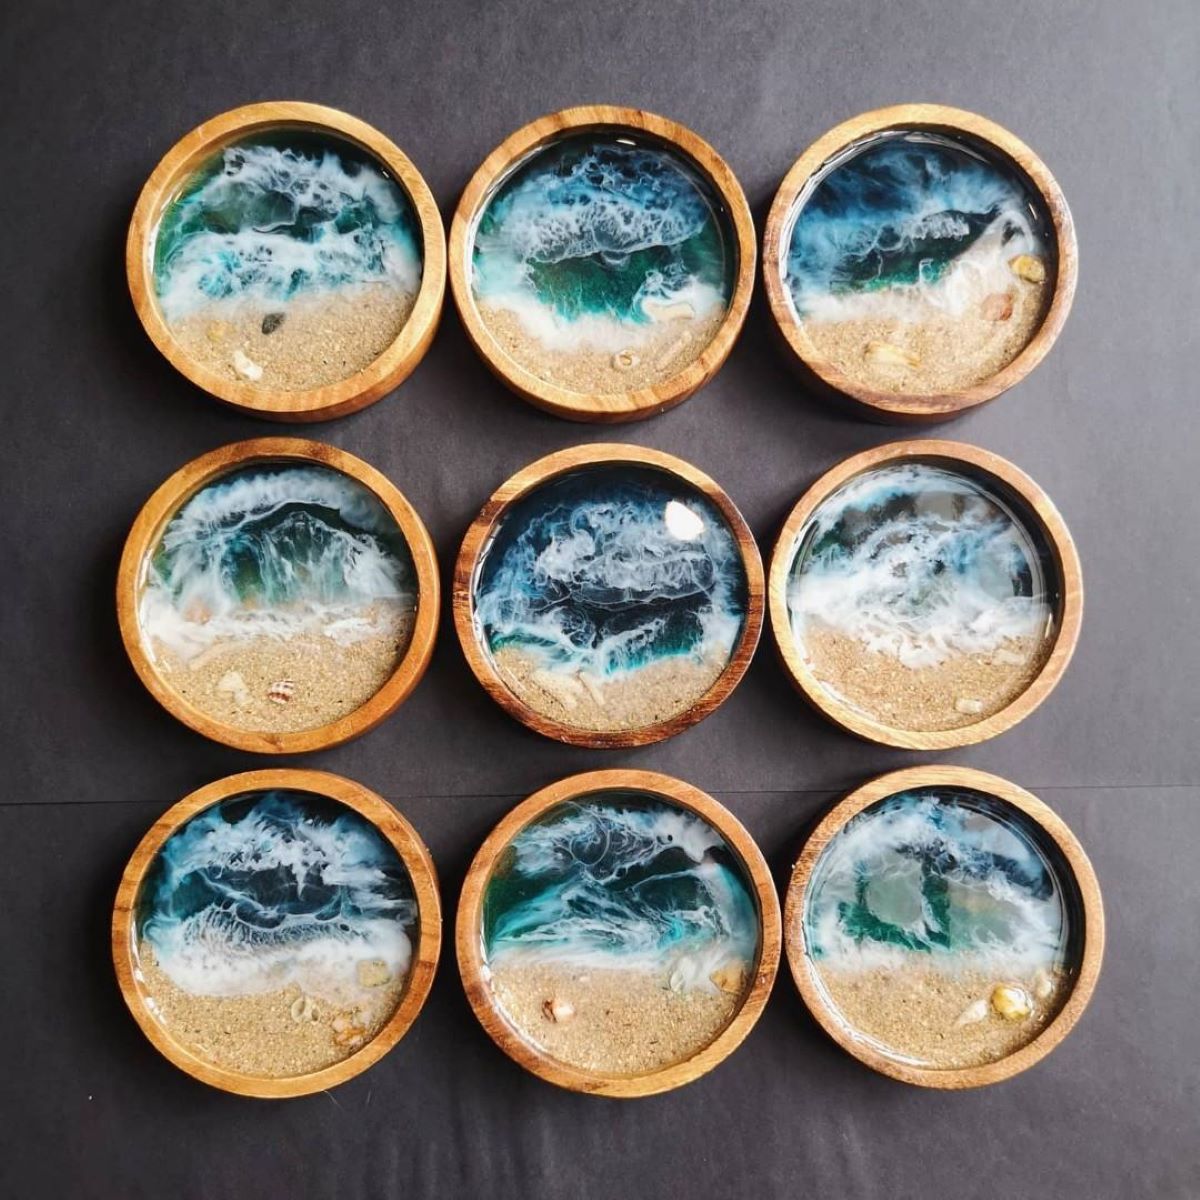
Learn how to make stunning beach-inspired resin coasters that will elevate your tableware collection. Perfect for adding a touch of coastal charm to your home décor.
(Many of the links in this article redirect to a specific reviewed product. Your purchase of these products through affiliate links helps to generate commission for Storables.com, at no extra cost. Learn more)
Introduction
Welcome to the world of beach resin coasters! If you’re looking to add a touch of coastal charm to your tableware collection or create unique and personalized gifts, this article will guide you through the process step by step. Resin coasters are not only functional but also serve as stunning pieces of art that capture the beauty of the beach.
Creating your own beach resin coasters allows you to unleash your creativity and customize them to match your style and preferences. You can incorporate various beach elements like shells, sand, sea glass, or even tiny starfish to bring the seaside vibe to life. Whether you’re a beginner or have experience working with resin, this project is fun, versatile, and highly rewarding.
Before diving into the exciting process of making these coasters, let’s take a look at the materials you’ll need to gather.
Key Takeaways:
- Unleash your creativity and capture the beauty of the beach with personalized resin coasters. From gathering materials to adding beach elements, follow the steps for a fun and rewarding crafting experience.
- Elevate your tableware collection with stunning beach resin coasters. Embrace the artistic process, remove air bubbles, and add finishing touches for durable and customizable coasters that bring coastal charm to any space.
Read more: How To Make Flower Resin Coasters
Materials Needed
Before you get started on your beach resin coaster project, it’s important to gather all the necessary materials. Here’s a list to help you get prepared:
- Epoxy resin: High-quality epoxy resin is essential for creating durable and long-lasting coasters. Look for a brand that is specifically designed for casting and has a low viscosity to ensure easy pouring and optimal results.
- Coaster molds: Choose silicone molds that are heat resistant and have a smooth surface to ensure easy demolding. You can find a wide variety of coaster mold shapes and sizes, from traditional round or square molds to unique designs like shells or seashells.
- Beach elements: Collect various beach-inspired elements like seashells, starfish, sand, sea glass, or any other small objects that you would like to incorporate into your coasters. Make sure to clean and dry them thoroughly before use.
- Pigments and dyes: This is where you can unleash your creativity! Choose pigments or dyes in colors that complement the beach theme, such as shades of blue, aqua, or sandy hues. You can opt for opaque or translucent colors, depending on the effect you want to achieve.
- Stir sticks and mixing cups: Use disposable stir sticks to mix your resin and pigment thoroughly. Plastic or silicone measuring cups with measurements marked on the side are perfect for accurate mixing ratios.
- Protective gear: To ensure your safety, wear gloves, safety goggles, and a respirator mask when working with epoxy resin to avoid any skin or inhalation contact. Follow the manufacturer’s instructions for safe handling.
- Heat gun or torch: A heat gun or torch is essential for removing air bubbles from the resin surface, giving your coasters a smooth and professional finish.
- Protective coating: To enhance the durability and longevity of your coasters, consider applying a clear protective coating at the end. This will help protect them from scratches and UV damage.
Now that you have all the necessary materials, it’s time to start the creative process of making your beach resin coasters. Follow along as we guide you through each step in detail.
Step 1: Gathering Supplies
Before delving into the fascinating world of creating beach resin coasters, it’s important to gather all the necessary supplies. Proper preparation ensures a smoother and more enjoyable crafting experience. Here’s a detailed guide to help you:
- Epoxy Resin: Choose a high-quality epoxy resin that is specifically designed for casting. Look for a brand that offers a low viscosity resin, as it will make pouring easier and help ensure optimal results. Consider factors like curing time and heat resistance when selecting your resin.
- Mold: Select silicone molds that are suitable for creating coasters. You can find a variety of shapes and sizes, from traditional round or square molds to more unique designs like shells or waves. Ensure that the mold is heat resistant and has a smooth surface for easy demolding.
- Beach Elements: Collect a range of beach-inspired elements to incorporate into your coasters. This could include seashells, starfish, sea glass, sand, or even small pieces of driftwood. Ensure that the elements are clean, dry, and free from any sharp edges before using them in your project.
- Pigments and Dyes: Add a pop of color to your coasters with pigments or dyes. Look for colors that resemble the vibrant hues of the beach, such as shades of blue, aqua, or sandy tones. Consider whether you want opaque or translucent colors to achieve your desired effect.
- Stir Sticks and Mixing Cups: Use disposable stir sticks to mix your resin and pigments thoroughly. Opt for plastic or silicone measuring cups, as they often have measurement markings on the sides, allowing for accurate mixing ratios.
- Protective Gear: Prioritize your safety by using protective gear such as gloves, safety goggles, and a respirator mask when working with epoxy resin. This will help prevent skin contact and inhalation of any harmful fumes. Always follow the manufacturer’s instructions for safe handling.
- Heat Gun or Torch: To eliminate any air bubbles that may form on the surface of your coasters, use a heat gun or torch. Gently pass the heat source over the resin to remove the bubbles and achieve a smooth finish. Take precautions and avoid overheating the resin.
- Protective Coating: Consider applying a clear protective coating to your coasters to enhance their durability and longevity. This will help protect them from scratches and UV damage, ensuring they maintain their beauty for years to come.
By gathering all of these supplies, you’ll be well-prepared to embark on your beach resin coaster adventure. The next step is to prepare the molds for the resin pouring process, which we’ll explore in detail in the following step.
Step 2: Preparing the Coaster Molds
Now that you have gathered all your supplies, it’s time to prepare the molds for pouring the resin. Proper preparation ensures that your coasters will come out smoothly and without any issues. Follow these steps to get your molds ready:
- Clean the Molds: Start by thoroughly cleaning the coaster molds with soap and water. Make sure to remove any dust, dirt, or residues that may affect the appearance of the final coasters.
- Apply Mold Release: If you’re using silicone molds, it’s recommended to apply a mold release agent to facilitate the demolding process later on. Simply spray or brush a thin layer of mold release agent onto the inside of each mold, ensuring even coverage.
- Level the Molds: For perfectly flat coasters, place the molds on a level surface. This will prevent the resin from pooling or accumulating unevenly during the pouring process.
- Secure the Molds (Optional): If desired, you can use adhesive to secure the molds to the surface beneath them. This can help prevent any accidental movement or shifting that may occur as you pour the resin.
Once you have followed these steps and prepared your molds, you’re ready to move on to the exciting process of mixing the resin. Let’s dive into that in the next step.
Step 3: Mixing the Resin
With your molds prepared, it’s time to mix the epoxy resin. Follow these steps to ensure a proper resin mixture:
- Read the Instructions: Start by carefully reading the instructions provided with your epoxy resin. Each brand may have specific guidelines and ratios that need to be followed for the best results.
- Measure the Resin and Hardener: Most epoxy resins require a 1:1 ratio of resin to hardener. Measure out the appropriate amounts of both components in separate mixing cups. Use a digital scale for accurate measurements.
- Mix the Resin and Hardener: Pour the measured amounts of resin and hardener into a clean mixing cup. Use a stir stick to thoroughly mix the two components together. Stir slowly and consistently, ensuring that no streaks or unmixed areas remain.
- Scrape the Sides: While mixing, be sure to scrape the sides and bottom of the mixing cup to incorporate any resin that may have settled or stuck to the edges. This will ensure a fully mixed resin mixture.
- Avoid Overmixing: Be cautious not to overmix the resin, as excessive mixing can introduce air bubbles into the mixture. Aim for a smooth and consistent blend, but stop stirring once the resin and hardener are fully combined.
- Add Color (Optional): If you want to add color to your resin, now is the time to do so. Add small amounts of pigment or dye to the resin mixture and stir until the color is evenly distributed. Adjust the amount of color as desired to achieve your desired hue.
Remember, it’s important to work efficiently and mix only the amount of resin you can pour within the specified working time provided by the manufacturer. This will prevent the resin from hardening before you have a chance to pour it into the molds.
Now that your resin is properly mixed and potentially colored, you’re ready to move on to the next exciting step: adding beach elements to your coasters. Let’s dive in!
Read more: How To Make A Resin Lamp
Step 4: Adding Beach Elements
Adding beach elements to your resin coasters is where the creativity truly comes into play. Follow these steps to incorporate your favorite beach-inspired elements into your coasters:
- Arrange Your Elements: Take your cleaned and dried beach elements, such as seashells, starfish, sea glass, or sand, and arrange them inside the coaster molds. You can place them in a symmetrical or random pattern, depending on your preference. Get creative and experiment with different combinations and placements.
- Embedment Options: There are different ways to incorporate the beach elements into your coasters. You can either partially embed them in the resin or place them on top, depending on the desired visual effect. For a more subtle look, embedding them slightly below the resin surface works well. If you want them to stand out, place them on top of the resin.
- Secure Large Pieces: If you’re working with larger or heavier beach elements, it’s a good idea to secure them in place. Apply a small amount of epoxy resin to the back of each element before placing it in the mold. This will prevent them from shifting or floating during the resin pouring process.
- Add Layers: If you want to create depth and dimension in your coasters, you can add layers of elements. For example, place a layer of sand or sea glass, then add a layer of shells or starfish, and repeat the process until you achieve the desired effect.
Take your time during this step to arrange the beach elements in a way that pleases you. Remember that these elements will be preserved in the resin, so have fun and experiment with different combinations and placements.
Once you’re satisfied with the arrangement, it’s time to move on to the next step: pouring the resin into the molds. Let’s dive in!
When making beach resin coasters, make sure to thoroughly mix the resin and hardener to avoid any sticky or soft spots in the finished product.
Step 5: Pouring the Resin
With your beach elements in place, it’s time to pour the epoxy resin into the molds to bring your coasters to life. Follow these steps for a successful resin pouring process:
- Prepare Your Workstation: Ensure that your work area is clean and well-ventilated. Place a protective cover or mat on the surface to catch any resin spills or drips.
- Slow and Controlled Pouring: Slowly pour the mixed epoxy resin into each coaster mold, covering the beach elements. Start pouring in the center of the mold and allow the resin to spread naturally to the edges. Take your time to avoid any overflow or spillage.
- Fill to the Desired Thickness: Decide on the desired thickness for your coasters and adjust the amount of resin accordingly. Pour the resin to the desired height, keeping in mind that it will level and settle as it cures.
- Smooth the Surface: After pouring the resin, gently tilt the molds from side to side to ensure that the resin covers the entire surface evenly. This helps to eliminate any air bubbles and create a smooth finish.
- Cover and Let Sit: Cover the molds with a dust cover to prevent any debris or dust from settling on the surface of the resin. Allow the coasters to sit undisturbed in a clean and dust-free area for the next step of the curing process.
Remember to work carefully and avoid any sudden movements or disturbances that may introduce air bubbles into the resin. If you notice any air bubbles on the surface, gently blow on them or use a heat gun or torch to remove them.
With the resin poured, it’s time to move on to the next step: removing air bubbles. Let’s continue with the exciting process of creating your beach resin coasters!
Step 6: Removing Air Bubbles
After pouring the resin, it’s common to have air bubbles trapped within the mixture. Removing these bubbles is essential for achieving a pristine and professional-looking finish. Follow these steps to eliminate air bubbles from your coasters:
- Use a Heat Gun or Torch: Gently pass a heat gun or torch over the surface of the resin to remove air bubbles. Keep the heat source a few inches away from the surface and move it in a sweeping motion. The heat helps the bubbles rise to the surface and pop.
- Be Mindful of Overheating: Take care not to overheat the resin, as excessive heat can cause the resin to boil or become discolored. Keep the heat source moving and avoid spending too much time in one area.
- Use a Toothpick or Stir Stick: For smaller bubbles or hard-to-reach areas, gently poke and swirl the resin using a toothpick or stir stick. This helps release the trapped air and encourages the bubbles to rise to the surface.
- Allow Natural Bubble Release: Sometimes, air bubbles will naturally rise and disperse on their own as the resin cures. However, this method may take longer and is not recommended if you’re looking for quick results.
- Repeat if Necessary: If you notice any new bubbles forming after removing the initial ones, repeat the process of using a heat gun or torch, or gently stirring the resin, until the surface is bubble-free.
Remember that removing air bubbles is crucial for achieving a smooth and flawless finish. Take your time during this step to ensure all the bubbles are addressed before the resin starts to cure.
With the air bubbles removed, it’s time for the resin to cure and harden. Let’s move on to the next step: curing the coasters.
Step 7: Curing the Coasters
Now that you’ve removed the air bubbles from your resin coasters, it’s time to let them cure and harden. Curing is a crucial step that ensures the resin transforms into a solid and durable material. Here’s what you need to do:
- Follow Manufacturer’s Instructions: Read the instructions provided with your epoxy resin to determine the recommended curing time. Curing times can vary depending on the brand and type of resin used.
- Choose a Curing Area: Select a clean and dust-free area where you can let the coasters cure undisturbed. Ensure that the temperature and humidity are within the specified range recommended by the resin manufacturer.
- Cover the Coasters: To protect the curing coasters from dust and debris, cover them with a dust cover or use a domed silicone mold lid. This will prevent any unwanted particles from settling on the surface of the resin as it cures.
- Allow Sufficient Curing Time: It’s important to be patient and allow the coasters to cure for the recommended time mentioned by the manufacturer. Rushing this step may result in sticky or soft coasters that are not fully set.
- Check for Full Cure: After the initial curing period, check if the coasters have fully cured by gently touching the surface. If it feels hard and firm, you can proceed to the next step. If it still feels slightly tacky or soft, give it more time to cure.
During the curing process, refrain from touching or moving the coasters to avoid introducing any fingerprints or imperfections. Follow the instructions provided with your specific epoxy resin to ensure proper curing and the best results.
Once the coasters have fully cured and hardened, it’s time to demold them. Let’s move on to the next step and learn how to safely remove the coasters from the molds.
Read more: How To Make Concrete Coasters
Step 8: Demolding the Coasters
After the resin has fully cured, it’s time to demold your beach resin coasters. Demolding is an exciting step where you get to see the final results of your hard work. Follow these steps to safely and successfully demold your coasters:
- Prepare Your Workspace: Find a clean and flat surface to work on. Place a soft cloth or protective mat on the surface to prevent scratching the coasters.
- Carefully Remove the Mold: Gently flex the mold to release the edges of the coasters. Slowly and carefully peel back the mold, working your way around the coaster until it fully separates from the mold. If the coaster sticks to the mold, try bending the mold slightly or use a gentle twisting motion to release it.
- Check for Sticking Points: If any parts of the coaster are still sticking to the mold, use a toothpick or a small craft knife to carefully peel away the remaining resin. Be careful not to scratch or damage the surface of the coaster.
- Inspect the Coasters: Once all the coasters are demolded, inspect them for any imperfections, such as rough edges or small dents. If necessary, gently sand the edges with fine-grit sandpaper to achieve a smooth and polished finish.
- Clean and Polish: Give the coasters a thorough cleaning with a gentle soap and water solution. Dry them completely and then apply a clear resin polish or coat them with a protective varnish to enhance their shine and durability.
Take your time while demolding the coasters to avoid any damage or accidental breakage. Be patient and gentle in this step to preserve the beauty of your beach resin coasters.
Now that your coasters are demolded and looking stunning, it’s time to add the finishing touches in the next step.
Step 9: Finishing Touches
With your demolded beach resin coasters in hand, it’s time to add those final finishing touches that will elevate their beauty and make them ready for use or gifting. Follow these steps to complete your coasters:
- Inspect for Imperfections: Take a close look at each coaster to check for any imperfections or blemishes that may have occurred during demolding or curing. If needed, lightly sand any rough spots or edges to ensure a smooth surface.
- Clean the Coasters: Give the coasters a final cleaning using a gentle soap and water solution. This will remove any residue or fingerprints that may have accumulated during the crafting process. Ensure the coasters are completely dry before proceeding.
- Apply a Protective Coat: To enhance the durability and longevity of your coasters, consider applying a clear protective coating. This can be in the form of a resin polish or a varnish designed for epoxy resin. Follow the instructions provided by the manufacturer for the best application method.
- Personalize (Optional): If desired, you can add a personal touch to your coasters by incorporating custom elements. This can include adding small labels, initials, or decorative accents that reflect your style or the intended recipient’s personality.
- Showcase and Enjoy: Once the coasters are fully cured and enhanced with the finishing touches, it’s time to showcase and enjoy them. Place them on your coffee table, kitchen counter, or give them as thoughtful gifts to friends and family.
Remember, the finishing touches add that extra level of polish and perfection to your coasters. Take pride in your creation and enjoy the beauty and functionality they bring to your home or the joy they bring to others as gifts.
Congratulations! You have successfully completed the process of making your own beach resin coasters. Enjoy the fruits of your labor and let your creativity shine through these stunning tableware pieces.
If you’re interested in exploring further resin crafting projects, there are endless possibilities to explore. Happy crafting!
Conclusion
Creating your own beach resin coasters is a truly rewarding and enjoyable crafting project. From gathering the materials to demolding the coasters, each step allows for artistic expression and a chance to bring the beauty of the beach into your tableware collection. The process may seem intimidating at first, but with the right materials, preparation, and guidance, you can create stunning coasters that reflect your personal style and capture the essence of the seaside.
Throughout this article, we’ve covered the materials needed for this project, the steps involved, and the importance of attention to detail. By following each step carefully, from preparing the molds to adding beach elements, pouring the resin, removing air bubbles, and demolding the coasters, you’ll be able to create beautiful, functional, and durable pieces of art.
Remember to always follow the instructions provided by the epoxy resin manufacturer and take the necessary safety precautions. Working in a clean and well-ventilated space will ensure the best results. Additionally, take the time to inspect and sand the coasters for any imperfections before applying a protective coat.
Whether you’re making these coasters for yourself or as gifts for loved ones, they are sure to impress and spark conversation. The versatility of beach resin coasters allows you to customize them to match any decor style, making them the perfect addition to any home or office.
So gather your supplies, unleash your creativity, and let the beach resin coaster-making adventure begin. Have fun, experiment, and enjoy the process of creating unique and stunning pieces of tableware that bring a touch of the beach into your everyday life.
Happy crafting!
Frequently Asked Questions about How To Make Beach Resin Coasters
Was this page helpful?
At Storables.com, we guarantee accurate and reliable information. Our content, validated by Expert Board Contributors, is crafted following stringent Editorial Policies. We're committed to providing you with well-researched, expert-backed insights for all your informational needs.

0 thoughts on “How To Make Beach Resin Coasters”