Tableware
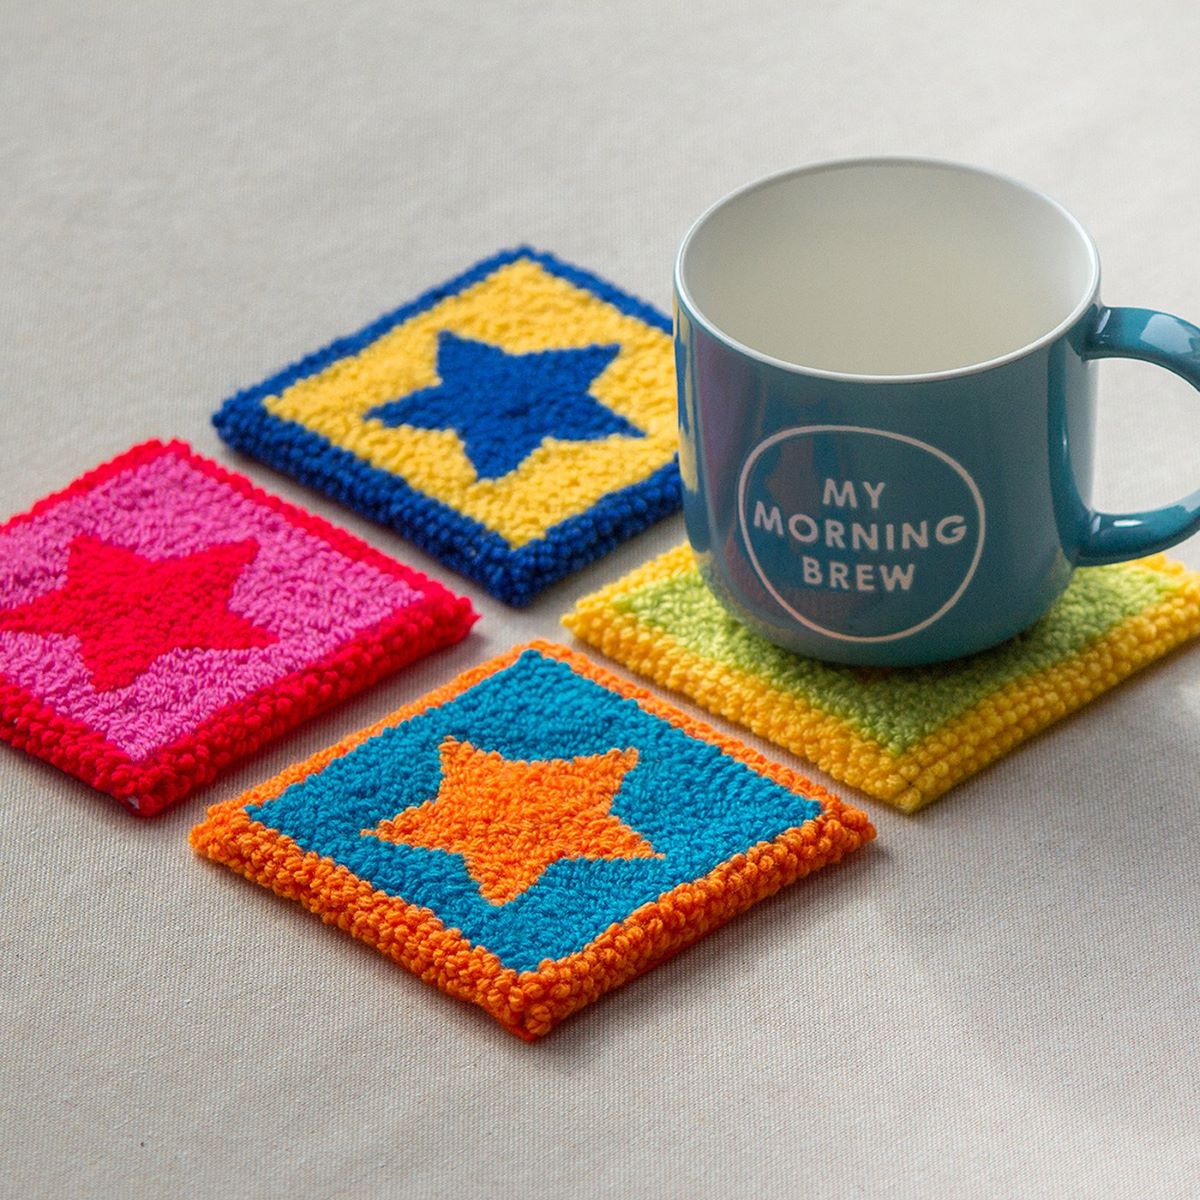
How To Make Punch Needle Coasters
Modified: October 20, 2024
Learn how to make stunning punch needle coasters for your tableware. Discover step-by-step instructions and create unique pieces for your home decor.
(Many of the links in this article redirect to a specific reviewed product. Your purchase of these products through affiliate links helps to generate commission for Storables.com, at no extra cost. Learn more)
Introduction
Welcome to the world of punch needle weaving! If you are looking for a creative and practical way to add a personal touch to your tableware, then making punch needle coasters is the perfect project for you. Punch needle weaving is a technique that allows you to create beautiful designs with textured patterns using a special tool called a punch needle. Not only are these coasters functional, but they also make great gifts or decorative accents for your home.
In this article, we will guide you through the process of making punch needle coasters. We will cover everything from choosing a design to finishing touches, so you can create your own unique and stylish coasters. Let’s dive in!
Key Takeaways:
- Elevate your tableware with personalized punch needle coasters. Unleash your creativity, follow the step-by-step guide, and craft unique coasters that add style and charm to any space.
- Dive into the world of punch needle weaving and create functional, stylish coasters. From design selection to finishing touches, enjoy the rewarding process of crafting your own tabletop accessories.
Read more: How To Make A Trash Can Punch
Materials Needed
Before you get started, gather the following materials:
- Punch needle: This is the key tool for creating the woven design on your coaster. Make sure you choose a punch needle that is suitable for the size of your project.
- Fabric: Choose a sturdy and tightly woven fabric for your coaster. Cotton or linen fabrics work well for this project.
- Embroidery hoop: An embroidery hoop will keep your fabric taut and help maintain the tension while you work.
- Embroidery floss: Select your preferred colors of embroidery floss to create your design. Make sure to choose high-quality floss for better durability.
- Scissors: You will need a pair of sharp scissors to trim the excess fabric and floss.
- Transfer method: Depending on your chosen design, you may need transfer materials such as transfer paper, iron-on transfer pens, or a lightbox.
These are the basic materials needed for your punch needle coaster project. Feel free to add any additional embellishments or decorations that you want to incorporate into your design.
Step 1: Choosing a Design
The first step in making punch needle coasters is choosing a design. This is where your creativity can truly shine! Consider the theme or style you want for your coasters, whether it’s floral, geometric, abstract, or even a custom monogram.
You can find inspiration from various sources such as online patterns, books, or even creating your own design. Pinterest and craft websites are excellent resources for finding punch needle patterns and ideas.
If you prefer a more personal touch, you can sketch or trace your design onto paper. Then, using a transfer method, transfer the design onto your fabric. Iron-on transfer pens or tracing the design on a lightbox both work well for this purpose.
Remember to choose a design that fits the size of your coasters and is suitable for punch needle weaving. Simple designs with larger areas of color are ideal for beginners, while more intricate patterns may require advanced techniques.
Once you have your design finalized, you are ready to move on to the next step: preparing the fabric.
Step 2: Preparing the Fabric
Now that you have chosen your design, it’s time to prepare the fabric for your punch needle coaster. Follow these steps:
- Cut the fabric: Start by cutting your fabric into squares or circles, depending on the shape you want for your coaster. Remember to leave a few inches of excess fabric around the edges to accommodate the weaving process.
- Secure the fabric: Place the fabric within the inner ring of the embroidery hoop. Make sure the fabric is taut and smooth. Then, tighten the outer ring to secure the fabric in place.
- Trim the excess fabric: Trim any excess fabric outside the embroidery hoop, leaving a neat and even edge. This will make it easier to work with the punch needle.
Once the fabric is prepared, you’re ready to move on to the next step: setting up the punch needle.
When making punch needle coasters, be sure to use a tight-weave fabric like monk’s cloth to prevent the yarn from slipping out. This will ensure a sturdy and durable finished product.
Step 3: Setting up the Punch Needle
Setting up the punch needle is crucial to ensure smooth weaving and accurate results. Follow these steps:
- Select the right yarn: Choose embroidery floss that matches your design and desired color scheme. Separate the floss strands and thread them through the punch needle, leaving a tail of about 2-3 inches.
- Adjust the needle length: Most punch needles have an adjustable needle length. Set it according to the thickness of your fabric. Longer needles are used for thicker fabrics, while shorter needles work well for finer fabrics.
- Thread the needle: Insert the threaded punch needle through the fabric, piercing it from the bottom side where you want to start weaving, then pull it up to the top side. Make sure the tail of the floss is on the underside of the fabric.
- Adjust the tension: Hold the needle at a slight angle, with the handle resting on the fabric. Adjust the tension by tightening or loosening the floss as needed, making sure it is not too tight or too loose.
With your punch needle set up and ready, it’s time to move on to the next step: punching the design.
Read more: How To Make Concrete Coasters
Step 4: Punching the Design
Now comes the fun part – punching the design onto your fabric! Follow these steps:
- Start by punching the outline: Begin by punching the outline of your design. Insert the punch needle into the fabric, pushing it all the way through until the handle touches the fabric. Pull the needle up slightly to create a loop on the top side of the fabric.
- Fill in the shape: Once the outline is complete, start filling in the shape of your design. Move the punch needle in a straight or curved motion, closely following the outline. Continuously punch the needle into the fabric, maintaining an even distance between the stitches.
- Create texture: If you want to add texture to your design, vary the length of the loops. For a more textured look, you can punch shorter loops closer together or longer loops for a more spaced-out effect. Be careful not to punch too close to the edge of the fabric to prevent any fraying.
- Switch colors: If your design consists of multiple colors, carefully transition between colors by cutting the floss and rethreading the punch needle with the new color. Remember to leave a small tail of the new color to secure the floss.
- Continue punching: Repeat the punching process until you have filled in all areas of your design. Take breaks as needed and adjust the tension of the floss to ensure smooth weaving.
Punching the design requires patience and practice. Don’t worry if your stitches aren’t perfect at first – it takes time to develop a consistent technique. With each punch, you’ll gain more confidence and improve your skills.
Once your design is complete, it’s time to add the finishing touches.
Step 5: Finishing Touches
After punching the design onto your fabric, it’s time to add those final finishing touches to your punch needle coaster. Follow these steps to complete your project:
- Trim the loops: Carefully trim the loops on the top side of your fabric using sharp scissors. Be sure to leave a small amount of the loop intact to maintain the textured effect.
- Secure loose threads: Check for any loose threads or floss tails and secure them by tying knots or weaving them back into the fabric. This will help prevent unraveling and maintain the durability of your coaster.
- Remove the fabric from the hoop: Loosen the outer ring of the embroidery hoop and gently remove the fabric from the inner ring.
- Finishing options: Depending on your preference, you can add backing material to your coaster for extra protection. Options include gluing a piece of felt or fabric to the back or using fusible interfacing to attach a backing fabric.
- Final trimming: Trim any excess backing fabric or felt to match the size and shape of your coaster, ensuring a clean and polished look.
Once you have completed these final touches, your punch needle coaster is ready to be used or gifted. Admire your handiwork and revel in the satisfaction of creating a unique and beautiful tabletop accessory.
Remember to care for your punch needle coaster by gently spot cleaning or handwashing as needed to maintain its quality and longevity.
Congratulations, you have successfully completed the process of making punch needle coasters!
Conclusion
Making punch needle coasters is a rewarding and enjoyable craft project that allows you to showcase your creativity and create unique tableware. With just a few materials and some basic techniques, you can design and craft personalized coasters that add a touch of style to any space.
Throughout this article, we have covered the step-by-step process of making punch needle coasters, from choosing a design to adding the final finishing touches. Remember to select a design that matches your style, prepare the fabric with care, set up the punch needle correctly, punch the design with attention to detail, and finish off your coaster with precision.
While the initial stages of learning the punch needle technique may require some practice, don’t be discouraged. With time and patience, your skills will improve, and you will be able to experiment with more complex designs and techniques.
So, gather your materials, unleash your creativity, and embark on the journey of making your own punch needle coasters. Whether you keep them for yourself or gift them to loved ones, these handmade creations will surely bring joy and admiration.
Enjoy the process, and have fun creating your very own punch needle coasters!
Frequently Asked Questions about How To Make Punch Needle Coasters
Was this page helpful?
At Storables.com, we guarantee accurate and reliable information. Our content, validated by Expert Board Contributors, is crafted following stringent Editorial Policies. We're committed to providing you with well-researched, expert-backed insights for all your informational needs.


0 thoughts on “How To Make Punch Needle Coasters”