Home>diy>Architecture & Design>How To Design A 3D House Online For Free
Architecture & Design
How To Design A 3D House Online For Free
Modified: August 20, 2024
Learn how to design a 3D house online for free with our step-by-step guide. Explore different architecture design tools and unleash your creativity today!
(Many of the links in this article redirect to a specific reviewed product. Your purchase of these products through affiliate links helps to generate commission for Storables.com, at no extra cost. Learn more)
Introduction
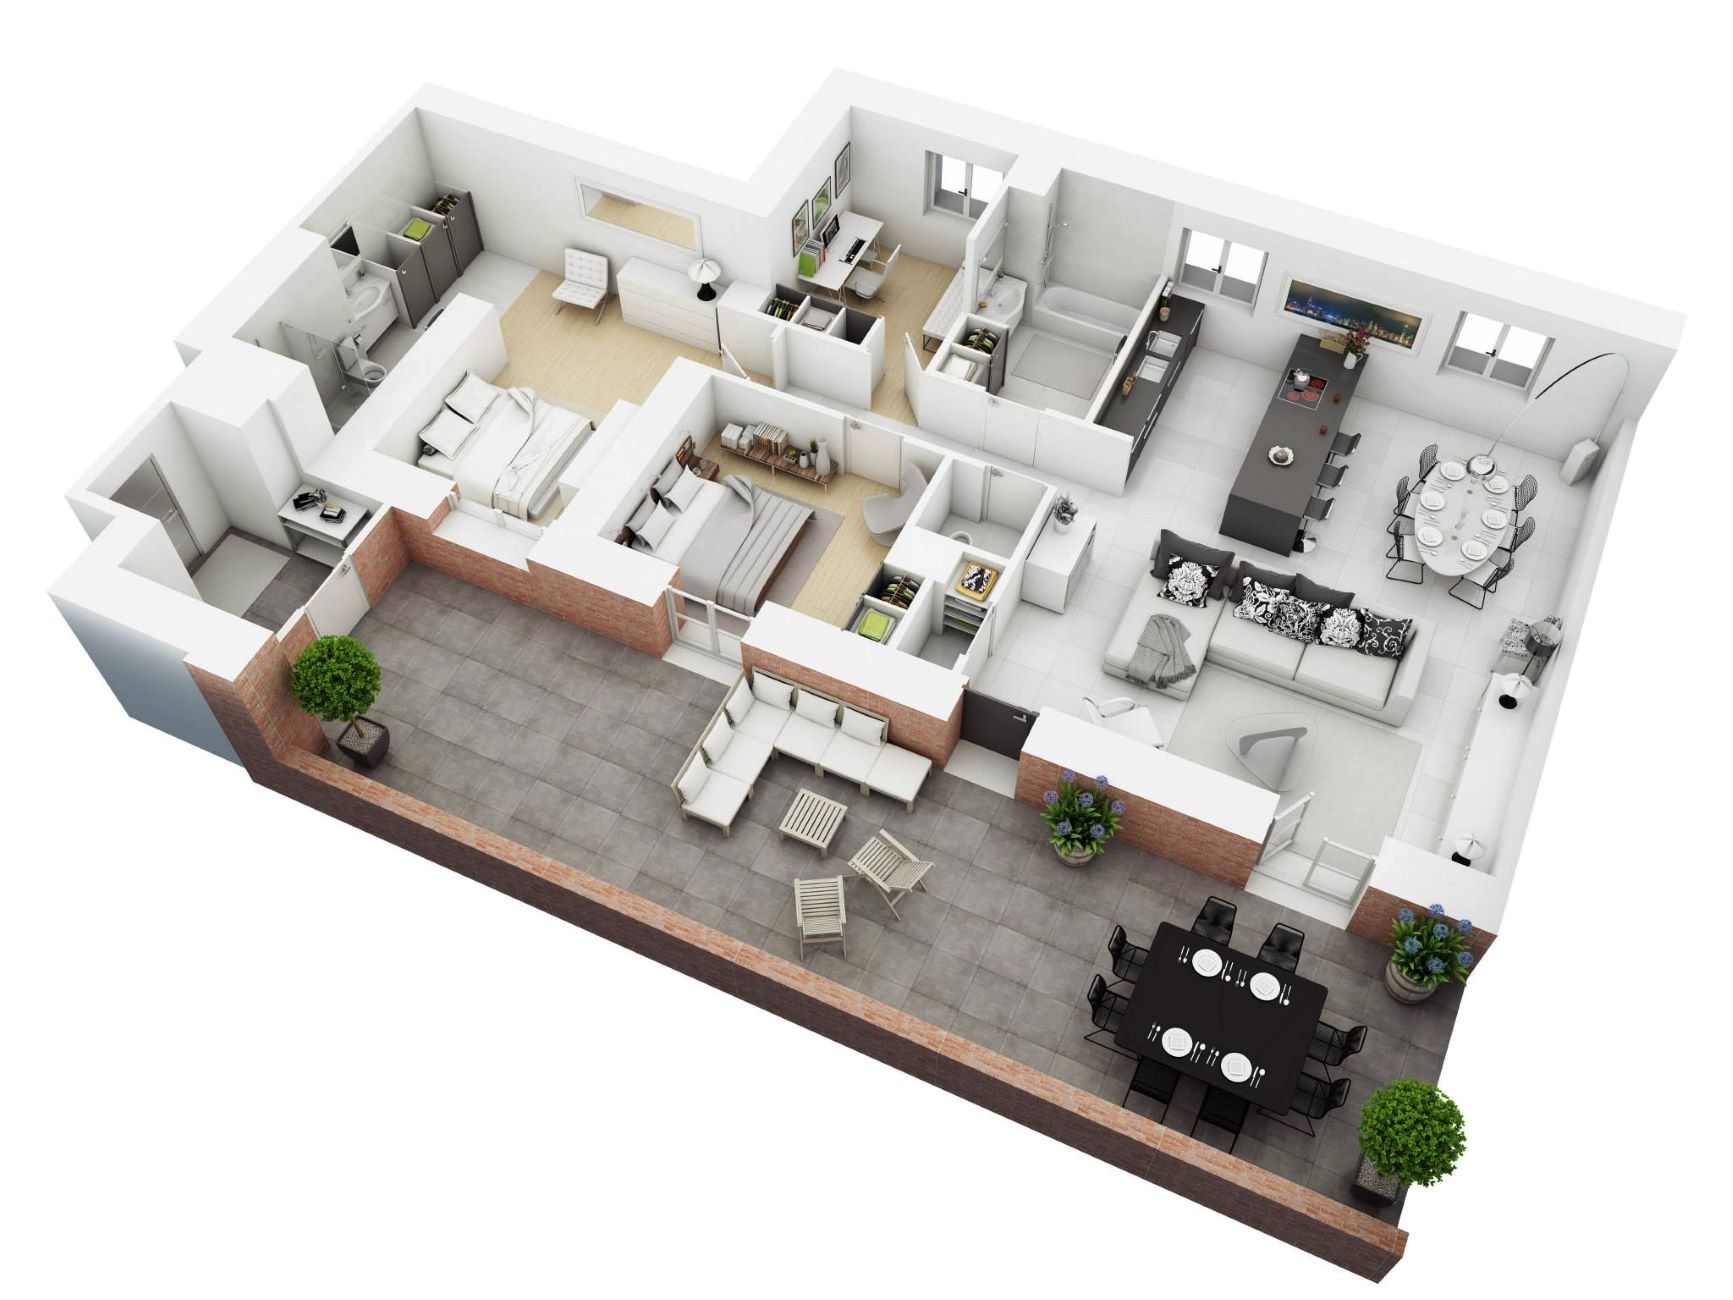
Designing a house is an exciting endeavor, but it can also be a daunting task. Hiring professional architects and designers can be expensive, but thanks to advancements in technology, you can now design a 3D house online for free. Online 3D house design tools provide a user-friendly interface that allows you to visualize and customize every aspect of your dream home.
In this article, we will guide you through the process of designing a 3D house online for free. From choosing the right design tool to adding furniture and decorations, we will cover all the essential steps that will help you bring your vision to life.
So, let’s dive in and explore how you can design a 3D house online for free!
Key Takeaways:
- Designing a 3D house online for free is now accessible and user-friendly, allowing for personalized and detailed customization of every aspect of your dream home.
- Choosing the right online 3D house design tool is crucial, considering factors such as user-friendliness, design features, object library, collaboration options, and compatibility for a smooth and enjoyable design experience.
Step 1: Choosing the Right Online 3D House Design Tool
The first step in designing a 3D house online for free is to select the right online design tool. With plenty of options available, it’s important to choose a tool that suits your needs and provides the features you require.
There are several factors to consider when deciding on a design tool:
- User-Friendliness: Look for a tool that has an intuitive interface and is easy to navigate. This will ensure a smooth and efficient design process.
- Design Features: Consider the features offered by the tool. Does it allow you to create detailed floor plans? Can you customize wall heights and roof designs? Make sure the tool provides the flexibility you need to bring your house design to life.
- Library of Objects: Check if the design tool offers a vast library of objects such as furniture, appliances, and decorations. Having access to a wide range of objects will enable you to accurately visualize the final look of your house.
- Collaboration Options: If you’re working with a team or seeking input from others, consider a design tool that allows for collaboration. This will make it easier to share your designs and receive feedback from others.
- Compatibility: Ensure that the design tool is compatible with your operating system or web browser. This will ensure a seamless and hassle-free design experience.
Take the time to explore different online 3D house design tools and compare their features and capabilities. Look for reviews or user testimonials to gain insights into the user experience and the tool’s performance.
A popular and highly recommended online 3D house design tool is [Tool Name]. It offers a user-friendly interface, a wide range of design features, and an extensive library of objects to choose from. It also allows for collaboration, making it an ideal choice for those working on house design projects with others.
Once you’ve chosen the right online 3D house design tool, you’re ready to move on to the next step and start setting up the basic structure of your house.
Step 2: Setting Up the Basic Structure
Now that you have selected the online 3D house design tool, it’s time to set up the basic structure of your house. This step involves creating the foundation, walls, and roof of your dream home.
Follow these steps to set up the basic structure:
- Create the Foundation: Start by defining the shape and size of your house’s foundation. This will serve as the base for your entire design. Use the design tool’s measurement features to ensure accurate dimensions and proportions.
- Add Exterior Walls: Once the foundation is set, add exterior walls to enclose the space. You can choose from various wall types and materials, such as brick, wood, or concrete. Adjust the height and thickness of the walls to match your design preferences.
- Include Interior Walls: Next, add interior walls to divide the space into rooms and define the layout. Consider the functionality and flow of your house when placing interior walls. Ensure that they align with the overall design aesthetic and meet your specific needs.
- Create Openings: Incorporate windows and doors into your design. Choose from different styles and sizes to match the overall look of your house. Position them strategically to maximize natural light and ventilation.
- Add the Roof: Complete the basic structure by adding the roof. Select the roof style that complements your design, whether it’s a flat roof, gable roof, or hip roof. Adjust the pitch and overhangs to achieve the desired architectural look.
As you set up the basic structure, constantly refer to your vision and make adjustments as needed. The online 3D house design tool allows you to visualize the changes in real-time, making it easy to experiment with different configurations.
Remember, the basic structure will serve as the foundation for the rest of your house design, so take your time to ensure it accurately reflects your preferences and needs. Once you’re satisfied with the basic structure, you can move on to the next step of customizing the interior.
Step 3: Adding Walls, Windows, and Doors
With the basic structure in place, it’s time to add walls, windows, and doors to your 3D house design. This step helps create the boundaries and openings that define each room and allow for natural light and ventilation.
Follow these steps to add walls, windows, and doors:
- Modify Wall Height and Thickness: Fine-tune the height and thickness of the walls to your liking. This customization allows you to create the desired look and feel for your house’s interior.
- Add Interior Walls: Use the wall tool in the design tool to insert interior walls and segment the space into different rooms. Pay attention to the flow and functionality of each room, taking into account furniture placement and accessibility.
- Place Windows: Select the windows from the design tool’s library and position them on the walls. Consider the orientation and size of the windows to optimize natural light and views. Experiment with different window styles until you find the perfect fit.
- Install Doors: Choose the doors that match your design style and place them in appropriate locations. Doors not only provide access but also contribute to the overall aesthetic of your house. Consider the dimensions and swing direction when placing doors to ensure smooth traffic flow.
As you add walls, windows, and doors, keep in mind the functionality and aesthetics of each element. Balance privacy, natural light, and visual interest to create inviting and practical spaces. Remember, the online 3D house design tool allows you to easily make adjustments and visualize the impact of your choices.
After completing this step, you will have a more defined and detailed representation of your house. The walls, windows, and doors serve as crucial components that add depth and functionality to your design. Now, it’s time to move on to the next step: customizing the interior of your house.
When designing a 3D house online for free, start by using a reliable and user-friendly 3D design software or platform. Look for one that offers a wide range of customizable features and allows you to easily visualize and modify your design in real time.
Step 4: Customizing the Interior
With the walls, windows, and doors in place, it’s time to bring your 3D house design to life by customizing the interior. This step involves selecting finishes, materials, and colors to create the desired ambiance and style for each room.
Follow these steps to customize the interior of your house:
- Select Flooring: Choose the type of flooring that complements your design aesthetic, whether it’s hardwood, tiles, or carpet. Experiment with different colors and patterns to find the perfect fit for each room.
- Pick Wall Finishes: Explore various wall finishes, such as paint, wallpaper, or textured panels. Consider the mood and style you want to achieve in each room. Opt for lighter colors to create an open and airy feel, or go for bold statements with vibrant wallpapers.
- Choose Ceiling Design: Customize the ceiling design to enhance the overall look of each room. Select from options like flat, tray, or coffered ceilings. Consider adding crown molding or ceiling medallions for added elegance and detail.
- Lighting Fixtures: Experiment with different lighting fixtures, such as chandeliers, pendant lights, or recessed lighting. Lighting can greatly influence the ambiance of a space, so choose fixtures that complement the overall design and provide adequate illumination for each area.
- Select Cabinetry and Countertops: If your design includes kitchens or bathrooms, select cabinetry and countertops that blend well with the overall theme. Choose materials that are durable and practical while also adding aesthetic value to the space.
- Personalize with Accessories: Add personal touches and accessories to make each room unique. This could include artwork, decorative items, rugs, curtains, and furniture. Pay attention to scale and placement to create a cohesive and visually pleasing interior.
Remember, the goal is to create a harmonious and functional interior that reflects your style and preferences. Experiment with different combinations and visualize how each customization choice contributes to the overall design aesthetic. The online 3D house design tool provides the flexibility to try out different options and make adjustments as needed.
Now that you have personalized the interior, you can move on to the final touches in the next step: adding furniture and decorations to bring your 3D house design to life.
Read more: How To Get A Free 3D Printer
Step 5: Adding Furniture and Decorations
Now that you have customized the interior of your 3D house design, it’s time to add furniture and decorations to bring your virtual home to life. This step is where you can showcase your personal style and create a cozy and inviting atmosphere.
Follow these steps to add furniture and decorations:
- Select Furniture Pieces: Browse through the design tool’s furniture library and choose pieces that suit each room’s purpose and style. Consider scale, functionality, and comfort when selecting furniture. Arrange the furniture in a way that promotes a smooth traffic flow and creates conversational areas.
- Add Decorative Elements: Enhance the ambiance of each room by adding decorative elements such as artwork, mirrors, rugs, and plants. These accessories add personality and visual interest to the space. Experiment with different placement options to find the perfect balance.
- Consider Storage Solutions: If your design includes storage areas like closets or cabinets, add organizational features such as shelves, drawers, and hangers. These solutions ensure that your space remains tidy and efficient.
- Select Window Treatments: Complete the look of your windows by adding curtains, blinds, or shades. Consider the functionality of each window treatment option, such as providing privacy, blocking sunlight, or enhancing insulation.
- Create Outdoor Spaces: If your design includes outdoor areas, don’t forget to furnish them as well. Add patio furniture, outdoor dining sets, and landscaping elements to create an inviting outdoor oasis.
As you add furniture and decorations, consider the overall theme and style of your home. Make sure that each element complements the design and creates a cohesive look throughout the house. The online 3D house design tool allows you to easily experiment with different furniture arrangements and visualize how each piece contributes to the overall design.
Once you have finished adding furniture and decorations, take a step back and admire your completed 3D house design. The combination of customized interiors, furniture, and decorations brings your dream home to life and allows you to envision the finished result. Now, it’s time to review and make any final adjustments before finalizing your design.
Step 6: Reviewing and Finalizing the Design
You’ve reached the final step of designing your 3D house online for free – reviewing and finalizing your design. This step allows you to carefully evaluate your design choices, make any necessary adjustments, and ensure that your dream home is truly a reflection of your vision.
Follow these steps to review and finalize your design:
- Review the Overall Layout: Take a comprehensive look at the entire layout of your house. Consider the flow and functionality of each room and ensure that it meets your needs. Make sure that the rooms are properly connected and there are no design elements that feel out of place.
- Check for Consistency: Assess the consistency of your design throughout the house. Ensure that the style, materials, and color schemes are cohesive and harmonious. This will create a unified and visually pleasing aesthetic.
- Pay Attention to Proportions: Check the proportions of each room and the furniture within. Ensure that the scale is balanced and that furniture pieces are appropriately sized for the space. This will help maintain a comfortable and visually appealing environment.
- Test Lighting and Shadows: Utilize the lighting features of the online design tool to assess how natural and artificial lighting will affect the ambiance of your home. Observe how shadows cast and ensure they create the desired atmosphere.
- Seek Feedback: Share your design with friends, family, or professionals to gather feedback and different perspectives. Others may notice details or suggest improvements that you may have overlooked.
- Make Necessary Adjustments: Based on the feedback and your own observations, make any necessary adjustments to your design. This could involve tweaking the placement of furniture, refining color schemes, or modifying the layout of certain areas.
- Save and Export your Design: Once you are satisfied with the final design, save and export the project. This will allow you to access the design in the future and share it with others.
Remember, the beauty of online 3D house design tools is their flexibility. You can easily make changes and modifications until you achieve the perfect design. Take your time with this step, as it will ensure that you have a design that you are truly satisfied with.
Congratulations! You’ve successfully gone through the process of designing a 3D house online for free. Your attention to detail and creativity have resulted in a unique and personalized home design. Now, with your finalized design in hand, you can confidently move forward with bringing your dream home into reality.
Conclusion
Designing a 3D house online for free is an exciting and rewarding process. With the help of user-friendly online design tools, you have the ability to bring your dream home to life and customize every aspect of its design. From the basic structure to the interior customization, furniture placement, and final touches, each step allows you to create a personalized and functional space.
Throughout the process, it’s important to choose the right online design tool that suits your needs and provides the necessary features. Consider factors such as user-friendliness, design features, object library, collaboration options, and compatibility to ensure a smooth and enjoyable design experience.
Setting up the basic structure of your house involves creating the foundation, walls, windows, and doors. This lays the groundwork for the rest of your design and allows you to visualize the physical structure of your dream home.
Customizing the interior is where you can truly showcase your personal style. Choosing flooring, wall finishes, lighting fixtures, and furniture pieces allows you to create a unique and inviting atmosphere that reflects your preferences.
Adding furniture and decorations brings your 3D house design to life. Carefully selecting furniture pieces and accessories, and arranging them in a way that promotes functionality and aesthetics, transforms your virtual space into a cozy and personalized home.
Finally, reviewing and finalizing your design ensures that all the elements come together harmoniously. Paying attention to layout, consistency, proportions, lighting, and seeking feedback from others helps you make any necessary adjustments and create a design that you are truly satisfied with.
With your completed design, you can now move forward with confidence, knowing that your vision and creativity have been translated into a tangible representation of your dream home. Whether you are an aspiring homeowner or a professional designer, the ability to design a 3D house online for free opens up endless possibilities and allows you to explore various options before making any commitments.
So, harness the power of online 3D house design tools, unleash your creativity, and embark on the exciting journey of designing your dream home!
Frequently Asked Questions about How To Design A 3D House Online For Free
Was this page helpful?
At Storables.com, we guarantee accurate and reliable information. Our content, validated by Expert Board Contributors, is crafted following stringent Editorial Policies. We're committed to providing you with well-researched, expert-backed insights for all your informational needs.


0 thoughts on “How To Design A 3D House Online For Free”