Home>diy>Architecture & Design>How To Draw Window On A Floor Plan

Architecture & Design
How To Draw Window On A Floor Plan
Modified: May 6, 2024
Learn how to draw a window on a floor plan with our step-by-step guide. Enhance your architecture design skills and create stunning layouts.
(Many of the links in this article redirect to a specific reviewed product. Your purchase of these products through affiliate links helps to generate commission for Storables.com, at no extra cost. Learn more)
Introduction
When it comes to designing an architectural floor plan, windows play a crucial role in enhancing both the aesthetic appeal and functionality of a building. Drawing windows on a floor plan requires careful consideration and precision to ensure accurate placement and dimensions. Whether you are an architect, designer, or simply someone interested in learning about architectural drafting, this article will guide you through the steps of drawing windows on a floor plan.
Windows not only bring in natural light and ventilation but also serve as a key design element that can transform the overall look and feel of a space. From traditional casement windows to modern floor-to-ceiling glass panels, each window type creates a unique visual statement and contributes to the overall architectural style.
Understanding how to draw windows on a floor plan is essential for creating accurate representations of buildings and effectively communicating design intentions. In this article, we will explore the step-by-step process of drawing a window on a floor plan, covering everything from measuring the window dimensions to adding details and labeling.
By the end of this article, you will have the knowledge and confidence to draw windows on a floor plan like a pro. So, let’s dive in and discover the art of window drawing in architectural floor plans!
Key Takeaways:
- Precision and attention to detail are essential when drawing windows on a floor plan. Accurate measurements, proper placement, and realistic details contribute to effective communication of design intentions.
- Proper labeling of windows on a floor plan is crucial for clear identification and effective communication. Detailed drawings and accurate representation enhance the overall aesthetic appeal and functionality of architectural designs.
Read more: How To Draw An Evacuation Floor Plan
Steps to Draw a Window on a Floor Plan
Drawing a window on a floor plan requires careful attention to detail and adherence to proper drafting techniques. Follow these steps to accurately depict the windows on your floor plan:
- Measure the Window Dimensions: Begin by measuring the dimensions of the window you intend to draw. Take note of the width, height, and any specific details like sills or mullions. Use a measuring tape or laser measurer to ensure accuracy.
- Locate the Window on the Floor Plan: Identify the location of the window on the floor plan. Determine the wall where the window will be placed. Measure the distance from the nearest corner or reference point to accurately position the window.
- Draw the Window Opening: Using a sharp pencil or architectural scale, draw the outline of the window opening on the floor plan. Start by drawing a horizontal line for the window sill at the desired height. Then, draw vertical lines on either side to represent the edges of the window.
- Add Details to the Window: To add more realism and detail to the window, consider including elements such as mullions, window panes, and hardware. Mullions are the vertical bars that divide the window into sections. Draw these lines on the window opening to indicate the presence of mullions.
- Label the Window: Lastly, label the window on the floor plan to provide clear identification. Use a text box or label the window with a designated number or symbol. This will help differentiate the window from other elements on the floor plan.
By following these steps, you can accurately draw a window on a floor plan and ensure that your design accurately represents the intended window placement and dimensions. Remember to always double-check your measurements and take your time to ensure accuracy in your drawings.
Now that you have a clear understanding of how to draw a window on a floor plan, you can start incorporating windows into your architectural designs with confidence.
Measure the Window Dimensions
Before you can draw a window on a floor plan, it is crucial to measure the window dimensions accurately. This step is essential for creating a realistic representation of the window on the floor plan and ensuring that the final design is both functional and aesthetically pleasing.
To measure the window dimensions, follow these steps:
- Use a measuring tape: Grab a measuring tape and make sure it is properly calibrated. This will ensure accurate measurements of the window’s width, height, and any specific details like sills or mullions.
- Measure the width: Start by measuring the width of the window from the outer edges. Place the measuring tape horizontally across the window frame and record the measurement in inches or centimeters. Be sure to measure the entire width, including any frames or casings.
- Measure the height: Next, measure the height of the window from the top of the frame to the bottom. Place the measuring tape vertically along the side of the window and record the measurement. Remember to include any sill or bottom casing in your measurement.
- Note specific details: If your window has any additional features like sills, mullions, or hardware, make sure to measure these as well. Measure the width and height of the sill and the spacing and size of any mullions within the window.
It’s important to ensure precise measurements, as any inaccuracies could result in errors in your floor plan drawings. Double-check your measurements and verify their accuracy before proceeding to the next steps.
By measuring the window dimensions accurately, you are now equipped with the necessary information to accurately represent the window on your floor plan.
Locate the Window on the Floor Plan
Once you have measured the window dimensions, the next step is to locate the window on the floor plan. Proper placement of the window is crucial for accurate representation and effective communication of your design intentions.
To locate the window on the floor plan, follow these steps:
- Identify the wall: Determine which wall the window will be placed on. Consider factors such as the orientation of the room, the desired view, and the architectural design of the building. Take note of the wall where the window will be located.
- Measure the distance: Measure the distance from the nearest corner or reference point to determine the exact location of the window. Use a measuring tape or an architectural scale to ensure accuracy.
- Mark the location: On the floor plan, mark the location of the window using a light pencil. Place a small dot or a cross at the specified distance from the corner or reference point to indicate the window’s position on the wall.
- Consider other elements: Take into consideration other elements present in the room, such as doors, furniture, or fixtures, that may impact the placement of the window. Ensure that the window is positioned in a way that maximizes natural light, ventilation, and overall functionality.
By accurately locating the window on the floor plan, you can ensure that your design accurately reflects the intended placement of the window within the architectural context. This step is vital for creating a floor plan that accurately represents the overall design of the building.
Now that you have successfully located the window on the floor plan, you are ready to move on to the next step of drawing the window opening.
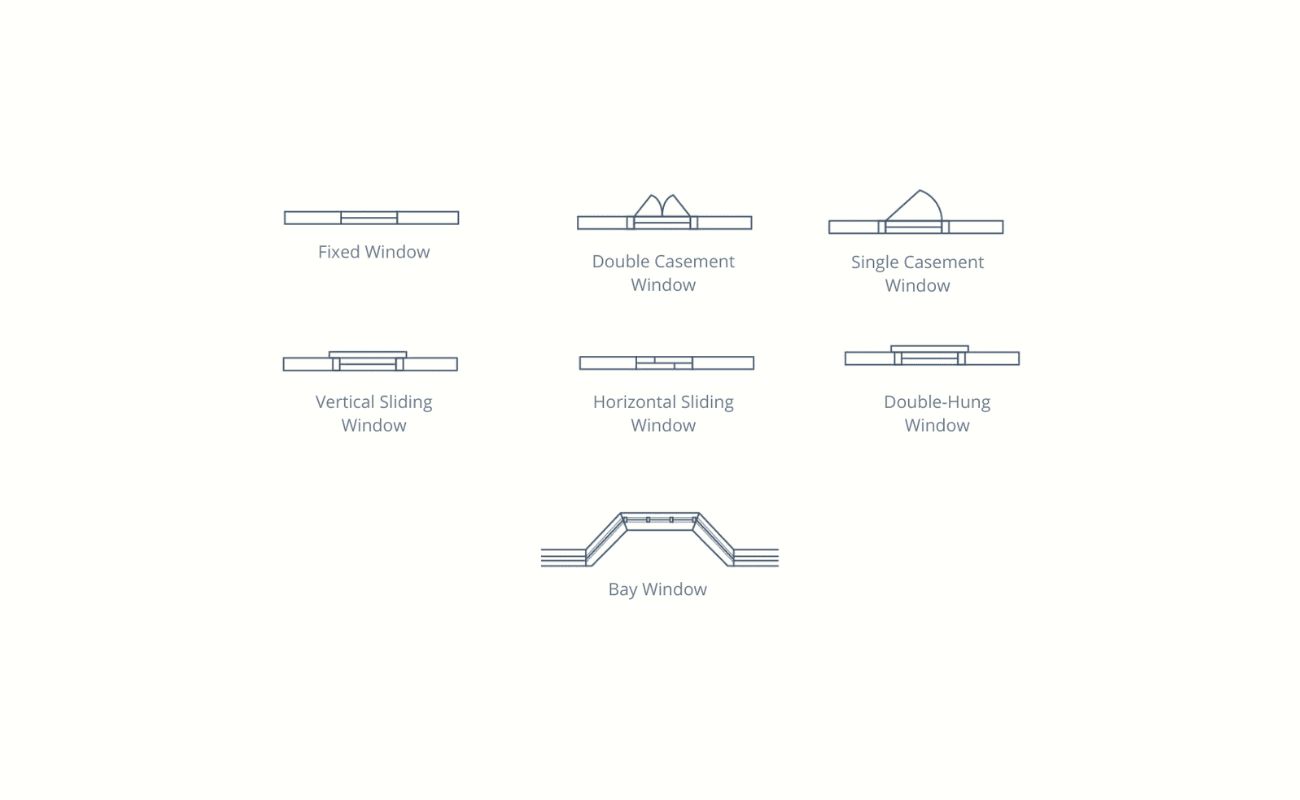
When drawing a window on a floor plan, use a consistent scale and symbol to represent the window. Make sure to accurately measure and place the window in the correct location on the floor plan.
Draw the Window Opening
Once you have identified the location of the window on the floor plan, it’s time to draw the window opening. This step involves creating a visual representation of the window on the floor plan, including the outline of the window frame and the opening it occupies.
Follow these steps to draw the window opening:
- Choose the appropriate scale: Determine the scale at which you are working. Select an architectural scale that will allow you to accurately represent the window and its dimensions on the floor plan.
- Draw the horizontal line: Start by drawing a horizontal line to represent the window sill. Use a ruler or a straight edge to create a straight line at the desired height of the window sill.
- Draw the vertical lines: From the ends of the horizontal line, draw vertical lines upwards to represent the edges of the window. These lines should be parallel to each other and perpendicular to the horizontal line.
- Join the lines: Extend the vertical lines downwards to meet the existing floor plan walls. This creates a rectangular shape that represents the window opening.
It’s important to pay attention to the dimensions and proportions of the window opening. Ensure that the width and height of the window opening correspond accurately to the measurements you took earlier.
In addition to the basic window opening, you may also want to include other elements such as sills, headers, or transoms in your drawing. These details can enhance the visual representation and provide more information about the window design.
Remember to use a sharp pencil or a drafting pen for clean and precise lines. Take your time to ensure accuracy and double-check your measurements and proportions before moving on to the next steps.
By drawing the window opening on the floor plan, you are creating a visual representation of how the window will appear within the architectural context of the building. This step brings your floor plan to life and provides a clearer understanding of your design intentions.
Now that you have drawn the window opening, it’s time to add further details to make the window more realistic and visually appealing.
Read more: How To Draw A Door In A Floor Plan
Add Details to the Window
Once you have drawn the basic window opening on the floor plan, it’s time to add details that will enhance the realism and visual appeal of the window. Adding these details will help create a more accurate representation of the window’s design and style.
Follow these steps to add details to the window on the floor plan:
- Mullions and Divisions: If your window design includes mullions or divisions, draw vertical lines to represent these elements. Mullions are vertical bars that divide the window into multiple sections. Place them evenly within the window opening to create a balanced design.
- Window Panes: If your window has multiple panes, determine the number and size of each pane. Draw horizontal and vertical lines to represent the divisions between the panes. Ensure that the sizes and proportions of the panes are accurate.
- Sills and Headers: If your window design includes sills or headers, draw additional lines to represent these elements. Sills are the horizontal surfaces at the bottom of the window opening, while headers are the horizontal elements at the top.
- Hardware or Accessories: Consider adding details such as handles, locks, or other hardware that may be present on the window. These small touches add realism and provide a better understanding of the window’s functionality.
- Trim and Casing: If your window design includes decorative trim or casing, draw additional lines to represent these elements. Pay attention to the size and proportions of the trim to accurately reflect the window’s design style.
As you add details to the window, make sure to maintain the proper scale and proportions. Use a sharp pencil or a fine-tip pen for clean and precise lines. Take your time to ensure accuracy and double-check your measurements and proportions before moving on to the next steps.
By adding these details, you are creating a more realistic and visually appealing representation of the window on the floor plan. This step allows viewers to better visualize the final design and understand the window’s features and characteristics.
Now that you have added details to the window, it’s time to label the window on the floor plan for clear identification.
Label the Window
Labeling the window on the floor plan is essential for clear identification and effective communication of your design. Proper labeling ensures that viewers can easily identify and understand the window within the architectural context of the floor plan.
Follow these steps to label the window on the floor plan:
- Choose a labeling method: Determine the preferred method of labeling for your floor plan. This can be done through text boxes, symbols, or designated numbers.
- Place the label: Select a location near the window opening to place the label. In the chosen location, add a text box or write a designated number or symbol that corresponds to the window.
- Ensure clarity: Make sure that the label is clear and easy to read. Use legible handwriting or choose a font size and style that is easily understandable.
- Add additional information: If necessary, provide additional information about the window in a separate note or callout. This can include details such as the window type, manufacturer, or any specific features.
Labeling the window on the floor plan helps to differentiate it from other elements and provides a clear reference point for discussions and future modifications. An accurately labeled window allows viewers to understand its location and role within the building design.
Remember to consider the scale and positioning of the label to ensure that it doesn’t obstruct other elements on the floor plan. Place the label in a location that is easily visible and doesn’t clutter the drawing.
By labeling the window on the floor plan, you provide important information and make it easier for viewers to navigate and understand your design. This step is crucial for effective communication and collaboration with other professionals involved in the architectural process.
Now that you have successfully labeled the window on the floor plan, you have completed the process of drawing a window on a floor plan. Your floor plan now accurately represents the window’s dimensions, location, and design elements.
Conclusion
Drawing windows on a floor plan requires careful attention to detail and precision to accurately represent the dimensions, placement, and design elements of the window. By following the step-by-step process outlined in this article, you can confidently draw windows on your floor plans and effectively communicate your design intentions.
Measuring the window dimensions and locating the window on the floor plan are crucial initial steps that ensure your drawings reflect the intended placement and proportions of the windows. Drawing the window opening and adding details such as mullions, panes, and hardware enhance the realism and visual appeal of the window design.
Properly labeling the window on the floor plan provides clear identification and helps viewers understand the window’s location and role within the building design. A well-label window allows for effective communication and collaboration with other professionals involved in the architectural process.
Remember to pay attention to accuracy, scale, and proportion throughout the drawing process. Taking the time to double-check measurements and ensure precise representation will result in more accurate and reliable floor plans.
Now that you have gained a deeper understanding of how to draw windows on a floor plan, you can confidently incorporate windows into your architectural designs. Windows not only play a crucial role in bringing in natural light and ventilation but also contribute to the overall aesthetic appeal and functionality of a building. By mastering the art of window drawing, you can create captivating and well-designed floor plans that effectively communicate your architectural vision.
So, grab your drafting tools and start drawing those windows with confidence and precision. Happy designing!
Now that you've mastered drawing windows on floor plans, why not broaden your understanding of the very foundation of building design? Our detailed guide on "What Is A Floor Plan" is ready to walk you through the basics and intricacies of floor plans, ensuring you have a solid grasp on creating and interpreting these essential architectural documents. This read is perfect for anyone looking to expand their knowledge in architecture or planning home improvements. Don't miss out; check it out now!
Frequently Asked Questions about How To Draw Window On A Floor Plan
Was this page helpful?
At Storables.com, we guarantee accurate and reliable information. Our content, validated by Expert Board Contributors, is crafted following stringent Editorial Policies. We're committed to providing you with well-researched, expert-backed insights for all your informational needs.





0 thoughts on “How To Draw Window On A Floor Plan”