Home>Furniture & Design>Interior Design Trends>How To Install Glass Rinser
Interior Design Trends
How To Install Glass Rinser
Modified: August 27, 2024
Learn how to install a glass rinser to keep up with the latest interior design trends. Upgrade your space with this modern and functional addition.
(Many of the links in this article redirect to a specific reviewed product. Your purchase of these products through affiliate links helps to generate commission for Storables.com, at no extra cost. Learn more)
Introduction
Installing a glass rinser is a fantastic way to elevate the functionality and aesthetics of your home or commercial bar. This innovative addition not only streamlines the glass-cleaning process but also adds a touch of modern sophistication to the space. Whether you're a seasoned mixologist or a casual entertainer, a glass rinser can revolutionize the way you serve and enjoy beverages.
In this comprehensive guide, we will walk you through the step-by-step process of installing a glass rinser. From gathering the necessary tools and materials to testing the functionality of the rinser, we've got you covered. By following these instructions, you'll be able to seamlessly integrate this convenient feature into your bar setup, enhancing both the efficiency and visual appeal of your space.
So, roll up your sleeves and get ready to embark on this rewarding installation journey. With the right tools and a clear understanding of the process, you'll soon be enjoying the convenience and elegance of a newly installed glass rinser. Let's dive in and make your bar area the envy of all your guests!
Key Takeaways:
- Elevate your bar with a glass rinser for convenient and stylish glass-cleaning. Follow the guide for a seamless installation and enjoy the modern sophistication it brings to your space.
- Prepare, install, and test your glass rinser with confidence. Enjoy the convenience and elegance it adds to your bar, creating a seamless and visually appealing beverage serving area.
Read more: How To Install Glass Blocks
Step 1: Gather the necessary tools and materials
Before diving into the installation process, it's crucial to gather all the essential tools and materials to ensure a smooth and efficient setup. Here's a comprehensive list of what you'll need:
Tools:
- Adjustable Wrench: This versatile tool will come in handy for securing and adjusting the connections during the installation process.
- Phillips Screwdriver: A reliable screwdriver is essential for handling any screws or fasteners involved in mounting the glass rinser.
- Teflon Tape: This tape will help create a secure and leak-free seal when connecting the water supply lines.
- Drill and Hole Saw Bit: Depending on the type of countertop or bar surface, you may need a drill and a hole saw bit to create an opening for the glass rinser.
- Level: Ensuring that the glass rinser is installed perfectly level is crucial for its functionality and aesthetic appeal.
Materials:
- Glass Rinser Unit: The central component of the installation, the glass rinser unit, should include the rinser basin and the necessary fittings.
- Water Supply Lines: Depending on the specific requirements of the glass rinser unit, you may need flexible water supply lines to connect to the existing plumbing.
- Mounting Hardware: This includes any screws or brackets required to securely fasten the glass rinser to the installation surface.
- Cleaning and Drying Agent: To ensure the glass rinser operates at its best, have a suitable cleaning and drying agent on hand to maintain the rinser basin.
By ensuring that you have all the tools and materials listed above, you'll be well-prepared to proceed with the installation process. With everything in place, you can approach the next steps with confidence, knowing that you have everything you need to successfully integrate the glass rinser into your bar setup.
Step 2: Prepare the installation area
Preparing the installation area is a crucial preliminary step that sets the foundation for a successful glass rinser installation. This phase involves assessing the chosen location, ensuring proper access to essential utilities, and making any necessary adjustments to the surrounding area. Here's a detailed breakdown of the key tasks involved in preparing the installation area:
-
Selecting the Installation Site: Carefully choose the location for the glass rinser, considering factors such as proximity to the main water supply and the convenience of use. Ideally, the installation site should be near the primary bar or beverage serving area, allowing for seamless glass rinsing during drink preparation.
-
Measuring and Marking: Once the installation site is determined, use a measuring tape and a pencil to mark the precise position where the glass rinser will be placed. Ensure that the measurements align with the dimensions of the rinser unit, allowing for a secure and snug fit.
-
Access to Water Supply: Assess the proximity of the water supply lines to the installation site. If necessary, make arrangements to extend the water supply lines to reach the designated location. This may involve consulting a professional plumber to ensure proper connection and compliance with local plumbing codes.
-
Electrical Considerations: If the glass rinser unit includes any electrical components, such as LED lighting or power activation features, ensure that there is access to a nearby power source. If additional electrical work is required, it's essential to enlist the expertise of a qualified electrician to handle the connections safely.
-
Surface Preparation: Depending on the installation surface, whether it's a countertop, bar, or sink area, prepare the surface for the glass rinser. This may involve clearing the area of any obstructions, ensuring a level surface for mounting, and making provisions for any necessary modifications, such as drilling holes for the rinser's drainage and water supply connections.
By meticulously attending to these preparatory tasks, you'll set the stage for a seamless and efficient glass rinser installation. Taking the time to prepare the installation area ensures that the subsequent steps can be carried out with precision and confidence, ultimately leading to a professionally integrated glass rinser that enhances the functionality and visual appeal of your bar or beverage serving space.
Read more: How To Install A Sliding Glass Door
Step 3: Install the glass rinser
With the installation area prepared and all the necessary tools and materials at hand, it's time to proceed with the actual installation of the glass rinser. This phase involves mounting the rinser unit, connecting the water supply lines, and ensuring that all components are securely positioned for optimal functionality. Here's a detailed breakdown of the installation process:
-
Positioning the Glass Rinser Unit: Carefully place the glass rinser unit in the designated installation area, ensuring that it aligns with the previously marked measurements. Take into account any specific orientation requirements, such as the direction of the rinser basin and the location of any integrated features, such as LED lighting or activation buttons.
-
Securing the Mounting Hardware: Using the appropriate screws or brackets, securely fasten the glass rinser unit to the installation surface. Ensure that the unit is level and firmly anchored, minimizing any potential movement during use. A level will come in handy to guarantee that the rinser unit is perfectly aligned with the surrounding surface.
-
Connecting the Water Supply Lines: If the glass rinser unit requires a direct water connection, carefully attach the water supply lines to the designated inlet on the rinser unit. Use Teflon tape to create a tight and leak-free seal, and ensure that the connections are secure. If the rinser unit includes a drainage system, connect the drainage line to the appropriate outlet, allowing for efficient water disposal.
-
Testing the Water Flow: Once the water supply lines are connected, turn on the water source and test the functionality of the glass rinser. Check for any leaks or irregularities in the water flow, and make any necessary adjustments to the connections to ensure a consistent and reliable water supply to the rinser basin.
-
Final Adjustments and Cleaning: With the glass rinser installed and operational, make any final adjustments to the positioning or connections as needed. Once satisfied with the setup, clean the rinser basin thoroughly to remove any debris or residues accumulated during the installation process. This ensures that the glass rinser is ready for immediate use.
By following these detailed steps, you can effectively install a glass rinser with precision and confidence. With the rinser unit securely mounted, the water supply lines connected, and the functionality tested, you're now ready to enjoy the convenience and efficiency that this innovative addition brings to your bar or beverage serving area.
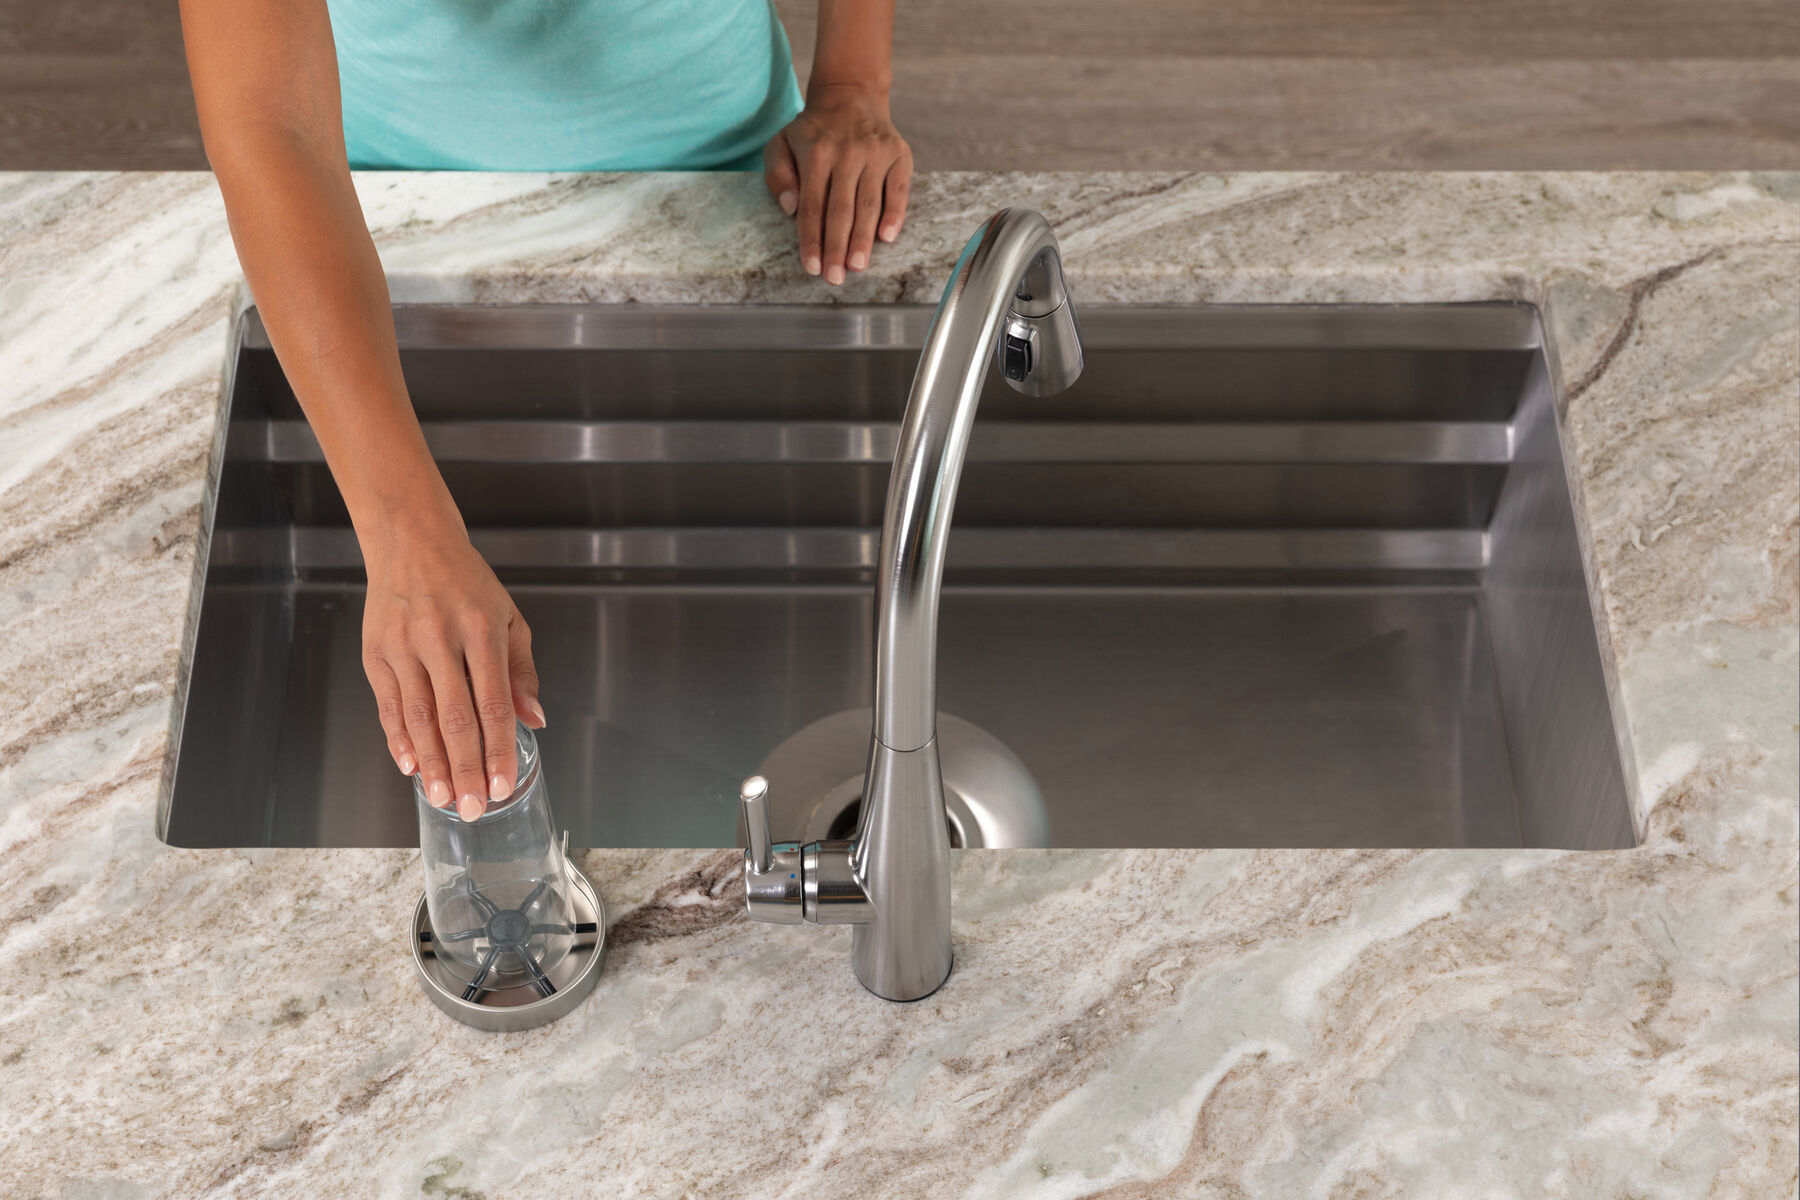
Step 4: Test the glass rinser
Testing the glass rinser is a critical step to ensure that the installation has been executed successfully and that the rinser functions as intended. This phase involves conducting thorough tests to verify the water flow, drainage efficiency, and overall performance of the glass rinser. By meticulously assessing the functionality of the rinser, you can address any potential issues and make necessary adjustments before putting it into regular use.
Water Flow Verification
Begin by activating the glass rinser and observing the water flow from the rinser basin. Check for a steady and consistent stream of water, ensuring that it effectively rinses the interior of the glassware. Assess the pressure and coverage of the water flow, confirming that it adequately cleans the surfaces of various glass shapes and sizes. Additionally, verify that the water flow ceases promptly when the rinser is deactivated, minimizing any wastage or unnecessary water usage.
Drainage Efficiency
After testing the water flow, focus on the drainage system of the glass rinser. Activate the rinser and observe the drainage process, ensuring that the used water efficiently exits the rinser basin and is effectively directed to the appropriate outlet. Verify that the drainage system operates smoothly, preventing any water accumulation or residual moisture within the rinser basin after each use. Efficient drainage is essential for maintaining the cleanliness and hygiene of the glass rinser.
Read more: How To Install Glass Block Windows
Functional Checks
In addition to water flow and drainage, conduct functional checks on any integrated features or mechanisms within the glass rinser. If the unit includes LED lighting, ensure that it illuminates the rinser basin effectively, enhancing visibility during use. Test any activation buttons or sensors to confirm their responsiveness and reliability. By thoroughly assessing the functional aspects of the glass rinser, you can guarantee a seamless and user-friendly experience for both yourself and your guests.
Adjustment and Optimization
During the testing phase, if any irregularities or performance issues are identified, take the opportunity to make necessary adjustments and optimizations. This may involve fine-tuning the water supply connections, repositioning the rinser unit for improved functionality, or addressing any minor leaks or operational inconsistencies. By addressing these issues proactively, you can maximize the effectiveness of the glass rinser and ensure its seamless integration into your bar setup.
By diligently testing the glass rinser and addressing any potential issues, you can finalize the installation process with confidence, knowing that the rinser is fully operational and ready for regular use. With the testing phase completed, you can look forward to enjoying the convenience, efficiency, and modern elegance that the glass rinser brings to your bar or beverage serving area.
Conclusion
In conclusion, the installation of a glass rinser represents a significant enhancement to any home or commercial bar setup. By following the step-by-step process outlined in this guide, you can seamlessly integrate this innovative feature, elevating both the functionality and visual appeal of your beverage serving area.
From the initial task of gathering the necessary tools and materials to the meticulous preparation of the installation area, each step plays a crucial role in ensuring a successful and professional installation. By paying attention to detail and adhering to the recommended guidelines, you can navigate the installation process with confidence and precision.
The installation of the glass rinser not only streamlines the glass-cleaning process but also adds a touch of modern sophistication to the space. With the rinser unit securely mounted, the water supply lines connected, and the functionality thoroughly tested, you are now poised to enjoy the convenience and efficiency that this innovative addition brings to your bar or beverage serving area.
As you embark on this rewarding installation journey, remember that the successful integration of a glass rinser is a testament to your commitment to creating a functional and aesthetically pleasing environment for yourself and your guests. With the rinser in place, you can look forward to effortlessly maintaining clean and sparkling glassware, enhancing the overall drinking experience for everyone who gathers at your bar.
So, whether you're a passionate mixologist, a dedicated entertainer, or simply someone who appreciates the finer details of beverage service, the installation of a glass rinser is a valuable investment that promises both practicality and elegance. Embrace the process, enjoy the results, and raise a toast to the seamless integration of this modern convenience into your bar setup. Cheers to the enhanced functionality and visual allure that the glass rinser brings to your space!
Frequently Asked Questions about How To Install Glass Rinser
Was this page helpful?
At Storables.com, we guarantee accurate and reliable information. Our content, validated by Expert Board Contributors, is crafted following stringent Editorial Policies. We're committed to providing you with well-researched, expert-backed insights for all your informational needs.


0 thoughts on “How To Install Glass Rinser”