Home>Furniture>Bedroom Furniture>How To Build A Day Bed Frame
Bedroom Furniture
How To Build A Day Bed Frame
Modified: December 7, 2023
Learn how to build a beautiful and functional day bed frame for your bedroom with our step-by-step guide. Perfect addition to your bedroom furniture collection.
(Many of the links in this article redirect to a specific reviewed product. Your purchase of these products through affiliate links helps to generate commission for Storables.com, at no extra cost. Learn more)
Introduction
Welcome! In this comprehensive guide, we will take you through the step-by-step process of building a day bed frame. A day bed is not only a functional piece of furniture, but it can also add style and comfort to any bedroom or living space. Whether you’re looking to create a cozy reading nook or a versatile sleeping area for guests, building your own day bed frame allows you to customize it to your exact preferences and needs.
Before we dive into the building process, it’s important to gather all the necessary tools and materials. This will ensure a smooth construction process and a sturdy end result. You’ll need:
- Measuring tape
- Saw (circular or miter)
- Drill or screwdriver
- Screws or nails
- Sanding block or sandpaper
- Wood glue
- Wood stain or paint
- Paintbrush or roller
- Mattress and pillows
Once you have your tools and materials ready, let’s move on to measuring and cutting the wood. This is a crucial step that will determine the overall dimensions and stability of your day bed frame.
Note: It’s important to measure twice and cut once to ensure accuracy.
Key Takeaways:
- Build a custom day bed frame to enhance your bedroom or living space with style and comfort. Enjoy the satisfaction of creating a functional piece of furniture tailored to your exact preferences and needs.
- Save money and express your creativity by building your own day bed frame. From measuring and cutting wood to adding the final touches, create a cozy oasis within your home with a personalized touch.
Read more: How To Build A Bed Frame
Step 1: Gather Necessary Tools and Materials
Before you begin building your day bed frame, it’s important to gather all the necessary tools and materials. Having everything ready will make the construction process much smoother and more efficient. Here’s what you’ll need:
- Measuring tape: This will be essential for accurately measuring the dimensions of the frame.
- Saw: You can use either a circular or miter saw to cut the wood to the desired lengths.
- Drill or screwdriver: Depending on your preference, choose a tool that will allow you to securely attach the different components of the frame.
- Screws or nails: These will be used to fasten the wood pieces together.
- Sanding block or sandpaper: To smooth out any rough edges or surfaces, ensuring a polished finish.
- Wood glue: This will provide extra strength and stability to the joints of the frame.
- Wood stain or paint: Choose a finish that matches your desired aesthetic and protects the wood from damage.
- Paintbrush or roller: For applying the wood stain or paint evenly onto the frame.
- Mattress and pillows: Once the frame is complete, you’ll need a comfortable mattress and pillows to complete your day bed.
By having all these tools and materials readily available, you’ll be able to move through the construction process seamlessly, without any interruptions or delays. The next step will be measuring and cutting the wood to the correct dimensions.
Step 2: Measure and Cut the Wood
Now that you have gathered all the necessary tools and materials for your day bed frame, it’s time to move on to the next step: measuring and cutting the wood. This step is crucial as it determines the overall dimensions and stability of your frame. Here’s how to do it:
- Measure the desired dimensions: Use a measuring tape to determine the length, width, and height of your day bed frame. Consider the size of your mattress and any additional space you may want around it.
- Mark the measurements on the wood: Using a pencil or marker, mark the measurements on your wood pieces. Make sure to double-check your measurements before cutting.
- Secure the wood: Use clamps or other means to hold the wood securely in place before cutting.
- Cut the wood: Using a saw (circular or miter), carefully cut along the marked lines to obtain the desired wood pieces for your day bed frame. Take your time and ensure smooth and straight cuts.
- Sand the cut edges: Use a sanding block or sandpaper to smooth out any rough edges or surfaces resulting from the cutting process. This will give your frame a polished and professional look.
Note: If you’re not comfortable using a saw or cutting the wood yourself, you can also have the wood pieces pre-cut at a hardware store to your desired dimensions.
With the wood pieces cut to the correct dimensions and any rough edges smoothed out, you’re now ready to move on to the next step: assembling the frame. This is where your day bed frame will start to take shape, so make sure you have all the necessary components and tools at hand.
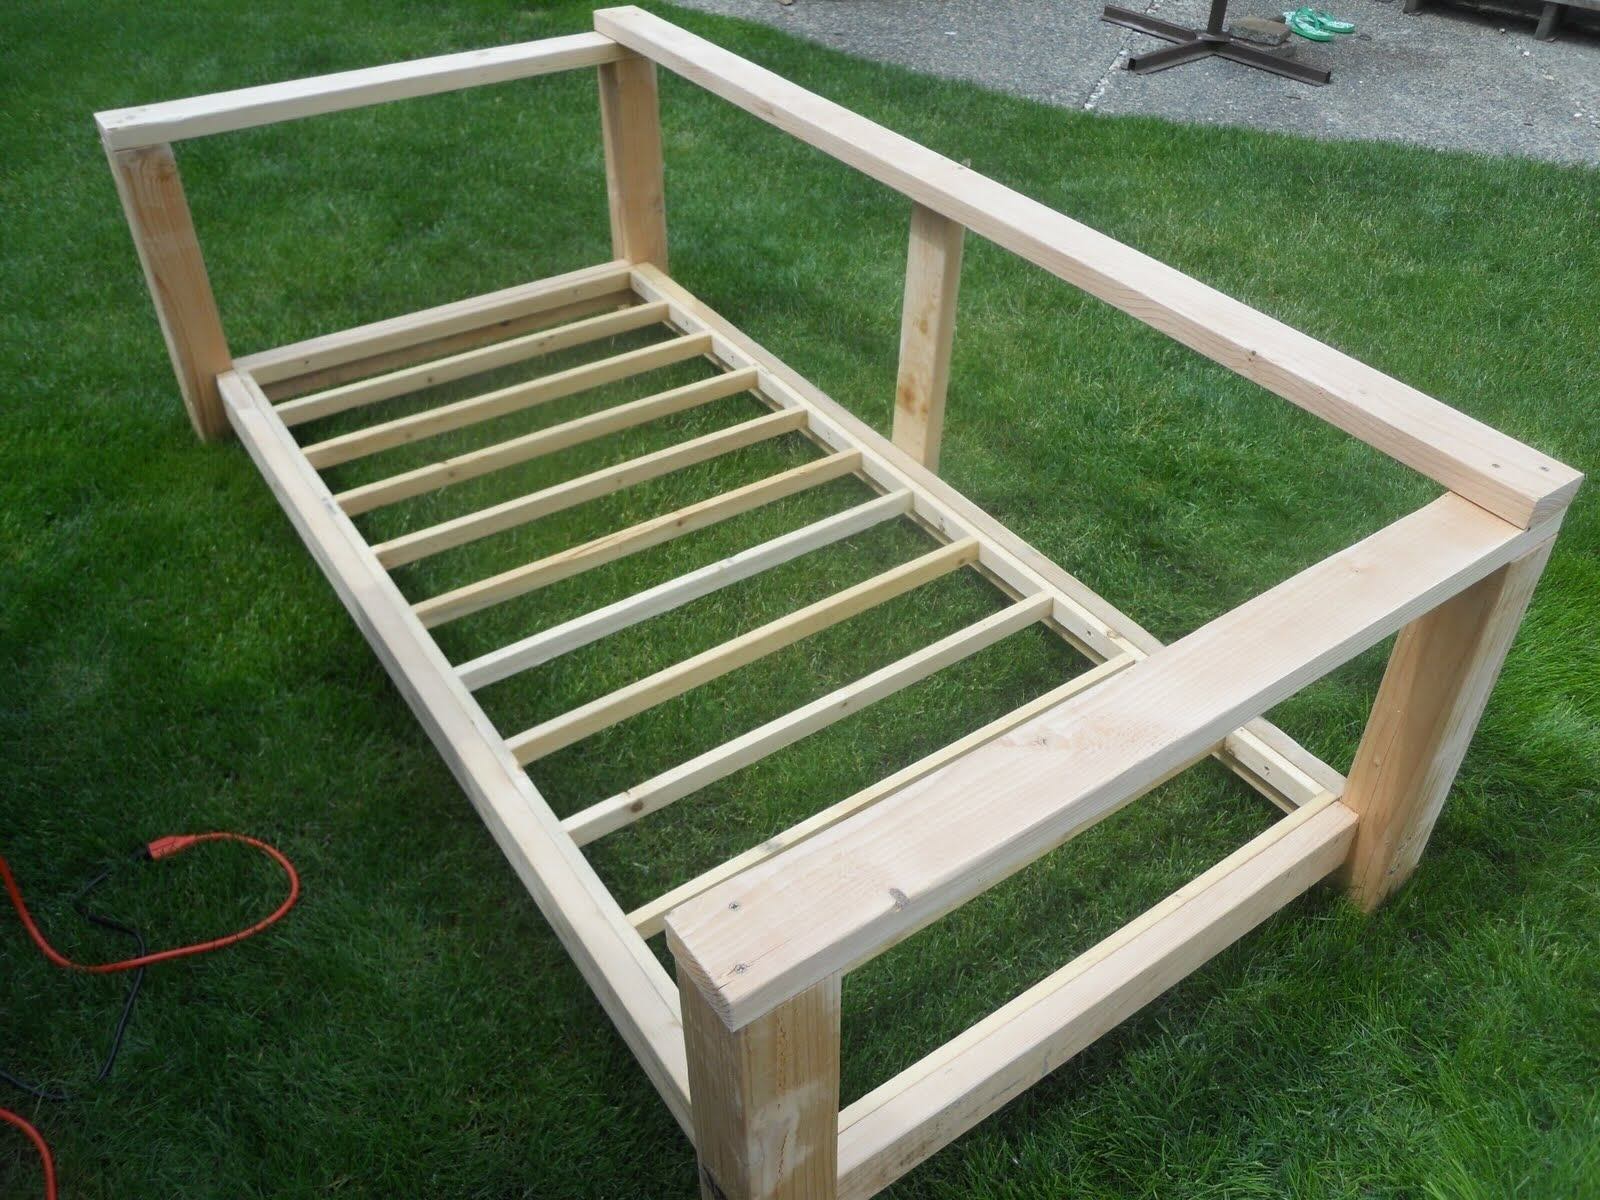
Step 3: Assemble the Frame
With the wood pieces cut and smoothed, it’s time to assemble the frame of your day bed. This step involves joining the different components together to create a sturdy and stable structure. Follow these steps to assemble your day bed frame:
- Lay out the wood pieces: Start by laying out the different wood pieces according to your design and measurements. This will give you a clear visual of how the frame will come together.
- Attach the side panels: Begin by attaching the side panels to the headboard and footboard. Use a drill or screwdriver along with screws or nails to securely fasten the pieces together. Ensure that the corners are square and the joints are tight.
- Reinforce the corners: For added strength, consider reinforcing the corners of the frame with corner brackets or metal braces. This will help prevent any wobbling or instability.
- Attach a center support beam: If your day bed frame is wide or will be supporting a heavy load, it may be necessary to add a center support beam. This will provide additional stability and prevent sagging of the mattress.
- Check for levelness: Use a level to ensure that the frame is even and balanced. Adjust as necessary by tightening or loosening the screws or nails.
Throughout the assembly process, double-check your measurements and ensure that each joint is secure. It’s important to take your time and follow the instructions carefully to create a sturdy and durable day bed frame.
Once the frame is assembled, move on to the next step: attaching the legs. The legs not only provide additional support but also give your day bed a finished and elevated look.
Step 4: Attach the Legs
Now that your day bed frame is assembled, it’s time to add the legs. The legs not only provide support but also elevate the frame, giving it a stylish and finished look. Follow these steps to attach the legs to your day bed frame:
- Determine leg placement: Decide where you want to position the legs on each corner of the frame. Measure and mark the desired location on the bottom of the frame.
- Pre-drill holes: Use a drill bit slightly smaller than the screws or bolts you will be using to attach the legs. Pre-drill holes at the marked locations to prevent the wood from splitting when attaching the legs.
- Align the legs: Place each leg on its corresponding marked location, aligning it with the pre-drilled holes.
- Secure the legs: Use screws or bolts to attach the legs to the frame. Make sure they are firmly and securely fastened.
- Test for stability: Once all the legs are attached, gently test the stability of the day bed frame. Apply some pressure and ensure that it doesn’t wobble or tip. If needed, tighten the screws or bolts for added stability.
By attaching the legs, you not only enhance the overall stability of the day bed frame but also add a touch of style and sophistication. Make sure to choose legs that are appropriate in height and design for your desired aesthetic.
With the legs securely attached, we can move on to the next step: sanding and finishing the frame. This will give your day bed a smooth and professional look, ready for the final touches.
Read more: How To Build A Tall Bed Frame
Step 5: Sand and Finish the Frame
After assembling the day bed frame and attaching the legs, it’s time to move on to the next step: sanding and finishing the frame. This step is essential for achieving a polished and professional look while also protecting the wood from damage. Follow these steps to sand and finish your day bed frame:
- Gather your sanding materials: Prepare a sanding block or sandpaper with medium to fine grit. This will allow you to smooth out any rough surfaces or edges.
- Sand the frame: Start by sanding the entire surface of the frame, including the corners and edges. Use smooth, even strokes to achieve a consistent finish. Pay extra attention to any areas that may feel rough or have splinters.
- Remove dust: After sanding, make sure to wipe away any dust or debris from the frame. This will ensure a clean surface for the finishing process.
- Choose your finish: Decide whether you want to stain or paint the frame. Staining highlights the natural beauty of the wood, while painting allows you to customize the color of the frame.
- Apply the finish: Follow the instructions on the stain or paint can to apply an even coat onto the frame. Use a paintbrush or roller, working in long, smooth strokes. Allow the first coat to dry completely before applying a second coat, if desired.
- Inspect the finish: Once the finish has dried, inspect the frame for any missed spots or uneven application. Touch up as needed to achieve a flawless finish.
By sanding and finishing the frame, you not only create a smooth and visually appealing surface but also protect the wood from everyday wear and tear. The finish helps seal the pores of the wood, preventing moisture damage and enhancing its longevity.
With the frame sanded and finished, it’s time to move on to the next step: adding support slats. These slats will provide the necessary support for your mattress and ensure a comfortable sleeping or lounging experience on your day bed.
When building a day bed frame, make sure to use sturdy and durable materials such as hardwood or metal to ensure the bed can support weight and last for a long time.
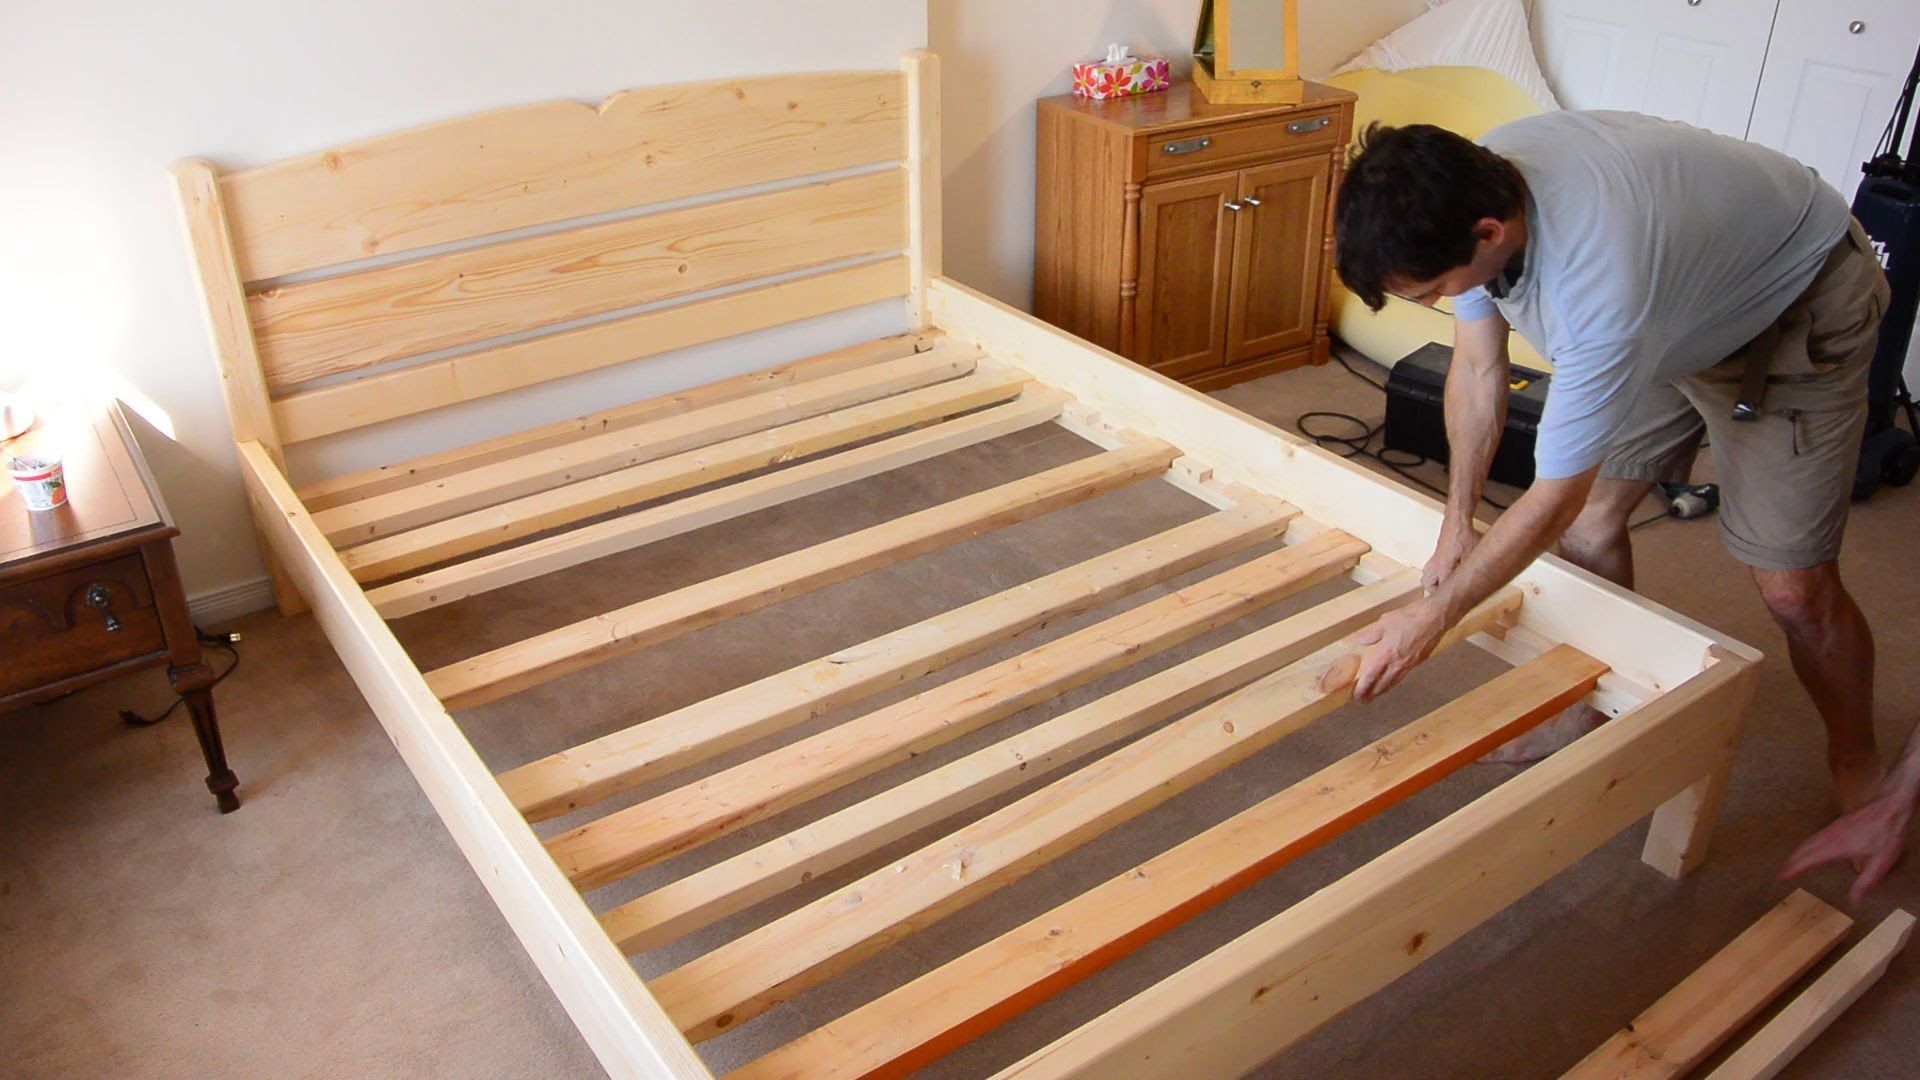
Step 6: Add Support Slats
Now that you have sanded and finished the frame of your day bed, it’s time to add support slats. These slats provide a stable and even base for your mattress, ensuring proper support and comfort. Follow these steps to add support slats to your day bed:
- Measure the spacing: Determine the spacing between the slats. The general guideline is to have a gap of about 2-3 inches between each slat.
- Cut the slats: Using the appropriate measurements, cut the slats from sturdy and durable wooden planks. It’s recommended to use slats that are at least 2 inches in width for ample support.
- Place the center slat: Position the first support slat in the center of the frame, in between the headboard and footboard. Make sure it is aligned properly and rests securely on the frame.
- Attach the side slats: Place the remaining slats evenly spaced between the center slat and the headboard and footboard. Attach them securely to the frame using screws or nails. Ensure that the slats are level and parallel to each other.
- Reinforce with additional slats: Depending on the size of your day bed and the weight it will support, you may need to add additional support slats for added stability. Space them evenly between the existing slats for optimal support.
- Test for stability: Once all the slats are securely attached, test the stability of the support system by applying some pressure. Ensure that the slats don’t flex or sag excessively.
By adding support slats to your day bed, you ensure that the mattress is properly supported and prevents any discomfort or sagging. This step is crucial for creating a comfortable sleeping or lounging experience.
With the support slats in place, we can now move on to the next step: attaching the plywood base. This will provide additional support and stability to the mattress while completing the foundation of your day bed.
Step 7: Attach the Plywood Base
Now that you have added support slats to your day bed frame, it’s time to attach the plywood base. The plywood base provides a solid and even surface for your mattress, ensuring optimal support and comfort. Follow these steps to attach the plywood base to your day bed:
- Measure the dimensions: Measure the length and width of your day bed frame.
- Cut the plywood: Using the measurements, cut the plywood board to fit the dimensions of the frame. If needed, you can have the plywood cut at a hardware store for precise sizing.
- Place the plywood on the frame: Lay the plywood board on top of the support slats, ensuring that it covers the entire surface of the frame.
- Secure the plywood: Begin by attaching the plywood to the frame using screws or nails. Start at one corner and work your way around the perimeter, spacing the screws or nails evenly. Make sure the plywood is securely fastened to prevent any movement or shifting.
- Check for stability: Test the stability of the plywood base by applying some pressure or gently jumping on the bed. Ensure that the base doesn’t flex or shift excessively.
By attaching the plywood base, you create a sturdy foundation for your mattress, preventing it from sagging and ensuring a comfortable sleeping or lounging experience. The plywood adds an extra layer of support and stability to your day bed frame.
With the plywood base securely attached, we can now move on to the next step: creating the mattress platform. This will provide the final layer of support for your mattress while giving your day bed a finished look.
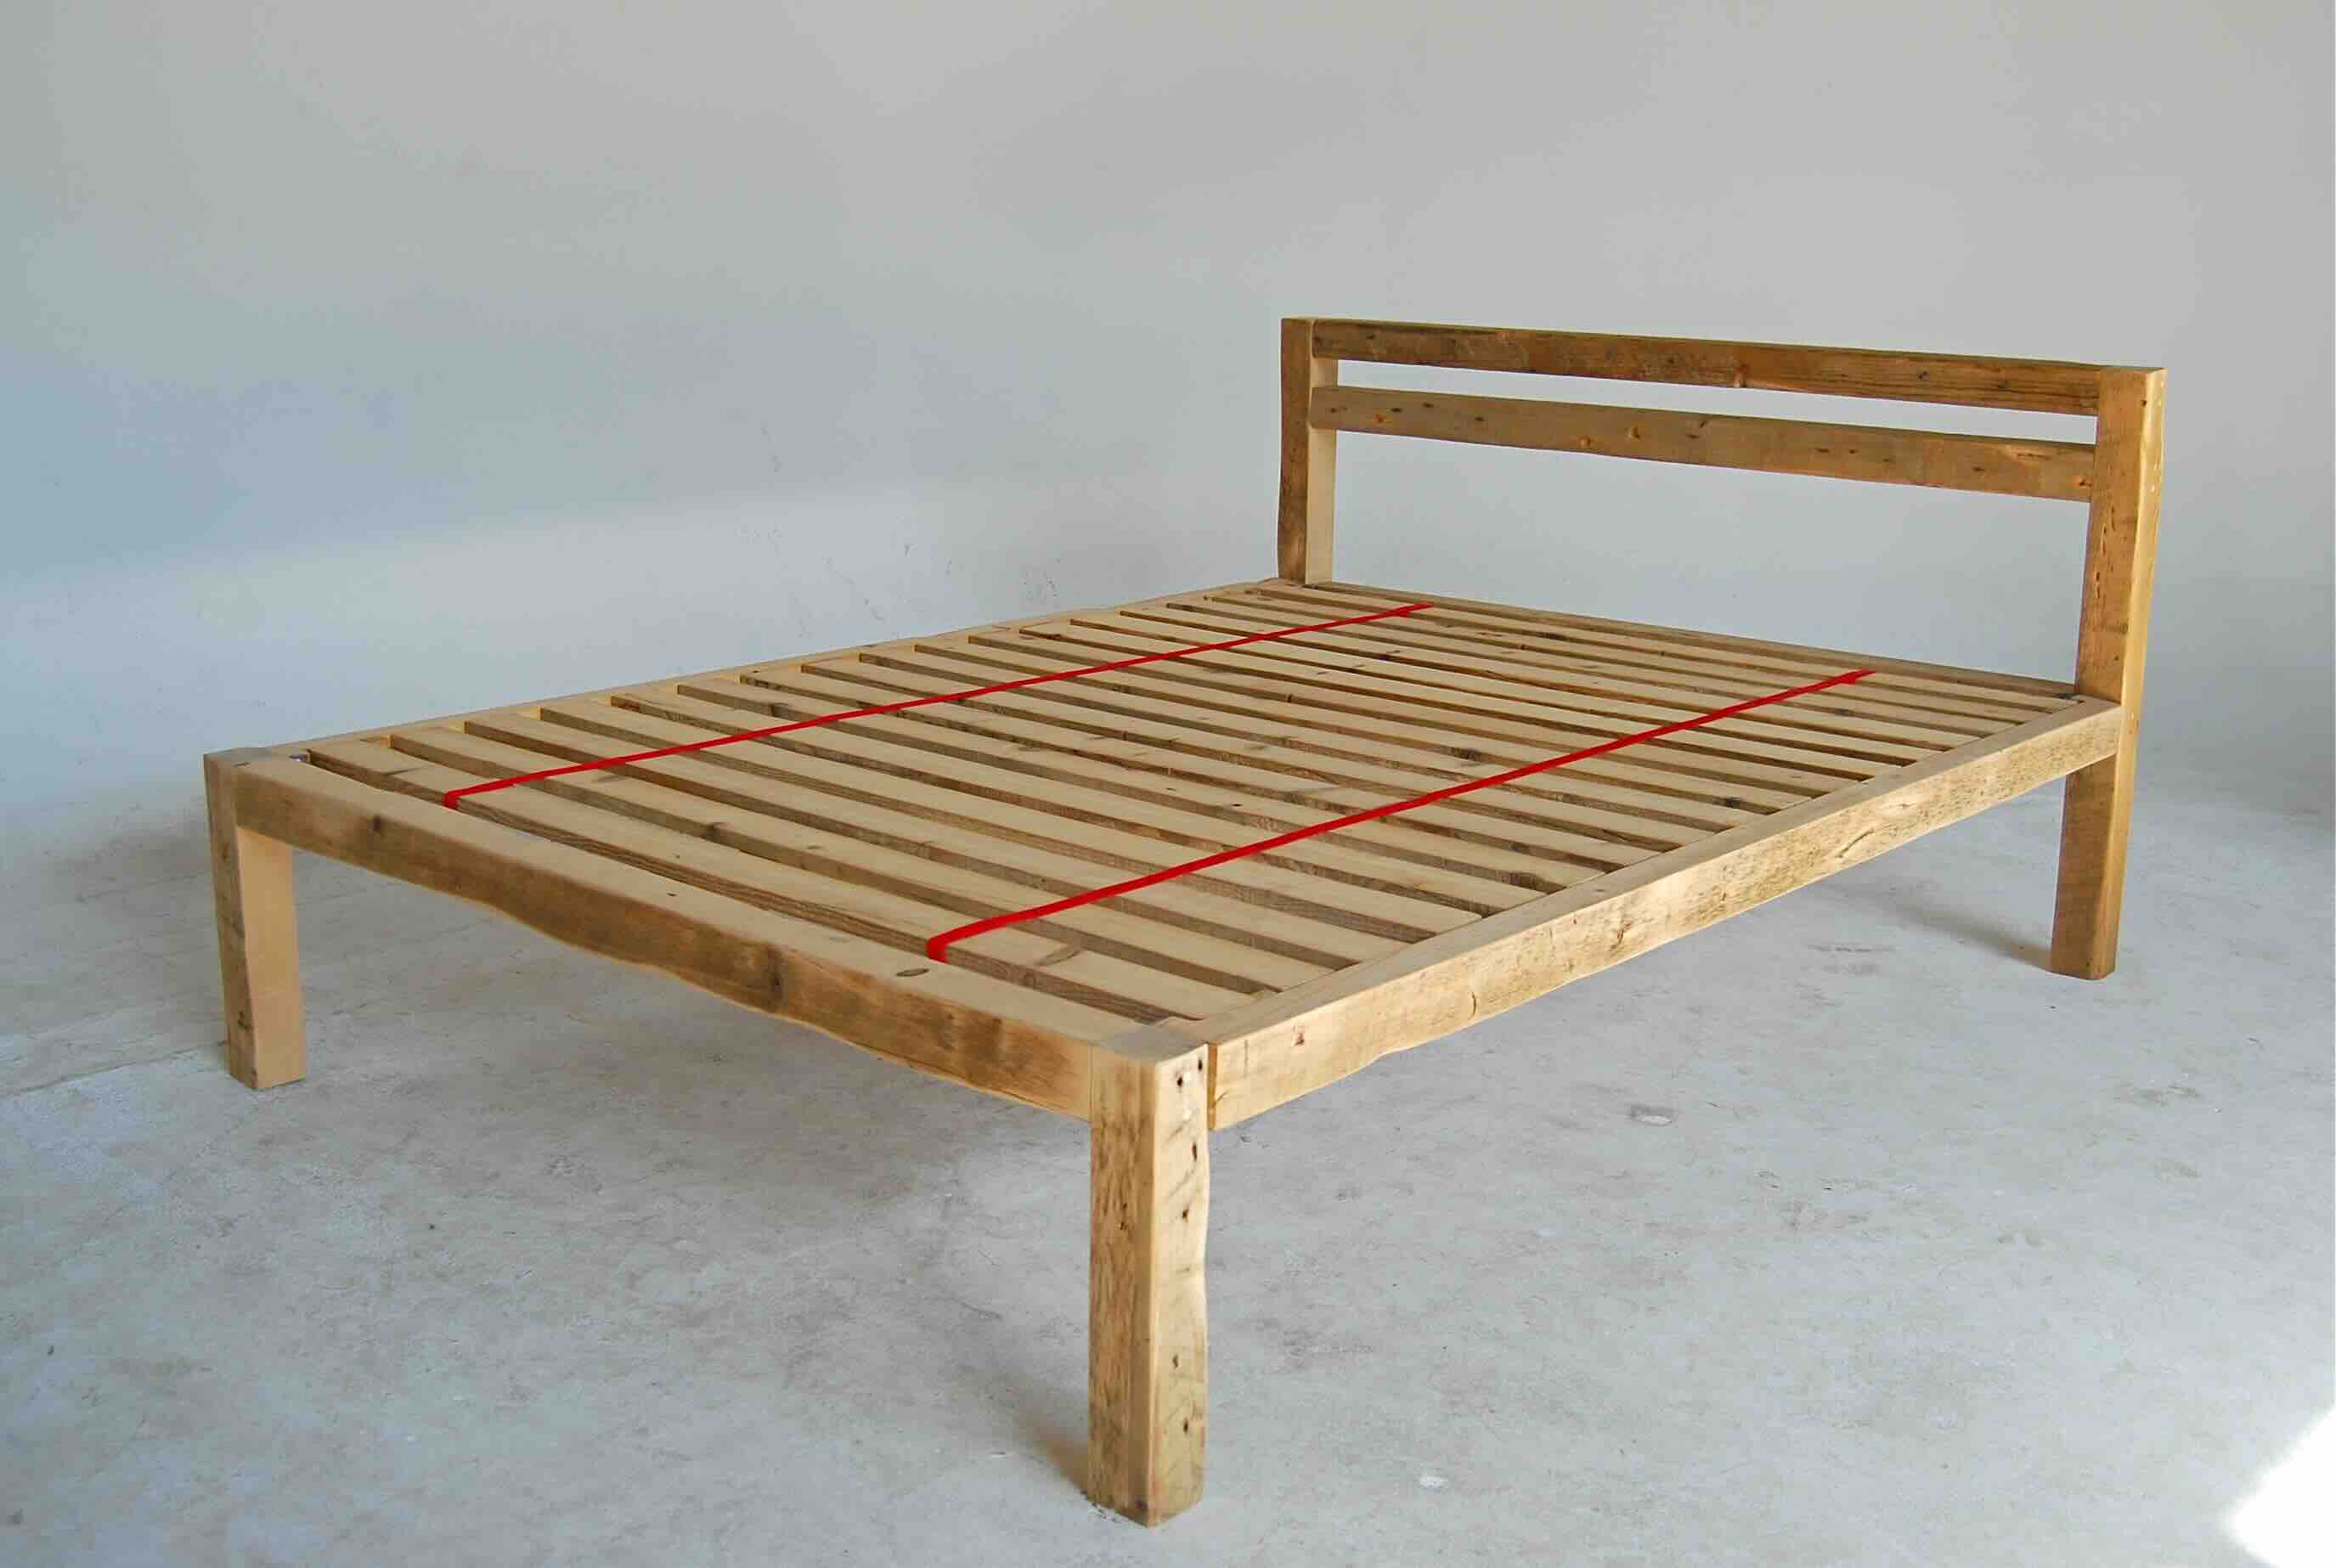
Step 8: Create the Mattress Platform
Now that you have attached the plywood base to your day bed frame, it’s time to create the mattress platform. The mattress platform adds an extra layer of support and stability to your mattress, ensuring a comfortable and secure sleeping or lounging experience. Follow these steps to create the mattress platform:
- Gather your materials: You will need wooden planks or slats to create the platform. Choose sturdy and durable wood that is at least 2-3 inches in width.
- Measure and cut the planks: Measure the width of your day bed frame and cut the planks to fit across the width. Cut enough planks to span the entire length of the frame.
- Space the planks: Lay the planks evenly across the plywood base, leaving a small gap between each plank. This allows for ventilation and airflow.
- Secure the planks: Attach the planks to the plywood base using screws or nails. Make sure they are securely fastened to prevent any movement or shifting.
- Test for stability: Apply some weight or pressure to the mattress platform to ensure that it is stable and doesn’t flex or sag excessively.
The mattress platform provides essential support and helps distribute the weight of the mattress evenly, preventing any discomfort or sagging. It also allows for proper airflow, keeping your mattress fresh and hygienic.
With the mattress platform in place, we can now move on to the next step: painting or staining the frame. This step adds the final touch of style and personalization to your day bed.
Read more: How To Build A Pipe Bed Frame
Step 9: Paint or Stain the Frame
With the construction of your day bed frame nearing completion, it’s time to add the final touch of style and protection by painting or staining the frame. This step allows you to customize the appearance of your day bed to match your personal taste and the overall aesthetic of your bedroom. Follow these steps to paint or stain the frame:
- Prepare the frame: Clean the frame thoroughly to remove any dust or debris. You can use a damp cloth or a mild cleaning solution, depending on the material of your frame.
- Choose your finish: Decide whether you want to paint the frame with a color of your choice or apply a stain to enhance the natural beauty of the wood. Consider the existing décor and color scheme in your bedroom.
- Protect the floor: If you are painting the frame, lay down a drop cloth or old newspapers to protect the floor from any paint drips or spills.
- Apply the paint or stain: Using a paintbrush or a roller, apply a thin and even coat of paint or stain onto the frame. Follow the manufacturer’s instructions on drying time and the number of coats needed. Allow the first coat to dry completely before applying subsequent coats, if necessary.
- Add decorative details (optional): If desired, you can add decorative details, such as stencils or patterns, to enhance the aesthetic appeal of the frame. Use painters tape to create clean and precise lines.
- Allow for proper drying and curing: Once you have finished applying the paint or stain, allow the frame to dry and cure completely. This will ensure a durable and long-lasting finish.
Painting or staining the frame not only adds a personalized touch to your day bed but also provides a protective layer that helps prevent wear and tear. It also allows you to coordinate the frame with the overall design and theme of your bedroom.
With the frame painted or stained, we are almost ready for the final step: adding the mattress and pillows to complete your cozy and inviting day bed.
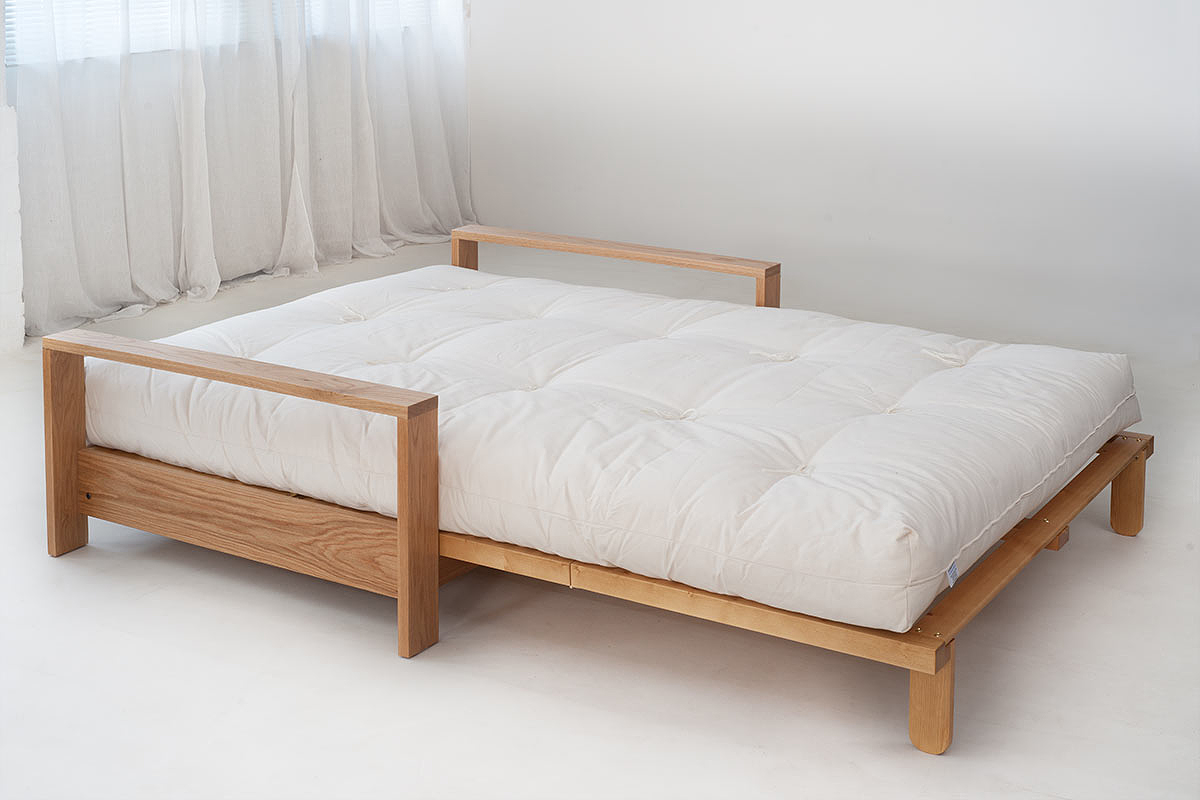
Step 10: Add the Mattress and Pillows
Congratulations! You’re at the final step of building your day bed – adding the mattress and pillows. This step brings your day bed to life, transforming it into a comfortable and inviting space for lounging or sleeping. Follow these steps to complete your day bed:
- Select a mattress: Choose a mattress that suits your comfort preferences and the size of your day bed frame. Consider factors like firmness, thickness, and materials.
- Position the mattress: Place the mattress evenly on top of the plywood base and mattress platform. Make sure it fits snugly within the frame.
- Arrange the pillows: Add pillows of various sizes and softness levels to create a cozy and inviting look. Arrange them in a way that suits your personal style and ensures maximum comfort.
- Add decorative accents: Enhance the visual appeal of your day bed by adding throw blankets, decorative cushions, or a bedspread that complements the color scheme and theme of your bedroom.
- Finalize the styling: Take a step back and assess the overall appearance of your day bed. Make any necessary adjustments to the positioning of the mattress, pillows, and decorative elements to achieve the desired look.
Adding the mattress and pillows completes the functionality and comfort of your day bed, turning it into a versatile and inviting spot for relaxation or rest. Personalize the space with your choice of bedding and accessories to create a cozy oasis within your bedroom.
Congratulations once again on completing the construction of your day bed! Enjoy the comfort and style it brings to your space, and take pride in the fact that you built a beautiful piece of furniture with your own hands.
Conclusion
Congratulations on successfully building your own day bed frame! By following the step-by-step process outlined in this guide, you have created a functional and stylish piece of furniture that will enhance the comfort and aesthetic appeal of your bedroom or living space.
Throughout this journey, you gathered the necessary tools and materials, measured and cut the wood, assembled the frame, attached the legs, and sanded and finished the surfaces. You then added support slats, attached the plywood base, and created the mattress platform. Finally, you painted or stained the frame and completed your day bed by adding the mattress and pillows.
Building your own day bed frame not only allows you to customize it to your exact preferences, but it also gives you the satisfaction of creating something with your own hands. It’s a testament to your creativity and craftsmanship. Plus, by building it yourself, you may have saved some money compared to purchasing a pre-made day bed.
Now that your day bed is complete, make sure to take some time to relax and enjoy the comfort it provides. Whether you use it for reading, lounging, or accommodating guests, your day bed will undoubtedly become a cherished feature of your home.
Remember, you can always tweak or modify the design to suit your individual needs and preferences. Feel free to experiment with different finishes, fabrics, or decorative accents to personalize your day bed even further.
Thank you for joining us on this journey of building a day bed frame. We hope this guide has been informative, inspiring, and empowering. May your day bed provide you with many restful moments and become a focal point of comfort and style in your home.
Frequently Asked Questions about How To Build A Day Bed Frame
Was this page helpful?
At Storables.com, we guarantee accurate and reliable information. Our content, validated by Expert Board Contributors, is crafted following stringent Editorial Policies. We're committed to providing you with well-researched, expert-backed insights for all your informational needs.


0 thoughts on “How To Build A Day Bed Frame”