Home>Furniture>Bedroom Furniture>How To Build A Futon Bed Frame
Bedroom Furniture
How To Build A Futon Bed Frame
Modified: May 6, 2024
Learn how to build a stylish and functional futon bed frame for your bedroom. Explore our step-by-step guide and create the perfect addition to your bedroom furniture collection.
(Many of the links in this article redirect to a specific reviewed product. Your purchase of these products through affiliate links helps to generate commission for Storables.com, at no extra cost. Learn more)
Introduction
Welcome to the ultimate guide on how to build a futon bed frame! If you’re looking to add a versatile and stylish piece of furniture to your bedroom, a futon bed frame is just what you need. Futons offer the perfect combination of comfort and functionality, serving as both a comfortable bed and a stylish sofa. Plus, building your own futon bed frame allows you to customize it to suit your specific design preferences.
In this guide, we’ll walk you through each step of the process, from gathering the necessary materials to adding the finishing touches. Whether you’re a seasoned DIY enthusiast or a beginner, this guide will provide you with all the information you need to build a futon bed frame that will impress both your friends and your guests.
But before we dive into the construction process, let’s go over the materials you’ll need to complete this project:
Read more: How To Build A Bed Frame
Materials Needed:
- Wood planks (preferably hardwood) for the frame and slats
- Plywood for the backrest
- Screws
- Wood glue
- Sandpaper
- Stain or paint for finishing
- Measuring tape
- Saw
- Drill
Now that you have your materials ready, let’s begin the construction process!
Key Takeaways:
- Building a futon bed frame allows for customization to fit your bedroom decor, providing a versatile and stylish piece of furniture that serves as both a comfortable bed and a stylish sofa.
- The construction process involves careful preparation, precise assembly, and attention to detail, resulting in a sturdy and well-built futon bed frame that brings convenience, comfort, and style to your bedroom.
Materials Needed
Before you start building your futon bed frame, it’s important to gather all the necessary materials. Having everything on hand will make the construction process much smoother. Here’s what you’ll need:
- Wood planks (preferably hardwood) for the frame and slats: The type of wood you choose will largely depend on your personal preference and budget. Popular choices include oak, maple, and pine. Make sure the wood is sturdy and durable, as it will bear the weight of the mattress and sleepers.
- Plywood for the backrest: The plywood will provide support and stability to the backrest of the futon. Opt for a plywood sheet that is at least ½ inch thick to ensure strength.
- Screws: Choose screws that are suitable for woodwork. The size of the screws will vary based on the thickness of the wood you’re using.
- Wood glue: This adhesive will enhance the stability of the joints and reinforce the overall structure of the futon bed frame.
- Sandpaper: Sandpaper is essential for smoothing out rough edges and surfaces. You’ll want to achieve a polished and splinter-free finish.
- Stain or paint for finishing: This is optional but recommended for adding a decorative touch to your futon bed frame. Choose a stain or paint color that complements your bedroom decor.
- Measuring tape: Accurate measurements are crucial for ensuring the proper dimensions of your futon bed frame. A measuring tape will help you achieve precise results.
- Saw: You’ll need a saw to cut the wood planks and plywood to the required lengths and shapes. A circular saw or a miter saw will work well for this purpose.
- Drill: A drill is essential for creating holes and driving in screws. Make sure you have the appropriate bits for your screws.
Once you have gathered all the necessary materials, you’re ready to move on to the construction process. Remember to wear appropriate safety gear, such as goggles and gloves, when handling tools and materials. Safety should always be a priority when undertaking any DIY project.
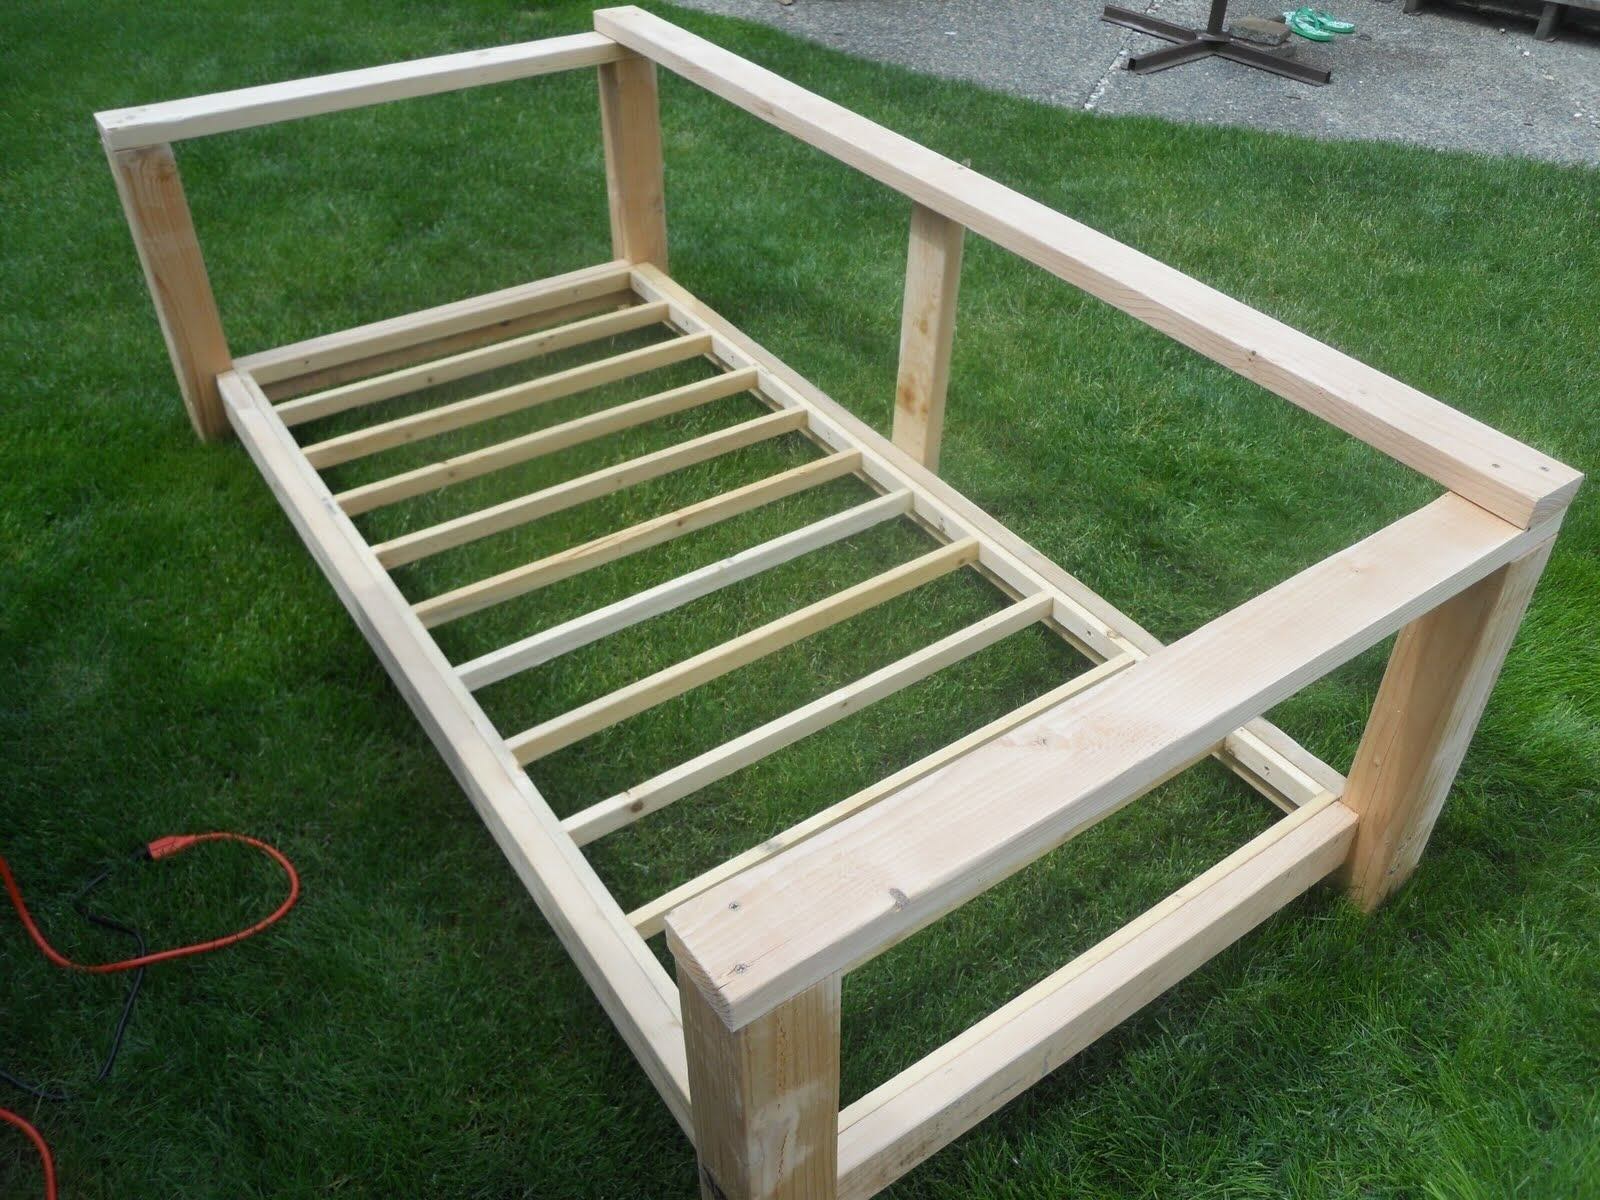
Step 1: Preparing the Frame
The first step in building your futon bed frame is to prepare the frame itself. This involves cutting and assembling the wood planks to create the basic structure of the frame. Follow these steps to ensure a sturdy and well-built foundation:
- Measure and cut the wood: Start by measuring and marking the dimensions for your frame. Using a saw, cut the wood planks according to your measurements. You’ll need four long pieces for the sides and two shorter pieces for the head and foot of the frame.
- Create the side rails: Take two of the long wood planks and position them parallel to each other. These will serve as the side rails of the frame. Use a drill and screws to attach them securely, forming a rectangular shape.
- Add the head and foot: Attach the shorter wood planks to the ends of the side rails to form the head and foot of the frame. Make sure they are aligned properly and securely fastened with screws.
- Check for stability: Once the frame is assembled, check for any wobbling or instability. If necessary, reinforce the joints with additional screws and wood glue to ensure a solid and stable structure.
- Sand the frame: Use sandpaper to smooth out any rough edges or surfaces on the frame. This will prevent splinters and create a polished finish.
By following these steps, you’ll have a well-prepared frame that sets the foundation for your futon bed. Once you’re satisfied with the construction, you can proceed to the next step of assembling the side rails.
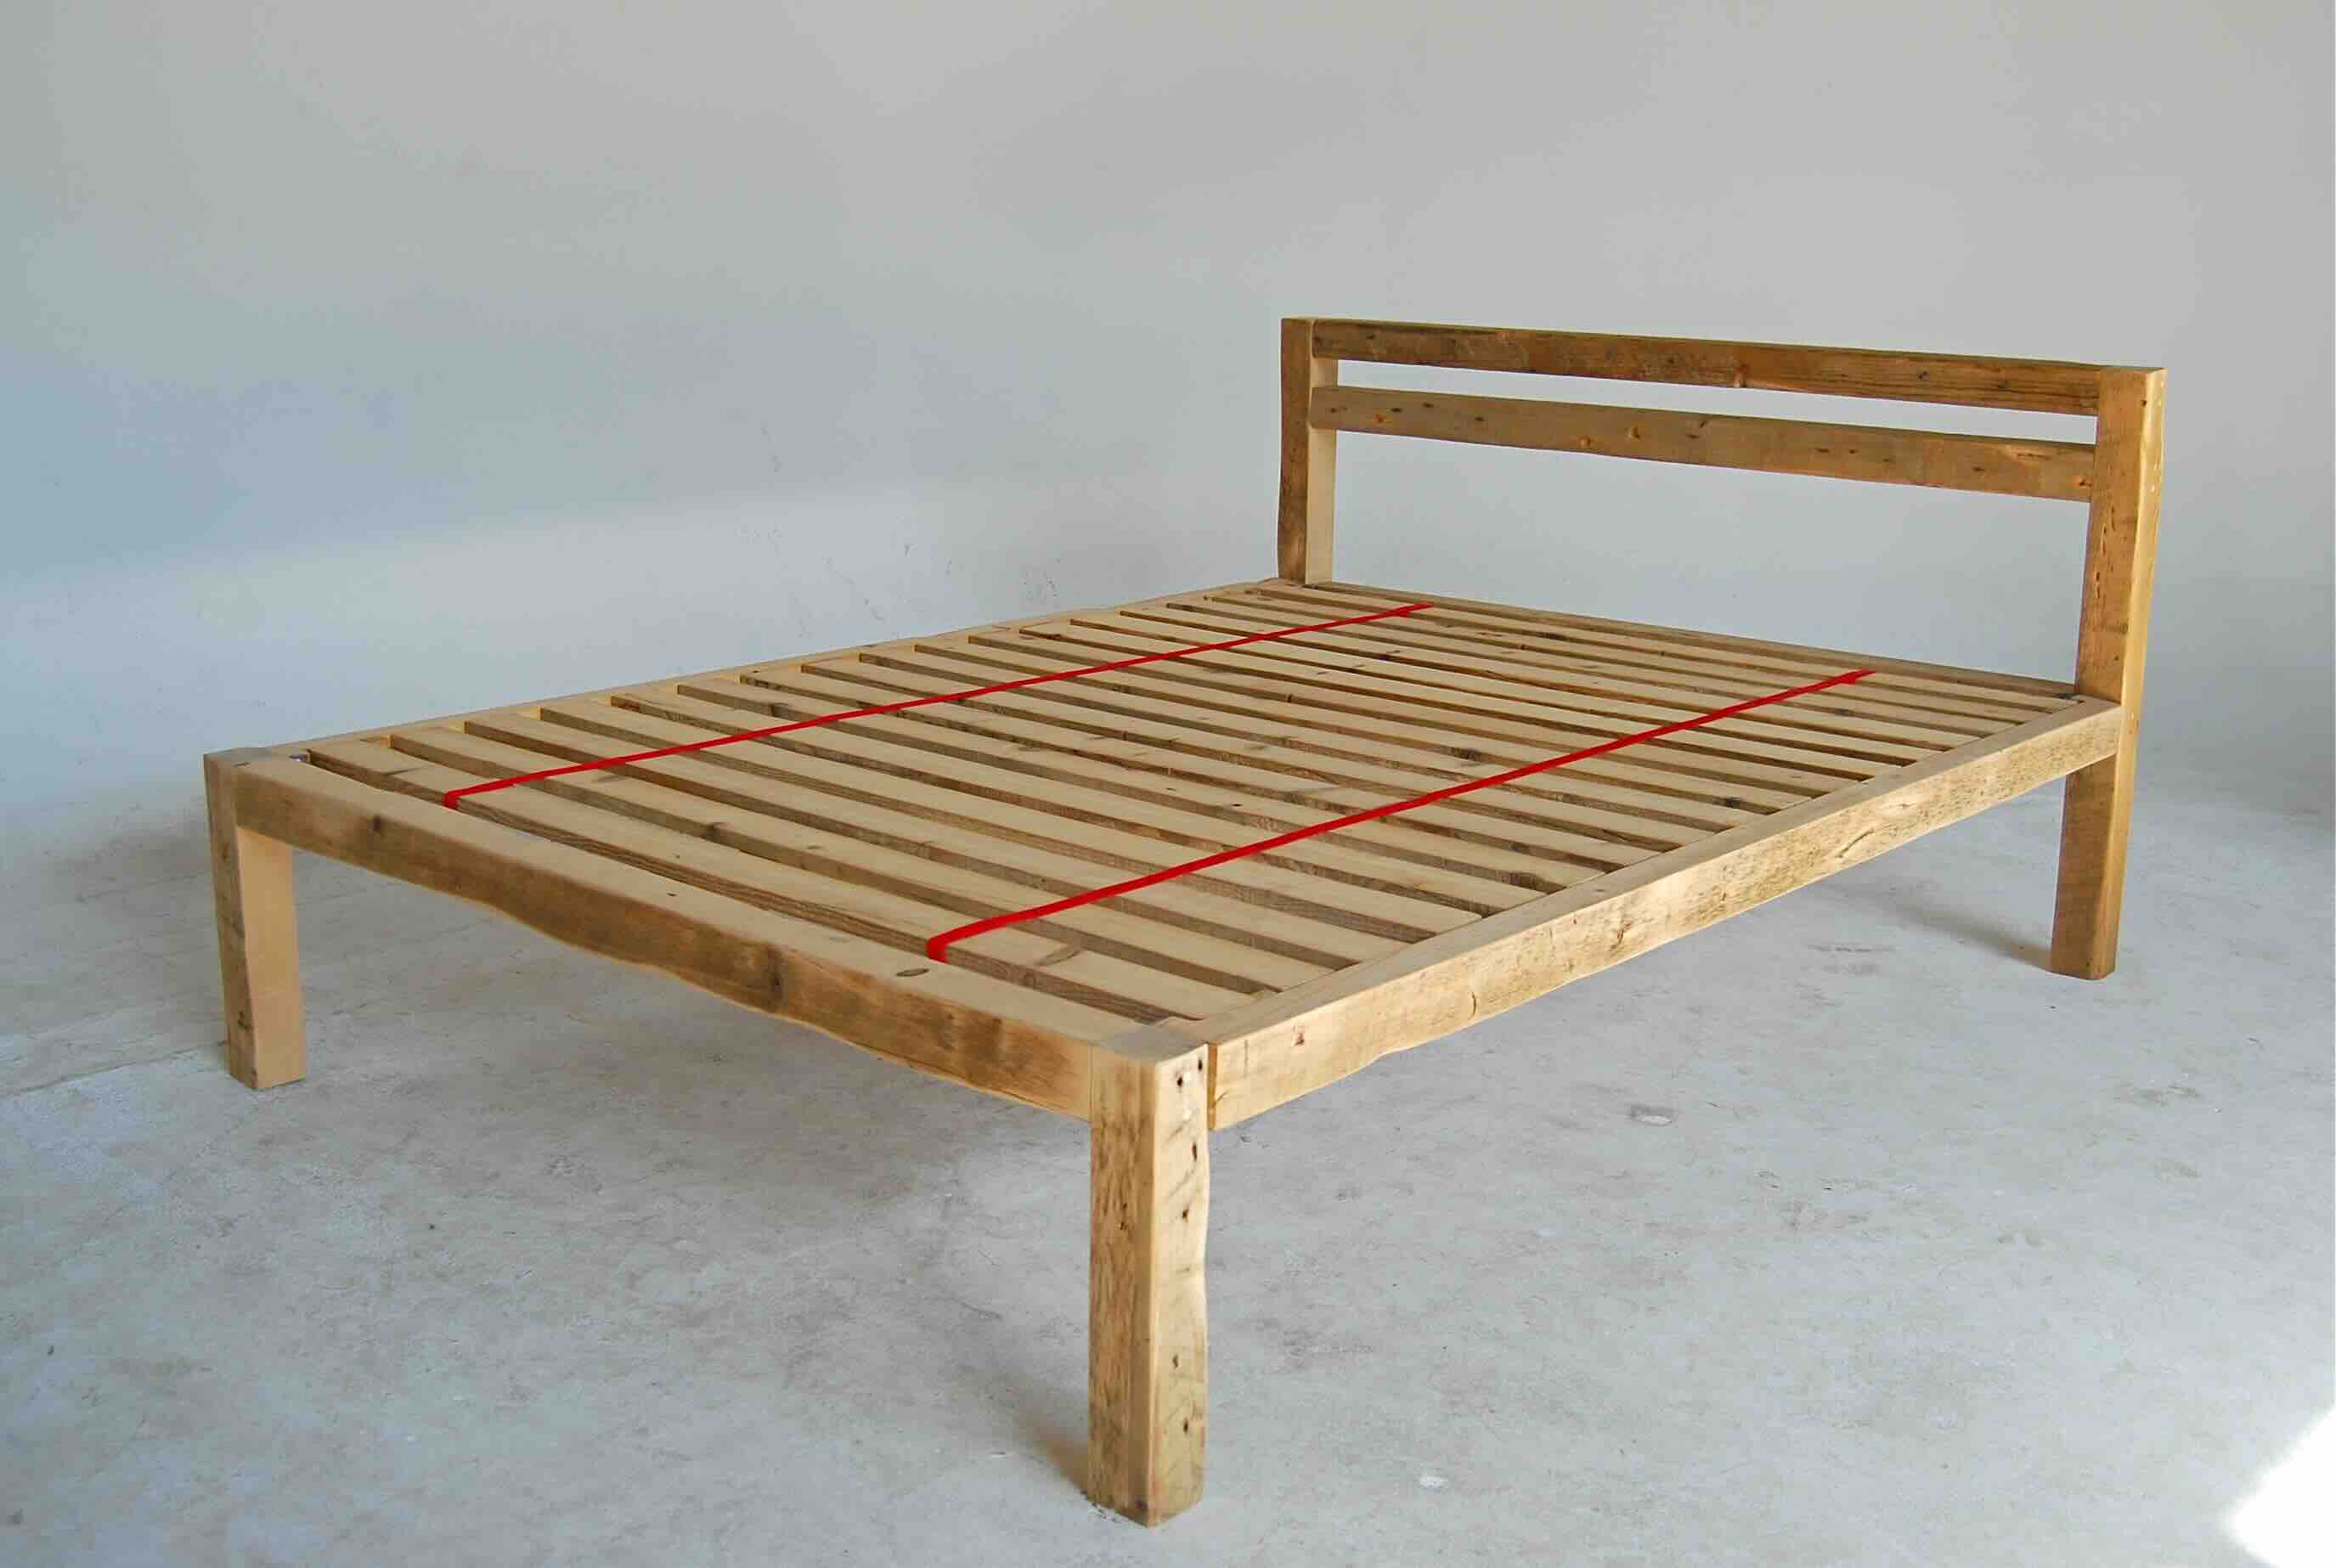
Step 2: Assembling the Side Rails
Now that you have the basic frame prepared, it’s time to move on to assembling the side rails of the futon bed frame. The side rails will provide support for the mattress and ensure stability. Follow these steps to properly assemble the side rails:
- Measure and mark: Start by measuring and marking the locations where the slats will be attached to the side rails. The spacing between the slats should be even to provide proper support.
- Attach the slat supports: Cut additional planks of the same wood you used for the frame to the appropriate length to serve as slat supports. Position them vertically between the head and foot of the frame, lining them up with the marked locations.
- Secure the slat supports: Use screws or wood glue to attach the slat supports to the side rails. Ensure they are firmly fixed in place and evenly spaced along the length of the side rails.
- Consider additional support: Depending on the size of your futon bed frame, you may want to add additional support beams in the center of the side rails. These beams will provide extra stability and prevent the slats from sagging over time.
Once you have assembled the side rails and attached the slat supports, test the stability by gently applying pressure. The side rails should remain sturdy and secure. If needed, make any necessary adjustments or reinforcements before moving on to the next step.
With the side rails assembled, your futon bed frame is starting to take shape. The next step is to attach the slats, which will provide the surface for the mattress to rest on.
Read more: How To Build A Tall Bed Frame
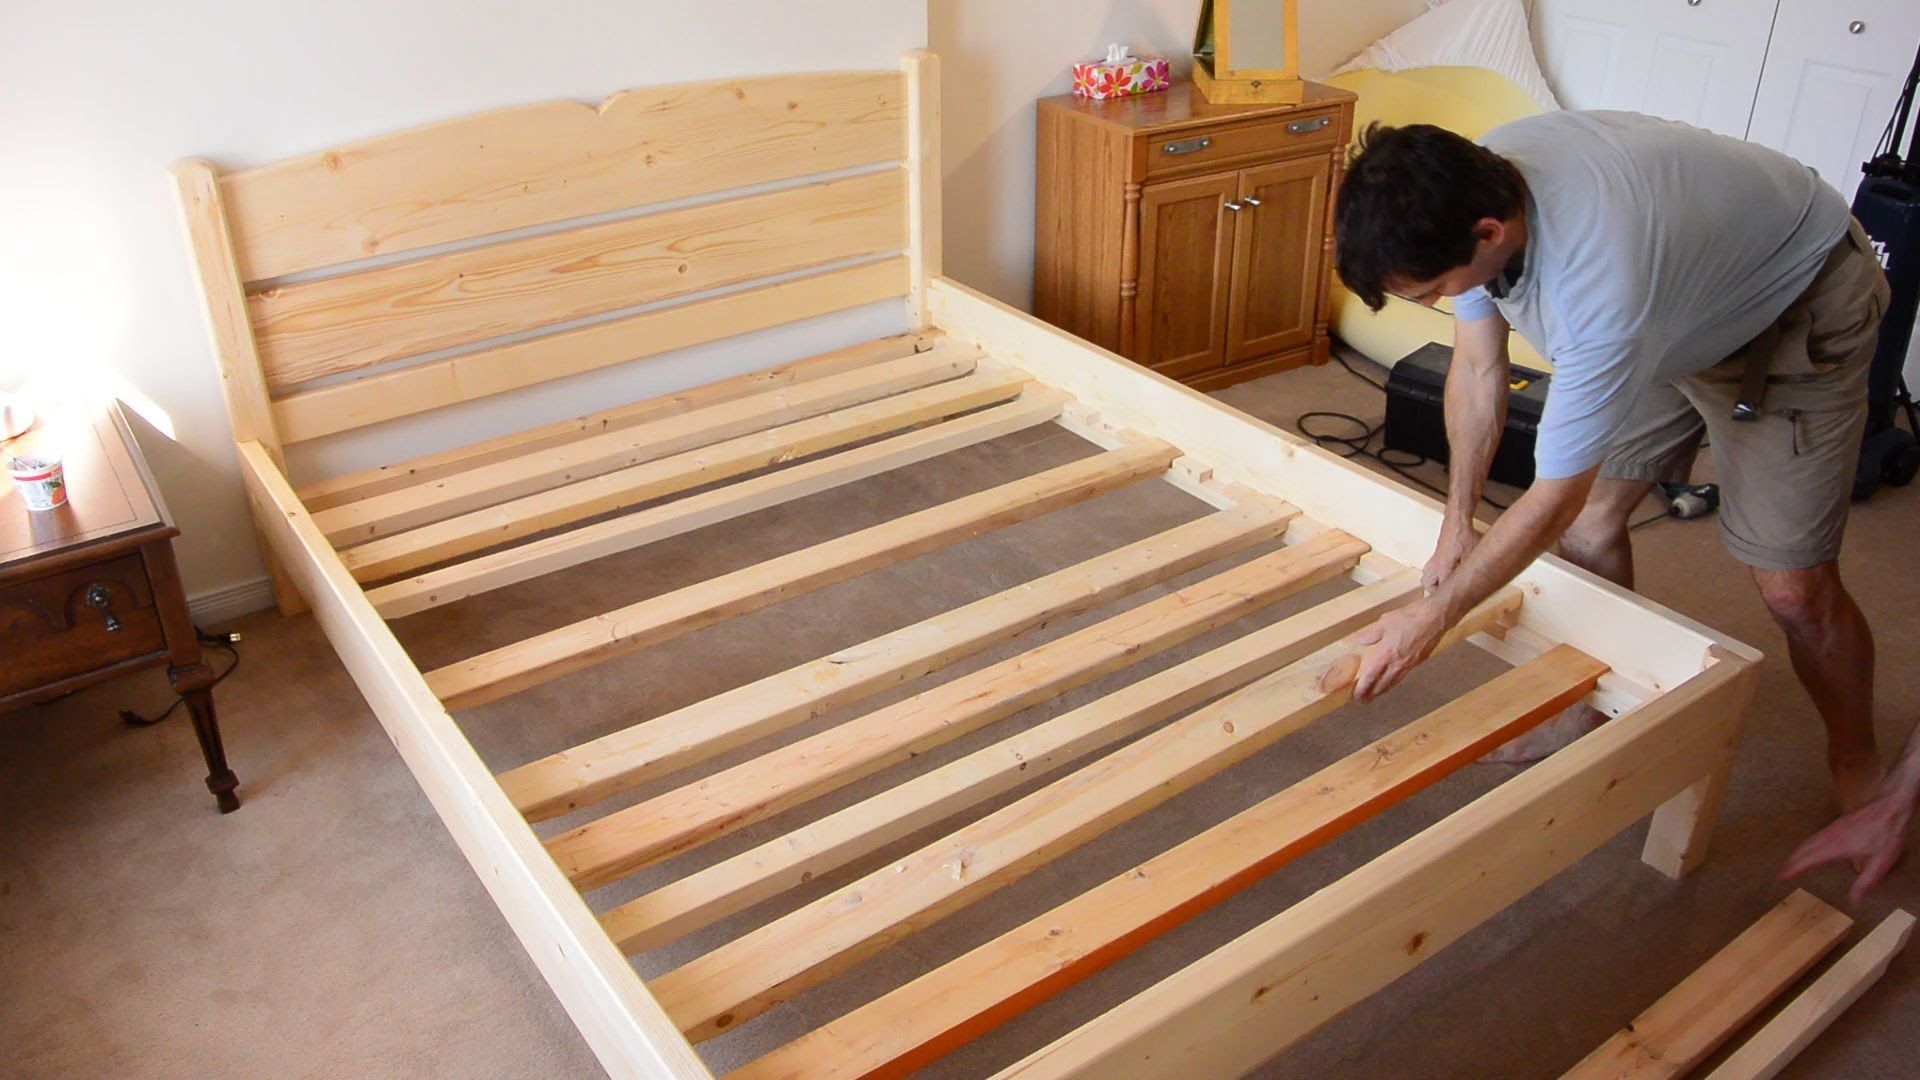
Step 3: Attaching the Slats
Attaching the slats is a crucial step in building your futon bed frame. The slats will provide support for the mattress and ensure a comfortable sleeping surface. Follow these steps to properly attach the slats to your frame:
- Measure and cut the slats: Measure the distance between the inside edges of the side rails to determine the length of each slat. Cut the slats from the same type of wood used for the frame, ensuring they are the correct length.
- Space the slats evenly: Determine the desired spacing between the slats. Generally, a gap of 2-3 inches is recommended for proper air circulation and support. Use spacers or a measuring device to ensure the slats are evenly spaced along the width of the frame.
- Attach the slats: Begin attaching the slats by placing them on top of the slat supports, aligning them with the marked locations. Use screws or wood glue to secure the slats to the supports. Ensure they are centered, level, and securely fastened.
- Reinforce the slats: To ensure long-lasting durability, you may choose to reinforce the slats by attaching additional support beams underneath. These beams will provide extra stability and prevent the slats from sagging or bending over time.
Once all the slats are attached, test the stability of the bed frame by applying gentle pressure. The slats should be secure and evenly spaced, providing a solid foundation for the mattress.
Attaching the slats is a significant step towards completing your futon bed frame. The next step will involve adding support beams to enhance the overall stability of the frame.
Step 4: Adding Support Beams
Adding support beams to your futon bed frame is an important step in ensuring its stability and longevity. These beams will provide additional reinforcement and distribute the weight evenly across the frame. Follow these steps to properly add support beams:
- Determine the number of support beams: Assess the size and dimensions of your futon bed frame to determine how many support beams are needed. Typically, one or two beams placed strategically in the center of the frame are sufficient.
- Measure and cut the support beams: Using the same wood type as the frame, measure and cut the support beams to the appropriate length. They should fit snugly between the side rails without any gaps or overhang.
- Position the support beams: Place the support beams underneath the slats, aligning them with the center of the side rails. Ensure they are evenly spaced and positioned to provide optimal support.
- Secure the support beams: Use screws or wood glue to attach the support beams to the slat supports and side rails. Make sure they are securely fastened and provide a stable connection.
Once the support beams are in place, test the stability of the futon bed frame by applying gentle pressure. The frame should feel solid and evenly supported across the entire surface.
With the support beams added, your futon bed frame is now reinforced and ready for the next step: installing the futon mechanism.
When building a futon bed frame, make sure to use sturdy and durable materials such as hardwood or metal to ensure the frame can support the weight of the mattress and the person using it.
Step 5: Installing the Futon Mechanism
The futon mechanism is an essential component of your futon bed frame as it allows for easy conversion between a bed and a sofa. Installing the futon mechanism requires precision and careful attention to detail. Follow these steps to properly install the futon mechanism:
- Position the futon mechanism: Place the futon mechanism in the center of the frame, ensuring it is aligned with the head and foot of the frame. The mechanism should fit securely and have enough clearance for movement.
- Mark the screw hole locations: Use a marker or pencil to mark the locations of the screw holes on the side rails of the frame. These marks will serve as a guide for attaching the mechanism.
- Secure the futon mechanism: Using the appropriate screws, attach the futon mechanism to the frame by screwing through the pre-marked holes. Ensure the mechanism is firmly secured to provide stability and smooth operation.
- Test the futon mechanism: Once the mechanism is installed, test its functionality by transitioning between the bed and sofa positions. Ensure that the mechanism operates smoothly without any hitches or obstructions.
It’s important to follow the manufacturer’s instructions for installing the specific futon mechanism you have. The installation process may vary slightly depending on the design and style of the mechanism.
With the futon mechanism properly installed, your futon bed frame is now ready to provide the convenience of a comfortable sofa or a relaxing bed. The next step will involve attaching the backrest to complete the construction process.
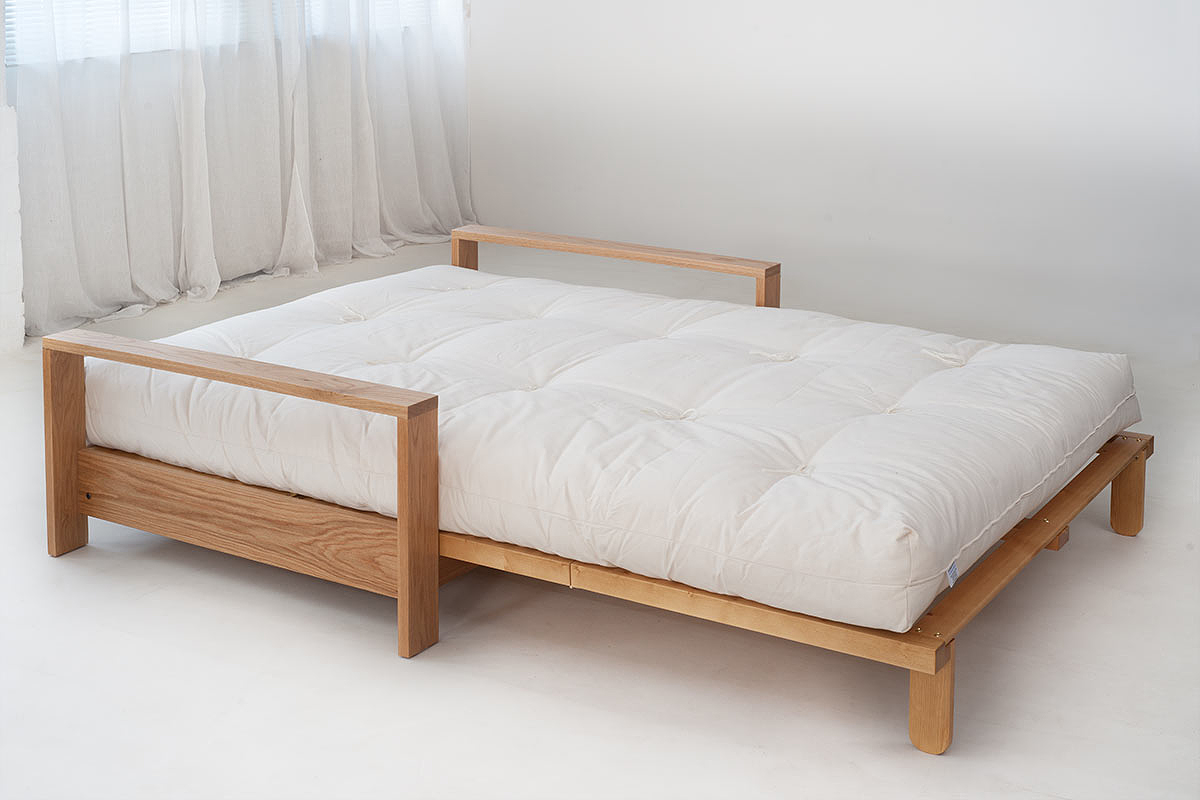
Step 6: Attaching the Backrest
The backrest is an integral part of your futon bed frame, providing support and comfort when used as a sofa. Attaching the backrest requires careful positioning and secure fastening to ensure stability. Follow these steps to properly attach the backrest:
- Measure and cut the plywood: Measure the dimensions of the backrest and cut a piece of plywood to fit. Ensure that the plywood is thick enough to provide adequate support.
- Position the plywood: Place the plywood on the backside of the futon bed frame, aligning it with the top of the side rails. Make sure it is centered and level.
- Secure the plywood: Using screws or wood glue, attach the plywood to the side rails. Place screws at regular intervals along the perimeter of the plywood to ensure it is securely fastened.
- Reinforce the plywood: To provide additional strength and stability, you may choose to add support braces or brackets to reinforce the backrest. These can be attached diagonally or horizontally on the backside of the plywood.
Once the backrest is attached, test its stability by applying gentle pressure. It should feel secure and able to support the weight of a person when using the futon as a sofa.
With the backrest securely in place, your futon bed frame is nearing completion. The final step will involve adding the finishing touches to enhance its appearance.
Read more: How To Build A Pipe Bed Frame
Step 7: Finishing Touches
The finishing touches are an essential part of building your futon bed frame, as they enhance its appearance and protect it from wear and tear. Follow these steps to add the final touches and ensure your futon bed frame is both functional and visually appealing:
- Sand and smooth the frame: Use sandpaper to smooth out any rough edges or surfaces on the frame. Pay extra attention to areas that will come into contact with the mattress or the skin to prevent any potential discomfort.
- Apply a finish: Consider applying a stain, varnish, or paint to the wood to enhance its natural beauty and protect it from scratches and stains. Choose a finish that matches your bedroom décor and allows the wood grain to shine through.
- Add decorative elements: If desired, you can add decorative elements such as trim, moldings, or carved designs to customize the look of your futon bed frame. Be creative and choose elements that complement your personal style.
- Protective measures: Consider adding felt pads or rubber stoppers to the bottom of the frame to protect your floors from scratches and to prevent the frame from sliding or shifting during use.
- Quality check: Take a final look at the overall construction of the futon bed frame. Ensure that all screws are tightened, joints are secure, and the frame is stable and sturdy.
By following these steps, your futon bed frame will be complete and ready for use. The finishing touches not only add an aesthetic appeal but also contribute to the overall durability and functionality of the frame.
Congratulations! You have successfully built your own futon bed frame. Now, it’s time to enjoy the versatility, comfort, and style that it brings to your bedroom.
If you have any other questions, feel free to ask. Happy relaxing and sleeping!
Conclusion
Congratulations on successfully completing the construction of your very own futon bed frame! By following the steps outlined in this guide, you have created a versatile and stylish piece of furniture that will bring comfort and functionality to your bedroom.
Building your futon bed frame allows you to customize it to your specific design preferences, ensuring that it fits perfectly with your overall bedroom decor. Not only does it provide a comfortable sleeping surface, but it also transforms into a stylish sofa, making it ideal for small spaces or guest rooms.
Throughout the construction process, you have learned how to prepare and assemble the frame, attach the slats and support beams, install the futon mechanism, attach the backrest, and add the finishing touches. Each step was carefully explained to help you achieve a sturdy and well-built futon bed frame.
Remember, safety should always be a priority during any DIY project. Ensure that you wear appropriate safety gear and use tools correctly and responsibly. Take your time and pay attention to detail to ensure the best possible results.
Now that your futon bed frame is complete, take some time to admire your craftsmanship and enjoy the convenience and comfort it brings. Whether you’re using it as a comfortable bed for a good night’s sleep or as a stylish sofa for relaxation, your futon bed frame is sure to be a standout piece in your bedroom.
Thank you for choosing this guide to help you build your futon bed frame. We hope you found it informative and easy to follow. If you have any questions or need further assistance, feel free to reach out. Happy sleeping and lounging!
Now that you've mastered building a futon bed frame, why not enhance your woodworking skills? Dive into our latest guide on the best woodworking practices coming up in 2024. Whether you're a novice or seasoned woodworker, this collection of tips and tools will surely sharpen your craft and bring your projects to life. Don't miss out on becoming a more skilled woodworker with our insightful guide.
Frequently Asked Questions about How To Build A Futon Bed Frame
Was this page helpful?
At Storables.com, we guarantee accurate and reliable information. Our content, validated by Expert Board Contributors, is crafted following stringent Editorial Policies. We're committed to providing you with well-researched, expert-backed insights for all your informational needs.


0 thoughts on “How To Build A Futon Bed Frame”