Furniture
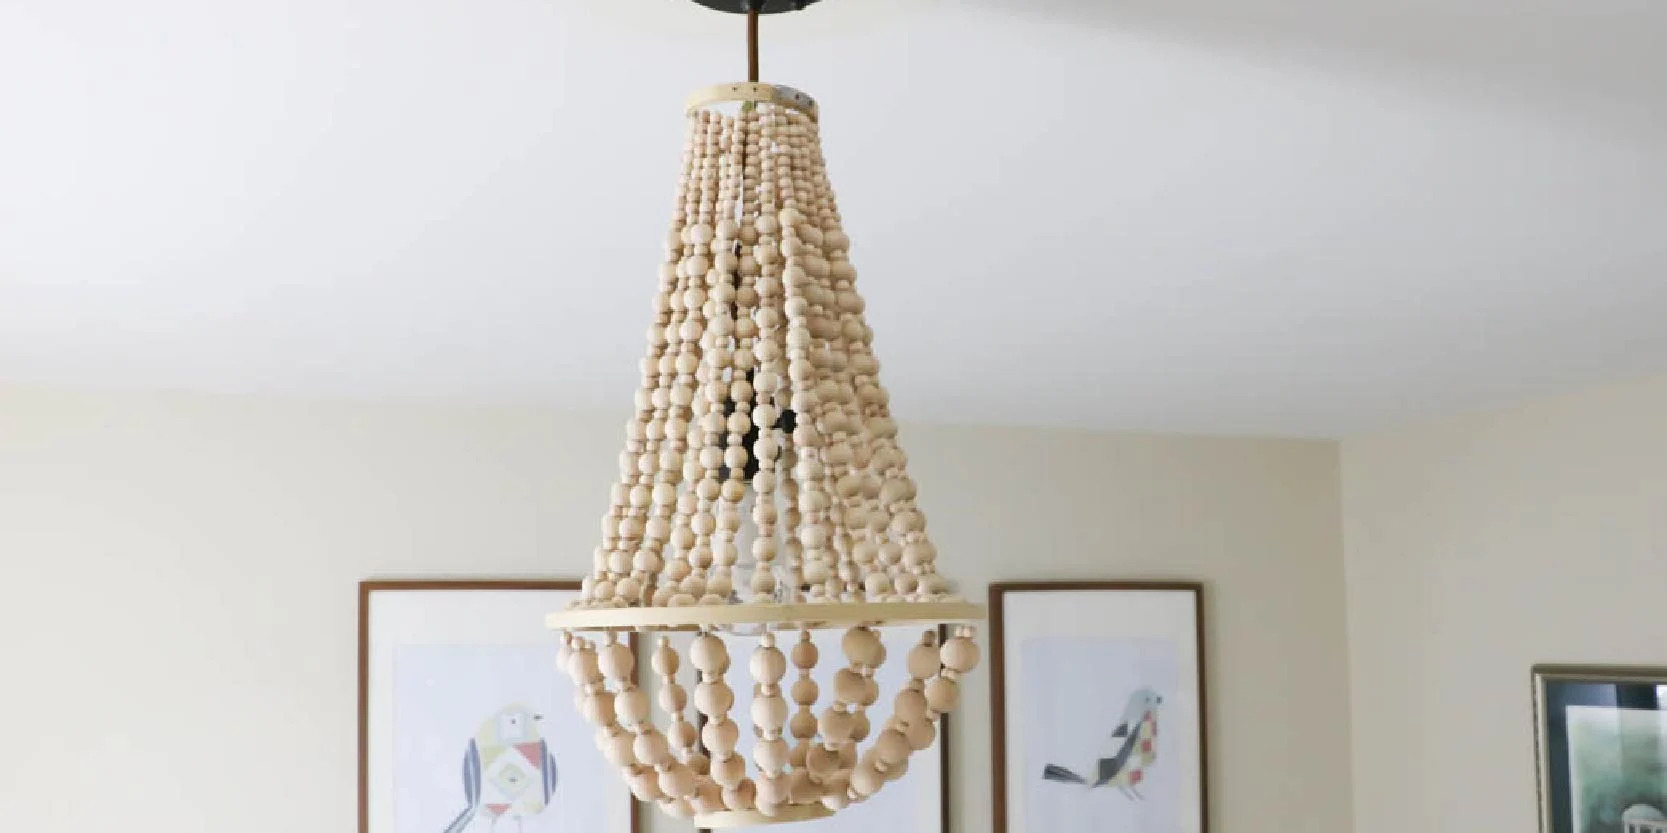
How To Make A Beaded Chandelier
Modified: March 2, 2024
Learn how to make a stunning beaded chandelier to add a touch of elegance to your furniture collection. Step-by-step tutorial for DIY enthusiasts!
(Many of the links in this article redirect to a specific reviewed product. Your purchase of these products through affiliate links helps to generate commission for Storables.com, at no extra cost. Learn more)
Introduction
Welcome to this comprehensive guide on how to make a beautiful beaded chandelier. A beaded chandelier can instantly add elegance and charm to any room. Whether you want to create a statement piece for your dining room or a whimsical fixture for a child’s bedroom, making your own beaded chandelier allows you to customize it to suit your style and space.
Making a beaded chandelier may seem daunting, but with the right materials and a little bit of patience, you can create a stunning piece that will be the envy of all your friends. In this guide, we will walk you through the step-by-step process of making a beaded chandelier, from gathering your supplies to hanging the finished product.
This project is perfect for beginners who are looking to unleash their creativity and add a personal touch to their home décor. So, let’s dive in and start creating!
Key Takeaways:
- Unleash your creativity and personalize your space by crafting a stunning beaded chandelier with a variety of materials and decorative accents to suit your style and vision.
- Transform simple supplies into an elegant and captivating lighting fixture that adds character and charm to any room, creating a warm and inviting ambiance for years to come.
Read also: 9 Amazing Beaded Chandelier for 2024
Materials Needed
- Chandelier base or wire frame
- Beads of your choice – different sizes, shapes, and colors
- Beading wire or fishing line
- Jump rings
- Jewelry pliers
- Wire cutters
- Scissors
- Measuring tape
- Optional: decorative accents, such as crystals or charms
Before you begin creating your beaded chandelier, it’s essential to gather all the necessary materials. These items can be easily found at craft stores or online. The chandelier base or wire frame will serve as the foundation for your beaded masterpiece, while the beads will add the desired look and style.
When it comes to selecting beads, let your imagination run wild! Choose beads of different sizes, shapes, and colors to create an eye-catching design. Beading wire or fishing line will be used to string the beads and attach them to the chandelier base.
Jump rings are small metal rings that enable you to connect the beaded strands to the chandelier base. Jewelry pliers and wire cutters are essential tools for manipulating the wire and cutting it to the desired length. Scissors will be needed to trim any excess material, while a measuring tape will help you ensure the chandelier is appropriately sized for your space.
For those looking to add extra flair, consider incorporating decorative accents such as crystals or charms. These elements can enhance the overall aesthetic of the beaded chandelier and make it truly unique.
Once you have gathered all the materials, you’re ready to move on to the next step: preparing the chandelier base.
Step 1: Gather Your Supplies
Before diving into the process of making your beaded chandelier, it’s crucial to gather all the necessary supplies. Having everything readily available will ensure a smoother and more efficient crafting experience. Here’s a quick checklist to assist you:
- Chandelier base or wire frame: Choose a base that suits your desired style and size. It can be a pre-made chandelier base or a wire frame that you can shape into your desired form.
- Beads: Select a variety of beads to create visual interest. Consider different shapes, sizes, and colors that coordinate with your overall design concept. You can choose glass beads, wooden beads, plastic beads, or any other material that fits your aesthetic.
- Beading wire or fishing line: Depending on your preference, choose either beading wire or fishing line to string your beads. Beading wire is sturdy and easy to work with, while fishing line provides a more transparent look.
- Jump rings: These small metal rings are essential for attaching the beaded strands to the chandelier base. They act as connectors and provide flexibility in the design.
- Jewelry pliers: Invest in a good pair of jewelry pliers with a flat nose and round nose for bending and cutting wires. These will be handy tools throughout the process.
- Wire cutters: A sharp pair of wire cutters will be necessary to trim the beading wire or fishing line to the desired length. Make sure to use the proper tool for a clean and precise cut.
- Scissors: Keep a pair of scissors close by to trim any excess beading wire or fishing line.
- Measuring tape: Accurate measurements are crucial to achieving the desired size and proportions for your chandelier. Keep a measuring tape handy and refer to it when needed.
- Optional: Decorative accents – If you want to add a touch of elegance or uniqueness to your chandelier, consider incorporating decorative accents such as crystals, charms, or pendants. Choose accents that complement the overall design and enhance its visual appeal.
Once you have gathered all the necessary supplies, you are ready to embark on the creative journey of making your very own beaded chandelier. Next, we will move on to preparing the chandelier base.
Step 2: Prepare the Chandelier Base
Now that you have all your supplies ready, it’s time to prepare the chandelier base. The base serves as the foundation for your beaded chandelier, providing structure and support. If you are using a pre-made chandelier base, skip to the next step. If you have a wire frame that needs shaping, follow these steps:
- Measure and mark the desired size for your chandelier using a measuring tape. This will help ensure that your finished chandelier fits perfectly in your space.
- Using wire cutters, cut the wire frame to the appropriate length based on your measurements. Be careful to make clean and even cuts for a professional-looking finish.
- If necessary, shape the wire frame into your desired chandelier form. You can create a classic round shape, a modern geometric shape, or any design that matches your vision. Use your hands or jewelry pliers to bend the wire gently, following the marked lines.
- Make any adjustments needed to achieve the desired shape and symmetry. Keep in mind that the wire frame will be visible in certain parts of the finished chandelier, so ensure that it looks neat and presentable.
If you are using a pre-made chandelier base, inspect it carefully to ensure it is in good condition and ready for the beading process. Clean or repair any damages if necessary. Take note of any hooks or attachment points on the base where you will be connecting the beaded strands.
With your chandelier base prepared, you can now move on to the exciting part of stringing the beads. This step will bring your beaded chandelier to life and allow you to unleash your creativity. Next, we will dive into the process of stringing the beads onto the chandelier base.
Step 3: String the Beads
With your chandelier base prepared, it’s time to start stringing the beads onto the wire or fishing line. This step allows you to create beautiful beaded strands that will adorn your chandelier. Follow these steps to string the beads:
- Measure and cut a length of beading wire or fishing line that is longer than the desired length of your beaded strand. Giving yourself some extra length will ensure that you have enough to work with and make adjustments if needed.
- If you are using beading wire, thread one end through a jump ring, leaving a small tail to secure it later. If you are using fishing line, tie a knot at one end to create a loop for attaching the jump ring.
- Begin stringing the beads onto the wire or fishing line, following your chosen pattern or design. You can create a uniform pattern, mix different bead shapes and sizes, or incorporate specific color schemes. Let your creativity guide you.
- As you string the beads, periodically check the length against your chandelier base. Make adjustments as necessary to ensure that each beaded strand reaches your desired position when attached to the base.
- Continue stringing the beads until you reach the desired length for each beaded strand. Remember to leave a small amount of space at the end to allow for attaching the jump ring securely.
- Once you have finished stringing a beaded strand, thread the opposite end of the wire or fishing line through another jump ring. Pull the wire or fishing line tightly to secure the beads in place.
- If you are using beading wire, use jewelry pliers to create a tight loop or crimp the wire close to the jump ring. This will ensure that the beads are securely held in place. If you are using fishing line, tie a knot to secure the beads.
- Repeat the above steps for each beaded strand, creating as many strands as you desire for your chandelier design.
Remember to take your time and enjoy the process of stringing the beads. This step allows you to showcase your artistic flair and create a unique and personalized beaded chandelier. Once all the beads are strung, you are ready to move on to the next step: attaching the beaded strands to the chandelier base.
When making a beaded chandelier, be sure to plan out your design and layout before starting to ensure a balanced and visually appealing finished product.
Step 4: Attach the Beaded Strands
With the beaded strands ready, it’s time to attach them to your chandelier base. This step will bring your design together and create the beautiful cascading effect of the beaded chandelier. Follow these steps to attach the beaded strands:
- Start by determining the desired placement of each beaded strand on the chandelier base. You can evenly distribute the strands or create a specific arrangement based on your design concept.
- Using jewelry pliers, open a jump ring by gently twisting it sideways. Be careful not to distort the shape of the ring.
- Slide one end of a beaded strand onto the open jump ring, making sure it is securely attached.
- Locate a suitable attachment point on the chandelier base, such as a hook or loop, and thread the jump ring onto it. Use the jewelry pliers to close the jump ring, ensuring that it is securely fastened.
- Repeat the above steps for each beaded strand, attaching them to their designated spots on the chandelier base. Take your time to position and adjust each strand to achieve the desired look.
- As you attach the beaded strands, step back and assess the overall design. Make any necessary adjustments to ensure that the strands are evenly spaced and create a balanced appearance.
- Once all the beaded strands are attached, gently shake the chandelier to ensure that the strands are secure and will not come loose.
Attaching the beaded strands is a crucial step in the process, as it determines the final look of your beaded chandelier. Take your time to ensure that each strand is securely fastened and positioned correctly. When done correctly, the beaded strands will gracefully cascade from the chandelier base, creating an enchanting focal point in any room.
After attaching the beaded strands, you can proceed to the next step: securing the chandelier. This step ensures that your beaded chandelier is stable and will withstand any movement or vibration.
Step 5: Secure the Chandelier
Once you have attached all the beaded strands to the chandelier base, it’s important to ensure that your creation is securely fastened and stable. This step will prevent any mishaps and keep your beaded chandelier in place. Follow these steps to securely secure the chandelier:
- Inspect the attachment points where the beaded strands are connected to the chandelier base. Check for any loose or weak connections that need reinforcement.
- Using jewelry pliers, verify that all jump rings are closed tightly. Ensure that they are securely holding the beaded strands and will not come undone.
- If necessary, add additional jump rings or connectors to reinforce any weak spots. This will provide extra support and stability to your chandelier.
- Check the overall balance of the chandelier. Make sure it hangs straight and evenly, without any tilting or leaning to one side.
- If needed, adjust the length of the beaded strands by trimming the excess wire or fishing line. Be cautious not to cut them too short, as you still want the beaded strands to have some movement and flow.
- Once you are satisfied with the stability and overall appearance of the chandelier, give it a gentle shake to ensure that everything remains firmly in place.
Securing the chandelier is an essential step to guarantee the safety and longevity of your beaded creation. Take the time to double-check all the connections, reinforce any weak spots, and ensure that the chandelier is balanced and stable. This will give you peace of mind and allow you to enjoy your beaded chandelier for years to come.
Now that your chandelier is securely fastened, you are ready to move on to the next step: hanging the chandelier in its designated space.
Step 6: Hang the Chandelier
With your beaded chandelier securely fastened and ready to shine, it’s time to hang it in its designated space. Hanging the chandelier requires careful planning and a few simple steps to ensure a safe and visually appealing installation. Follow these steps to hang your beaded chandelier:
- Choose the location where you want to hang your chandelier. This could be over a dining table, in a living room, or any other area that you want to highlight with this stunning piece.
- Locate a ceiling hook or support that can handle the weight of your chandelier. Ensure that the hook is securely attached to a ceiling joist or support beam for maximum stability.
- Measure the distance from the ceiling to the desired height of your chandelier. Use a measuring tape to ensure accuracy.
- Attach a sturdy chain or wire to the chandelier base. Make sure the chain is long enough to reach the ceiling without putting strain on the chandelier or the electrical wiring.
- Hang the chain onto the ceiling hook, making sure it is securely fastened. Gently lower the chandelier, ensuring that it is centered and level with the surrounding space.
- Plug in or wire the chandelier according to the manufacturer’s instructions. If it is a wired chandelier, ensure that the electrical connections are safely insulated and that the power is turned off during installation.
- Switch on the power and test the chandelier to make sure it is functioning properly. Check for any loose or dangling wires and tuck them away neatly.
Once your beaded chandelier is securely hung, step back and admire its beauty. Take a moment to ensure that it is hanging straight and that the beaded strands are evenly distributed. Adjust the position as needed to achieve the desired look.
Now that your beaded chandelier is hanging elegantly in its designated space, you can move on to adding the finishing touches to truly make it shine.
Step 7: Finishing Touches
As you gaze upon your beautifully hung beaded chandelier, it’s time to add the finishing touches that will elevate its overall appearance and ensure it seamlessly blends into your space. Follow these steps to complete the final touches:
- Inspect the chandelier for any loose or stray beads. Use scissors or wire cutters to carefully trim any excess beading wire or fishing line, ensuring a clean and polished look.
- Consider adding decorative accents to enhance the visual appeal of your chandelier. Crystals, charms, or pendants can be attached strategically among the beaded strands to catch the light and add sparkle.
- Give your chandelier a thorough cleaning to remove any dust or fingerprints. Use a soft cloth or a feather duster to gently wipe down the beads and the chandelier base.
- Step back and assess the overall ambiance and lighting of the room. Consider adjusting the surrounding lighting to complement and enhance the beauty of your beaded chandelier.
- Add any additional décor elements around the chandelier to create a cohesive and inviting space. This can include things like candles, floral arrangements, or wall art.
- Take the time to thoroughly enjoy your newly completed beaded chandelier. Admire its craftsmanship, bask in the soft glow it emits, and appreciate the unique touch it brings to your home.
With the finishing touches complete, your beaded chandelier is ready to captivate everyone who enters your space. The combination of the intricate beadwork, the elegant design, and the warm lighting will create a stunning focal point that enhances the ambiance of any room.
Remember to clean and maintain your chandelier regularly to ensure its longevity and beauty. Wipe away any dust or debris and double-check the integrity of the beaded strands and connections periodically.
Congratulations on completing your DIY beaded chandelier! It’s time to bask in the satisfaction of your creative accomplishment and revel in the radiant beauty that now graces your space.
Thank you for following this comprehensive guide on how to make a beaded chandelier. We hope you enjoyed the process and that your new chandelier brings joy and elegance to your home for years to come.
Happy crafting!
Read also: 15 Incredible Wood Bead Chandelier for 2024
Conclusion
Congratulations on completing your journey to create a stunning beaded chandelier! Through careful planning, creativity, and a little bit of patience, you have transformed simple materials into a captivating and personalized piece of home decor.
By following the steps outlined in this comprehensive guide, you have learned how to gather the necessary supplies, prepare the chandelier base, string the beads, attach the beaded strands, secure the chandelier, hang it in its designated space, and add the finishing touches. Each step has allowed you to unleash your creativity and bring your vision to life.
A beaded chandelier not only serves as a functional lighting fixture but also as a statement piece that adds character and charm to any room. Its intricate beadwork, combined with the warm glow of the light, creates an ambiance that is both elegant and inviting.
As you admire your completed beaded chandelier, take a moment to appreciate the time and effort you have put into this project. Your attention to detail and craftsmanship have resulted in a truly unique and beautiful piece that reflects your personal style and enhances the aesthetic of your home.
Remember to maintain and care for your beaded chandelier regularly, keeping it clean and free from dust or debris. This will ensure its longevity and preserve its beauty for years to come.
We hope this guide has inspired you to explore your creativity further and embark on more DIY projects. The joy of creating something with your own hands is incomparable, and it allows you to infuse your living space with your unique style and personality.
Thank you for joining us on this journey to make a beaded chandelier. Your dedication and enthusiasm have made this experience truly special. Now, sit back, relax, and enjoy the mesmerizing beauty of your handcrafted beaded chandelier.
Happy crafting and may your home be filled with warmth and elegance!
Frequently Asked Questions about How To Make A Beaded Chandelier
Was this page helpful?
At Storables.com, we guarantee accurate and reliable information. Our content, validated by Expert Board Contributors, is crafted following stringent Editorial Policies. We're committed to providing you with well-researched, expert-backed insights for all your informational needs.


0 thoughts on “How To Make A Beaded Chandelier”