Furniture
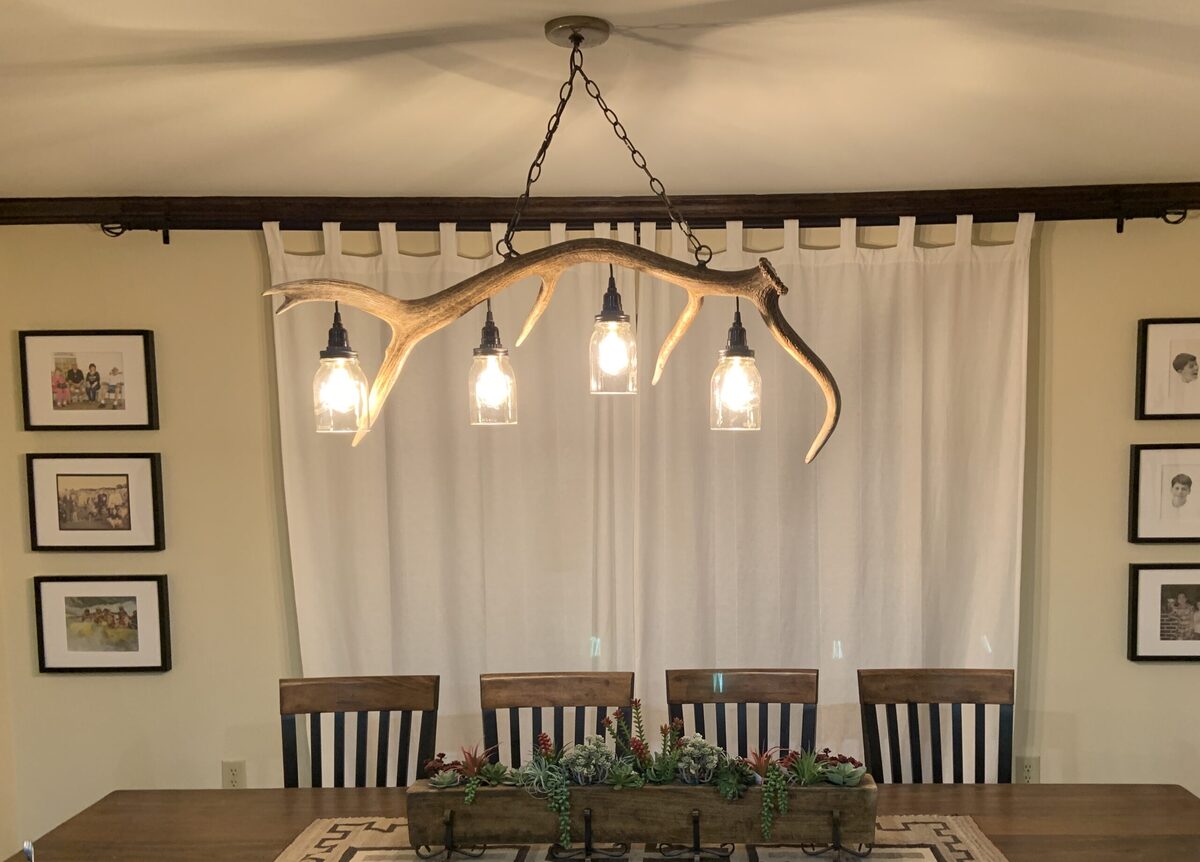
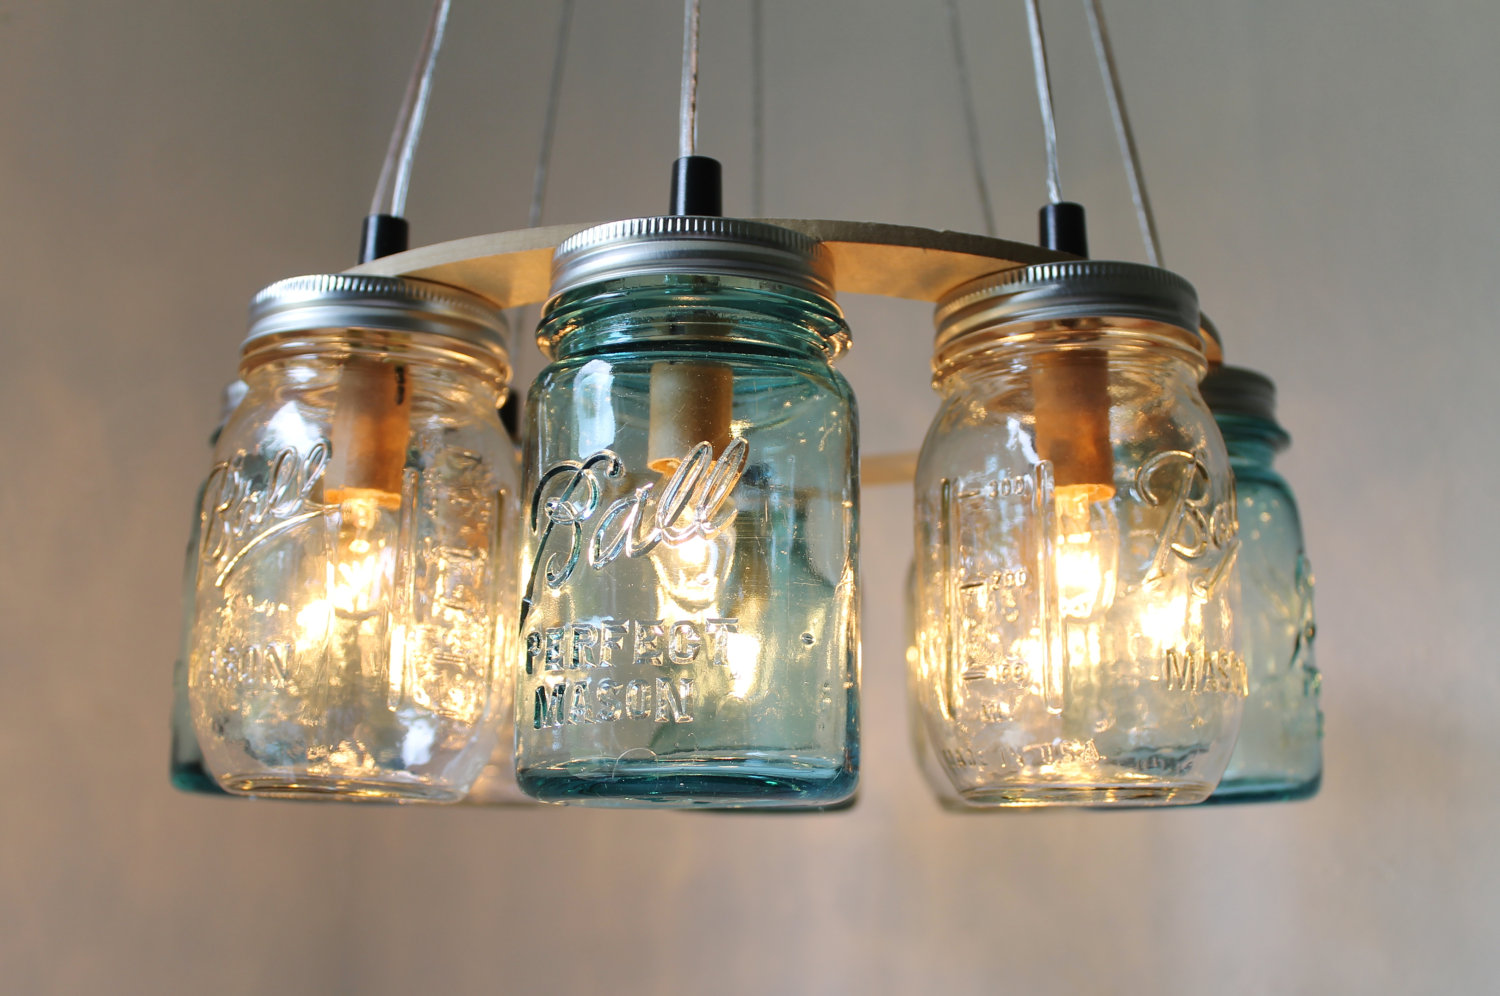
How To Make A Mason Jar Chandelier
Modified: October 19, 2024
Learn how to create a stunning mason jar chandelier for your home with our step-by-step guide. Perfect for adding a touch of rustic furniture to any room.
(Many of the links in this article redirect to a specific reviewed product. Your purchase of these products through affiliate links helps to generate commission for Storables.com, at no extra cost. Learn more)
Introduction
Welcome to the world of DIY home decor! If you’re looking to add a touch of rustic charm and a warm glow to your living space, a mason jar chandelier might just be the perfect project for you. With its rustic beauty and versatility, a mason jar chandelier can be a stunning centerpiece in any room.
This article will guide you through the step-by-step process of creating your own mason jar chandelier. From assembling the materials to hanging the finished product, you’ll be able to create a unique and beautiful lighting fixture that reflects your personal style.
Not only is making a mason jar chandelier a fun and rewarding DIY project, but it also offers you the opportunity to repurpose old mason jars and add a personal touch to your home decor. So, let’s gather our tools and dive into this exciting project!
Key Takeaways:
- Create a unique mason jar chandelier to add rustic charm and a warm glow to your living space. Repurpose old mason jars and personalize your lighting fixture to reflect your personal style.
- Follow the step-by-step process to safely and creatively make your own mason jar chandelier. Choose the right materials, test the lights, and enjoy the cozy ambiance it brings to your home.
Read more: How To Make Mason Jar Centerpieces
Materials Needed
Before we get started, let’s make sure we have all the necessary materials on hand to create our mason jar chandelier:
- Mason jars: You’ll need as many mason jars as you want for your chandelier. The size and style of the jars are up to you, but make sure they have a wide mouth to accommodate the lights.
- Lightbulbs: Choose the type of lightbulbs that fit your design aesthetic. LED or Edison bulbs work well for a vintage look, while colored or dimmable bulbs can add a unique touch.
- Light sockets: These will hold the lightbulbs in place inside the mason jars. Look for sockets that are compatible with the type of bulbs you’ve chosen.
- Electrical wire: You’ll need enough wire to connect the light sockets and create the desired length for your chandelier. Make sure the wire is capable of handling the electrical load.
- Ceiling canopy: This is the decorative cover that hides the electrical wiring and attaches the chandelier to the ceiling. Choose a canopy that matches your design preferences.
- Chain or rope: This will be used to hang the chandelier from the ceiling. Choose a material that complements the style of your chandelier and can support its weight.
- Hooks or anchors: These will be used to securely attach the chain or rope to the ceiling. Make sure they are suitable for your ceiling type and can support the weight of the chandelier.
- Tools: You’ll need basic tools such as a drill, screws, wire cutters, and pliers to assemble and hang the chandelier.
Once you have gathered all these materials, you’re ready to move on to the next steps of creating your mason jar chandelier. Remember to choose materials that best fit your vision and style, as they will play a significant role in the overall look and ambiance of your finished chandelier.
Step 1: Prepare the Mason Jars
Now that you have all the materials ready, it’s time to prepare the mason jars for your chandelier. Follow these steps to ensure that your jars are clean, safe, and ready to be transformed into beautiful light fixtures:
- Start by cleaning the mason jars: Remove any stickers, labels, or residue from the jars. Soak them in warm soapy water to remove any dirt or grime. Use a scrub brush or sponge to scrub the jars inside and out. Rinse them thoroughly and let them dry completely.
- Check the jars for cracks or chips: Inspect each jar carefully to ensure there are no cracks or chips that could compromise their integrity or safety. Discard any jars that are damaged.
- Optional: Paint or decorate the jars: If you want to add a unique touch to your mason jar chandelier, you can paint the jars or decorate them with adhesive vinyl decals. Choose colors or designs that match your overall decor theme.
- Drill holes in the jar lids: To allow the electrical wire to pass through the mason jar lids, you’ll need to drill a hole in each lid. Use a drill bit that is slightly larger than the diameter of your wire. Be careful and wear protective eyewear while drilling.
- Attach the light sockets to the jar lids: Thread the electrical wire through the hole in the lid and connect the light socket to the wire. Make sure it is securely attached. Repeat this process for each jar lid.
Once you’ve completed these steps, you’ll have a set of mason jars that are clean, decorated (if desired), and ready to be transformed into stunning light fixtures. The next step will be attaching the lights and getting closer to your finished mason jar chandelier!
Step 2: Attach the Lights
Now that you’ve prepared the mason jars, it’s time to attach the lights and bring your chandelier to life. Here’s how you can attach the lights to the mason jar lids:
- Start by disconnecting the power source: Before handling any electrical components, make sure the power is turned off and the circuit is deactivated to avoid any accidents.
- Attach the light socket to the mason jar lid: Take the mason jar lid with the pre-drilled hole and feed the electrical wire through it. Screw the light socket onto the lid, ensuring it is tightly secured.
- Connect the wires: Strip off about half an inch of insulation from the ends of the electrical wire coming out of the light socket. Connect these wires to the corresponding wires from the main electrical wire, using wire nuts or electrical tape to secure the connection. Make sure the exposed wires are covered completely.
- Test the connection: Before proceeding further, it’s important to test the connection to ensure that the lights are working properly. Turn the power back on temporarily, and if the lights turn on, then you can proceed to the next step.
- Secure the wires inside the mason jar lid: To keep the wires neat and prevent them from tangling or interfering with the light bulbs, use zip ties or adhesive clips to secure the wires to the inside of the mason jar lid.
Repeat these steps for each mason jar lid and light socket. Once you’ve attached all the lights, take a step back and admire the progress you’ve made. The mason jar chandelier is starting to take shape, and the next step will involve inserting the light bulbs to complete the look.
When making a mason jar chandelier, be sure to use the correct type of light bulbs for the fixture. LED bulbs are a great choice as they are energy-efficient and produce less heat, which is important for safety when using glass jars.
Step 3: Insert the Light Bulbs
Now that you have the mason jars with the lights attached, it’s time to insert the light bulbs and add the final touch to your chandelier. Follow these steps to safely insert the light bulbs:
- Ensure the power is turned off: Before handling the light bulbs, make sure the power is turned off to avoid any electrical shock.
- Choose the right light bulbs: Select light bulbs that fit the sockets you have attached to the mason jar lids. You can opt for traditional incandescent bulbs, LED bulbs, or even vintage-style Edison bulbs, depending on the look you want to achieve.
- Carefully insert the light bulbs into the jars: Unscrew the lids of the mason jars and gently insert the light bulbs into each jar. Be careful not to twist the wires or accidentally touch the exposed ends.
- Screw the lids back onto the jars: Once the light bulbs are in place, securely screw the mason jar lids back onto the jars. Make sure they are tightly sealed to prevent any dust or debris from entering.
After following these steps, you should have a set of mason jars with the light bulbs securely inserted. Take a moment to step back and admire how the chandelier is coming together. The next step will involve hanging the chandelier to complete the installation process.
Read more: How To Make Candles In A Mason Jar
Step 4: Hang the Chandelier
With the mason jars prepared and the lights attached, it’s time to hang your beautiful chandelier. Follow these steps to safely and securely hang your mason jar chandelier:
- Choose the right location: Select a suitable location in your home where you want to hang the chandelier. Consider the size and weight of the chandelier, as well as the available electrical connections.
- Locate a sturdy ceiling anchor: Find a stable ceiling anchor point that can support the weight of the chandelier. This could be a ceiling joist or a ceiling mount that is designed for light fixtures.
- Mark the anchor point: Use a pencil or marker to mark the exact spot where you will attach the chandelier to the ceiling. Double-check the alignment and make sure it suits your desired placement.
- Install the ceiling hook or anchor: Depending on the type of anchor you have, follow the manufacturer’s instructions to securely install it in the marked spot on the ceiling. Make sure it is firmly attached.
- Attach the chain or rope: Determine the desired length for your chandelier and cut the chain or rope accordingly. Attach one end of the chain or rope to the ceiling anchor using a secure knot or a hook.
- Hang the chandelier: Carefully lift the mason jar chandelier and hang it from the chain or rope. Ensure that it is level and adjust the length of the chain or rope as needed to achieve the desired height.
- Secure the chandelier: Use pliers or hooks to secure the chain or rope to the chandelier frame, ensuring it is held firmly in place. Double-check the stability and make any necessary adjustments.
Once you’ve completed these steps, take a moment to step back and marvel at the beauty of your hanging mason jar chandelier. The next and final step will involve testing the lights to ensure everything is working correctly.
Step 5: Test the Lights
Now that your mason jar chandelier is securely hung, it’s time to test the lights to ensure they are functioning properly. Follow these steps to make sure everything is in working order:
- Turn on the power: Flip the switch or turn on the power supply to activate the electricity to your chandelier. Be cautious and ensure your hands are dry to avoid any electrical mishaps.
- Check each light bulb: Examine each mason jar to ensure that the light bulbs are illuminating. If any of the bulbs aren’t functioning, double-check the electrical connections and make sure they are securely attached.
- Adjust the brightness: If your chandelier allows for dimmable bulbs or has a dimming feature, test the different brightness levels to find the perfect ambiance for your room.
- Observe the overall effect: Step back and take a moment to admire the beautiful glow of your mason jar chandelier. See how the light enhances the room and creates a cozy, rustic atmosphere.
If you notice any issues during the testing phase, such as flickering lights or poor illumination, double-check the connections, tighten the light bulbs, and ensure that the power source is stable. If the problem persists, consult a professional electrician to address any electrical concerns.
Once you have confirmed that all the lights are working correctly, give yourself a well-deserved pat on the back. You have successfully created and installed your very own mason jar chandelier!
Enjoy the warm and inviting atmosphere that your homemade chandelier creates in your living space. Feel free to make any additional adjustments or decorations to personalize your chandelier even further.
With your DIY skills and creativity, you have transformed ordinary mason jars into a stunning lighting fixture that adds charm and character to your home. Congratulations on a job well done!
Conclusion
Creating a mason jar chandelier is not only a fun and rewarding DIY project, but it also allows you to add a touch of rustic charm and a warm glow to your living space. By repurposing mason jars and incorporating your personal style, you can create a unique and beautiful lighting fixture that becomes a captivating centerpiece in any room.
Throughout this article, we discussed the step-by-step process of making a mason jar chandelier. From preparing the mason jars and attaching the lights to inserting the light bulbs, hanging the chandelier, and testing the lights, each step is essential to ensure the safety and functionality of your creation.
Remember to choose the right materials, follow safety precautions, and personalize your chandelier with paint or decorations that align with your overall design theme. You have the freedom to choose different bulb styles, like LED or Edison bulbs, to create the desired look and ambiance.
Once your mason jar chandelier is complete, hang it in a suitable location and bask in the warm glow and cozy atmosphere it brings to your home. The combination of soft lighting and rustic charm will surely impress guests and create a welcoming environment in any room.
Whether you’re a seasoned DIY enthusiast or a beginner, making a mason jar chandelier is a project that allows you to showcase your creativity and practical skills. So gather your materials, follow the steps outlined in this article, and let your imagination shine as you create a stunning mason jar chandelier that truly reflects your unique style.
Enjoy the process, and may your beautifully crafted mason jar chandelier bring warmth and charm to your living space for years to come!
Frequently Asked Questions about How To Make A Mason Jar Chandelier
Was this page helpful?
At Storables.com, we guarantee accurate and reliable information. Our content, validated by Expert Board Contributors, is crafted following stringent Editorial Policies. We're committed to providing you with well-researched, expert-backed insights for all your informational needs.


0 thoughts on “How To Make A Mason Jar Chandelier”