
Furniture
How To Turn A Dresser Into A Changing Table
Modified: October 22, 2024
Transform your dresser into a functional and stylish changing table with our step-by-step guide. Add versatility to your nursery furniture with this DIY furniture project.
(Many of the links in this article redirect to a specific reviewed product. Your purchase of these products through affiliate links helps to generate commission for Storables.com, at no extra cost. Learn more)
Introduction
Welcome to the world of DIY furniture transformations! Turning a dresser into a changing table is a fantastic way to repurpose an old piece of furniture while adding functionality and style to your nursery. Not only will you save money by repurposing an existing item, but you’ll also have the satisfaction of creating a unique and personalized changing table that perfectly suits your needs.
In this step-by-step guide, we will walk you through the process of transforming a dresser into a changing table. From gathering the necessary materials to adding those final decorative touches, you’ll have all the information you need to create a beautiful and functional changing station for your little one.
Before we dive into the details, it’s important to note that safety should always be your top priority. When using any DIY techniques, make sure to follow all safety guidelines and use appropriate tools. If you’re not comfortable with any step of the process, consult a professional for assistance.
Now, let’s get started on turning your dresser into a custom changing table that will be the envy of every parent!
Key Takeaways:
- Repurpose an old dresser into a personalized changing table, adding functionality and style to your nursery while saving money and creating a unique space for your baby.
- Prioritize safety and attention to detail when transforming a dresser into a changing table, ensuring a smooth and professional result that meets your needs and reflects your personal style.
Read more: How To Turn A Dresser Into A Cabinet
Step 1: Gather necessary materials
Before you begin the transformation process, it’s important to gather all the materials you’ll need to turn your dresser into a changing table. Having everything ready beforehand will streamline the process and ensure that you have everything you need on hand. Here’s a list of the materials you’ll need:
- Dresser: Choose a sturdy dresser that will serve as the base for your changing table. Look for one with a solid structure and ample storage space.
- Changing pad: Invest in a high-quality changing pad that is safe and comfortable for your baby. Measure the dimensions of the changing pad to ensure it will fit on top of your dresser.
- Measuring tape: Accurate measurements are essential for this project, so make sure you have a measuring tape on hand.
- Saw: Depending on your dresser design, you may need a saw to cut an opening for the changing pad. Make sure you use the appropriate saw for your specific needs.
- Sander: To prepare the dresser for painting, you’ll need a sander to smooth out any rough edges or imperfections.
- Paint and primer: Choose a paint color that matches your nursery theme and invest in a high-quality primer and paint to achieve a durable and beautiful finish.
- Safety straps: It’s crucial to prioritize safety when using a changing table, so make sure to purchase safety straps that can be securely attached to your dresser.
- Decorative hardware: To add a touch of style to your changing table, consider purchasing decorative knobs or handles that complement your nursery decor.
Once you’ve gathered all of these materials, you’ll be ready to embark on your dresser transformation journey. Remember, it’s always better to have everything prepared beforehand so that you can focus on the project without interruptions. Now that you have your materials in hand, let’s move on to the next step: preparing the dresser.
Step 2: Prepare the dresser
Now that you have all the necessary materials, it’s time to prepare the dresser for its transformation into a changing table. This step is essential for ensuring a smooth and professional-looking final result. Follow these steps to properly prepare the dresser:
- Clean the dresser: Start by removing any dust, dirt, or grime from the dresser. Wipe it down with a mild soap and water solution, and let it dry completely.
- Remove drawers and hardware: Take out all the drawers and set them aside. This will make it easier to work on the dresser surface and prevent any damage to the drawers during the transformation process. Additionally, remove any hardware such as knobs or handles.
- Inspect for damage: Carefully examine the dresser for any damages, cracks, or uneven surfaces. If you notice any issues, address them before proceeding with the transformation. Repair any damages and sand down any rough spots to ensure a smooth base for painting.
- Fill in any holes or gaps: If your dresser has any unwanted holes or gaps that you want to conceal, use wood filler to fill them in. Follow the manufacturer’s instructions for application and drying time.
By cleaning, inspecting, and repairing the dresser, you are setting the foundation for a successful transformation. This step ensures that the dresser is in good condition and ready for the next stages of the process. Once you have completed these preparatory steps, you can move on to the next exciting phase – removing any unwanted components.
Step 3: Remove any unwanted components
Now that your dresser is cleaned and prepped, it’s time to take a closer look at its design and functionality. In this step, you will determine if there are any components of the dresser that you want to remove or modify to better suit your changing table needs. Follow these steps to remove any unwanted components:
- Consider drawer configuration: Evaluate the current drawer configuration of your dresser. Depending on your preference and needs, you may decide to remove some or all of the drawers. Removing drawers can create open shelving space that can be utilized for storage baskets or decorative items.
- Assess attached mirrors: If your dresser has an attached mirror that you don’t intend to use, carefully remove it. Use a screwdriver or appropriate tool to detach the mirror. Make sure to take caution and support the mirror to prevent any accidents or breakage.
- Remove unnecessary trim or molding: Look for any decorative trim or molding that may not fit with the changing table design. If you find any, remove it using a crowbar or appropriate tool. Be gentle to avoid damaging the dresser surface.
- Adjust or remove hardware: If you plan to change the appearance or style of your dresser, consider removing the existing hardware such as knobs or handles. If you wish to keep the hardware, you can paint or replace them with new ones that match your desired aesthetics.
Removing unwanted components allows you to customize the dresser to meet your changing table requirements. It also gives you the opportunity to create a more cohesive and visually appealing piece of furniture. By taking the time to make these modifications, you can ensure that your dresser will seamlessly transition into a functional and stylish changing table.
Once you have removed any unwanted components, it’s time to move on to the next step – measuring and marking for the changing pad.
Step 4: Measure and mark for the changing pad
With the unwanted components removed, it’s time to measure and mark the dresser to ensure a perfect fit for the changing pad. The changing pad will provide a comfortable and secure surface for your little one during diaper changes. Follow these steps to measure and mark the dresser:
- Place the changing pad on the dresser: Position the changing pad on top of the dresser to determine the best placement. Consider the height and accessibility, ensuring that the changing pad is at a comfortable level for you.
- Measure the dimensions: Using a measuring tape, measure the width, length, and depth of the changing pad. Write down these measurements as you will need them later.
- Center the changing pad: Once you have the measurements, center the changing pad on the dresser. Use a pencil or masking tape to outline the shape and size of the changing pad onto the dresser surface.
- Double-check the measurements: Before proceeding, double-check the accuracy of your measurements and markings. Adjust as needed to ensure a precise fit for the changing pad.
By measuring and marking for the changing pad, you are taking the necessary steps to create a secure and snug area for diaper changes. A properly fitted changing pad will provide stability and ease of use, ensuring the safety and comfort of your baby during changing times.
Once you have completed this step, it’s time to move on to the exciting part – cutting an opening for the changing pad. Let’s dive in!
Read more: How To Turn A Dresser Into A Bench
Step 5: Cut an opening for the changing pad
Now that you have measured and marked the dresser for the changing pad, it’s time to cut an opening to accommodate the pad. This step requires precision and caution to ensure a clean and accurate cut. Follow these steps to cut an opening for the changing pad:
- Gather the necessary tools: Before you start cutting, make sure you have the appropriate tools for the job. Depending on the material of your dresser, you may need a jigsaw, circular saw, or utility knife. Choose the tool that is best suited for the material and ensure the blade is sharp and in good condition.
- Identify the cutting area: Using the markings you made in the previous step, clearly identify the area that needs to be cut out to accommodate the changing pad. If using a jigsaw or circular saw, be mindful of any attached drawers or structural supports that need to be avoided.
- Wear appropriate safety gear: Safety should always be a priority when using power tools. Wear safety glasses, gloves, and any other necessary protective gear to ensure your well-being throughout the cutting process.
- Make the cut: Using the chosen tool, carefully cut along the marked lines. Take your time and go slowly to maintain control and accuracy. If using a jigsaw or circular saw, follow the manufacturer’s instructions for proper usage and technique.
- Smooth the edges: Once you have made the cut, use sandpaper or a file to smooth the edges of the opening. This will prevent any splinters or rough surfaces that could potentially harm your baby.
Remember, cutting an opening for the changing pad requires precision and attention to detail. Take your time and proceed with caution to ensure a clean and professional-looking result. If you don’t feel comfortable using power tools, consider seeking assistance from someone with experience or hire a professional.
With the opening now cut out, it’s time to move on to the next step – sanding and smoothing the dresser.
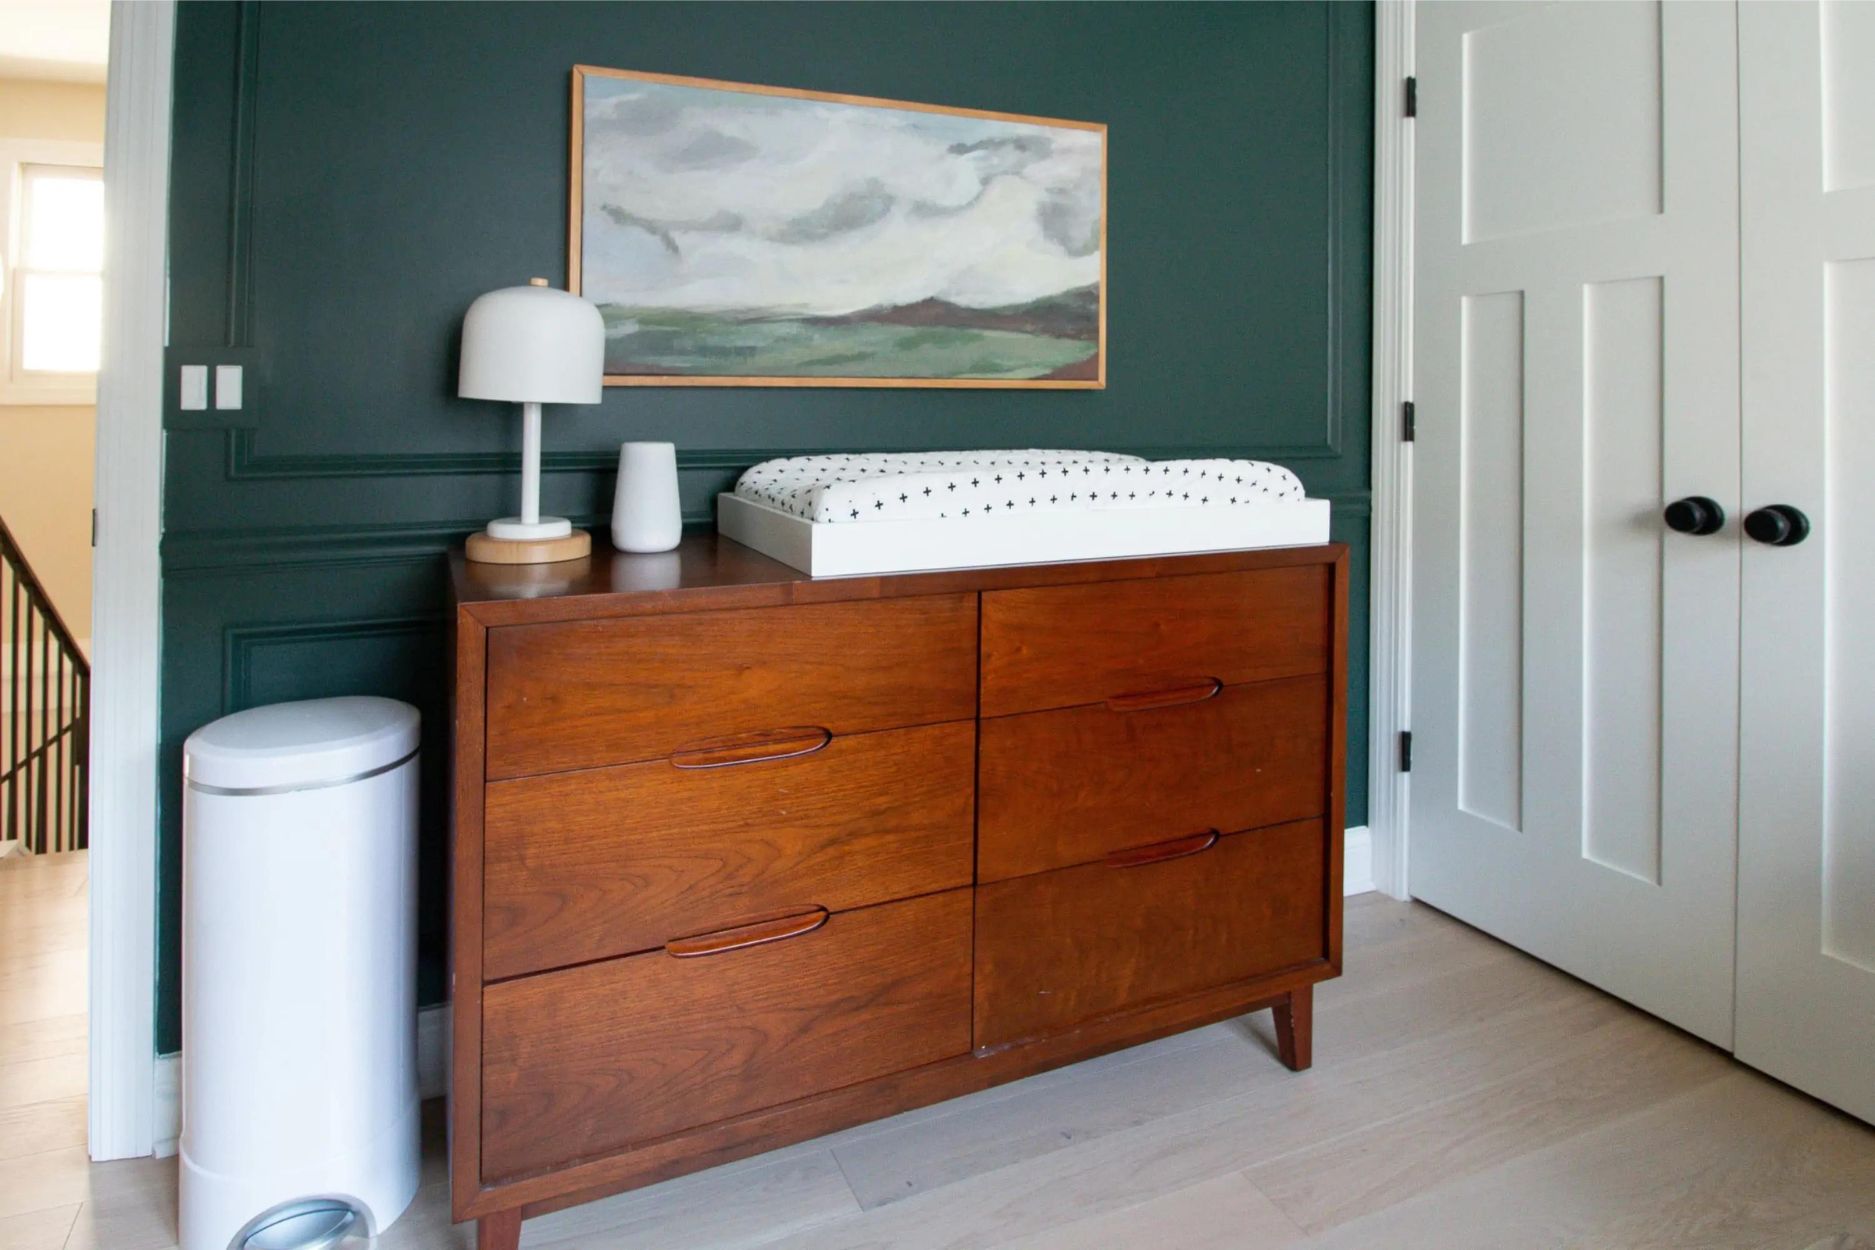
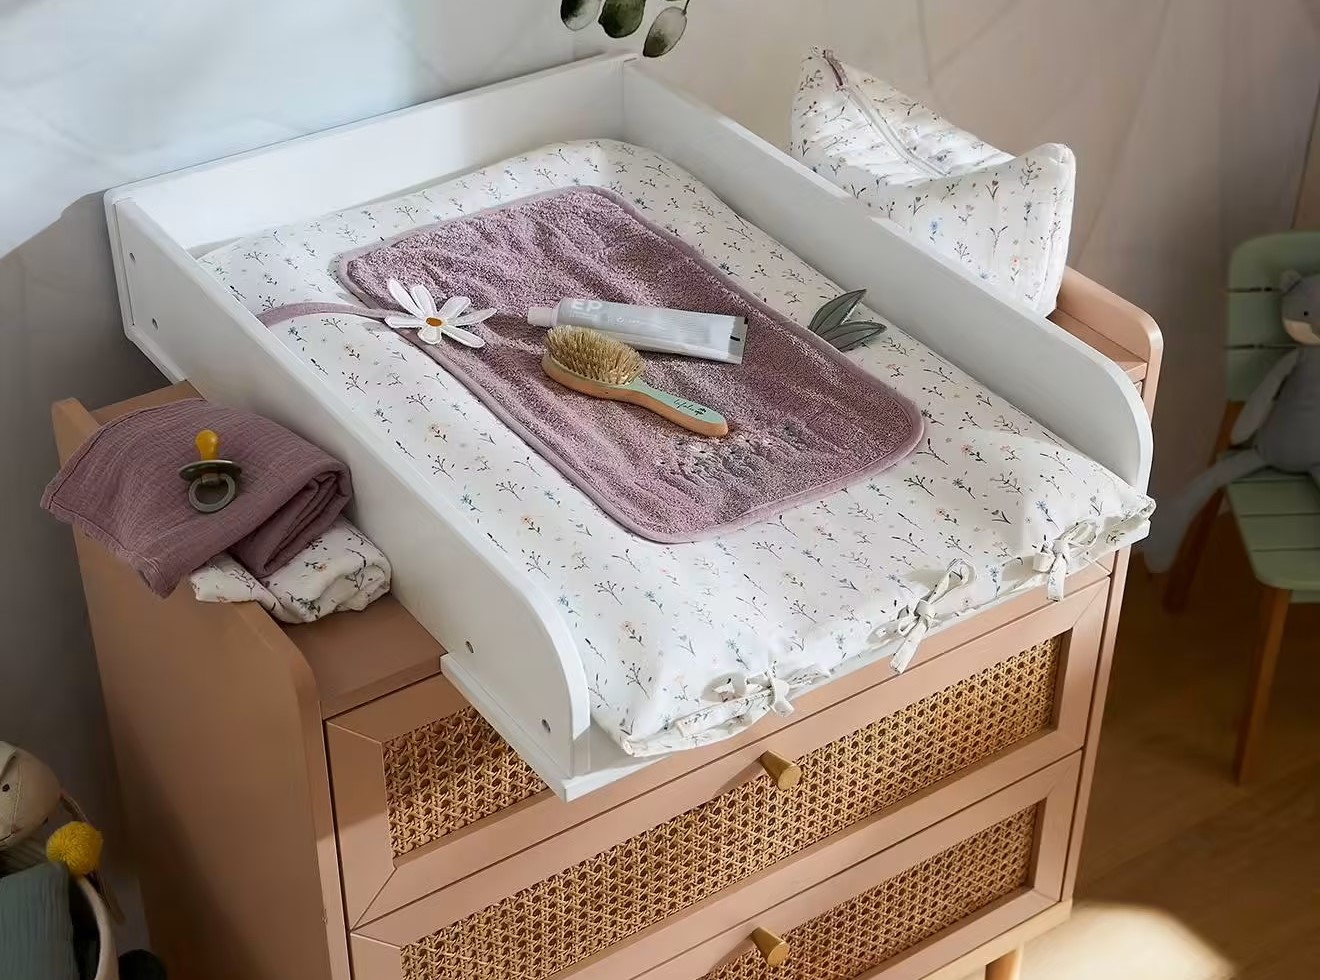
When turning a dresser into a changing table, make sure to securely attach a changing pad to the top of the dresser to create a safe and functional space for diaper changes.
Step 6: Sand and smooth the dresser
Now that you have cut the opening for the changing pad, it’s time to focus on creating a smooth and polished surface for the dresser. This step involves sanding and smoothing out any rough edges or imperfections to prepare the dresser for painting and ensure a beautiful finished product. Follow these steps to sand and smooth the dresser:
- Gather the necessary tools: To complete this step, you’ll need sandpaper of varying grits, a sanding block or a power sander, and a clean cloth or tack cloth to remove dust.
- Sand the entire dresser: Start by sanding the entire dresser, including the areas around the opening you cut for the changing pad. Use medium-grit sandpaper to remove any rough spots, paint drips, or imperfections on the dresser surface. Sand in the direction of the wood grain for a smoother finish.
- Focus on the edges and corners: Pay special attention to the edges and corners of the dresser. These areas tend to have rough edges, so use a sanding block or sandpaper to smooth them out.
- Switch to a finer grit: Once you have sanded with medium-grit sandpaper, switch to a finer grit to achieve a smoother finish. Gradually work your way up to the finest grit for a polished surface.
- Remove dust: After sanding, use a clean cloth or tack cloth to wipe away any dust or debris from the dresser surface. This will ensure a clean canvas for painting.
Sanding and smoothing the dresser is crucial for achieving a professional-looking final result. It not only enhances the aesthetic appeal but also creates a pleasant surface for your baby to touch and interact with during diaper changes. Taking the time to complete this step will ensure that your dresser turned changing table is of the highest quality.
Now that you have sanded and smoothed the dresser, it’s time to move on to the next step – priming and painting the dresser to bring it to life.
Step 7: Prime and paint the dresser
With the dresser sanded and smoothed, it’s time to give it a fresh new look by priming and painting. Priming creates a smooth and clean base for the paint, while painting adds color and personality to the changing table. Follow these steps to prime and paint the dresser:
- Gather the necessary supplies: You will need primer, paint, paintbrushes or rollers, paint trays, and painter’s tape.
- Prep the dresser: Before applying primer, make sure the dresser surface is clean and free of any dust or debris. Use a tack cloth or a clean cloth to remove any remaining dust particles.
- Apply primer: Using a brush or roller, apply a coat of primer to the entire dresser, including the inside of the cut-out area. Primer helps the paint adhere better and provides an even surface for the paint to be applied to.
- Allow the primer to dry: Follow the manufacturer’s instructions on the primer label to determine the drying time. It’s crucial to allow the primer to fully dry before applying the paint.
- Tape off areas: If there are any areas you want to protect from paint, such as hardware or edges, use painter’s tape to cover them. This will create clean and crisp lines.
- Apply paint: Using the desired paint color and a brush or roller, apply the first coat of paint. Make sure to work in even strokes and cover the entire surface. Allow the first coat to dry completely before applying a second coat.
- Apply additional coats (if necessary): Depending on the desired finish and the paint’s opacity, you may need to apply additional coats of paint. Follow the drying time instructions between coats.
- Remove the painter’s tape: Once the final coat is applied and dry, carefully remove the painter’s tape to reveal clean lines and edges.
Priming and painting the dresser is one of the most exciting steps in the transformation process. It allows you to add your personal touch, aligning the changing table with your nursery’s theme and creating a cohesive look. Take your time and apply the paint with care to achieve a beautiful and professional finish.
Now that you have primed and painted the dresser, it’s time to move on to the next step – attaching safety straps to ensure the maximum safety for your baby.
Step 8: Attach safety straps
Safety is paramount when it comes to a changing table, and attaching safety straps is an essential step to ensure the well-being of your little one. By securing the changing pad to the dresser, you can prevent any accidental slips or falls during diaper changes. Follow these steps to attach safety straps to your dresser:
- Gather the necessary materials: You will need safety straps specifically designed for securing changing pads, as well as screws or other appropriate hardware.
- Position the changing pad: Place the changing pad on top of the dresser and center it within the cut-out opening. Ensure that the pad is level and secure before proceeding.
- Attach the safety straps: Take the safety straps and fasten them securely to the underside of the changing pad, following the manufacturer’s instructions. Typically, safety straps will include adjustable buckles or clips for a custom fit.
- Secure the other end of the straps: Once the safety straps are attached to the changing pad, determine the best points on the dresser to fasten the other ends of the straps. These points should provide stability and support when the straps are tightened.
- Drill pilot holes (if necessary): If the dresser does not have built-in anchor points, you may need to drill pilot holes for the screws or other hardware that will secure the straps to the dresser. Ensure that the pilot holes are slightly smaller than the screws to create a tight and secure fit.
- Secure the straps to the dresser: Use screws or appropriate hardware to secure the ends of the safety straps to the dresser. Ensure that the straps are taut but not overly tight, allowing enough space for the changing pad to sit comfortably on the dresser.
- Double-check the stability: Once the safety straps are securely attached, double-check their stability and the overall security of the changing pad on the dresser. Give the pad a gentle tug to ensure it remains firmly in place.
By attaching safety straps, you are adding an extra layer of protection to your changing table. This simple yet significant step ensures your baby’s safety during every diaper change. Remember to regularly inspect the straps for any signs of wear or damage and replace them if necessary.
Now that the safety straps are in place, it’s time to move on to the next step – installing the changing pad onto the dresser.
Read more: How To Turn A Dresser Into A Bookshelf
Step 9: Install the changing pad
Now that you have attached the safety straps, it’s time to install the changing pad onto the dresser. Installing the changing pad properly ensures that it is secure and stable, providing a safe and convenient surface for diaper changes. Follow these steps to install the changing pad:
- Place the changing pad onto the dresser: Carefully position the changing pad within the cut-out opening on top of the dresser. Ensure that it is centered and aligned properly.
- Secure the changing pad: Utilize the attached safety straps to secure the changing pad to the dresser. Tighten the straps to hold the pad in place, ensuring that it doesn’t shift or move during use.
- Double-check the stability: Give the changing pad a gentle tug to confirm that it is securely fastened to the dresser. Check for any wobbling or movement and make any necessary adjustments to ensure a stable and safe surface.
- Add additional padding (optional): For added comfort, you may choose to place a soft changing pad cover or liner over the changing pad. This can provide extra cushioning and make diaper changes more comfortable for your little one.
By properly installing the changing pad, you create a designated and secure space for diaper changes. This ensures that your baby will be safe and comfortable during every changing session. Remember to periodically check and tighten the safety straps as needed to maintain the stability of the changing pad.
With the changing pad now installed, you’re almost done with transforming your dresser into a functional changing table. The final step involves putting those finishing touches on the changing table to complete the look and add a personal flair.
Step 10: Final touches and decoration ideas
Congratulations! You have successfully transformed your dresser into a beautiful and functional changing table. Now it’s time to add those final touches and decoration ideas to personalize the space and make it even more special. Here are some ideas to consider:
- Add decorative knobs or handles: Replace the existing hardware with decorative knobs or handles that match the style and theme of your nursery. This small change can make a big difference in the overall aesthetic appeal of the changing table.
- Accessorize with storage baskets: Place storage baskets on the open shelves or inside the drawers to organize diapering essentials, such as diapers, wipes, lotions, and burp cloths. Choose baskets in coordinating colors or patterns to enhance the visual appeal.
- Hang a mobile or artwork: Add a whimsical touch by hanging a mobile above the changing table. This will not only entertain your baby during diaper changes but also serve as a decorative element. Alternatively, you can hang artwork or a framed print that complements the nursery decor.
- Consider a diaper caddy: To keep all the essentials within arm’s reach, consider adding a diaper caddy to the changing table. It can hold diapers, wipes, diaper cream, and other diapering essentials, allowing you to have everything you need on hand.
- Personalize with wall decals or stencils: Add a personal touch by applying wall decals or stencils with your baby’s name or a meaningful quote onto the wall adjacent to the changing table. This will create a customized and sentimental ambiance in the nursery.
- Install a changing table organizer: Consider adding a changing table organizer to keep all the essentials neatly organized and easily accessible. These organizers typically come with compartments for diapers, wipes, and other supplies, making diaper changes more efficient.
Remember, the final touches and decorations should reflect your personal style and the overall theme of your nursery. Have fun exploring different options and get creative with the details that will make your changing table unique and visually appealing.
By following these steps and adding those final touches, you have successfully transformed your dresser into a functional and stylish changing table. Not only have you repurposed a piece of furniture, but you’ve also created a special space in your nursery for those precious moments with your baby.
Enjoy the process and embrace the joy that comes with creating a personalized changing table that perfectly suits your needs and style!
Remember, safety should always be a priority when using a changing table. Never leave your baby unattended, and always follow recommended safety guidelines while using the changing table.
Now step back, admire your hard work, and get ready to enjoy the convenience and beauty of your newly transformed changing table!
Conclusion
Congratulations on completing the transformation of your dresser into a functional and stylish changing table! You have taken a simple piece of furniture and turned it into a personalized and practical space for diaper changes. By following the step-by-step guide and adding your own creative touches, you have created a changing table that is not only beautiful but also tailored to your nursery’s theme and your needs as a parent.
Throughout this process, you have learned how to gather the necessary materials, prepare the dresser, remove unwanted components, measure and mark for the changing pad, cut an opening, sand and smooth the surface, prime and paint the dresser, attach safety straps, install the changing pad, and add those final decorative touches. Each step has contributed to the overall success of the project and has resulted in a changing table that is both safe for your baby and aesthetically pleasing.
Remember to always prioritize safety when using a changing table. Double-check that the safety straps are securely fastened and regularly inspect them for signs of wear or damage. Never leave your baby unattended on the changing table and always follow recommended safety guidelines.
As your little one grows, this transformed dresser can continue to serve as a functional piece of furniture in your nursery. It can be repurposed as a storage space for clothes, toys, or other essentials, extending its usefulness beyond the diaper-changing stage.
Creating a personalized changing table not only adds beauty to your nursery but also brings a sense of accomplishment and pride. The time and effort you have invested in transforming your dresser into a changing table truly pay off when you see the final result. It is a testament to your creativity and dedication as a parent.
Now it’s time to enjoy the convenience and charm of your newly transformed changing table. Cherish the precious moments you’ll spend with your little one at the changing table, and embrace the joy that comes with creating a special space just for them.
Thank you for joining us on this DIY furniture transformation journey. We hope you found this guide helpful and that it has inspired you to explore other creative projects in the future. Happy parenting and happy diaper changes!
Frequently Asked Questions about How To Turn A Dresser Into A Changing Table
Was this page helpful?
At Storables.com, we guarantee accurate and reliable information. Our content, validated by Expert Board Contributors, is crafted following stringent Editorial Policies. We're committed to providing you with well-researched, expert-backed insights for all your informational needs.


0 thoughts on “How To Turn A Dresser Into A Changing Table”