Home>Garden Essentials>How To Start Cantaloupe Seeds
Garden Essentials
How To Start Cantaloupe Seeds
Modified: August 27, 2024
Learn how to start cantaloupe seeds and begin your garden with this helpful guide. Discover tips and techniques for successful cultivation and harvest.
(Many of the links in this article redirect to a specific reviewed product. Your purchase of these products through affiliate links helps to generate commission for Storables.com, at no extra cost. Learn more)
Introduction
Growing your own cantaloupes can be a rewarding and delicious experience. Whether you”re an experienced gardener or a beginner, starting cantaloupe seeds can be a fun and fulfilling project. Not only will you have the satisfaction of watching your plants grow, but you”ll also get to enjoy the sweet, juicy fruits that they produce.
Cantaloupes, also known as muskmelons, are a warm-weather crop that thrives in sunny locations with well-drained soil. They are a member of the Cucurbitaceae family and are known for their distinctive orange flesh and sweet aroma. While cantaloupes are commonly available in grocery stores, there is nothing quite like the taste of a freshly picked, homegrown cantaloupe.
In this article, we will guide you through the steps to start cantaloupe seeds and provide you with the information you need to successfully grow your own delicious melons.
Key Takeaways:
- Growing cantaloupes from seeds is a fun and rewarding project. Gather high-quality seeds, prepare well-draining soil, and provide optimal growing conditions for a delicious harvest.
- Proper watering, fertilization, and pest control are essential for healthy cantaloupe plants. Harvest ripe fruits by checking for visual cues, smelling the aroma, and using the “slip” test. Enjoy the sweet and juicy flavor of homegrown cantaloupes!
Read more: How To Save Cantaloupe Seeds
Step 1: Gather the necessary materials
Before you begin planting cantaloupe seeds, it”s important to gather all the necessary materials. Having everything you need in advance will ensure a smooth and successful planting process. Here are the materials you will need:
- Cantaloupe seeds: Choose high-quality seeds from a reputable seed supplier. Look for hybrid varieties that are known for their disease resistance and high yield.
- Potting soil: Opt for a well-draining potting mix that is rich in organic matter. Avoid heavy clay soils as they can cause waterlogging and hinder root development.
- Pots or containers: Select containers that have drainage holes to prevent water accumulation. You can use plastic pots or recycled containers, as long as they are clean and provide enough room for the seedlings to grow.
- Plant labels: It”s important to label your cantaloupe plants to keep track of the different varieties and planting dates. This will help you monitor their growth and ensure proper care.
- Watering can or hose: You”ll need a way to water your cantaloupe plants regularly. A watering can or a hose with a gentle nozzle attachment will work well.
- Fertilizer: Cantaloupes have high nutrient requirements. Select a balanced organic fertilizer or a slow-release granular fertilizer specifically formulated for fruits and vegetables.
- Support trellis or stakes (optional): If you plan to train your cantaloupe vines vertically, you may need a trellis or stakes to provide support as they grow.
Once you have gathered these materials, you”ll be well-equipped to start the process of planting cantaloupe seeds. Let”s move on to the next step: preparing the potting soil.
Step 2: Prepare the potting soil
Preparing the right potting soil is crucial for the successful growth of your cantaloupe seeds. The ideal potting soil should be well-draining while retaining enough moisture for the seeds to germinate. Follow these steps to prepare the potting soil:
- Choose a suitable potting mix: Select a high-quality potting mix that is specifically formulated for container gardening. Look for a mix that is lightweight, well-draining, and enriched with organic matter.
- Moisten the potting mix: Before filling your containers with the potting soil, moisten it slightly. This will help the soil hold moisture better and provide a conducive environment for seed germination.
- Fill the containers: Fill your pots or containers with the moistened potting mix, leaving about an inch of space at the top. Gently press down the soil to remove any air pockets.
- Add organic matter: Cantaloupes thrive in nutrient-rich soil. Consider adding compost or well-rotted manure to the potting mix to provide additional organic matter and nutrients for the plants.
- Ensure proper drainage: Check that your containers have drainage holes to allow excess water to escape. This will prevent waterlogging, which can lead to root rot.
Once your potting soil is prepared, it”s time to move on to the next step: planting the cantaloupe seeds. By taking the time to prepare the right potting soil, you are providing your cantaloupe plants with the best possible start for healthy growth.
Step 3: Planting the cantaloupe seeds
Now that your potting soil is ready, it”s time to plant the cantaloupe seeds. Follow these steps to ensure proper planting and germination:
- Determine the planting method: Cantaloupe seeds can be planted directly in the containers or started indoors and then transplanted. Choose the method that works best for you.
- Plant the seeds at the right depth: Make small indentations in the potting soil, about 1 inch deep. Place 2-3 cantaloupe seeds in each indentation, ensuring they are evenly spaced.
- Cover and water: Cover the seeds with a thin layer of soil and gently press it down. Use a watering can or a gentle spray to moisten the soil without washing away the seeds.
- Label your containers: Place plant labels in each container to keep track of the different varieties and planting dates. This will help you monitor their growth and distinguish them during transplanting.
- Provide warmth: Cantaloupe seeds require warmth for germination. Place the containers in a warm location, such as a sunny windowsill or a greenhouse, where the temperature is consistently around 70°F (21°C).
- Monitor moisture levels: Check the moisture levels regularly and ensure that the soil remains moist but not waterlogged. Avoid overwatering, as this can lead to root rot.
- Germination time: Cantaloupe seeds typically germinate within 7-14 days. Once the seedlings emerge, remove any weak or overcrowded ones, leaving the strongest seedling in each indentation.
By following these steps, you will give your cantaloupe seeds the best chance of germinating and sprouting into healthy seedlings. The next step will focus on providing the right growing conditions for your young cantaloupe plants.
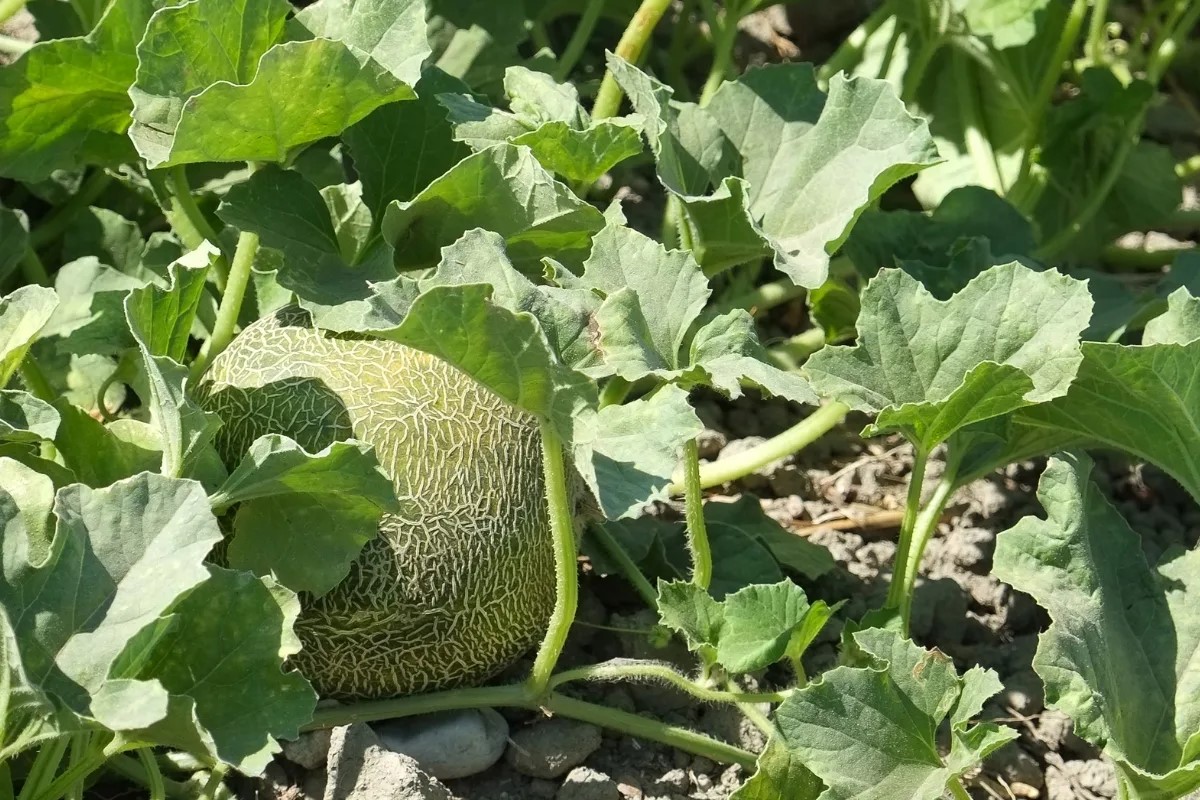
Step 4: Provide the right growing conditions
Creating the right growing conditions for your cantaloupe plants is essential for their healthy development and fruit production. Here are some key factors to consider:
- Sunlight: Cantaloupes thrive in full sun, so choose a location that receives at least 6-8 hours of direct sunlight daily. This will ensure proper photosynthesis and fruit development.
- Temperature: Cantaloupes are warm-season plants and require consistently warm temperatures to grow successfully. The optimal temperature range for their growth is between 70°F (21°C) and 85°F (29°C).
- Air circulation: Adequate airflow is crucial for preventing disease and promoting pollination. Avoid planting cantaloupes in areas with poor air circulation or where they may be susceptible to wind damage.
- Spacing: Give your cantaloupe plants enough space to grow and spread. Plant them at least 3-4 feet apart to allow for proper air circulation and to prevent overcrowding.
- Soil pH: Cantaloupes prefer slightly acidic to neutral soil with a pH range of 6.0-6.8. Test your soil”s pH and make necessary adjustments using organic amendments if needed.
- Mulching: Apply a layer of organic mulch, such as straw or wood chips, around the base of the plants. This will help retain moisture, suppress weeds, and maintain more even soil temperatures.
By providing these optimal growing conditions, you are creating an environment where your cantaloupe plants can thrive. The next step will focus on watering your seeds to ensure proper hydration and growth.
Plant cantaloupe seeds in well-draining soil, 1 inch deep and 18 inches apart. Keep soil consistently moist and provide plenty of sunlight for optimal growth.
Read more: How To Plant Cantaloupe Seeds
Step 5: Watering the seeds
Proper watering is crucial for the germination and growth of your cantaloupe seeds. Follow these guidelines to ensure adequate hydration:
- Watering frequency: Keep the soil consistently moist but not waterlogged. Water the seeds gently using a watering can or a hose with a fine mist nozzle. Avoid overwatering, as it can lead to root rot and other diseases.
- Early stages: During the germination stage, mist the soil daily to keep it evenly moist. As the seedlings emerge and establish, reduce the frequency but increase the amount of water to encourage deeper root growth.
- Soil moisture: Check the moisture level of the soil regularly by sticking your finger into the soil about an inch deep. If it feels dry, it”s time to water. If it”s still moist, hold off on watering until the top layer dries out.
- Avoid overhead watering: Water directly at the base of the plants to prevent wetting the foliage excessively. Overhead watering can lead to fungal diseases and hinder plant growth.
- Watering consistency: Maintain a consistent watering schedule throughout the growing season. Cantaloupes require regular moisture, especially during flowering and fruiting stages.
- Water during the morning: Water your cantaloupe plants in the early morning, allowing the foliage to dry before evening. This helps prevent disease development and promotes healthier plants.
Remember that water requirements may vary depending on environmental factors such as temperature and humidity. It”s important to monitor the moisture level of the soil and adjust your watering routine accordingly. The next step will focus on transplanting your cantaloupe seedlings for continued growth.
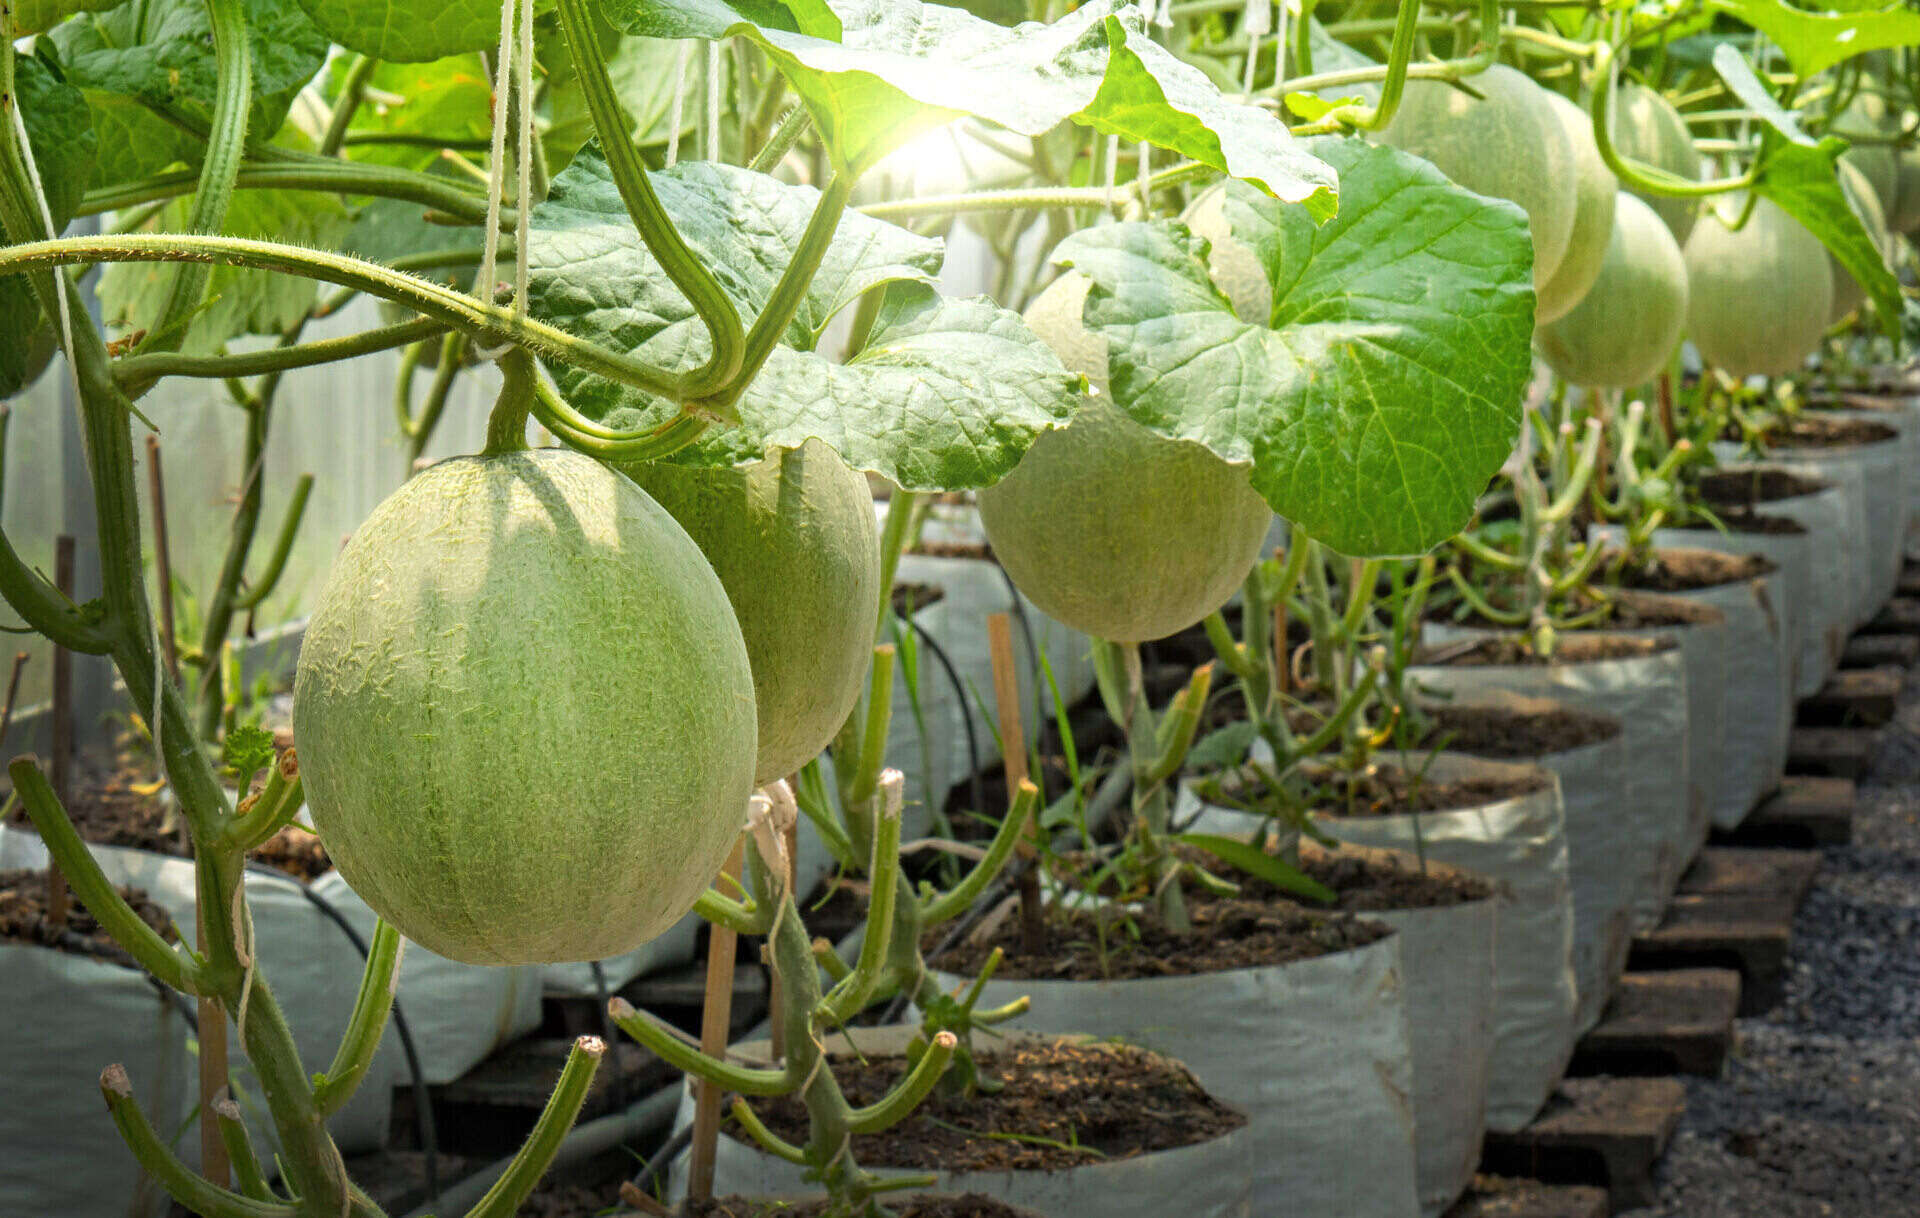
Step 6: Transplanting the seedlings
Once your cantaloupe seedlings have grown to a suitable size, it’s time to transplant them into their permanent growing location. Follow these steps to ensure a successful transplant:
- Prepare the planting area: Choose a sunny spot in your garden with well-drained soil. Clear any weeds and loosen the soil to create a hospitable environment for the seedlings.
- Timing: Wait to transplant your cantaloupe seedlings until after the threat of frost has passed and the soil has warmed up. Soil temperatures between 65°F (18°C) and 75°F (24°C) are ideal.
- Dig holes: Dig holes that are slightly larger than the root ball of each seedling. Space the holes at least 3-4 feet apart to provide the growing cantaloupes with ample space.
- Remove seedlings from containers: Gently remove the seedlings from their containers, taking care not to damage the delicate roots. If the plants are root-bound, loosen the roots slightly before transplanting.
- Plant at the right depth: Place each seedling in a hole at the same depth it was growing in the container. Backfill the hole with soil, gently firming it around the base of the plant.
- Water thoroughly: After transplanting, water the seedlings well to settle the soil and help them establish in their new location. Provide consistent moisture in the following days to ensure proper growth.
- Consider support: If you plan to train your cantaloupe vines vertically, install trellises or stakes soon after transplanting. This will provide support as the vines grow and help prevent damage to the fruits.
It’s important to handle the seedlings with care during the transplanting process to minimize stress and promote their healthy growth. Once transplanted, your cantaloupe plants will continue to grow and require regular care and maintenance. The next step will focus on caring for the young plants as they develop.
Step 7: Caring for the young plants
Once your cantaloupe seedlings are transplanted, they will require ongoing care and attention to ensure their healthy development and optimal fruit production. Here are some important tasks to keep in mind:
- Watering: Continue to water your cantaloupe plants regularly, providing them with about 1-2 inches of water per week. Adjust watering based on weather conditions, making sure the soil remains consistently moist but not waterlogged.
- Fertilization: Feed your cantaloupes with a balanced organic fertilizer every 4-6 weeks. Apply the fertilizer according to the package instructions, taking care not to over-fertilize, as it may result in lush foliage growth at the expense of fruit production.
- Weed control: Keep the area around your cantaloupe plants free from weeds, as they can compete for nutrients and water. Regularly remove any weeds by hand or use organic mulch to suppress weed growth.
- Pest and disease control: Monitor your cantaloupe plants for any signs of pests or diseases. Common pests include aphids, cucumber beetles, and squash bugs. If necessary, use organic pest control methods or consult with a local extension office for advice.
- Pruning: Cantaloupe plants typically require minimal pruning. However, you can pinch off excessive lateral vines to redirect the plant’s energy towards fruit production. Pruning can also improve air circulation and reduce the risk of disease.
- Support: If you decide to train your cantaloupe vines vertically, continue to provide support as the plants grow. Regularly tie or weave the vines onto trellises or stakes to prevent them from sprawling on the ground.
- Pollination: Cantaloupes require pollination for fruit set. Encourage pollinators, such as bees, to visit your garden by planting flowers nearby. You can also gently shake the flowers to distribute pollen or use a small brush to transfer pollen between flowers.
By diligently caring for your young cantaloupe plants, you are ensuring their overall health and productivity. As the plants mature, you’ll start to see the fruits developing. The next step will focus on harvesting your ripe cantaloupes for maximum sweetness and flavor.
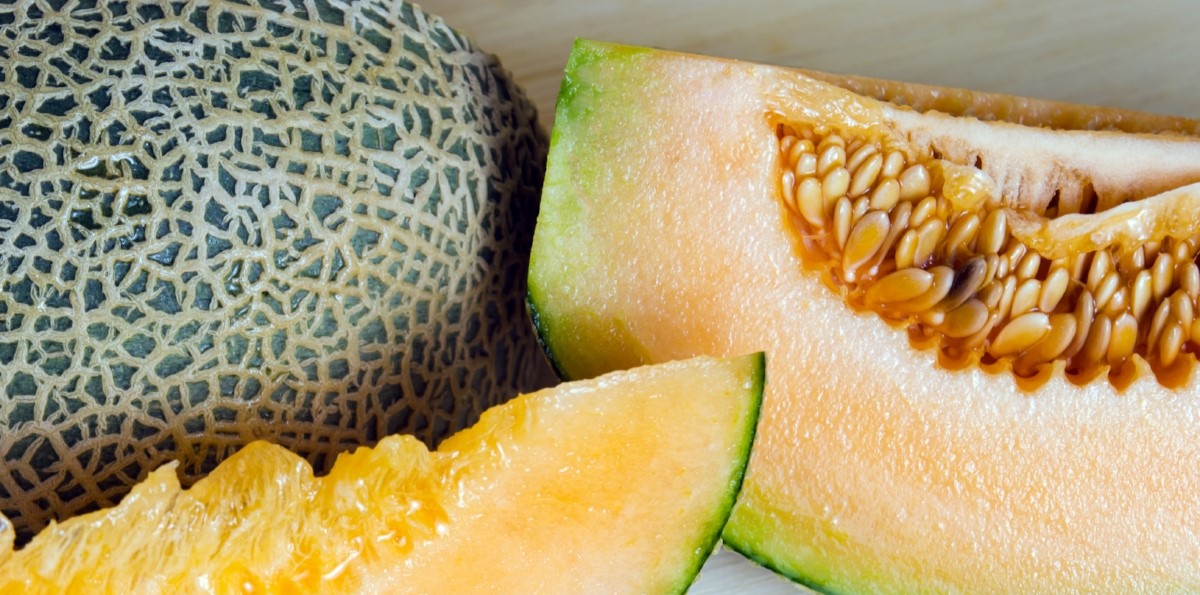
Step 8: Harvesting the cantaloupes
Harvesting ripe cantaloupes at the right time is crucial to enjoy their juicy sweetness and flavor. Follow these guidelines to ensure a successful harvest:
- Check for signs of ripeness: Look for visual cues to determine if your cantaloupes are ready to be harvested. The skin should have a net-like texture and turn golden or creamy beige in color. The fruit should feel slightly soft on the blossom end when gently pressed.
- Smell the aroma: Ripe cantaloupes emit a sweet, fragrant aroma from the stem end. If you can smell the characteristic melon scent, it’s a good indication that the fruit is ready for harvest.
- Use the “slip” test: With some cantaloupe varieties, the fruit easily separates from the stem when it’s fully ripe. Gently lift the cantaloupe and if it easily slips off the stem, it’s ready to be harvested.
- Cut the fruit: To harvest your cantaloupes, use a sharp knife or shears to cut the fruit from the vine, leaving a short stub of stem attached. Avoid twisting or pulling on the fruit, as this can damage the vine.
- Handle with care: Cantaloupes have delicate skin, so handle them gently to avoid bruising or damaging the fruit. Place them in a shallow basket or tray to prevent excessive pressure on the skin.
- Store properly: Freshly harvested cantaloupes can be stored at room temperature for 2-3 days to fully ripen. Once fully ripe, transfer them to the refrigerator to prolong their shelf life for up to a week.
- Enjoy the fruits of your labor: Once your cantaloupes are fully ripe and ready to eat, slice them open, remove the seeds, and enjoy the sweet and juicy flesh. You can eat them as is, add them to fruit salads, or blend them into refreshing smoothies.
Remember that different cantaloupe varieties may have slight variations in appearance and ripening times. It’s always best to refer to the specific guidelines provided by the seed supplier or check for variety-specific information. Enjoy the delicious taste of your homegrown cantaloupes and start planning for the next growing season!
Read more: How To Preserve Cantaloupe Seeds
Conclusion
Starting cantaloupe seeds and growing your own delicious melons can be a rewarding and enjoyable experience. By following the steps outlined in this guide, you have the knowledge and tools to successfully grow cantaloupes from seed to harvest. From gathering the necessary materials to providing the right growing conditions and caring for the young plants, each step plays a crucial role in the overall success of your cantaloupe garden.
Remember to choose high-quality seeds, prepare the appropriate potting soil, and provide the optimal growing conditions, including sunlight, temperature, and airflow. Proper watering, fertilization, and pest control are essential for the healthy development of your cantaloupe plants. Additionally, paying attention to signs of ripeness and harvesting your cantaloupes at the right time will ensure the best flavor and sweetness.
By growing your own cantaloupes, you not only get to savor the delicious taste of the sweet and juicy fruits, but you also gain a sense of accomplishment and a deeper connection to nature. So, roll up your sleeves, get your hands dirty, and experience the joy of growing your own cantaloupes in your garden.
Enjoy the process, experiment with different varieties, and don’t forget to share the bounty with friends and family. Happy gardening and delicious harvests!
Frequently Asked Questions about How To Start Cantaloupe Seeds
Was this page helpful?
At Storables.com, we guarantee accurate and reliable information. Our content, validated by Expert Board Contributors, is crafted following stringent Editorial Policies. We're committed to providing you with well-researched, expert-backed insights for all your informational needs.


0 thoughts on “How To Start Cantaloupe Seeds”