Home>Home Maintenance>How To Install A Ventilation System For A Toilet
Home Maintenance
How To Install A Ventilation System For A Toilet
Modified: March 6, 2024
Looking to improve home maintenance? Learn how to install a ventilation system for your toilet with our step-by-step guide. Enhance air quality and prevent moisture damage.
(Many of the links in this article redirect to a specific reviewed product. Your purchase of these products through affiliate links helps to generate commission for Storables.com, at no extra cost. Learn more)
Introduction
Welcome to our complete guide on how to install a ventilation system for a toilet. Proper ventilation is essential for any bathroom, as it helps remove excess humidity, odors, and airborne contaminants. Inadequate ventilation can lead to issues such as mold growth, peeling paint, and unpleasant odors. Installing a ventilation system can help improve air quality, prevent damage, and create a more comfortable bathroom environment.
In this guide, we will take you through the step-by-step process of installing a ventilation system for your toilet. We will cover everything from determining your ventilation needs to selecting the appropriate system and completing the installation. Whether you are a DIY enthusiast or a homeowner looking to tackle a home improvement project, this guide will provide you with the knowledge and guidance you need.
Before we dive into the installation process, let’s first understand why ventilation is important for a toilet. Bathrooms are prone to high levels of humidity due to the presence of water from showers, baths, and toilets. This high humidity, if not properly addressed, can lead to the growth of mold and mildew, which can have detrimental effects on your health and the structural integrity of your home.
A suitable ventilation system helps to remove excess moisture from the air, helping to prevent mold growth and protecting your bathroom from potential damage. Additionally, it aids in eliminating unpleasant odors and improving overall air quality. With the right ventilation system in place, you can maintain a fresh, clean and healthy bathroom environment.
Now that we understand the importance of ventilation, let’s move on to the step-by-step process of installing a ventilation system for your toilet.
Key Takeaways:
- Proper ventilation in your bathroom is crucial to prevent mold growth, odors, and structural damage. Installing a ventilation system can create a healthier and more comfortable environment for your home.
- When installing a ventilation system for your toilet, consider factors like bathroom size, noise level, and energy efficiency. Proper measurement, marking, and testing are essential for a successful installation.
Read more: How To Install Island Range Hood
Step 1: Determine the Ventilation Needs
The first step in installing a ventilation system for your toilet is to assess your specific ventilation needs. Several factors need to be considered when determining the appropriate ventilation system for your bathroom.
1. Size of the Bathroom: The size of your bathroom will determine the airflow capacity required for the ventilation system. Larger bathrooms may require more powerful fans or multiple fans to ensure proper air circulation.
2. Location of the Bathroom: If your bathroom is located on an exterior wall, it may be easier to install a ventilation system as the ductwork can be directed straight to the outside. For bathrooms located in the center of your home, you may need to consider alternative ventilation options like ductless fans.
3. Existing Ventilation: Check if your bathroom already has an existing ventilation system in place. If so, assess if it is functioning properly and if it meets your ventilation needs. If not, you may need to replace or upgrade the existing system.
4. Noise Level: Consider the noise level of the ventilation system. Some fans can be quite noisy, which may not be ideal if you have a small bathroom or are sensitive to noise. Look for models with low noise ratings for a more comfortable bathroom experience.
5. Energy Efficiency: Opt for energy-efficient ventilation systems that help reduce energy consumption and save on your utility bills. Look for models with Energy Star certification, as they meet strict energy efficiency guidelines.
6. Additional Features: Some ventilation systems come with additional features such as built-in lights, humidity sensors, or timers. These features can enhance the functionality and convenience of your bathroom ventilation system.
By considering these factors, you can determine the specific requirements for your bathroom ventilation system. It is important to choose a system that suits your needs and fits within your budget.
Once you have determined your ventilation needs, you are ready to move on to the next step: gathering the necessary tools and materials for the installation process.
Step 2: Gather the Necessary Tools and Materials
Before you begin the installation of your toilet ventilation system, it’s important to gather all the necessary tools and materials. Having everything prepared in advance will make the installation process smoother and more efficient. Here’s a list of what you’ll need:
Tools:
- Measuring tape
- Pencil or marker
- Utility knife
- Drill
- Screwdriver
- Wire cutter/stripper
- Ladder (if needed)
- Safety glasses
- Gloves
- Stud finder (if installing on a wall)
Materials:
- Ventilation fan
- Ductwork (flexible or rigid)
- Aluminum tape
- Screws
- Electrical wire
- Wire connectors
- Clamps
- Duct tape
- Mounting brackets
- Caulk (if needed)
The specific tools and materials you need may vary depending on the type of ventilation system you choose and the layout of your bathroom. Make sure to check the manufacturer’s instructions for any additional tools or materials that may be required.
It’s important to prioritize safety during the installation process. Wear safety glasses and gloves to protect yourself from any potential hazards. If you’re working at heights, use a stable ladder and exercise caution.
By gathering all the necessary tools and materials in advance, you’ll be well-prepared to move on to the next step: choosing the type of ventilation system for your toilet.
Read more: How To Install ZLINE Range Hood
Step 3: Choose the Type of Ventilation System
When it comes to choosing the type of ventilation system for your toilet, there are several options to consider. The type of system you choose will depend on factors such as the layout of your bathroom, the availability of an exterior wall for ventilation, and your specific requirements. Here are three common types of ventilation systems:
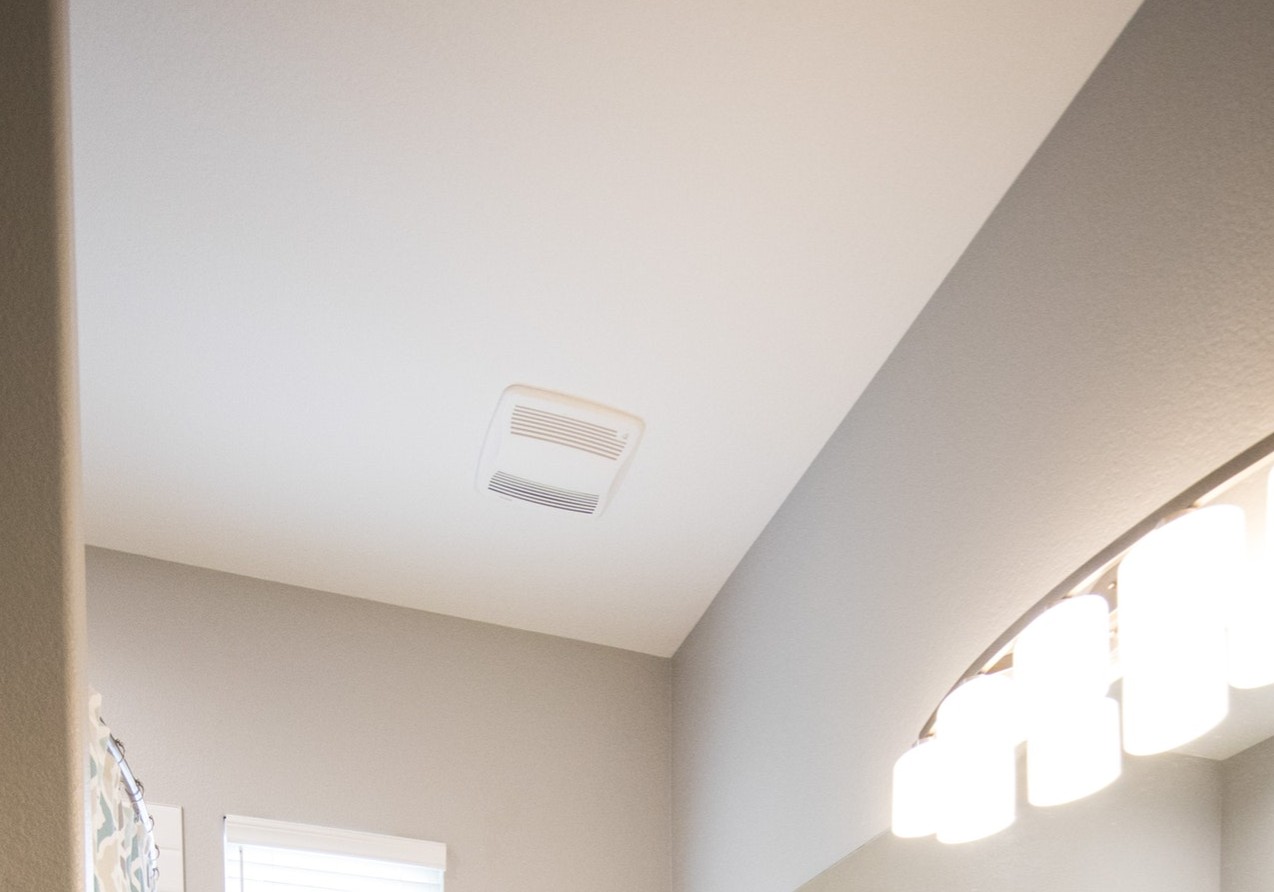
1. Exhaust Fan:
An exhaust fan is a popular choice for toilet ventilation. It works by drawing air out of the bathroom and expelling it outside. Exhaust fans come in various sizes and airflow capacities to suit different bathroom sizes. They can be installed on the ceiling or on the wall.
When selecting an exhaust fan, consider the noise level, air circulation capacity, and energy efficiency. Look for models with a high cubic feet per minute (CFM) rating to ensure adequate airflow. It’s also worth considering models that have energy-saving features or humidity sensors to optimize energy usage.
2. Ductless Ventilation Fan:
If your bathroom does not have access to an exterior wall for venting, or if installing ductwork is not feasible, a ductless ventilation fan may be a suitable option. These fans use a combination of filters and recirculation to remove odors and moisture from the air.
Ductless ventilation fans are generally easier to install since they do not require ductwork. They are also a quieter option compared to traditional exhaust fans. However, keep in mind that filters will need to be cleaned or replaced regularly for optimal performance.
3. Window Ventilation Kit:
If you have a window in your bathroom, you can consider using a window ventilation kit. This type of ventilation system utilizes a fan that fits into the window frame to draw out stale air and bring in fresh air from outside.
Window ventilation kits are relatively easy to install and do not require extensive modifications to your bathroom. However, they do rely on having an operable window and may not be suitable for all bathroom configurations. It’s important to ensure proper sealing around the fan and window to prevent air leakage.
Before making a final decision, carefully evaluate the pros and cons of each type of ventilation system and choose the one that best suits your specific needs. Once you’ve chosen the ventilation system, you can proceed to the next step: measuring and marking the installation area.
Read more: How To Install Broan Range Hood
Step 4: Measure and Mark the Installation Area
Now that you have chosen the type of ventilation system for your toilet, it’s time to measure and mark the installation area. Proper measurements and accurate marking are crucial for ensuring a precise and seamless installation. Follow these steps to measure and mark the installation area:
1. Determine the Location:
Identify the optimal location for installing the ventilation system. For exhaust fans, it is typically recommended to position them in the center of the ceiling or high on the wall, near the shower or toilet. For ductless ventilation fans, they can be placed anywhere in the bathroom.
2. Measure the Installation Area:
Measure the dimensions of the fan or ventilation kit to determine the exact size of the opening you need to create. Use a measuring tape to measure the length, width, and depth of the ventilation system. Transfer these measurements onto the ceiling or wall, ensuring that there is sufficient space for the installation and clearance.
3. Mark the Installation Area:
Using a pencil or marker, mark the outline of the installation area on the ceiling or wall. Double-check the measurements and ensure that the markings are straight and level. Use a level to ensure accurate horizontal and vertical lines if necessary.
Read more: How To Install A Vissani Range Hood
4. Locate Studs or Joists:
If you are installing the ventilation system on a wall, use a stud finder to locate the studs or joists behind the wall. This will help you determine the secure areas where you can attach the mounting brackets for the fan.
5. Check for Obstacles:
Before proceeding, check for any obstacles such as electrical wiring, plumbing pipes, or structural components that may interfere with the installation. If you encounter any obstacles, adjust the position of the installation area accordingly to avoid any complications.
6. Double-Check the Markings:
Take a final look at the marked installation area to ensure accuracy. If everything looks good, you’re ready to move on to the next step: cutting the opening for the ventilation system.
Proper measurement and marking are essential for a successful installation. Take your time to ensure accurate measurements and clear markings to avoid any mistakes or rework later on in the process.
Step 5: Cut the Opening for the Ventilation System
With the installation area marked, it’s time to cut the opening for the ventilation system. This step requires precision and attention to detail to ensure a clean and accurate cut. Follow these steps to cut the opening:
Read more: How To Install A Wall Mount Range Hood
1. Prepare the Work Area:
Before you begin, make sure your work area is clear of any obstacles. Protect the surrounding area with a drop cloth or plastic sheet to catch any debris or dust that may fall during the cutting process.
2. Use the Right Tools:
Depending on the material of your ceiling or wall, choose the appropriate cutting tool. A utility knife or drywall saw is commonly used for cutting through drywall or plaster. For other materials like wood or tile, a jigsaw or reciprocating saw may be necessary.
3. Start Cutting:
Using your chosen cutting tool, carefully follow the marked lines to cut out the opening for the ventilation system. Take your time and use a steady hand to ensure a clean and precise cut.
4. Check the Fit:
Once you have cut out the opening, check the fit of the ventilation system. Ensure that it fits securely and snugly within the opening. If adjustments are needed, carefully trim the edges as necessary to achieve the proper fit.
5. Smooth the Edges:
Use sandpaper or a sanding block to smooth out any rough edges around the opening. This will ensure a clean finish and prevent any snagging or damage during the installation process.
6. Remove any Debris:
After cutting, clean up any debris or dust that may have accumulated. Use a vacuum or brush to remove any remaining particles. This will help maintain a clean and tidy work area.
Remember to take your time during the cutting process and prioritize safety. Wear safety glasses and gloves to protect yourself from any potential hazards. Make sure to cut carefully and precisely, following the marked lines for the best results.
With the opening cut and prepared, you are now ready for the next step: installing the ductwork and ventilation fan.
Step 6: Install the Ductwork and Ventilation Fan
With the opening cut and prepared, it’s time to install the ductwork and ventilation fan for your toilet ventilation system. Follow these steps to complete the installation:
1. Position the Ventilation Fan:
Position the ventilation fan in the opening, ensuring that it fits securely. If necessary, use mounting brackets or screws provided by the manufacturer to secure the fan in place. Follow the manufacturer’s instructions for proper installation.
Read more: Who Installs A Range Hood
2. Connect the Ductwork:
Connect the ductwork to the ventilation fan. The ductwork can be either flexible or rigid, depending on your preference and the layout of your bathroom. Make sure to secure the connection with clamps or tape to prevent any leaks or disconnections.
3. Extend the Ductwork:
If needed, extend the ductwork to reach the exterior of your home. Ensure that the ductwork is properly aligned and connected, using clamps or tape to secure the joints. For exhaust fans, the ductwork should extend through the roof or sidewall, allowing the expelled air to be released outside.
4. Seal the Connections:
Use aluminum tape or duct tape to seal the connections between the ductwork and the ventilation fan. This will prevent air leaks and ensure optimal performance of the ventilation system.
5. Secure the Ductwork:
Secure the ductwork to the ceiling or wall using clamps or support brackets. This will help keep the ductwork in place and prevent any sagging or movement that could impact the efficiency of the ventilation system.
Read more: How To Install Attic Vents
6. Check for Proper Airflow:
Before finalizing the installation, turn on the ventilation fan and ensure there is proper airflow. Make sure the fan is operating smoothly and effectively, removing excess moisture and odors from the bathroom.
It’s important to carefully follow the manufacturer’s instructions for installing the ventilation fan and ductwork. Additionally, consider consulting a professional if you are unsure about any aspect of the installation process.
With the ductwork and ventilation fan installed, you’re one step closer to completing your toilet ventilation system installation. The next step involves connecting the ventilation fan to power.
Step 7: Connect the Ventilation Fan to Power
Once the ductwork and ventilation fan are installed, the next step is to connect the ventilation fan to power. Proper electrical connection is crucial for the efficient and safe operation of your toilet ventilation system. Follow these steps to connect the ventilation fan to power:
1. Turn off the Power:
Prior to working on the electrical connections, turn off the power to the bathroom at the circuit breaker. This will ensure your safety during the installation process.
2. Locate a Power Source:
Identify a suitable power source for the ventilation fan. You may have an existing electrical box or circuit that you can use. If not, consider installing a new dedicated circuit for the fan, following local electrical codes and regulations.
Read more: How To Install Bathtub Plumbing
3. Prepare the Wires:
If necessary, remove the cover plate of the electrical box. Prepare the wires by stripping the ends to expose the bare copper. Make sure to remove any insulation and create a clean and straight wire end.
4. Connect the Wires:
Match the colored wires from the ventilation fan to the corresponding colored wires in the electrical box. Use wire connectors to join the wires together securely. Connect the black wire to the black wire, the white wire to the white wire, and the green or copper wire to the grounding wire.
5. Secure the Connections:
Once the wires are properly connected, use wire connectors or electrical tape to secure the connections and prevent any accidental disconnections. Tuck the wires neatly into the electrical box and ensure they are not pinched or exposed.
6. Test the Connection:
Before closing up the electrical box, turn the power back on at the circuit breaker. Test the connection by switching on the ventilation fan and ensuring that it operates smoothly. Make sure there are no sparks, unusual noises, or signs of overheating. If everything looks good, turn off the power again before proceeding.
Remember, if you are uncomfortable working with electrical connections, it’s best to seek the assistance of a qualified electrician. They can ensure a safe and proper installation of the ventilation fan.
With the ventilation fan successfully connected to power, you’re almost done with the installation process. The final step involves testing and adjusting the ventilation system to ensure optimal performance.
Read more: How To Install Conduit In Wall
Step 8: Test and Adjust the Ventilation System
After completing the installation of your toilet ventilation system, it’s important to test and adjust the system to ensure it is functioning properly. Follow these steps to test and make any necessary adjustments:
1. Turn on the Ventilation System:
Turn on the ventilation system and let it run for a few minutes. Listen for any unusual noises or vibrations that may indicate an issue with the fan. Pay attention to the airflow and ensure that it feels strong and consistent.
2. Check for Proper Air Movement:
Hold a tissue or a small piece of paper near the ventilation fan to check for proper air movement. The paper should be drawn towards the fan, indicating that it is pulling air from the bathroom and expelling it outside. If there is weak airflow, check for any restrictions or blockages in the ductwork.
3. Monitor Humidity Levels:
Keep an eye on the humidity levels in your bathroom after using the ventilation system. If you notice a significant reduction in moisture levels and condensation on mirrors and surfaces, it indicates that the system is effectively removing excess humidity. Adjust the fan’s speed or duration of operation if necessary for optimal moisture control.
Read more: How to Install Shower Plumbing
4. Adjust Fan Settings:
Depending on the features of your ventilation system, you may have different settings to adjust. For example, some fans have humidity sensors that automatically detect and adjust the ventilation based on the moisture levels in the bathroom. Adjust the settings according to your preference and the specific needs of your bathroom.
5. Regular Maintenance:
To ensure the longevity and proper functioning of your ventilation system, it’s important to perform regular maintenance. Clean or replace the filters as recommended by the manufacturer to prevent clogs and optimize air circulation. Additionally, check the fan blades for any dust accumulation and clean them as needed.
6. Consult a Professional:
If you encounter any issues or concerns with your ventilation system that you are unable to resolve, consider consulting a professional. They can provide expert advice and assistance to ensure your system is working efficiently and effectively.
By testing and making any necessary adjustments to your ventilation system, you can ensure optimal performance and enjoy the benefits of a well-ventilated bathroom.
Congratulations! You have successfully completed the installation of a ventilation system for your toilet. Proper ventilation will not only improve air quality but also protect your bathroom from moisture-related issues. Enjoy the fresh and comfortable environment that your new ventilation system provides!
Conclusion
Installing a ventilation system for your toilet is a crucial step in maintaining a healthy and comfortable bathroom environment. Proper ventilation helps to remove excess humidity, eliminate odors, and improve air quality. With the step-by-step guide provided in this article, you now have the knowledge and confidence to successfully install a ventilation system in your toilet.
Throughout the installation process, we covered important steps such as determining your ventilation needs, gathering the necessary tools and materials, choosing the appropriate type of system, measuring and marking the installation area, cutting the opening, installing the ductwork and ventilation fan, connecting the fan to power, and testing and adjusting the system for optimal performance.
Remember to prioritize safety during the installation process. Use the recommended tools and equipment, follow electrical safety guidelines, and consult professionals if needed. It’s important to ensure that your ventilation system is properly installed to avoid any potential health or structural issues in the future.
Regular maintenance of your ventilation system is also essential to keep it functioning efficiently. Clean or replace filters as recommended, remove any debris or dust from the fan blades, and monitor humidity levels in your bathroom. This will help prolong the lifespan of your system and ensure its continued effectiveness in creating a fresh and comfortable bathroom environment.
We hope this comprehensive guide has provided you with valuable insights and guidance on how to install a ventilation system for your toilet. By following the steps outlined in this article, you can improve air quality, prevent moisture-related problems, and enjoy a healthier and more enjoyable bathroom space.
Thank you for taking the time to read this article, and we wish you the best of luck with your toilet ventilation system installation!
Frequently Asked Questions about How To Install A Ventilation System For A Toilet
Was this page helpful?
At Storables.com, we guarantee accurate and reliable information. Our content, validated by Expert Board Contributors, is crafted following stringent Editorial Policies. We're committed to providing you with well-researched, expert-backed insights for all your informational needs.

0 thoughts on “How To Install A Ventilation System For A Toilet”