Home>Interior Design>How To Stretch A Carpet: Simple Steps To Success

Interior Design
How To Stretch A Carpet: Simple Steps To Success
Modified: February 25, 2024
Learn how to stretch a carpet in simple steps for interior design success. Create a beautiful and polished look for your home with these easy carpet stretching techniques.
(Many of the links in this article redirect to a specific reviewed product. Your purchase of these products through affiliate links helps to generate commission for Storables.com, at no extra cost. Learn more)
Introduction
Welcome to the world of interior design, where every detail matters and every element contributes to creating a harmonious and visually appealing space. One important aspect of interior design is the flooring, and carpets play a significant role in providing comfort, style, and warmth to any room. However, over time, carpets can become loose and develop wrinkles or bulges, which not only affect their appearance but also pose a safety hazard. That’s where carpet stretching comes in.
Carpet stretching is a process used to smooth out wrinkles and remove bulges from carpets, making them appear taut and neat. This DIY technique can save you the cost of replacing your entire carpet and give it a new lease on life. In this article, we will guide you through the simple steps of stretching a carpet to achieve a professional-looking result.
Before we dive into the step-by-step process, it’s important to note that carpet stretching requires some physical effort and the use of specific tools. If you’re not confident in your abilities or have a large area to cover, it may be best to consult a professional carpet installer for assistance. However, if you’re up for the challenge, let’s get started!
In the following sections, we will walk you through each step of the carpet stretching process, ensuring that you have all the necessary tools and materials, as well as providing tips and techniques for a successful outcome. By the end of this guide, you will be equipped with the knowledge and confidence to transform your loose and wrinkled carpet into a firm and beautiful flooring feature. So, roll up your sleeves and let’s dive into the world of carpet stretching!
Key Takeaways:
- Transform your loose and wrinkled carpet into a professionally stretched and visually appealing floor covering with these simple DIY steps. Save on replacement costs and enjoy a revitalized living space.
- Carefully assess, gather tools, clear the room, stretch the carpet, and secure edges to achieve a successful and aesthetically pleasing carpet stretching outcome. Enjoy a transformed space with a smooth and taut carpet.
Read more: How To Stretch A Carpet
Step 1: Assessing the Carpet Condition
Before you begin the carpet stretching process, it’s important to assess the condition of your carpet to determine whether it can be successfully stretched or if it requires professional intervention. Here’s what you need to do:
- Inspect for visible wrinkles or bulges: Take a walk around the room and carefully examine your carpet for any signs of wrinkles, bulges, or areas where the carpet is loose. These can often be seen in high-traffic areas or areas where furniture has been placed.
- Measure the carpet’s tension: To determine if your carpet requires stretching, press down firmly on a small section of the carpet with your foot. If it feels loose or you can see wrinkles forming, then stretching is needed. However, if the carpet feels taut and doesn’t show any signs of looseness, stretching may not be necessary.
- Consider the age and condition of the carpet: If your carpet is relatively new and in good condition, stretching it yourself may be a viable option. However, if the carpet is old, worn, or has significant damage, it’s best to consult a professional to assess the extent of the problem and recommend the most appropriate solution.
Assessing the condition of your carpet will help you determine if you’re dealing with a simple stretching issue or if there are underlying problems that require professional attention. It’s essential to address any underlying issues before proceeding with the stretching process to ensure a long-lasting and successful outcome.
By taking the time to thoroughly inspect and evaluate your carpet, you’ll have a better understanding of its condition and be able to make an informed decision on whether to proceed with stretching it yourself or seek professional assistance. Once you’ve assessed the condition of your carpet, you can move on to the next step of the process: gathering the necessary tools and materials.
Step 2: Gathering the Necessary Tools and Materials
Now that you’ve assessed the condition of your carpet and confirmed the need for stretching, it’s time to gather the tools and materials you’ll need for the job. Here’s a list of essential items:
- Knee kicker: This tool is used to create tension in the carpet and secure it onto the tack strips.
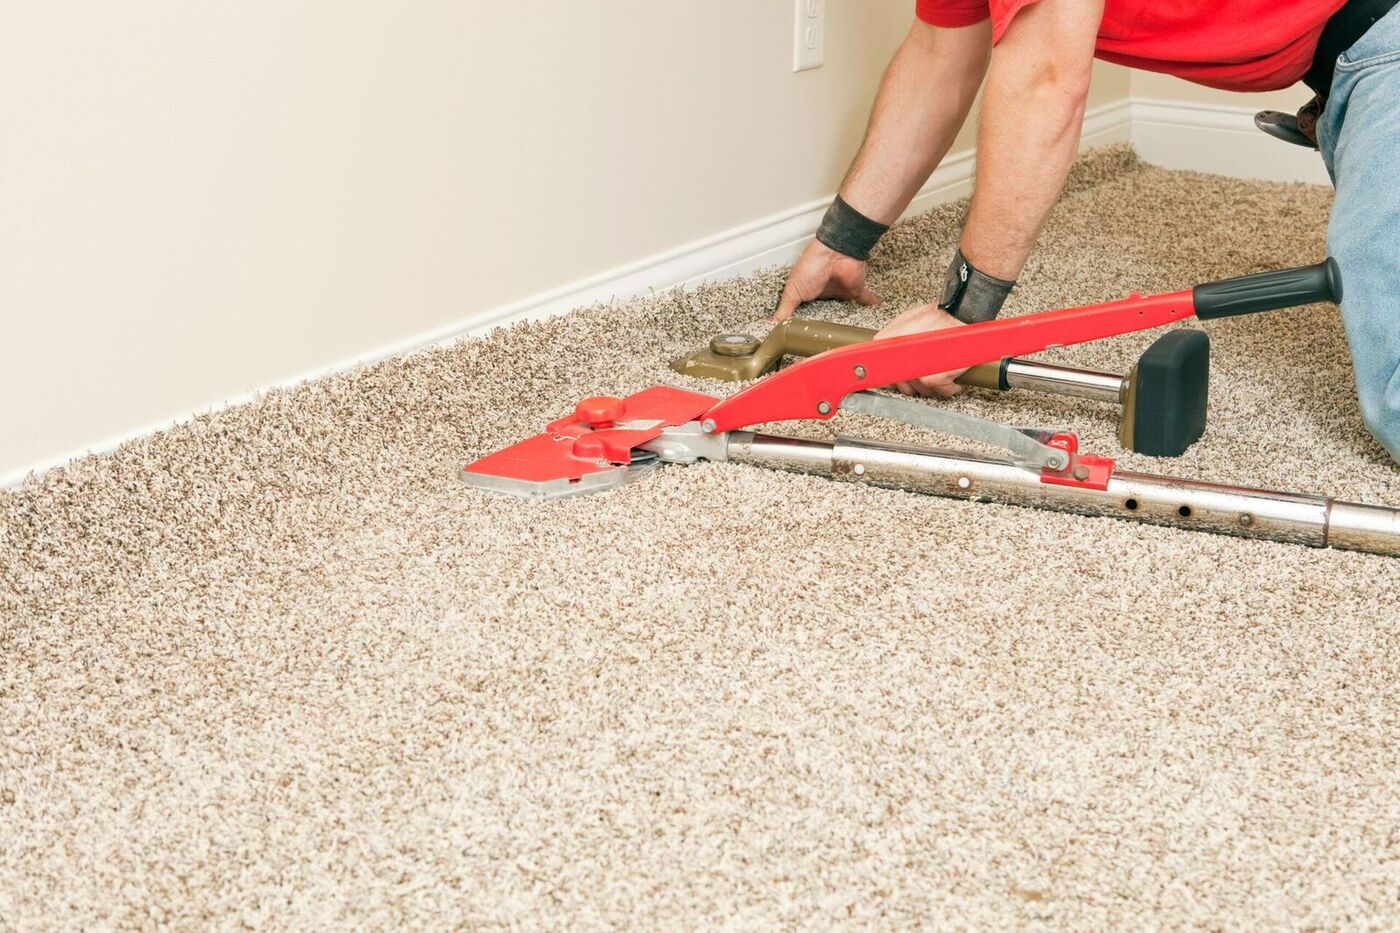
- Power stretcher: A power stretcher is a more advanced stretching tool that provides excellent tension and helps reach larger areas of the room.
- Carpet cutter or utility knife: You’ll need a sharp cutter or utility knife for trimming excess carpet after stretching.
- Stair tool: If you have carpeted stairs, a stair tool will help you stretch and secure the carpet onto the steps.
- Flathead screwdriver or pry bar: These tools are useful for removing carpet gripper strips if necessary.
- Tape measure: Accurate measurements are crucial for a successful stretching job, so make sure you have a tape measure handy.
- Work gloves: Protect your hands during the process by wearing work gloves.
- Mallet or hammer: A mallet or hammer can be used to secure the tack strips or adjust them if needed.
- Safety goggles: It’s important to protect your eyes from any debris or flying carpet fibers, so wear safety goggles throughout the process.
- Dust mask: If your carpet is old or if there’s a significant amount of dust, wearing a dust mask will help you breathe more comfortably.
Additionally, you’ll need the following materials:
- Carpet glue or adhesive: If the carpet has come loose from its backing in some areas, you may need carpet glue or adhesive to reattach it.
- Tack strips: Tack strips are thin strips of wood with sharp, angled nails that help secure the carpet in place. You may need to replace or adjust them during the stretching process.
- Carpet padding: If your carpet has padding beneath it and it’s damaged or worn out, you may need to replace it before stretching the carpet.
- Carpet seam tape (optional): If there are visible seams in your carpet, you may want to use carpet seam tape to reinforce them and prevent them from coming apart during stretching.
Gathering all the necessary tools and materials beforehand will ensure a smoother and more efficient carpet stretching process. Once you have everything you need, you can move on to the next step: clearing and preparing the room.
Step 3: Clearing and Preparing the Room
Before you begin stretching your carpet, it’s essential to clear and prepare the room for the process. This step will ensure that you have enough space to work comfortably and that obstacles are removed to prevent any damage or interruptions. Follow these guidelines to clear and prepare the room:
- Remove all furniture: Take out any furniture, area rugs, or objects from the room. This includes chairs, tables, decorative items, and anything else that may obstruct your path or get in the way during stretching.
- Disconnect electronic devices: Unplug and safely remove any electronic devices, such as lamps, TVs, computers, or speakers, to prevent any accidents or damage during the stretching process.
- Clear the pathways: Make sure all pathways and entrances to the room are clear of any obstacles, tripping hazards, or clutter. This will create a safe and accessible working environment.
- Protect delicate surfaces: If you have delicate flooring, such as hardwood or tile, consider placing protective covering or drop cloths over them to prevent any scratches or damage caused by tools or equipment.
- Secure electrical cords: Bundle and secure any electrical cords or wires to avoid tripping over them or accidentally unplugging devices during the stretching process.
- Open windows or use ventilation: Carpet stretching can generate dust and odors, so it’s a good idea to open windows for ventilation or use fans to keep the air circulating during the process.
By taking the time to clear and prepare the room, you’ll create a safe and streamlined environment for the carpet stretching process. This step will ensure that you have ample space to maneuver, minimize the risk of accidents, and protect your belongings. Once the room is cleared and prepared, you can proceed to the next step: removing and replacing furniture.
Step 4: Removing and Replacing Furniture
Now that you’ve cleared and prepared the room, it’s time to remove any remaining furniture from the area where you’ll be stretching the carpet. Removing furniture will give you the necessary space to work and ensure that it doesn’t obstruct the stretching process. Follow these steps to remove and replace your furniture:
- Start with larger pieces: Begin by removing larger furniture items, such as sofas, tables, or dressers. Enlist the help of a friend or family member to assist you in lifting and moving heavy items safely.
- Be cautious with fragile items: Pay extra attention to fragile or valuable items as you remove them from the room. Use caution and take measures to protect them from being damaged during the process.
- Label or photograph furniture placement: To make the furniture replacement process easier, consider labeling or taking photographs of the original layout and placement of the pieces. This will help you recreate the room’s design more accurately later.
- Store furniture in a safe area: Make sure to place the removed furniture in a safe and secure location, away from the carpet stretching area. Protect delicate surfaces with furniture blankets or covers to prevent scratches or damage.
- Identify areas requiring assistance: Some furniture pieces, such as heavy bookshelves or large beds, may require extra assistance or disassembly to be safely moved. Evaluate these pieces beforehand and plan accordingly.
Once the carpet stretching process is complete, you can start replacing the furniture in the room. Use your labels or photographs to guide you in accurately positioning the furniture back in its original layout. Take care not to drag or slide furniture across the freshly stretched carpet, as this can cause it to loosen or create new wrinkles. Instead, lift and place furniture gently.
By removing and replacing the furniture, you ensure that the carpet stretching process can be performed smoothly and without any obstructions. Take the necessary precautions to protect your furniture and belongings during this step, and ensure their safe return to the room once the carpet is properly stretched.
With the furniture out of the way, you’re now ready to move on to the next step: detaching the carpet from the tack strips.
Read more: How To Stretch Carpet In A Room
Step 5: Detaching the Carpet from the Tack Strips
Detaching the carpet from the tack strips is a crucial step in the carpet stretching process. The tack strips, also known as gripper strips, are thin pieces of wood with sharp nails that hold the carpet in place along the edges. Here’s how to remove the carpet from the tack strips:
- Put on work gloves: Before you begin, protect your hands by wearing work gloves. This will prevent any injuries from the sharp nails on the tack strips.
- Identify the loose area: Start by locating the loose or wrinkled area of the carpet. This is where you’ll begin the detaching process.
- Insert a flathead screwdriver or pry bar: Carefully insert a flathead screwdriver or pry bar between the carpet and the tack strip. Be cautious not to damage the carpet fibers or the baseboard.
- Gently pry the carpet away from the tack strip: Using the screwdriver or pry bar, apply gentle pressure to lift the carpet away from the tack strip. Work your way along the edge of the carpet, gradually releasing it from the strip.
- Continue detaching the carpet: Once you’ve loosened one side, move to the adjacent side and repeat the process. Continue to detach the carpet from the tack strips until you’ve freed all the edges.
- Be cautious with stubborn areas: Some areas of the carpet may be more stubborn or firmly attached to the tack strips. In these cases, use extra care and caution to avoid tearing or damaging the carpet fibers.
As you detach the carpet from the tack strips, take note of any areas where the carpet may have come loose from its backing. If there are small areas where the carpet is no longer attached, you may need to apply carpet glue or adhesive to reattach it later in the stretching process.
By carefully removing the carpet from the tack strips, you’re preparing it for the stretching process. Once the carpet is detached, you can move on to the next step: stretching the carpet.
When stretching a carpet, make sure to use a power stretcher to ensure the carpet is pulled tightly and evenly across the entire surface. This will prevent wrinkles and ensure a smooth, professional finish.
Step 6: Stretching the Carpet
With the carpet detached from the tack strips, it’s time to move on to the actual stretching process. This step requires the use of stretching tools such as a knee kicker or a power stretcher. Here’s how to stretch the carpet effectively:
- Start in a corner: Begin at one corner of the room and position the knee kicker or power stretcher about six inches away from the wall.
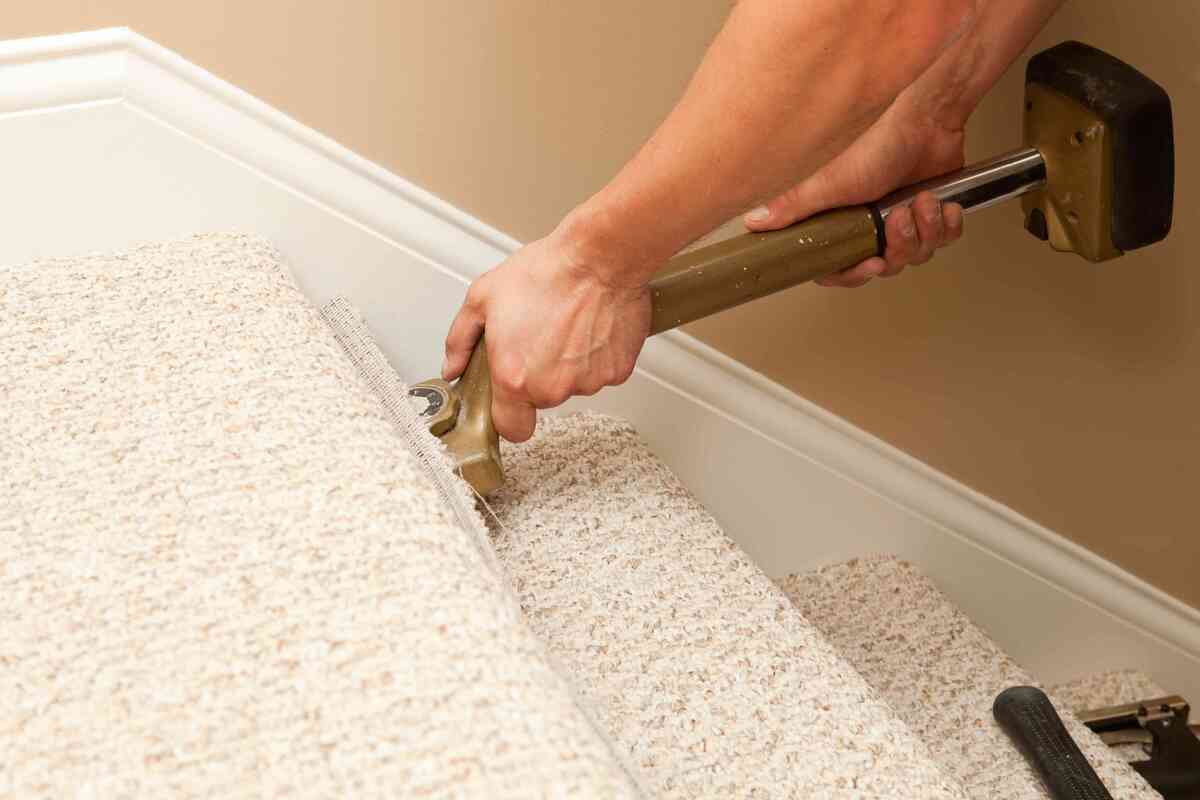
- Align the teeth of the knee kicker: If you’re using a knee kicker, align the teeth of the device with the carpet edge, positioning it at a slight angle towards the wall. Use your knee to apply force to the knee kicker, striking the padded end forcefully. This will stretch the carpet and create tension.
- Extend the power stretcher: If you’re using a power stretcher, extend the head of the tool to reach the opposite wall. This will allow you to apply even tension across a larger area and stretch the carpet more effectively.
- Secure the carpet onto the tack strips: As you stretch the carpet, use a carpet tucker or your hands to push the carpet edge onto the tack strip. Make sure the carpet is firmly secured and properly aligned along the wall.
- Continue stretching: Move along the wall, working your way around the perimeter of the room, stretching the carpet and securing it onto the tack strips consistently.
- Check for wrinkles or bulges: Periodically check the stretched carpet for any wrinkles or bulges. If you notice any, release the tension, reposition the carpet, and restretch it to eliminate the wrinkles.
- Repeat the process in the opposite direction: Once you’ve completed stretching the carpet along one wall, repeat the process on the adjacent wall and continue stretching the carpet until all edges are taut and smooth.
Whether you’re using a knee kicker or a power stretcher, it’s important to maintain consistent tension and avoid overstretching the carpet, which can lead to damage or unnecessary strain on the carpet fibers. Take your time and ensure that the carpet is stretched evenly across the room.
Once you’ve stretched the carpet to your satisfaction, you can move on to the next step: trimming excess carpet.
Step 7: Trimming Excess Carpet
After successfully stretching the carpet and achieving a taut and smooth surface, the next step is to trim any excess carpet. Trimming is essential to create clean and neat edges along the room’s perimeter. Follow these steps to trim the excess carpet:
- Measure and mark: Using a measuring tape, measure the distance between the stretched carpet and the wall. Add a few inches to this measurement to ensure that the carpet overlaps the tack strip.
- Create a cutting guideline: Using a straight edge or level, create a straight cutting guideline along the marked measurement. This will help you achieve a precise and straight cut.
- Use a carpet cutter or utility knife: Carefully cut along the guideline using a sharp carpet cutter or utility knife. Apply firm and even pressure to ensure a clean cut through the carpet.
- Remove the excess carpet: Once you’ve made the cut, remove the excess carpet from the room. Roll it up or fold it neatly for disposal or storage.
Trimming the excess carpet will give your flooring a polished and professional appearance. Take your time during this step to ensure accurate measurements and precise cutting. A clean cut will contribute to the overall aesthetic of the room and the longevity of the stretched carpet.
With the excess carpet trimmed, you’re ready to proceed to the next step: reattaching the carpet to the tack strips.
Step 8: Reattaching the Carpet to the Tack Strips
After trimming the excess carpet, it’s time to reattach it to the tack strips along the room’s perimeter. Reattaching the carpet will ensure that it stays securely in place and maintains its stretched appearance. Follow these steps to reattach the carpet to the tack strips:
- Start at a corner: Choose a corner of the room to begin reattaching the carpet to the tack strips.
- Align the carpet edge: Align the carpet edge with the tack strip, ensuring that it covers the strip completely.
- Push the carpet onto the tack strip: Using a carpet tucker or your hands, push the carpet edge firmly onto the tack strip. Make sure it’s securely fastened and tightly attached.
- Work your way along the wall: Move along the wall, reattaching the carpet to the tack strip as you go. Take your time to ensure that the carpet is properly aligned and tightly secured.
- Use a carpet stretcher for stubborn areas: If you encounter areas where the carpet doesn’t easily attach to the tack strip, use a knee kicker or a power stretcher to create tension and force the carpet onto the strip.
- Check for any loose areas: Once you’ve reattached the carpet along one wall, check for any loose areas or sections that need further securing. Use a carpet tucker or your hands to push any loose edges onto the tack strip.
- Repeat the process on all walls: Continue reattaching the carpet to the tack strips, moving along each wall until the carpet is firmly and evenly secured.
When reattaching the carpet, be mindful of the tension you apply. Be careful not to overstretch the carpet, as this can lead to wrinkles or damage. Take your time to ensure that the carpet is evenly reattached to the tack strips, creating a smooth and seamless finish.
Once the carpet is reattached to all the tack strips, you’re ready to move on to the next step: securing the edges and corners.
Step 9: Securing the Edges and Corners
With the carpet reattached to the tack strips, the next step is to secure the edges and corners. This will ensure that the carpet remains in place and doesn’t become loose over time. Follow these steps to secure the edges and corners of the carpet:
- Inspect the edges and corners: Take a close look at the edges and corners of the carpet to identify any areas that may need additional securing.
- Apply carpet glue if necessary: If you notice any edges or corners that are not firmly attached to the tack strip, apply a small amount of carpet glue or adhesive beneath the edge. Press the edge firmly onto the tack strip and hold it in place for a few seconds to allow the glue to set.
- Use a carpet awl or pronged tool: For corners or edges that require extra reinforcement, use a carpet awl or pronged tool to push the carpet edge into the gap between the tack strip and the wall. This will create a tighter and more secure hold.
- Trim excess carpet: If there is any excess carpet along the edges or corners, use a carpet cutter or utility knife to trim it neatly for a clean finish.
Take your time during this step to ensure that all edges and corners are securely fastened and properly aligned. This will prevent any potential issues in the future and keep your newly stretched carpet looking its best.
Once the edges and corners are secured, you’re ready for the final step: replacing the furniture and enjoying your newly stretched carpet!
Step 10: Replacing the Furniture
Now that you’ve successfully stretched and secured your carpet, it’s time to bring back the furniture and complete the room’s transformation. Follow these steps to replace the furniture:
- Refer to your labels or photographs: If you labeled or took photographs of the original furniture placement, use them as a guide to recreate the room’s layout. This will help you position the furniture accurately.
- Start with larger pieces: Begin by reintroducing the larger furniture items to the room, such as sofas, tables, and beds. Take your time to position them in their designated spots, ensuring they complement the newly stretched carpet.
- Arrange smaller items and accessories: Once the larger furniture is in place, arrange the smaller items, such as chairs, side tables, lamps, and accessories. Pay attention to balance and flow, creating a harmonious arrangement within the space.
- Take care when moving furniture: When placing furniture onto the carpet, be mindful not to drag or slide it. Lift and carefully place each item to avoid disturbing the newly stretched carpet or causing any damage.
- Adjust furniture positioning if needed: Step back and assess the room’s layout once all the furniture is in place. If necessary, make minor adjustments to optimize the flow and functionality of the space.
By carefully replacing the furniture, you will complete the final touch of the carpet stretching process. Take your time to arrange the furniture thoughtfully and create a welcoming and comfortable atmosphere in the room.
With all the furniture back in place, take a moment to admire your hard work and enjoy the transformed space. Your newly stretched carpet will not only enhance the overall appearance of the room but also provide a smooth and comfortable surface to walk on.
Remember to care for and maintain your carpet properly to ensure its longevity and continued beauty. Regular vacuuming and professional deep cleaning will help keep your freshly stretched carpet looking its best for years to come.
Congratulations on successfully stretching your carpet and reviving your space!
Conclusion
Carpet stretching is an essential DIY technique that can transform your loose and wrinkled carpet into a professionally stretched and aesthetically pleasing floor covering. By following the simple steps outlined in this guide, you can achieve impressive results and save the cost of replacing your entire carpet.
Throughout the carpet stretching process, we covered important steps such as assessing the carpet condition, gathering the necessary tools and materials, clearing and preparing the room, removing and replacing furniture, detaching the carpet from the tack strips, stretching the carpet, trimming excess carpet, reattaching the carpet to the tack strips, securing the edges and corners, and finally, replacing the furniture.
It is important to approach each step with careful attention to detail and to take the necessary time and effort to ensure a successful outcome. By properly stretching your carpet, you can eliminate wrinkles, bulges, and hazards, while simultaneously improving the overall appearance and longevity of your flooring.
However, it’s essential to recognize your limitations and when it may be necessary to seek professional assistance. If you have a large area to cover or lack the confidence and expertise to undertake the stretching process yourself, it’s advisable to consult with a professional carpet installer who can offer their expertise and ensure a high-quality result.
Remember, maintaining a well-stretched carpet requires regular care and maintenance. Vacuuming regularly and scheduling professional deep cleanings will help prolong the life and appearance of your carpet.
Now that you have a comprehensive understanding of how to stretch your carpet, you can confidently take on the task and experience the satisfaction of revitalizing your living space. So get ready to create a smooth, taut, and visually pleasing carpet that will bring comfort and style to your home for years to come.
Frequently Asked Questions about How To Stretch A Carpet: Simple Steps To Success
Was this page helpful?
At Storables.com, we guarantee accurate and reliable information. Our content, validated by Expert Board Contributors, is crafted following stringent Editorial Policies. We're committed to providing you with well-researched, expert-backed insights for all your informational needs.





0 thoughts on “How To Stretch A Carpet: Simple Steps To Success”