Home>Interior Design>How To Make Bowl Covers: Easy Steps With Upcycled Fabrics
Interior Design
How To Make Bowl Covers: Easy Steps With Upcycled Fabrics
Modified: December 7, 2023
Learn how to create unique and sustainable bowl covers using upcycled fabrics with our easy step-by-step guide. Elevate your interior design while reducing waste.
(Many of the links in this article redirect to a specific reviewed product. Your purchase of these products through affiliate links helps to generate commission for Storables.com, at no extra cost. Learn more)
Introduction
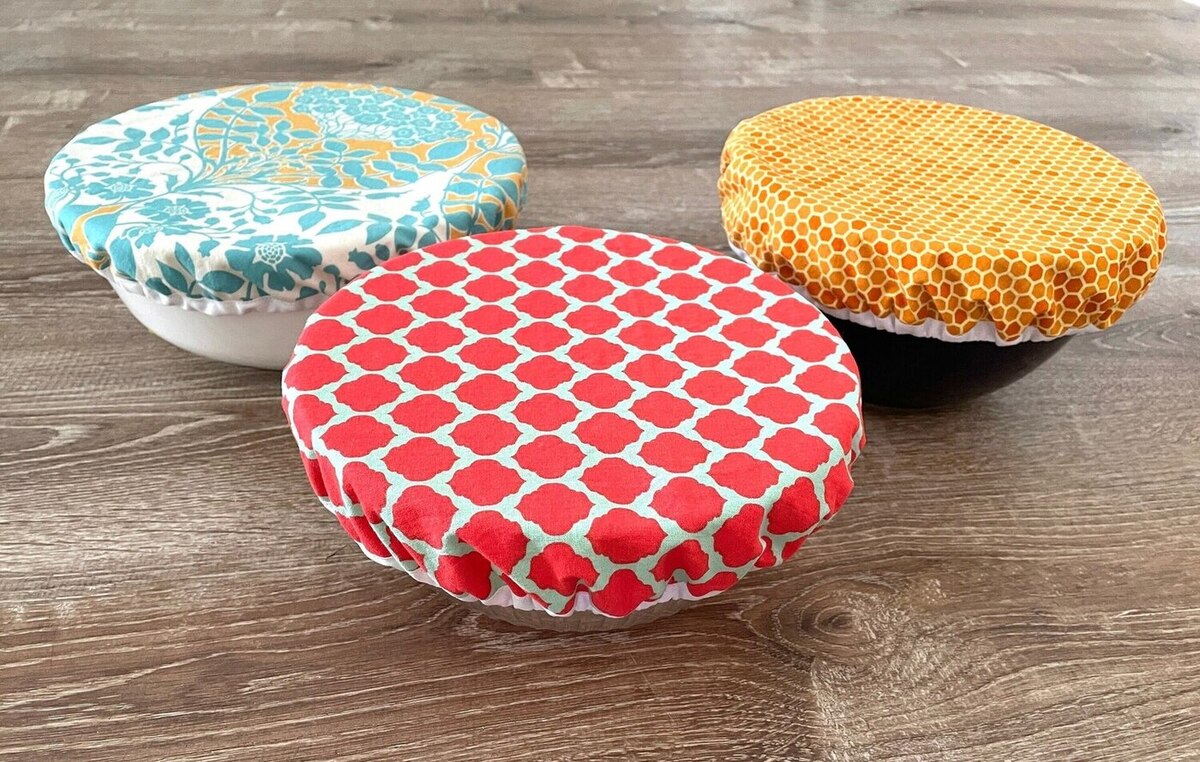
In today’s world, where sustainability and upcycling are becoming increasingly popular, finding creative ways to repurpose materials is essential. One such project that combines both functionality and eco-consciousness is making bowl covers from upcycled fabrics. Bowl covers are a practical and stylish alternative to plastic wrap or aluminum foil, allowing you to store food in bowls while keeping it fresh and protected.
In this article, we will guide you through the easy steps to create your own bowl covers using upcycled fabrics. By utilizing fabrics from old clothing, sheets, or curtains, you not only reduce waste but also give a new life to these materials.
Before we delve into the process, let’s gather the materials needed for this DIY project.
Key Takeaways:
- Reduce waste and add a personal touch to your kitchen by creating stylish bowl covers from upcycled fabrics. Enjoy a sustainable and eco-friendly alternative to plastic wrap!
- Embrace sustainability and creativity by repurposing old fabrics into functional and attractive bowl covers. Make a positive impact on the environment while adding a personalized touch to your kitchen decor.
Read more: How To Make Fabric-Covered Picture Frames
Materials Needed
Before you start making your bowl covers, gather the following materials:
- Upcycled fabrics: Look for fabrics from old clothing, sheets, or curtains that are clean, in good condition, and large enough to cover your bowls.
- Fabric scissors: Sharp scissors will make it easier to cut the fabrics neatly and accurately.
- Pins: Use pins to hold the fabrics together while sewing.
- Sewing machine or needle and thread: Depending on your preference and sewing skills, either a sewing machine or a needle and thread can be used to sew the fabrics together.
- Elastic band: Choose a thin and stretchy elastic band that will provide a snug fit around your bowls.
- Measuring tape or ruler: For accurate measuring and cutting of the fabrics.
- Optional: Decorative trim or ribbon: If you want to add a decorative touch to your bowl covers, you can use trim or ribbon to embellish the edges.
Once you have all these materials ready, you can proceed to the next step of measuring and cutting the fabrics.
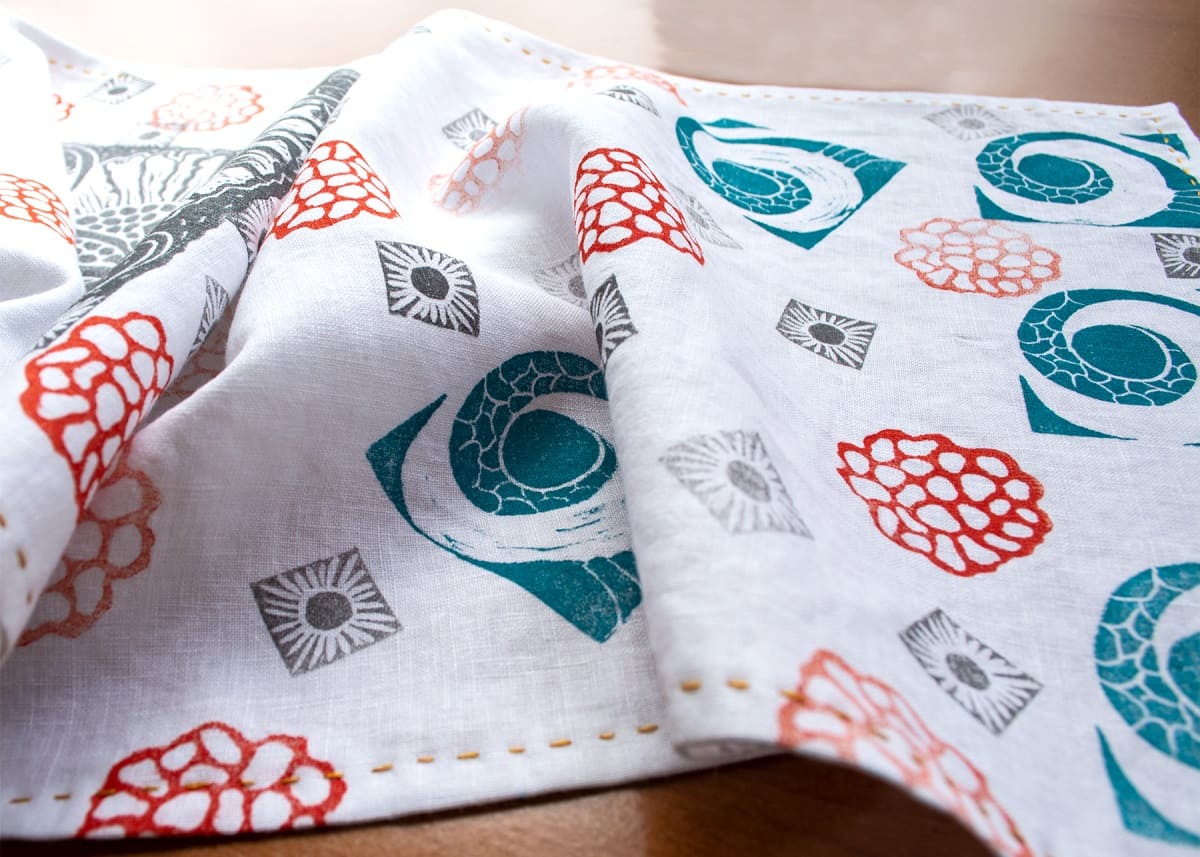
Step 1: Gather Upcycled Fabrics
The first step in making bowl covers from upcycled fabrics is to gather the fabrics you will be using. Look for fabrics from old clothing, sheets, or curtains that are clean, in good condition, and large enough to cover your bowls.
When selecting fabrics, consider the weight and stretchiness of the material. Lighter fabrics such as cotton or linen are ideal for bowl covers as they are breathable and easy to maneuver. If you prefer a more durable option, you can choose fabrics like denim or canvas.
Make sure to inspect the fabrics for any stains, tears, or holes. Avoid using fabrics that are heavily damaged as they may not provide adequate coverage for your bowls.
If necessary, wash and iron the fabrics before proceeding with the project. This will ensure that your bowl covers are clean and wrinkle-free.
Remember, the beauty of upcycling lies in giving new life to materials that might have otherwise ended up in the landfill. By using upcycled fabrics, you’re not only reducing waste but also adding a unique and personal touch to your bowl covers.
Once you have gathered the upcycled fabrics, you can move on to the next step of measuring and cutting them.
Step 2: Measure and Cut the Fabrics
Now that you have gathered your upcycled fabrics, it’s time to measure and cut them to the appropriate size for your bowl covers.
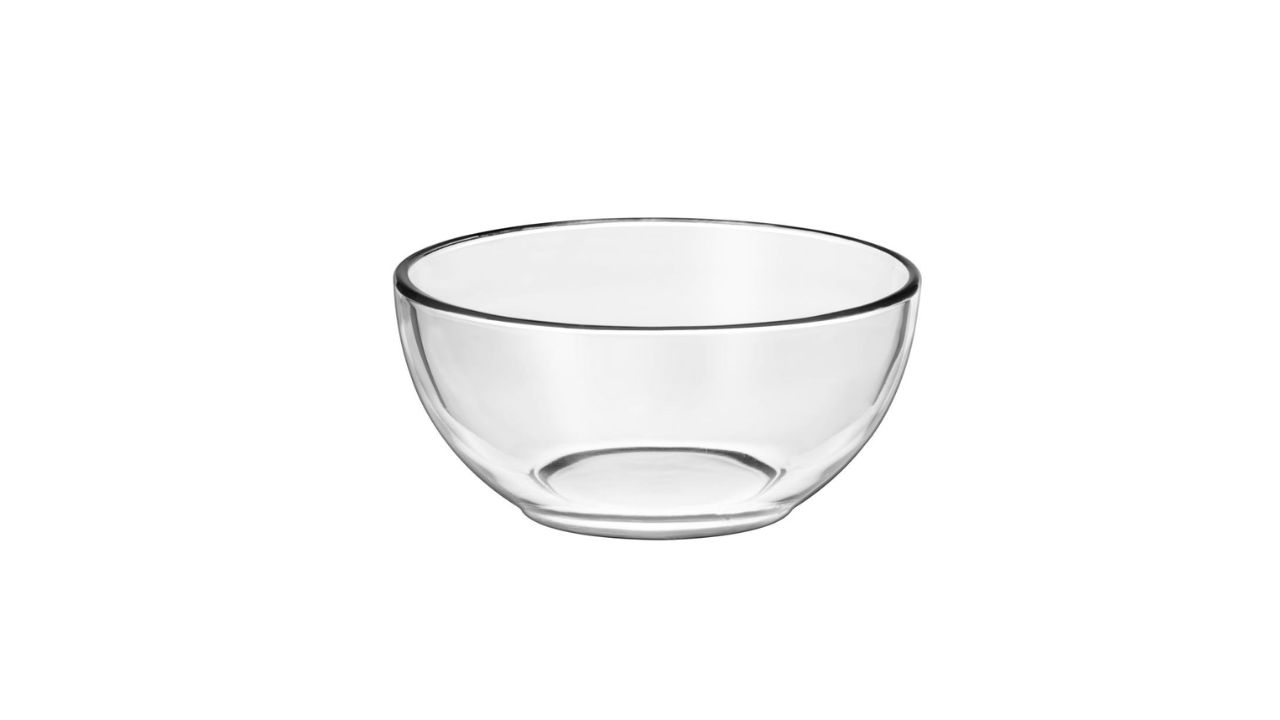
Start by placing the fabric on a flat surface and smoothing out any wrinkles. Place your bowl upside down on the fabric and adjust its position until you are satisfied with how much fabric will cover the bowl, ensuring there is enough fabric to drape over the edges.
Using a measuring tape or ruler, measure the diameter of the bowl. Add a few inches (about 2-3 inches) to the diameter to account for seam allowances and a snug fit. This will be the width of your fabric piece.
Next, measure the distance from the top of the bowl to the tabletop. Add a few inches (about 2-3 inches) to this measurement to accommodate for the height of the bowl and to ensure proper coverage. This will be the length of your fabric piece.
Using the measurements, mark the fabric with a fabric pen or pins. Then, using fabric scissors, carefully cut along the marked lines to create your fabric piece.
If you plan to make multiple bowl covers, repeat this process for each fabric piece, ensuring that they are all the same size.
At the end of this step, you should have neatly cut fabric pieces that are the appropriate size for your bowl covers.
Now that the fabrics are ready, let’s move on to the next step – pinning them together.
Step 3: Pin the Fabrics Together
With your cut fabric pieces in hand, it’s time to pin them together in preparation for sewing.
Start by placing one fabric piece on top of the other, right sides facing each other. Make sure that the edges are aligned as much as possible.
Take your pins and insert them along the edges of the fabric pieces, spacing them evenly and approximately 1 inch apart. The pins will hold the fabrics in place while you sew and ensure that they do not shift during the process.
If you are using a patterned fabric, make sure that the pattern matches up along the edges to create a visually appealing look.
Pay special attention to the corners, ensuring that they are pinned securely to prevent any gaps or loose edges.
Continue pinning until you have secured all the edges of the fabric pieces together.
Once you have completed this step, your fabric pieces should be securely pinned together, ready for the next step – sewing the edges.
When upcycling fabrics for bowl covers, choose materials that are durable and washable, such as old cotton sheets or denim. This will ensure that your bowl covers are both eco-friendly and practical.
Step 4: Sew the Edges
Now that your fabrics are securely pinned together, it’s time to sew the edges to create the actual bowl cover.
If you have a sewing machine, set it up according to the manufacturer’s instructions and select a straight stitch. Begin sewing along the pinned edges, leaving a small seam allowance of about 1/4 inch. Sew all the way around, removing the pins as you go.
If you prefer to hand sew, thread a needle with a thread that matches your fabric and tie a knot at the end. Starting at one corner, use a straight stitch to sew along the edges, ensuring that your stitches are evenly spaced and secure. As you sew, remove the pins that are holding the fabric together.
When you reach the starting point, secure the thread with a knot and trim off any excess thread.
Remember to backstitch at the beginning and end of your sewing to prevent the stitches from unraveling.
Once you have completed sewing all the edges, your bowl cover will start to take shape.
Take a moment to inspect your stitches and make any necessary adjustments. Trim any loose threads and ensure that all seams are secure.
Now that the edges are sewn, it’s time to add an elastic band to create a snug fit for your bowl covers. Let’s move on to the next step.
Step 5: Add Elastic Band
Adding an elastic band to your bowl cover will ensure a snug and secure fit on your bowls.
Start by measuring the circumference of your bowl cover. Use a measuring tape to get an accurate measurement of the fabric’s outer edge.
Once you have the measurement, cut a piece of thin and stretchy elastic band that is slightly shorter than the circumference measurement. This will allow the elastic to gather the fabric and create a snug fit.
Pin one end of the elastic band to the inside of the fabric, aligning it with the raw edge. Gradually stretch the elastic as you pin it around the entire edge of the fabric, evenly distributing the gathering.
Secure the other end of the elastic band to the fabric, making sure it is tightly pinned. This will ensure that the elastic remains in place during sewing.
Using a sewing machine or needle and thread, sew the elastic band to the fabric, making sure to sew close to the edge of the fabric. You can use a zigzag stitch to add extra durability to the elastic attachment.
As you sew, gently stretch the elastic to match the fabric’s edge, allowing the elastic to naturally gather the fabric as you go.
Once you have sewn all the way around, secure the end of the elastic with a few backstitches and trim off any excess.
With the elastic band attached, your bowl cover will now fit snugly around your bowls. However, before you finish, let’s tidy up the project by trimming excess threads.
Step 6: Trim Excess Threads
With your bowl cover almost complete, it’s time to give it a final touch by trimming any excess threads.
Take a pair of fabric scissors and carefully examine the edges of the bowl cover, looking for any loose or protruding threads. Trim these threads as close to the fabric as possible to create a neat and tidy finish.
Be cautious not to cut any of the fabric or the stitches while trimming the threads. Take your time and make small, precise cuts.
Once you have trimmed all the excess threads, run your fingers over the fabric to ensure that it feels smooth and thread-free.
Trimming the excess threads will not only improve the appearance of your bowl cover but also prevent any loose threads from getting tangled or caught on other objects.
With this step completed, your bowl cover is almost ready for use. There’s just one more step left – trying it on your bowl.
Step 7: Try on the Bowl Cover
The final step in making your bowl cover is to try it on your bowl and see how well it fits.
Take your bowl and place it upside down on a flat surface. Carefully drape the bowl cover over the top, ensuring that it fully encloses the bowl.
Adjust the cover as needed, making sure it fits securely and covers the entire bowl without any gaps.
If the bowl cover feels too loose, you can easily tighten it by sewing a smaller piece of elastic or adding a drawstring to the edge. On the other hand, if it feels too tight, you may need to release some of the elastic tension or use a larger piece of fabric for your next bowl cover.
Once you are satisfied with the fit, your bowl cover is ready to be used! Not only does it provide a stylish and eco-friendly alternative to plastic wrap, but it also keeps your food fresh and protected.
Remember to wash your bowl covers regularly to keep them clean and hygienic. They can be hand washed or machine washed on a gentle cycle and air-dried.
Now that you know how to make bowl covers from upcycled fabrics, you can get creative and make covers in different sizes, patterns, and colors to suit your kitchen decor or match different bowl sizes.
By repurposing fabrics and reducing waste, you have not only created functional and attractive bowl covers but also contributed to a more sustainable lifestyle.
Enjoy using your homemade bowl covers and impress your friends and family with your crafty skills!
With this step completed, your bowl cover is ready to be used. You have successfully created a sustainable and stylish solution for storing your food. Good job!
Conclusion
Creating bowl covers from upcycled fabrics is a rewarding and sustainable DIY project that combines functionality with eco-consciousness. By repurposing fabrics from old clothing, sheets, or curtains, you can reduce waste and give new life to these materials.
Throughout the easy steps outlined in this article, you have learned how to gather upcycled fabrics, measure and cut them, pin them together, sew the edges, add an elastic band, trim excess threads, and finally try on the bowl cover to ensure a proper fit.
With your homemade bowl covers now complete, you have a stylish and eco-friendly alternative to plastic wrap or aluminum foil. Not only do these covers keep your food fresh and protected, but they also add a personalized touch to your kitchen decor.
Remember to wash your bowl covers regularly to maintain their cleanliness and functionality. With proper care, they can be reused over and over again, reducing the need for single-use plastics.
So why not get creative and make bowl covers in different sizes, patterns, and colors? Customize them to match your kitchen decor or give them as thoughtful and sustainable gifts to friends and family.
By embracing upcycling and utilizing your sewing skills, you are not only reducing waste but also making a positive impact on the environment. So gather your upcycled fabrics, grab your sewing tools, and start making your own bowl covers today!
Enjoy the satisfaction that comes with creating something useful, beautiful, and sustainable!
With this comprehensive guide and your creativity, you can make a difference in the way you store and protect your food while promoting a greener lifestyle.
Frequently Asked Questions about How To Make Bowl Covers: Easy Steps With Upcycled Fabrics
Was this page helpful?
At Storables.com, we guarantee accurate and reliable information. Our content, validated by Expert Board Contributors, is crafted following stringent Editorial Policies. We're committed to providing you with well-researched, expert-backed insights for all your informational needs.


0 thoughts on “How To Make Bowl Covers: Easy Steps With Upcycled Fabrics”