Articles
How To Build A Bar In Basement
Modified: October 19, 2024
Looking for articles on how to build a bar in your basement? Find step-by-step guides and expert tips to create your dream basement bar with our comprehensive articles.
(Many of the links in this article redirect to a specific reviewed product. Your purchase of these products through affiliate links helps to generate commission for Storables.com, at no extra cost. Learn more)
Introduction
Welcome to the ultimate guide on how to build a bar in your basement! Turning your basement into a functional and stylish bar area not only adds value to your home, but also provides a perfect space for entertaining guests or enjoying a drink after a long day.
Building a basement bar may seem like a daunting task, but with proper planning, tools, and materials, you can create a bar that suits your style and meets your needs. Whether you’re a seasoned DIY enthusiast or a beginner with limited construction knowledge, this step-by-step guide will walk you through the process.
From planning and designing your bar to final touches like lighting and furniture, we’ll cover everything you need to know to create the basement bar of your dreams. So, roll up your sleeves, grab your tools, and let’s get started!
In this comprehensive guide, we’ll break down each step in detail, providing you with the necessary information and tips to make your basement bar project a success. We’ll cover everything from the initial planning and design stage to the final finishing touches.
Throughout the process, we’ll provide suggestions on materials, tools, and techniques to help you achieve professional results. However, please keep in mind that local building codes and regulations may vary, so always consult with a professional or check with your local authorities before starting any major construction project.
Now that you know what to expect, let’s dive into the exciting world of basement bar construction. With a little bit of time, effort, and creativity, you’ll soon have a fantastic space where you can relax, socialize, and enjoy your favorite cocktails in the comfort of your own home.
So, grab a drink and let’s begin our journey to building the perfect basement bar!
Key Takeaways:
- Building a basement bar involves careful planning, from designing the layout to gathering the necessary tools and materials. Proper preparation, including framing, installing plumbing and electrical connections, and applying insulation, is crucial for creating a functional and stylish bar area.
- The final steps of painting or staining the bar, choosing and installing flooring, and adding barstools and furniture are essential for personalizing the space and completing the transformation of the basement into a welcoming and enjoyable bar area.
Step 1: Planning and Designing Your Basement Bar
The first step in building a basement bar is to carefully plan and design the layout of your space. This is a crucial stage that will determine the functionality and aesthetics of your bar. Here are some key points to consider:
- Determine your bar’s purpose: Think about how you intend to use your basement bar. Will it primarily be a space for entertaining guests, or do you plan to use it for personal relaxation? This will help you determine the size, layout, and features of your bar.
- Measure your space: Take accurate measurements of your basement to determine the available space for your bar. This will guide your design choices and help you plan the layout effectively.
- Select a style: Decide on the style and theme you want for your bar. Do you prefer a modern and sleek look, or a rustic and cozy atmosphere? Consider your personal taste and the overall design of your home to ensure a cohesive look.
- Create a floor plan: Use graph paper or online design tools to create a scale drawing of your basement layout. Include details such as the bar area, seating, storage, and any additional features you want to incorporate.
- Consider functionality: Think about the practical aspects of your bar. Do you need a sink for washing glasses? Will you have a mini-fridge for drinks? How much storage space do you require? Taking these factors into account will ensure your bar is not only visually appealing but also convenient to use.
- Budget and prioritize: Determine your budget for the project and prioritize the elements that are most important to you. This will guide your decision-making process when selecting materials and furnishings.
- Research codes and regulations: Check with your local authorities to ensure you comply with any building codes or regulations for constructing a basement bar. This may include requirements for electrical work, plumbing, or ventilation.
Once you have a clear plan and design in mind, it’s time to move on to the next step of gathering the necessary tools and materials for building your basement bar.
Step 2: Gathering the Necessary Tools and Materials
Before you start building your basement bar, it’s essential to have all the tools and materials required for the project. Gathering everything in advance will ensure a smooth construction process. Here are the essential tools and materials you’ll need:
- Measuring tape: A measuring tape will help you accurately measure the dimensions of your space and ensure precise cuts.
- Level: A level is necessary to ensure that all components of your bar are straight and properly aligned.
- Saw: Depending on your project’s needs, you may require a circular saw, miter saw, or jigsaw for cutting wood or other materials.
- Screwdriver: A variety of screwdrivers, including both flathead and Phillips head, will be useful for assembling and securing various parts of your bar.
- Drill: A power drill with various drill bits will be necessary for drilling holes and attaching screws.
- Clamps: Clamps will help hold pieces together while you join them, ensuring a secure and accurate fit.
- Sanding tools: Sandpaper, a sanding block, or an electric sander will help smooth rough edges and surfaces.
- Wood glue: If you’re using wood for your bar, a strong wood glue will be needed for secure bonding.
- Construction adhesive: Construction adhesive will be necessary for attaching materials like cabinets or countertops to your bar.
- Nails and screws: Stock up on a variety of nails and screws suitable for the size and weight of materials you’ll be working with.
- Building materials: Depending on your design plans, you’ll need materials such as lumber, plywood, drywall, insulation, and vapor barrier for framing and finishing your bar.
- Countertop materials: Choose a suitable countertop material, such as laminate, granite, or concrete, depending on your design preferences and budget.
- Plumbing and electrical supplies: If you plan to have a sink or electrical outlets in your bar, ensure you have the necessary plumbing pipes, fittings, and electrical wires on hand.
- Finishing materials: Don’t forget to gather paint or stain, brushes, rollers, and other finishing materials to complete the look of your basement bar.
By gathering all the required tools and materials before you begin, you’ll save time and minimize disruptions during the construction process. With everything ready, you can now move on to step 3, which involves preparing the basement space for your bar.
Step 3: Preparing the Basement Space
Preparing your basement space is a crucial step in building a bar. Proper preparation ensures a clean and sturdy foundation for your project. Follow these steps to get your basement ready for construction:
- Clear the area: Remove any furniture, storage items, or clutter from the designated bar area in your basement. This will provide you with a clean, blank canvas to work with.
- Inspect and repair: Take a close look at the walls, floors, and ceiling of your basement. Look for any signs of damage, moisture, or structural issues. Address these problems before proceeding with your bar construction to ensure a sound and safe environment.
- Clean and disinfect: Thoroughly clean the basement area where your bar will be located. Sweep or vacuum the floor, wipe down the walls, and remove any dust or debris. Use a disinfectant to ensure a hygienic environment for your bar.
- Check for moisture: Basements are prone to moisture build-up, so it’s important to check for any signs of dampness or water leakage. Install a dehumidifier if necessary to control humidity levels and prevent moisture-related issues.
- Install a vapor barrier: To protect your bar against moisture, install a vapor barrier on the walls and floor. This will prevent any water seepage and help maintain a dry environment.
- Address lighting and ventilation: Assess the existing lighting and ventilation in your basement. Consider adding additional lighting fixtures to create a well-lit bar area. Also, ensure proper ventilation to avoid stale air and musty odors. If needed, consult a professional for guidance.
- Plan for utility hookups: For added convenience, plan the location of electrical outlets, plumbing connections, and any other utility hookups you may need for your bar. Consider the proximity to existing water lines, drain pipes, and electrical panels for ease of installation.
- Frame and partition walls: If your bar area requires partition walls or framing for added privacy or separation from the rest of the basement, you can proceed with framing at this stage.
Once you’ve completed these preparation steps, your basement space will be ready to move on to the next phase of construction. In Step 4, you’ll learn how to frame the structure of your basement bar. So, let’s continue building your dream bar!
Step 4: Framing the Bar Structure
The framing stage is where you’ll start to see the physical structure of your basement bar come to life. Framing involves building the framework that will support the various components of your bar, such as the walls, countertops, and shelving. Here’s how to frame your bar structure:
- Plan the layout: Using your floor plan from the design stage, mark the locations of the walls, countertop, and any other features on the basement floor using chalk lines or temporary markings.
- Measure and cut your lumber: Using the dimensions and layout of your bar, measure and cut the lumber to create the frame. Use a saw to make precise cuts according to your floor plan.
- Frame the walls: Start by framing the walls of your bar. Attach the bottom plates to the floor using nails or screws. Then, attach the studs, spaced according to your design, to the bottom plates. Finally, add the top plates to complete the wall frames.
- Frame the bar countertop: Create a frame for the bar countertop using sturdy lumber or plywood. Measure and cut the pieces to fit the desired shape and size of your countertop. Secure the pieces together using screws or nails.
- Install support beams and columns: If needed, install support beams or columns to provide extra stability and structural integrity to your bar. This is especially important if your bar has a significant overhang or if you’re working with a load-bearing wall.
- Attach the frame to the walls: Once your wall frames and countertop frame are complete, attach them to the existing basement walls using screws or nails. Ensure they are securely fastened and level.
- Create openings: If your bar design includes openings for windows, doors, or pass-throughs, frame these openings using additional lumber. Ensure they are properly sized and aligned according to your design plan.
- Consider electrical and plumbing: If you’re planning to install electrical outlets or plumbing fixtures in your bar, make sure to create appropriate openings in the framing to accommodate these installations. Consult with a professional if necessary.
Remember to double-check all measurements and alignments before securing the frames together. Taking the time to ensure accurate framing will lay the foundation for a successful and sturdy basement bar. Once you’ve completed the framing stage, you can move on to the next step of installing plumbing and electrical connections. Keep up the great work!
Read more: How To Build A Basement
Step 5: Installing Plumbing and Electrical Connections
Installing plumbing and electrical connections is a critical step in creating a functional and efficient basement bar. Proper installation of these systems ensures that your bar has access to water, drainage, and electricity. Follow these steps to install plumbing and electrical connections:
- Consult with professionals: If you’re not experienced in plumbing or electrical work, it’s advisable to consult with professionals or hire licensed contractors. They have the expertise to ensure proper installation and compliance with local building codes.
- Plan the layout: Determine the locations of the sink, faucet, drain, and any other plumbing fixtures you wish to install in your bar. Choose a suitable area for electrical outlets, switches, and lighting fixtures as well.
- Install plumbing connections: Begin by installing the necessary plumbing pipes, fittings, and valves for your sink and bar area. Follow the manufacturer’s instructions and adhere to local plumbing codes. If needed, connect the plumbing to the main water supply and sewage system.
- Install electrical wiring: Based on your layout plan, install electrical wiring to power the outlets, switches, and lighting fixtures in your bar. It’s crucial to follow electrical codes and safety guidelines when working with electricity. Consider running the wiring through conduit pipes to protect and conceal the wiring.
- Connect plumbing and electrical fixtures: Once the necessary pipes and wiring are in place, connect the sink, faucet, and any other plumbing fixtures to the appropriate water supply and drainage system. Connect electrical outlets, switches, and lighting fixtures to the installed wiring. Ensure all connections are secure and functioning properly.
- Test the plumbing and electrical systems: Before proceeding with the next steps of construction, thoroughly test the newly installed plumbing and electrical systems. Check for any leaks, ensure proper water flow, and verify that electrical connections are working safely. If any issues are identified, address them promptly.
It’s important to emphasize that when working with plumbing and electrical connections, safety is paramount. If you’re uncertain about any aspect of the installation, it’s best to seek professional assistance. Once you’re confident that the plumbing and electrical systems are functioning smoothly, you can proceed with the next step of applying insulation and vapor barrier. Keep up the great work, and you’ll have your basement bar up and running in no time!
Step 6: Applying Insulation and Vapor Barrier
Applying insulation and a vapor barrier to your basement walls is crucial for creating a comfortable, energy-efficient, and moisture-resistant space for your bar. Insulation helps to regulate temperature and reduce sound transfer, while a vapor barrier prevents moisture from seeping into the walls. Follow these steps to properly apply insulation and a vapor barrier:
- Select the right insulation material: Choose an insulation material that suits your needs and the climate in your area. Common options include fiberglass batts, foam board insulation, or spray foam insulation. Consider factors such as R-value, fire resistance, and ease of installation.
- Prepare the walls: Ensure that the walls are clean and dry before applying insulation. Remove any dirt, dust, or loose particles from the surface. Repair any cracks or damage to the walls to create a smooth and even surface.
- Measure and cut the insulation: Measure the height and width of each wall section, and cut the insulation material to fit. Use a utility knife or insulation cutter to make accurate cuts. Ensure a tight fit without compressing or stretching the insulation.
- Install the insulation: Place the insulation between the wall studs, starting from the bottom and working your way up. Press the insulation into place, ensuring it fills the entire cavity. Use adhesive or staples to secure the insulation if necessary.
- Seal air gaps: Inspect the insulation for any gaps or openings that could allow air to pass through. Use foam sealant or specialized insulation tape to seal these gaps and create an airtight barrier.
- Apply the vapor barrier: Install a vapor barrier over the insulation to prevent moisture from entering the walls. Use a plastic sheet or vapor barrier paper designed for this purpose. Ensure that the barrier covers the entire wall area, including corners and edges. Seal the seams with vapor barrier tape for added protection.
- Cut openings for electrical fixtures: If there are electrical outlets or switches on the walls, cut openings through the insulation and vapor barrier to access them. Be sure to seal around the openings to maintain the integrity of the vapor barrier.
- Inspect and test: Once the insulation and vapor barrier are in place, inspect the walls for any gaps, tears, or missing sections. Address any issues before proceeding with the next steps. Test the effectiveness of the vapor barrier by monitoring the moisture levels in the basement over time.
Proper insulation and a vapor barrier are essential for creating a comfortable, energy-efficient, and moisture-resistant environment for your basement bar. By carefully following these steps, you’ll ensure that your bar remains well-insulated and protected against potential moisture problems. In the next step, we’ll move on to building the frame and countertop of your bar. Keep up the great work!
Step 7: Building the Bar Frame and Countertop
Now that the insulation and vapor barrier are in place, it’s time to focus on building the frame and countertop of your basement bar. The frame provides structural support and the countertop is a key feature where you’ll serve drinks and socialize. Follow these steps to build the bar frame and countertop:
- Measure and cut the lumber: Based on your bar design and dimensions, measure and cut the lumber for the frame and countertop. Use a saw to make precise cuts, following your planned layout. Ensure that the pieces are cut to the appropriate length, width, and height.
- Assemble the bar frame: Start by assembling the base of the bar frame. Attach the side panels to the front and back panels using screws or nails. Ensure that the corners are square and the frame is sturdy. If necessary, add additional bracing to reinforce the structure.
- Build the countertop frame: Construct the frame for the countertop, which will rest on top of the bar frame. Measure and cut the pieces according to the desired dimensions of your countertop. Attach the pieces together using screws or nails, ensuring a solid and level surface.
- Attach the bar frame to the floor: Position the bar frame in the desired location in your basement. Use screws or concrete anchors (if applicable) to secure the frame to the floor, ensuring stability and preventing any movement.
- Secure the countertop frame: Attach the countertop frame to the bar frame using screws or brackets. Make sure the countertop frame is level and securely fastened to provide a solid foundation for the countertop material.
- Consider additional features: Depending on your design plans, you may want to incorporate additional features such as a foot rail, built-in shelves, or a raised bar area. Measure and cut the necessary components and attach them to the bar frame as desired.
- Ensure structural integrity: Double-check the stability and structural integrity of the bar frame and countertop frame. Make any necessary adjustments or reinforcements to ensure a sturdy and durable structure.
- Finish the frame: Sand any rough or sharp edges of the frame to create a smooth and polished finish. Fill any visible nail or screw holes with wood filler and sand them down for a seamless appearance.
With the bar frame and countertop frame built, you’ve now laid the foundation for your basement bar. In the next step, we’ll focus on installing cabinets and shelving to create storage space and enhance the functionality of your bar. Keep up the great work!
When building a bar in your basement, make sure to consider the layout and flow of the space. Position the bar in a central location to allow for easy access and social interaction.
Step 8: Installing Cabinets and Shelving
Installing cabinets and shelving is an important step in organizing your basement bar and maximizing storage space. Cabinets provide a place to store glassware, bottles, and other essentials, while shelving allows for the display of decorative items or easy access to frequently used items. Follow these steps to install cabinets and shelving in your basement bar:
- Plan the layout: Determine the placement of your cabinets and shelving based on your bar design and storage needs. Consider the height, width, and depth of the cabinets, as well as the spacing between shelves.
- Measure and mark: Use a measuring tape and a pencil to mark the positions of the cabinets and shelving on the walls of your bar. Ensure accurate measurements and level markings.
- Install upper cabinets: Start with the upper cabinets. Use a stud finder to locate the wall studs, which will provide the necessary support for the cabinets. Secure the cabinets to the studs using screws, ensuring they are level and properly aligned.
- Mount lower cabinets: Install the lower cabinets in a similar manner, ensuring they are secured to both the wall studs and the bar frame. Double-check the levelness and alignment of each cabinet as you go.
- Attach countertop support: If your bar design requires additional support for the countertop, install support brackets or wooden brackets beneath the cabinets. These will help distribute the weight and provide stability.
- Install shelving: Determine the desired height and spacing for your shelves. Use a level to mark and ensure accuracy. Install shelf brackets or rails, then place the shelves on top. Secure the shelves in place using screws or brackets.
- Adjust and align: Once all the cabinets and shelving are installed, double-check that everything is properly aligned and level. Make any necessary adjustments to ensure a seamless and visually appealing installation.
- Add finishing touches: Sand any rough edges or surfaces of the cabinets and shelves for a polished look. Apply a coat of paint or stain to match your desired aesthetic. Consider adding decorative trim or molding to further enhance the appearance.
With cabinets and shelving installed, your basement bar will now have the organizational features necessary for a functional and visually appealing space. In the next step, we’ll focus on adding a sink and faucet to complete the utility of your bar. Keep up the great work!
Read more: How To Build A Dry Bar
Step 9: Adding a Sink and Faucet
Adding a sink and faucet to your basement bar not only enhances its functionality but also provides a convenient space for washing glasses and utensils. Follow these steps to successfully install a sink and faucet:
- Choose a sink and faucet: Select a sink and faucet that fit both your design aesthetic and the available space in your basement bar. Consider the size, style, and material of the sink, as well as the functionality and finish of the faucet.
- Locate the water supply: Determine the location of the main water supply in your basement. This will help you plan the placement of the sink and access to water.
- Prepare the sink area: Measure and mark the location where you want to install the sink. Ensure that the area is large enough to accommodate the sink and offers enough countertop space around it.
- Cut an opening in the countertop: Using a jigsaw or a hole saw, carefully cut an opening in the countertop according to the dimensions provided by the sink manufacturer. Take your time to ensure smooth and accurate cuts.
- Install the sink: Place the sink into the opening in the countertop. Follow the manufacturer’s instructions for securing the sink. Typically, this involves applying a waterproof sealant around the edges of the sink and tightening clamps or brackets underneath to hold it in place.
- Connect the water supply: Install the necessary water supply lines from the main water supply to the sink. Use Teflon tape to secure the connections and prevent leaks. If you’re unsure about the plumbing connections, it’s recommended to consult a professional plumber.
- Install the faucet: Follow the manufacturer’s instructions to install the faucet onto the sink. Typically, this involves attaching the faucet to the sink using mounting hardware and connecting the water supply lines to the corresponding valves.
- Check for leaks: Turn on the water supply and check for any leaks around the sink and faucet connections. Make any necessary adjustments or repairs to ensure a tight and leak-free installation.
- Test the sink and faucet: Run water through the faucet and check for proper water flow and drainage. Ensure that the sink drains properly and that the faucet handles and sprayer, if applicable, function as intended.
With the sink and faucet successfully installed, your basement bar is now equipped with a convenient and functional washing area. In the next step, we’ll focus on wiring and installing lighting fixtures to create the perfect ambiance for your bar. Keep up the great work!
Step 10: Wiring and Installing Lighting Fixtures
Wiring and installing lighting fixtures in your basement bar is essential for creating a warm and inviting atmosphere. Proper lighting enhances the aesthetics of your bar and ensures visibility for both practical and decorative purposes. Follow these steps to wire and install lighting fixtures:
- Create a lighting plan: Determine the placement and type of lighting fixtures you want in your bar. Consider factors such as ambient lighting, task lighting, and accent lighting to create the desired ambiance.
- Consult an electrician if needed: If you’re not experienced in electrical work, it’s advisable to consult a licensed electrician for wiring and installation assistance. They have the expertise to ensure compliance with electrical codes and safety precautions.
- Turn off the power: Before working with any electrical components, turn off the power to the area where you’ll be installing the lighting fixtures. Locate the breaker switch for the bar area and switch it off to ensure safety. Use a voltage tester to verify that the power is fully off.
- Wire the lighting fixtures: Run electrical wires from an existing power source or junction box to the desired locations of your lighting fixtures. Take care to follow proper wiring techniques, such as using wire connectors and securing wires to prevent any loose connections.
- Install the light switches: Determine the locations for the light switches and wire them accordingly. Connect the wires from the switches to the lighting fixtures using proper wiring techniques. Ensure that the switches are properly grounded and labeled for easy identification.
- Mount the lighting fixtures: Follow the manufacturer’s instructions to mount and install the lighting fixtures. Use screws or brackets to securely attach them to the ceiling or appropriate mounting surfaces. Ensure that the fixtures are level and properly aligned.
- Connect the lighting fixtures: Connect the wiring from the fixtures to the previously installed electrical wires. Follow the manufacturer’s instructions for connecting the wires and securing them with wire connectors. Double-check that all connections are secure and insulated properly.
- Install dimmer switches: Consider installing dimmer switches to control the intensity of the lighting in your bar. Dimmer switches allow for greater flexibility in creating different moods and adjusting the ambiance to suit various occasions.
- Test the lighting fixtures: Once all the wiring is complete, turn the power back on and test each lighting fixture. Ensure that all fixtures are functioning properly and that there are no issues with flickering, buzzing, or excessive heat.
With the lighting fixtures wired and installed, your basement bar will be illuminated in the perfect light, creating a welcoming and enjoyable environment. In the next step, we’ll focus on choosing and installing flooring to complete the overall look of your bar. Keep up the great work!
Step 11: Choosing and Installing Flooring
Choosing and installing the right flooring for your basement bar is crucial for both the aesthetics and functionality of the space. The flooring you select should be durable, moisture-resistant, and easy to maintain. Follow these steps to choose and install the perfect flooring for your bar:
- Evaluate your options: Consider the different types of flooring suitable for basement spaces. This includes options such as vinyl, laminate, tile, or engineered wood. Each has its own advantages and considerations, so carefully research and assess which option best fits your needs and budget.
- Assess moisture resistance: Basements can be susceptible to moisture, so choose a flooring material that is moisture-resistant. Look for flooring options that have built-in moisture barriers or consider adding a separate subfloor or moisture barrier if needed.
- Measure your space: Accurately measure the dimensions of your basement bar area to determine the quantity of flooring material you’ll need. Take note of any irregularities or angled walls that may require special cutting or fitting.
- Prepare the subfloor: Ensure that your subfloor is clean, level, and free from any debris or moisture. If necessary, repair any imperfections or unevenness before proceeding with the installation of the new flooring.
- Follow manufacturer’s instructions: Consult the manufacturer’s guidelines and instructions for the specific flooring material you’ve chosen. This will provide you with important information regarding installation techniques, adhesives, underlayment, and maintenance requirements.
- Install the flooring: Depending on the type of flooring you’ve chosen, follow the appropriate installation method. For click-lock or floating floors, begin by laying the first row and continue to interlock subsequent planks or tiles. For glue-down flooring, apply the adhesive as directed and carefully place each piece in position.
- Cut and trim: Use a utility knife or appropriate cutting tool to trim the flooring to fit around walls, corners, or obstacles. Take care to ensure precise cuts for a clean and professional finish.
- Secure transitions and finishing touches: Install transition strips or molding in doorways or areas where different flooring types meet. This will provide a smooth and aesthetically pleasing transition between spaces. Install shoe molding or baseboards around the perimeter of the bar area to add a finishing touch and cover expansion gaps.
- Clean and maintain: Once the flooring installation is complete, thoroughly clean the surface to remove any debris or residue. Follow the recommended cleaning and maintenance instructions provided by the flooring manufacturer to keep your new floor looking its best.
With the perfect flooring installed, your basement bar will now have a solid foundation that enhances both the visual appeal and practicality of the space. In the next step, we’ll focus on painting or staining the bar to add the final touches of style. Keep up the great work!
Step 12: Painting or Staining the Bar
Painting or staining the bar is a crucial step in the finishing process that adds the final touches of style and aesthetics to your basement bar. Whether you prefer a bold and vibrant color or a rich and natural wood finish, this step allows you to personalize the bar and tie it in with the overall design of your space. Follow these steps to paint or stain your bar:
- Prepare the surface: Ensure that the bar is clean and free from any dust, dirt, or grease. Use sandpaper or a sanding block to smooth out any rough spots or imperfections on the surface. Wipe down the bar with a damp cloth to remove any leftover residue.
- Choose your paint or stain: Select a high-quality paint or stain that is specifically formulated for the material of your bar, whether it’s wood, laminate, or any other material. Consider the color or finish that best suits your bar’s design and your personal preference.
- Test the paint or stain: Before applying the paint or stain to the entire bar, it’s a good idea to test it on a small, inconspicuous area or on a sample piece of the same material. This allows you to assess the color, coverage, and finish.
- Apply primer (if needed): Depending on the type of material and paint you’re using, you may need to apply a primer as a base coat. The primer helps the paint adhere better and can improve the final appearance of your finished bar.
- Painting process: If you’re painting your bar, start by cutting in around the edges and corners with a brush, then use a paint roller to cover the larger areas. Apply thin, even coats, allowing sufficient drying time between each coat. Follow the manufacturer’s instructions regarding drying times and recommended number of coats.
- Staining process: If you’re staining your bar to enhance the natural beauty of the wood, use a brush or cloth to apply the stain in the direction of the wood grain. Allow the stain to penetrate for the recommended amount of time, then wipe off any excess with a clean cloth. Repeat the process with additional coats if desired, allowing sufficient drying time between each coat.
- Seal and protect: Once the paint or stain has dried completely, consider applying a protective topcoat or sealer to enhance durability and protect the finish. Choose a clear coat, such as polyurethane or varnish, suitable for your specific bar material. Apply the topcoat with a brush or roller, following the instructions provided by the manufacturer.
- Clean up: Properly dispose of any used paint cans, brushes, or other materials according to local regulations. Clean your brushes and other tools with the appropriate cleaner as recommended by the manufacturer.
By painting or staining your bar, you can achieve the exact look and feel you desire for your basement space. Whether you opt for a vibrant color that complements your style or a natural wood finish that exudes warmth, this step adds that final touch of personalization. In the next step, we’ll focus on adding barstools and furniture to complete the functionality and ambiance of your basement bar. Great job so far!
Read more: How To Build A Bar Shed
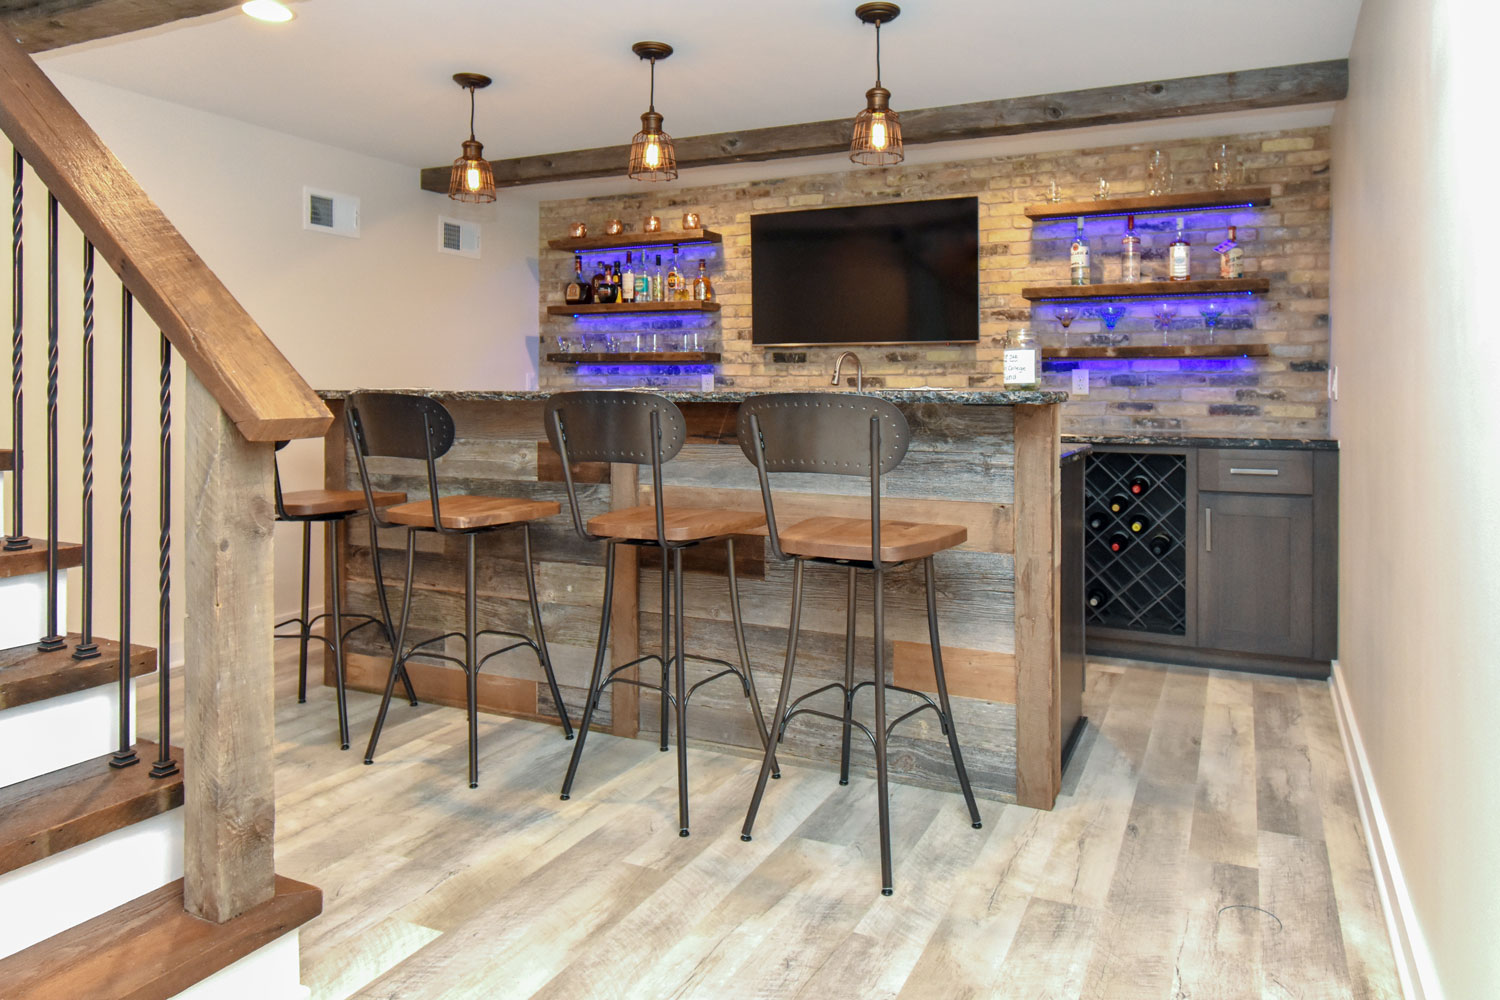
Step 13: Adding Barstools and Furniture
Adding barstools and furniture is the final step in transforming your basement into a functional and stylish bar area. The furniture you choose will not only provide seating but also contribute to the overall atmosphere and comfort of the space. Follow these steps to complete your basement bar with barstools and furniture:
- Determine the seating requirements: Consider how many people you want to accommodate in your bar area. This will help you determine the number of barstools or chairs you’ll need. Take into account the available space and the height of your bar or countertop.
- Select the right barstools: Choose barstools that fit your desired style, comfort level, and budget. Consider factors such as height, materials, cushioning, and backrests. Ensure that the barstools are proportionate to the size of your bar and complement the overall design.
- Consider additional furniture: Depending on the available space and your needs, you may want to include additional furniture such as lounge chairs, a small table, or a mini-fridge. Choose furniture pieces that add functionality and enhance the ambiance of your bar area.
- Measure the space: Measure the dimensions and layout of your bar area to ensure that the furniture you choose fits comfortably. Consider the legroom, spacing between barstools, and any additional clearance required.
- Arrange the furniture: Experiment with different furniture arrangements to find the most functional and visually appealing layout. Allow enough space for people to move around comfortably and ensure easy access to the bar, sink, and other features.
- Secure the furniture: Depending on the type of furniture, you may need to secure it to the floor or wall to prevent tipping or instability. Use appropriate anchors or brackets to ensure the safety and stability of the furniture.
- Add comfort and style: Enhance the comfort and aesthetics of your bar area by adding cushions, pillows, or upholstery to the seating. Choose fabrics and colors that complement the overall design and create a cozy atmosphere.
- Consider storage: If you require additional storage, select furniture pieces that offer built-in storage options such as cabinets, drawers, or shelving. This will help keep your bar area organized and clutter-free.
- Personalize with décor: Add personal touches and decorative elements to your bar area. Consider hanging artwork, displaying glassware or liquor bottles, or incorporating themed decorations that reflect your style and create a visually appealing space.
With the addition of barstools and furniture, your basement bar is now complete and ready to be enjoyed. The right seating and furniture choices will create a welcoming and comfortable space where you can socialize and relax. Take a moment to admire your hard work and enjoy the fruits of your labor!
Congratulations on successfully completing all the steps in building your basement bar. From planning and designing to painting and furnishing, you’ve transformed your basement into a stylish and functional bar area. Cheers to many memorable moments spent in your newly created space!
Conclusion
Congratulations on successfully building your very own basement bar! Through careful planning, diligent work, and attention to detail, you’ve transformed a previously underutilized space into a stylish and functional area that is sure to impress both family and friends. Here’s a recap of the steps you’ve taken:
In Step 1, you planned and designed your basement bar, considering its purpose, measuring the space, and selecting a style that suits your taste.
Step 2 involved gathering all the necessary tools and materials, ensuring you had everything at your disposal to complete the project effectively.
Next, in Step 3, you prepared the basement space by clearing the area, inspecting and repairing any damage or moisture issues, and ensuring proper lighting and ventilation.
Step 4 saw you framing the bar structure, creating the framework that supports the walls, countertop, and other components of your bar.
In Step 5, you installed the plumbing and electrical connections, ensuring a functional and convenient experience for washing glasses and powering your bar appliances.
Step 6 involved applying insulation and a vapor barrier to maintain a comfortable and moisture-resistant environment.
Next, in Step 7, you built the bar frame and countertop, creating the foundation and primary surface of your bar.
Step 8 saw the installation of cabinets and shelving, providing storage space and organization for your bar essentials.
In Step 9, you added a sink and faucet, enhancing the functionality of your bar and providing a convenient space for cleaning and preparing drinks.
Step 10 involved wiring and installing lighting fixtures, creating the perfect ambiance and ensuring visibility in your bar area.
Step 11 focused on choosing and installing the right flooring, taking into account durability and moisture resistance.
In Step 12, you painted or stained your bar, adding the final touch of style and personalization.
Lastly, in Step 13, you added barstools and furniture, completing the functionality and comfort of your bar area.
By following these steps, you’ve transformed your basement into a welcoming and enjoyable space for socializing, relaxation, and entertaining. Your basement bar is now ready to be enjoyed by family and friends, and it will surely become a centerpiece of your home. Remember to take pride in your accomplishments and continue to maintain and enhance your bar as needed.
We hope this comprehensive guide has provided you with the knowledge and inspiration to build the basement bar of your dreams. Cheers to creating many unforgettable memories in your new bar space!
If you're thrilled with your new basement bar, why stop there? Dive into our article on benefits of DIY projects where you'll find the joy and satisfaction that come from tackling projects yourself. Wondering about the time commitment for a larger space makeover? Our guide on duration of basement renovations offers valuable insights into timelines and planning. Ready to make your home the go-to spot for gatherings? Check out our essential tips on designing an entertaining space, ensuring every guest leaves impressed.
Frequently Asked Questions about How To Build A Bar In Basement
Was this page helpful?
At Storables.com, we guarantee accurate and reliable information. Our content, validated by Expert Board Contributors, is crafted following stringent Editorial Policies. We're committed to providing you with well-researched, expert-backed insights for all your informational needs.


0 thoughts on “How To Build A Bar In Basement”