Articles
How To Fill Hole In Cabinet
Modified: September 1, 2024
Learn how to fill a hole in your cabinet with our easy home maintenance tips. Restore the appearance and functionality of your cabinets with simple DIY techniques.
(Many of the links in this article redirect to a specific reviewed product. Your purchase of these products through affiliate links helps to generate commission for Storables.com, at no extra cost. Learn more)
Introduction
Welcome to our step-by-step guide on how to fill a hole in a cabinet. Over time, cabinets can sustain damage such as holes from accidental impacts, wear and tear, or even previous hardware installations. It’s important to address these imperfections to maintain the aesthetic appeal and functionality of your cabinets.
In this article, we will walk you through the process of effectively filling a hole in a cabinet. Whether you are a seasoned DIY enthusiast or new to home improvement projects, the steps outlined here will help you achieve professional-looking results.
Before diving into the process, it is crucial to have a clear understanding of the size and depth of the hole you need to fill. This will determine the materials and techniques you should use to achieve the best outcome.
Are you ready to begin? Let’s take a look at the materials you will need for this project.
Key Takeaways:
- Achieve professional-looking cabinet repairs by assessing hole size, selecting appropriate filler, and meticulously smoothing and shaping the filled area for seamless integration with the rest of the cabinet surface.
- Restore the aesthetic appeal and functionality of your cabinet with the right materials, tools, and step-by-step guidance. From filling the hole to priming and painting, each step is crucial for a successful DIY project.
Read more: How To Fill Hole In Driveway
Materials Needed
Before you get started, make sure you have the following materials on hand:
- A filler material: This can include wood filler, epoxy paste, or a similar product depending on the type of cabinet material you are working with.
- A putty knife: This will be used to apply the filler material and smooth it over the hole.
- Sandpaper: You will need various grits of sandpaper to smooth the filled area and prepare it for painting.
- Primer: If you plan on repainting the cabinet, you will need a primer to ensure good adhesion and a smooth finish.
- Paint: Choose a paint color that matches the cabinet or your desired aesthetic.
- Paintbrush or roller: Use these tools to apply the paint to the cabinet surface.
- Protective gear: It’s essential to wear gloves and eye protection when working with filler material and paint.
- Optional: If the hole is larger or there is significant damage, you may need additional materials such as wood glue, dowels, or wood blocks to reinforce the repair.
Ensure you have all the necessary materials before starting the project. This will help you work efficiently and complete the repair without any interruptions.
Step 1: Assess the Hole
Before you can begin filling the hole in your cabinet, it’s important to assess the size and depth of the damage. This will determine the best approach to repair the hole effectively.
Start by examining the hole closely. Is it a small pinhole or a larger gap? Is the surface around the hole intact or compromised? Understanding the extent of the damage will help you determine the appropriate filler material and technique to use.
If the hole is small, less than 1/4 inch in diameter, you can use a wood filler or epoxy paste to fill it. These materials are readily available at most hardware stores and are easy to work with.
For larger holes or gaps, you may need to consider reinforcing the repair. This can be done by using wood glue to attach dowels or small wooden blocks to the inside of the cabinet. Once secured, you can then fill the hole with the filler material, ensuring a strong and durable repair.
Assessing the hole is also a good time to consider any other visible damage or imperfections in the cabinet. If there are additional scratches or dents, you may want to address them during this repair process as well.
Once you have assessed the hole and any accompanying damage, you are ready to move on to the next step: selecting the appropriate filling method.
Step 2: Select Filling Method
After assessing the hole in your cabinet, it’s time to select the filling method that will best address the damage. The choice of filling method will depend on the material of the cabinet and the size of the hole.
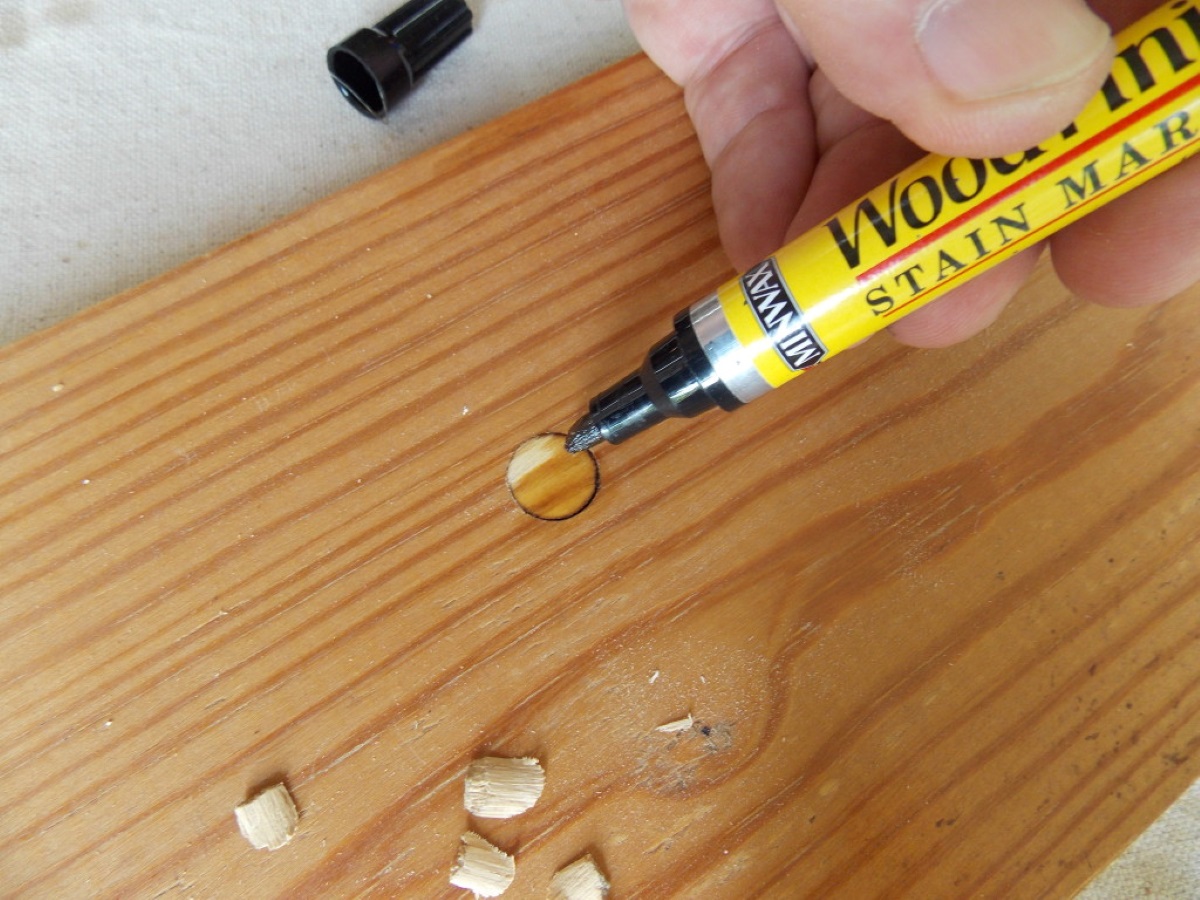
If you are working with a wooden cabinet, the most common filling method is to use a wood filler. Wood fillers come in various colors and can be matched to the shade of your cabinet. They are easy to apply and provide a seamless finish when sanded and painted.
If your cabinet is made of a different material, such as laminate or MDF, you may need to use an epoxy paste or a similar filler designed specifically for that material. These options provide a durable and long-lasting repair when applied correctly.
When selecting the filler, consider the size of the hole. If the hole is small, a regular wood filler or a small amount of epoxy paste will be sufficient. For larger holes or gaps, you may need to apply the filler in multiple layers, allowing each layer to dry before adding the next.
It’s important to follow the manufacturer’s instructions when applying the filler. Some fillers require mixing before use, while others can be applied directly from the container. Be sure to read the instructions carefully to ensure proper application.
By selecting the appropriate filling method, you are setting the foundation for a successful repair. With the filler chosen, it’s time to gather the necessary tools for the next step in the process.
Step 3: Gather Necessary Tools
Before you can begin filling the hole in your cabinet, it’s important to gather all the necessary tools. Having everything prepared in advance will ensure a smooth and efficient repair process.
Here are the essential tools you will need:
- A putty knife: This tool will be used to apply the filler material and smooth it over the hole. Choose a putty knife that is appropriate for the size of the hole you are filling.
- Sandpaper: You will need sandpaper of various grits to smooth the filled area and prepare it for painting. Start with a coarse grit (around 80-120) to shape the filler, then gradually move to finer grits (such as 220-320) for a smooth finish.
- Primer: If you plan on repainting the cabinet, you will need a suitable primer. Look for a primer specifically designed for the type of material your cabinet is made of.
- Paint: Choose a paint color that matches your cabinet or your desired aesthetic. Acrylic or latex-based paints are commonly used for cabinet repairs.
- Paintbrush or roller: Use a high-quality paintbrush or roller to apply the paint to the cabinet surface. This will ensure a smooth and even application.
- Protective gear: It’s important to protect yourself while working with filler material and paint. Wear gloves, safety glasses, and a dust mask to avoid skin irritation and inhalation of fumes or dust particles.
- Optional: Depending on the size and extent of the damage, you may need additional tools such as wood glue, dowels, or wood blocks to reinforce the repair.
Make sure all your tools are clean and in good condition before starting the repair. Having the necessary tools on hand will allow you to work efficiently and achieve professional-looking results.
With your tools gathered, you’re now ready to move on to the next step: preparing the cabinet surface.
Read more: How To Fill Holes In Concrete Floor
Step 4: Prepare the Cabinet Surface
Before applying the filler material to the hole in your cabinet, it’s important to properly prepare the surface. This will ensure that the filler adheres well and the repair blends seamlessly with the rest of the cabinet.
Follow these steps to prepare the cabinet surface:
- Clean the area: Begin by thoroughly cleaning the area around the hole. Use a mild detergent and water to remove any dust, grease, or residue. Allow the surface to dry completely before proceeding.
- Sand the area: Use sandpaper with a medium-grade grit (around 120-150) to roughen up the area around the hole. This will provide better adhesion for the filler material. Sand in a circular motion, blending the sanded area with the surrounding cabinet surface.
- Remove any loose debris: After sanding, wipe away any dust or debris with a damp cloth or sponge. You want the surface to be clean and free of any loose particles before applying the filler.
- Mask off surrounding areas: If necessary, use painter’s tape to mask off any areas adjacent to the hole that you want to protect from filler or paint. This will help you achieve clean and precise results.
Preparing the cabinet surface ensures that the filler material adheres properly and minimizes the visibility of the repair. By cleaning, sanding, and removing debris, you’re creating a smooth and ready surface for the next step: applying the filler material.
Now that the cabinet is prepped, it’s time to move on to step 5: applying the filler material.
Step 5: Apply Filler Material
Now that you have prepared the cabinet surface, it’s time to apply the filler material to the hole. The filler will help fill in the gap and create a seamless repair once sanded and painted.
Follow these steps to apply the filler material:
- Open the filler: If you are using a pre-mixed wood filler, open the container and stir the filler with a putty knife to ensure it is well mixed. If you are using an epoxy paste, follow the manufacturer’s instructions for preparation.
- Apply the filler: Use the putty knife to scoop a small amount of filler material and press it into the hole. Spread it evenly across the surface, ensuring that the hole is fully filled. If the hole is deep, you may need to apply the filler in layers, allowing each layer to dry before adding the next.
- Smooth the filler: While the filler is still pliable, use the putty knife to smooth and level the surface. Gently scrape away any excess filler to create a flush surface with the surrounding cabinet.
- Blend with the surrounding area: To ensure a seamless repair, blend the edges of the filled area with the surrounding cabinet surface. Use the putty knife or your fingers (with gloves on) to feather out the edges, creating a smooth transition.
Remember, different filler materials may have varying drying times, so refer to the manufacturer’s instructions for the recommended drying time. Allow the filler to dry completely before moving on to the next step.
Once the filler material is applied and dried, you’re ready to move on to step 6: smoothing and shaping the filler.
Use wood filler or putty to fill the hole in the cabinet. Apply the filler, let it dry, then sand it smooth. You can then paint or stain to match the cabinet.
Step 6: Smooth and Shape the Filler
After applying the filler material and allowing it to dry, it’s time to smooth and shape the filled area. This step is crucial to achieving a seamless repair and ensuring that the filled hole blends seamlessly with the rest of the cabinet surface.
Follow these steps to smooth and shape the filler:
- Inspect the filled area: Begin by examining the dried filler. Check for any unevenness, bumps, or ridges that need to be smoothed out. If necessary, use a putty knife or sandpaper with a fine-grit (around 220-320) to gently level the filler and create a flush surface.
- Feather out the edges: To create a seamless transition between the filled hole and the surrounding cabinet surface, feather out the edges of the filler. Use a sandpaper wrapped around a sanding block or your fingertips to gently blend the edges with the surrounding area. The goal is to create a smooth and gradual transition, minimizing the visibility of the repair.
- Remove any excess filler: Carefully scrape away any excess or protruding filler using a putty knife or a sandpaper block. Take your time and be gentle to avoid damaging the surrounding cabinet surface.
- Check for smoothness and uniformity: After shaping the filler, run your hand across the repaired area to ensure it feels smooth and even. If there are still noticeable imperfections, repeat the smoothing and shaping process until you achieve the desired result.
Take your time with this step and pay attention to detail. The goal is to create a flawless repair that seamlessly integrates with the rest of the cabinet surface. Once you are satisfied with the smoothness and shape of the filler, it’s time to move on to step 7: sanding the surface.
Step 7: Sand the Surface
Once the filler has been applied, dried, and shaped, it’s time to sand the surface to create a smooth and seamless finish. Sanding will help blend the repaired area with the rest of the cabinet surface and prepare it for priming and painting.
Follow these steps to sand the surface:
- Select the appropriate sandpaper: Start with a medium-grit sandpaper, such as 220-320, to sand the filled area. If the repair is almost flush with the surrounding cabinet surface, you can use a finer-grit sandpaper for the final smoothing.
- Gently sand the filled area: Using light pressure, sand the filled area in a circular or back-and-forth motion. Aim to create a smooth and even surface, blending the edges of the filled hole with the surrounding cabinet surface. Be careful not to oversand or remove too much of the filler material.
- Check for smoothness: After sanding, run your hand across the repaired area to check for any rough or uneven spots. If necessary, continue sanding until you achieve a uniform and smooth surface.
- Clean off the dust: Once you have finished sanding, use a damp cloth or sponge to wipe away any dust or debris. It’s important to have a clean surface before proceeding to the next steps.
Sanding the surface is an important step in achieving a professional-looking repair. It helps create a seamless transition between the repaired area and the surrounding cabinet surface. With the surface sanded and clean, you are now ready to move on to step 8: repeating the process if necessary.
Read more: How To Fill Screw Holes In Composite Decking
Step 8: Repeat if Necessary
After sanding the surface, it’s essential to evaluate the repaired area to determine if any additional filling and sanding are required. This step is especially important for larger holes or deeper damage that may require multiple layers of filler to achieve a seamless repair.
Follow these steps to determine if you need to repeat the filling and sanding process:
- Inspect the repaired area: Carefully examine the filled hole and the surrounding cabinet surface. Look for any remaining imperfections, unevenness, or areas that still need to be leveled.
- If needed, repeat the filling process: If you notice any gaps, depressions, or unevenness in the repaired area, carefully apply another layer of filler material. Follow the same steps as before, ensuring that the filler is applied and shaped to create a smooth and flush surface.
- Sand the repaired area again: Once the additional filler has dried, sand the repaired area using the same sandpaper and techniques as before. Focus on blending the newly filled section with the rest of the cabinet surface, ensuring a seamless transition.
- Check for smoothness and uniformity: After sanding, inspect the repaired area once more to ensure it feels smooth and even. Run your hand across the surface to detect any remaining imperfections. If necessary, repeat the filling and sanding process until you achieve a flawless repair.
Remember, patience and attention to detail are key during the filling and sanding stages. By carefully assessing the repaired area and repeating the process as needed, you can achieve a seamless and professional-looking repair that seamlessly blends with the rest of the cabinet surface.
Once you are satisfied with the smoothness and uniformity of the repaired area, it’s time to move on to step 9: priming and painting.
Step 9: Prime and Paint
With the repaired area sanded and smoothed, it’s time to prime and paint your cabinet to achieve a flawless finish. Priming helps create a smooth and even surface for the paint to adhere to, while painting will seamlessly blend the repair with the rest of the cabinet.
Follow these steps to prime and paint your cabinet:
- Prepare the area: Before priming and painting, make sure the cabinet surface is clean and free of dust or debris. Use a damp cloth or sponge to wipe away any remaining sanding residue.
- Apply the primer: Using a paintbrush or roller, apply a thin and even coat of primer to the repaired area and the surrounding cabinet surface. Follow the manufacturer’s instructions for the recommended drying time.
- Sand the primed area: Once the primer has dried, lightly sand the primed area with a fine-grit sandpaper (around 320-400). This step helps create a smooth surface for the paint to adhere to and ensures a seamless finish.
- Wipe away the dust: After sanding, use a clean cloth or sponge to remove any dust from sanding. Ensure the surface is clean and smooth before applying the paint.
- Apply the paint: Using a paintbrush or roller, carefully apply a thin and even coat of paint to the repaired area. Blend the paint with the surrounding cabinet surface for a seamless finish. Allow the paint to dry according to the manufacturer’s instructions before applying additional coats if necessary.
- Repeat the painting process: Depending on the color and coverage desired, you may need to apply multiple coats of paint. Allow each coat to dry completely before applying the next. Follow the recommended drying times between coats.
By priming and painting your cabinet, you not only ensure a flawless finish but also protect the repaired area and the rest of the cabinet from wear and tear.
Once the final coat of paint has dried, you’re ready for the last step: adding the final touches to complete the repair.
Step 10: Final Touches
Congratulations on reaching the final step of the cabinet hole repair process! Step 10 involves adding the final touches to complete the repair and ensure a professional-looking result.
Follow these steps for the final touches:
- Inspect the repaired area: Take a close look at the repaired area and the surrounding cabinet surface. Check for any imperfections, rough spots, or areas that may require additional touch-ups.
- If needed, touch up the paint: If you notice any areas that need improvement, use a small brush or a cotton swab to carefully touch up the paint. Apply a small amount of paint, blending it with the surrounding area for a seamless finish.
- Clean up and remove any masking: If you used painter’s tape to protect surrounding areas during the repair process, carefully remove it once the paint has dried. Dispose of any used materials and clean up any debris or dust.
- Allow the paint to cure: After completing the final touches, allow the paint sufficient time to cure and harden. Refer to the paint manufacturer’s instructions for recommended curing times. It’s important to avoid placing any objects or applying pressure to the repaired area until the paint is fully cured.
By paying attention to the final details, you will ensure a polished and professional outcome. Take the time to meticulously inspect the repaired area to ensure its seamless integration with the rest of the cabinet.
Now, step back and admire your successful cabinet hole repair. With proper techniques and attention to detail, you have restored the beauty and functionality of your cabinet!
Thank you for following our step-by-step guide. We hope this process has been helpful in guiding you through the cabinet hole repair process. Remember, with a little patience and care, you can tackle a wide range of home improvement projects.
Happy repairing!
Conclusion
Repairing a hole in a cabinet may seem like a daunting task, but with the right materials, tools, and step-by-step guidance, it is a manageable DIY project. Taking the time to fill and repair the hole will not only restore the aesthetic appeal of your cabinet but also ensure its longevity and functionality.
In this guide, we have provided you with a comprehensive 10-step process to fill a hole in a cabinet. From assessing the damage to priming and painting the repaired area, each step is crucial in achieving a seamless and professional-looking repair.
Remember, attention to detail is key throughout the process. Assess the size and depth of the hole, select the appropriate filling method, and gather all the necessary tools before you begin. Take your time to properly prepare the cabinet surface, apply the filler material, and sand it to create a smooth finish. Prime and paint the repaired area to seamlessly blend it with the rest of the cabinet.
By following these steps and adding the final touches to complete the repair, you can take pride in a job well done. Your cabinet will be restored to its former glory and you can enjoy its renewed beauty for years to come.
We hope this guide has been helpful in your cabinet hole repair journey. Remember, practice makes perfect, and as you gain more experience, you will become more comfortable with tackling various home improvement projects.
Thank you for choosing our step-by-step guide. We wish you success in your repair endeavors and a home filled with beauty and functionality!
Frequently Asked Questions about How To Fill Hole In Cabinet
Was this page helpful?
At Storables.com, we guarantee accurate and reliable information. Our content, validated by Expert Board Contributors, is crafted following stringent Editorial Policies. We're committed to providing you with well-researched, expert-backed insights for all your informational needs.


0 thoughts on “How To Fill Hole In Cabinet”