
Articles
How To Hook Up An Electric Dryer
Modified: October 20, 2024
Discover the step-by-step process of hooking up an electric dryer with our informative and comprehensive articles. Simplify your installation experience!
(Many of the links in this article redirect to a specific reviewed product. Your purchase of these products through affiliate links helps to generate commission for Storables.com, at no extra cost. Learn more)
Introduction
Hooking up an electric dryer may seem like a daunting task, especially if you’re not particularly familiar with electrical work. However, with the right knowledge and preparation, it can be a straightforward process. Whether you’re replacing an old dryer or installing a brand new one, this comprehensive guide will take you step-by-step through the process of hooking up an electric dryer.
Before we dive into the details, it’s important to note that electrical work should always be handled with caution. If you’re not confident in your abilities or unsure about any step, it’s best to seek the assistance of a licensed electrician. Safety should always be your top priority when working with electricity.
Now that we have the safety aspect covered, let’s gather the necessary supplies and get started on hooking up your electric dryer.
Key Takeaways:
- Ensure safety by turning off power, using appropriate gear, and inspecting components. When in doubt, consult a professional electrician for assistance to avoid potential hazards.
- Thoroughly check compatibility, attach power cord, connect ground wire, and test the dryer for proper functionality. Prioritize safety and seek professional help if needed.
Read more: How To Hook Up A Gas Dryer
Step 1: Safety Precautions
Before beginning any electrical work, it’s crucial to take proper safety precautions. Here are some essential steps to ensure your safety throughout the process:
- Turn off the power: Before you start working on the electrical connections for your dryer, make sure to turn off the power at the main circuit breaker or fuse box. This will help prevent any potential electric shock.
- Use appropriate safety gear: Wear safety goggles, gloves, and appropriate clothing to protect yourself from any potential hazards while working with electrical components.
- Work in a well-ventilated area: Ensure that your workspace is well-ventilated to avoid any buildup of fumes or gases that may be present during the installation process.
- Keep a fire extinguisher nearby: Have a fire extinguisher readily available in case of any electrical fires. It’s better to be prepared for emergencies.
- Inspect the electrical components: Before starting the installation, carefully examine all electrical components, including the power cord and outlet, to ensure they are in good condition and free from any damage.
- Follow manufacturer’s instructions: Always refer to the manufacturer’s manual or instructions specific to your electric dryer for any safety precautions or guidelines specific to your model.
Remember, electrical work can be dangerous, so if you’re unsure or uncomfortable with any step of the process, it’s best to consult a professional electrician for assistance. Now that we’ve covered the safety procedures, let’s move on to gathering the necessary supplies for hooking up your electric dryer.
Step 2: Gather Supplies
Before you can begin the installation process, it’s important to gather all the necessary supplies. Having everything you need on hand will make the process much smoother. Here’s a list of supplies you’ll typically need:
- Electric Dryer: Make sure you have the electric dryer unit itself. Choose a dryer that fits your needs and specifications.
- Power Cord: Most dryers do not come with a power cord, so you’ll need to purchase a compatible one separately. Ensure that the power cord matches your dryer’s electrical requirements and has the appropriate plug for your electrical outlet.
- Outlet Cover Plate: If your electrical outlet does not have a cover plate, you may need to purchase one for safety and aesthetic purposes.
- Electrical Tape: Electrical tape is essential for securing the wires and providing insulation.
- Screwdriver or Nut Driver: You’ll need a screwdriver or nut driver to remove and attach screws during the installation process.
- Wire Cutters or Strippers: Wire cutters or strippers are necessary for removing the insulation from the wires and connecting them to the appropriate terminals.
- Wire Nuts: Wire nuts are used to secure the wires together and ensure proper electrical connections.
- Grounding Strap (if needed): Some dryers may require a grounding strap to be installed. Check your dryer’s manual to see if this is necessary.
Once you’ve gathered all the necessary supplies, you’re ready to move on to the next step: locating the electrical outlet for your electric dryer.
Step 3: Locate Electrical Outlet
Locating the electrical outlet for your electric dryer is an essential step in the installation process. Here’s how to find and prepare the outlet:
- Check the laundry area: Take a look around your laundry area to locate the existing electrical outlet. In most cases, the outlet should be within a few feet of where your dryer will be positioned.
- Inspect the outlet: Once you’ve identified the outlet, examine it to ensure it is in good condition and compatible with your dryer’s power requirements. It should match the voltage and amperage specifications mentioned in your dryer’s manual.
- Verify the outlet type: Check if the outlet is a four-prong or three-prong type. Most modern dryers use a four-prong plug, but older installations may have a three-prong outlet. Make sure your dryer’s power cord and outlet match. If they don’t, you may need to replace the outlet or purchase an adapter.
- Ensure proper grounding: Electric dryers require proper grounding for safety purposes. Make sure the outlet has a grounding wire or metal conduit running to it. If not, you may need to consult a licensed electrician to install a grounded outlet.
Once you’ve located and confirmed the condition of the electrical outlet, you’re now ready to move on to the next step: checking dryer compatibility.
Step 4: Check Dryer Compatibility
Before proceeding with the installation, it’s important to ensure that your electric dryer is compatible with your electrical system and the designated installation location. Here’s what you need to do:
- Read the dryer manual: Start by referring to the dryer’s manual or documentation provided by the manufacturer. This will provide you with valuable information regarding the electrical requirements and compatibility of the dryer.
- Check the voltage: Verify that the voltage requirement of your electric dryer matches the voltage available at the electrical outlet. Commonly, electric dryers require a 240-volt power supply.
- Inspect the power cord: Examine the power cord included with your dryer. Ensure that it matches the type and configuration of the electrical outlet. If it doesn’t, you may need to purchase a compatible power cord or an adapter.
- Consider the dryer location: Take into account the location where you plan to install the dryer. Ensure that it is well-ventilated and has enough space for proper airflow around the appliance. Additionally, ensure that the location is easily accessible for maintenance and repairs.
- Check for additional requirements: Some electric dryers may have additional installation requirements, such as venting or plumbing connections. Confirm whether your dryer has any specific requirements and ensure that you have the necessary provisions in place.
- Consult a professional: If you’re uncertain about the compatibility of your electric dryer or have any doubts regarding the installation, it’s recommended to consult a professional electrician or contact the manufacturer for guidance.
By thoroughly checking the compatibility of your electric dryer, you can avoid potential problems and ensure a smooth installation process. With compatibility confirmed, let’s proceed to the next step: attaching the power cord.
Make sure to use a 240-volt outlet and a proper venting system for your electric dryer. Follow the manufacturer’s instructions for installation to ensure safety and efficiency.
Read more: How To Hook Up An Electric Fence
Step 5: Attach Power Cord
Attaching the power cord is a crucial step in hooking up your electric dryer. Here’s a step-by-step guide on how to do it:
- Ensure the power is turned off: Before you begin, make sure the power is turned off at the main circuit breaker or fuse box to prevent any electrical mishaps.
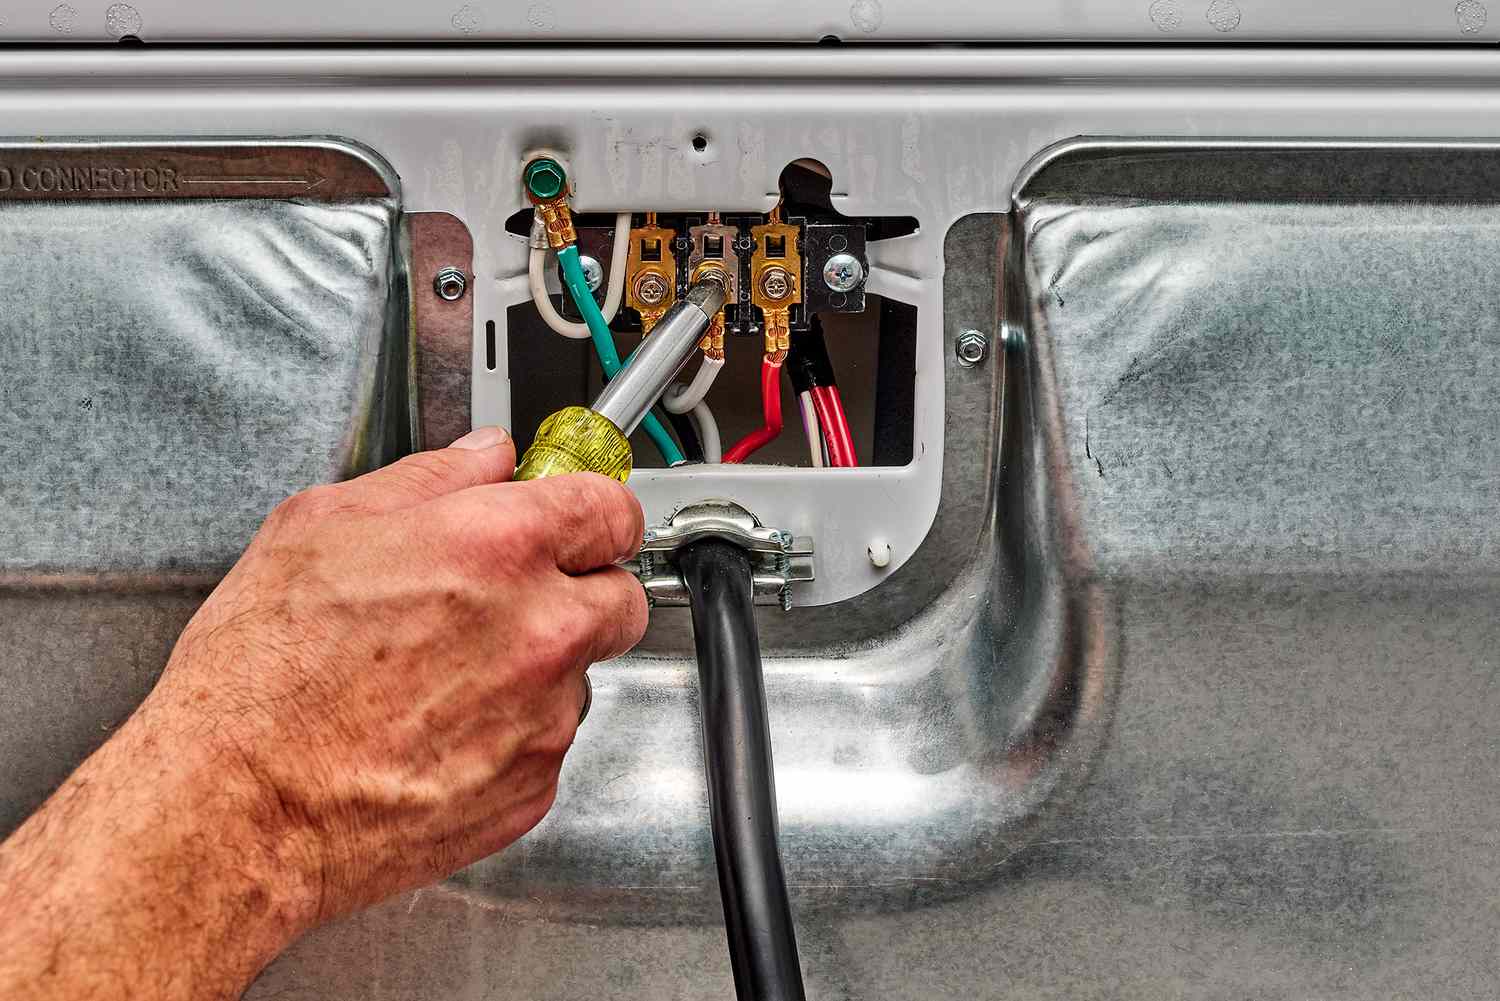
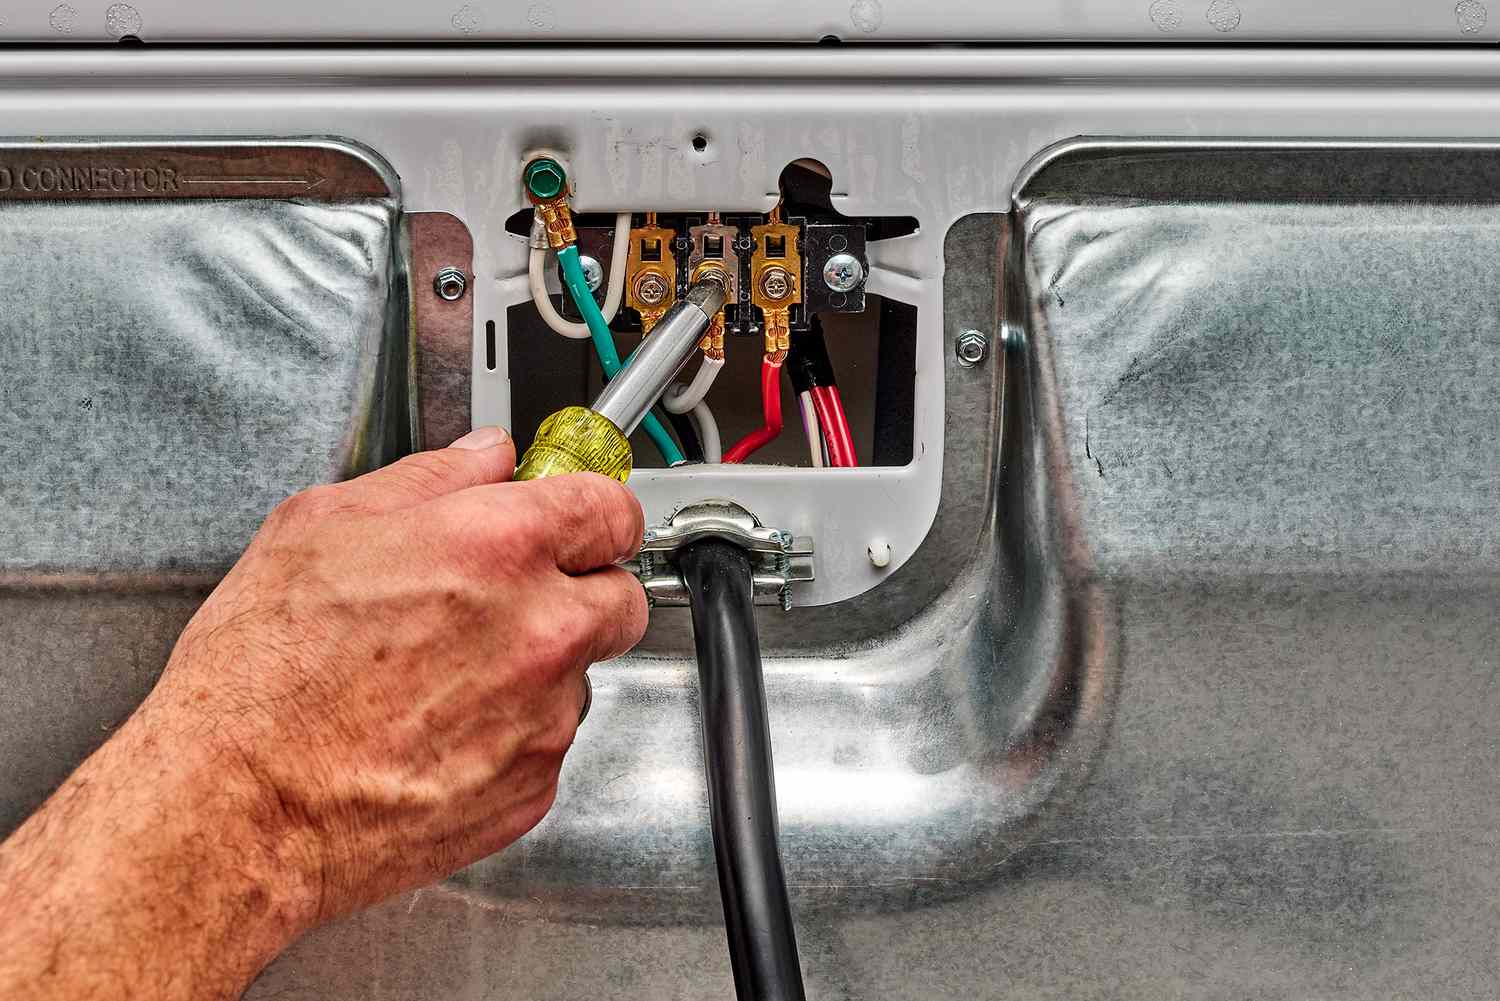
- Locate the terminal block: Find the terminal block on the back of your dryer. It’s a metal plate with screws where the power cord will be connected.
- Prepare the power cord: If your power cord did not come pre-attached to the dryer, follow these steps:
- If it’s a four-prong power cord, separate the wires and strip about an inch of insulation from the ends.
- If it’s a three-prong power cord, it typically comes with the wires already separated and stripped.
- Attach the power cord to the terminal block: Match the colors of the wires with the corresponding terminals on the block. The terminal screws are usually labeled. Here’s how to connect them:
- For a four-prong power cord, connect the white wire to the center terminal, the green or bare copper wire to the grounding terminal, and the black and red wires to the left and right terminals, respectively.
- For a three-prong power cord, connect the white wire to the center terminal, the green or bare copper wire to the grounding terminal, and the black or red wire to either of the side terminals.
- Tighten the terminal block screws: Once the wires are securely attached to the terminal block, tighten the screws to ensure a snug and secure connection.
- Secure the power cord: Use electrical tape to wrap around the connections on the terminal block. This will provide added insulation and security.
It’s essential to follow the specific instructions for your dryer model and consult the manufacturer’s manual if you have any doubts about the power cord installation. With the power cord attached, let’s move on to connecting the ground wire.
Step 6: Connect Ground Wire
Connecting the ground wire is an important step in the installation process of your electric dryer. The ground wire helps ensure electrical safety by providing a path for stray electrical currents to safely dissipate. Follow these steps to connect the ground wire:
- Locate the ground wire: The ground wire is usually green or exposed copper and is located near the terminal block on the back of the dryer.
- Prepare the ground wire: If the ground wire is not already stripped, use wire strippers to remove about an inch of the insulation from the end of the wire.
- Identify the grounding point: Locate the grounding point on the dryer. It is typically a screw or grounding strap near the terminal block.
- Attach the ground wire: Connect the stripped end of the ground wire to the grounding point on the dryer. If there is a grounding strap, remove the screw, place the wire beneath the strap, and then reattach the screw securely. If there is a grounding screw, simply wrap the wire around it and tighten it.
- Ensure a secure connection: Once the ground wire is attached, double-check that it is securely connected and there is no looseness. A proper connection is crucial for electrical safety.
Remember, the ground wire is an important safety feature, and it must be properly connected for the dryer to function safely. If you have any doubts or concerns about connecting the ground wire, consult the manufacturer’s manual or contact a professional electrician for assistance.
With the ground wire in place, we’re almost ready to test the dryer. Move on to the final step to plug in the dryer and ensure everything is functioning correctly.
Step 7: Plug-in and Test Dryer
After completing the previous steps, it’s time to plug in your electric dryer and test it to ensure everything is working properly. Follow these steps to complete the installation:
- Turn off the circuit breaker: Make sure the circuit breaker for the dryer’s electrical outlet is in the “off” position.
- Plug in the dryer: Insert the dryer’s plug into the electrical outlet. Ensure that the plug is inserted securely and the prongs are fully inserted into the outlet slots.
- Turn on the circuit breaker: Flip the circuit breaker for the dryer back to the “on” position.
- Check the dryer control panel: Verify that the control panel on your electric dryer is functioning properly. Check for any error codes or indicators that might suggest an issue.
- Set the drying cycle: Select the desired drying cycle, temperature, and time settings on the dryer’s control panel according to your laundry’s needs.
- Start the dryer: Press the start button or initiate the drying cycle to begin operation. Listen for any unusual noises or vibrations that may indicate a problem.
- Observe the dryer’s performance: Monitor the dryer as it operates to ensure that it functions as expected. Pay attention to the heat, airflow, and drying time. If you notice any issues, consult the dryer’s manual or contact the manufacturer for troubleshooting assistance.
It’s important to test the dryer thoroughly to ensure that there are no issues with the installation and that it is functioning safely and efficiently. If any problems arise or if you have concerns, it may be best to consult a professional electrician to address them.
Congratulations! You have successfully hooked up your electric dryer. Now you can enjoy the convenience of fresh, clean laundry at your fingertips.
Remember to always follow safety guidelines and the manufacturer’s instructions when working with electrical appliances. If in doubt, seek professional assistance.
Thank you for using this comprehensive guide. Happy drying!
Conclusion
Hooking up an electric dryer may seem like a complex task, but with the right knowledge and preparation, it can be accomplished safely and successfully. By following the steps outlined in this guide, you can ensure a smooth installation process and enjoy the convenience of your electric dryer.
Throughout the installation, it is crucial to prioritize safety. Take the necessary precautions, such as turning off the power, using appropriate safety gear, and inspecting all electrical components. If you’re unsure or uncomfortable with any step, don’t hesitate to seek the assistance of a professional electrician.
Gathering the necessary supplies, locating the electrical outlet, checking dryer compatibility, attaching the power cord, connecting the ground wire, and testing the dryer are all essential steps in the process. By carefully following each step and referring to the manufacturer’s manual, you can ensure a proper and efficient installation.
Remember to regularly maintain and clean your electric dryer to keep it running smoothly. Follow the manufacturer’s recommendations for maintenance, and be sure to clean the lint trap after each use to prevent lint buildup and potential fire hazards.
Enjoy the convenience and efficiency of your newly installed electric dryer! With proper care and maintenance, it will provide you with years of reliable service, making laundry day a breeze.
Thank you for using this comprehensive guide to hooking up an electric dryer. If you have any further questions or need additional assistance, don’t hesitate to reach out to a professional or consult the manufacturer’s support team. Happy drying!
Frequently Asked Questions about How To Hook Up An Electric Dryer
Was this page helpful?
At Storables.com, we guarantee accurate and reliable information. Our content, validated by Expert Board Contributors, is crafted following stringent Editorial Policies. We're committed to providing you with well-researched, expert-backed insights for all your informational needs.

0 thoughts on “How To Hook Up An Electric Dryer”