Articles
How To Install Penny Floor
Modified: December 7, 2023
Learn how to install a stunning penny floor in your home with our informative articles. Discover tips, tricks, and step-by-step instructions for a unique and eye-catching DIY project.
(Many of the links in this article redirect to a specific reviewed product. Your purchase of these products through affiliate links helps to generate commission for Storables.com, at no extra cost. Learn more)
Introduction
Welcome to the fascinating world of penny floors! If you’re looking to add a unique and eye-catching touch to your home decor, installing a penny floor might be just the project for you. Penny floors have gained popularity in recent years, as they offer a creative and cost-effective way to transform plain flooring into a stunning work of art.
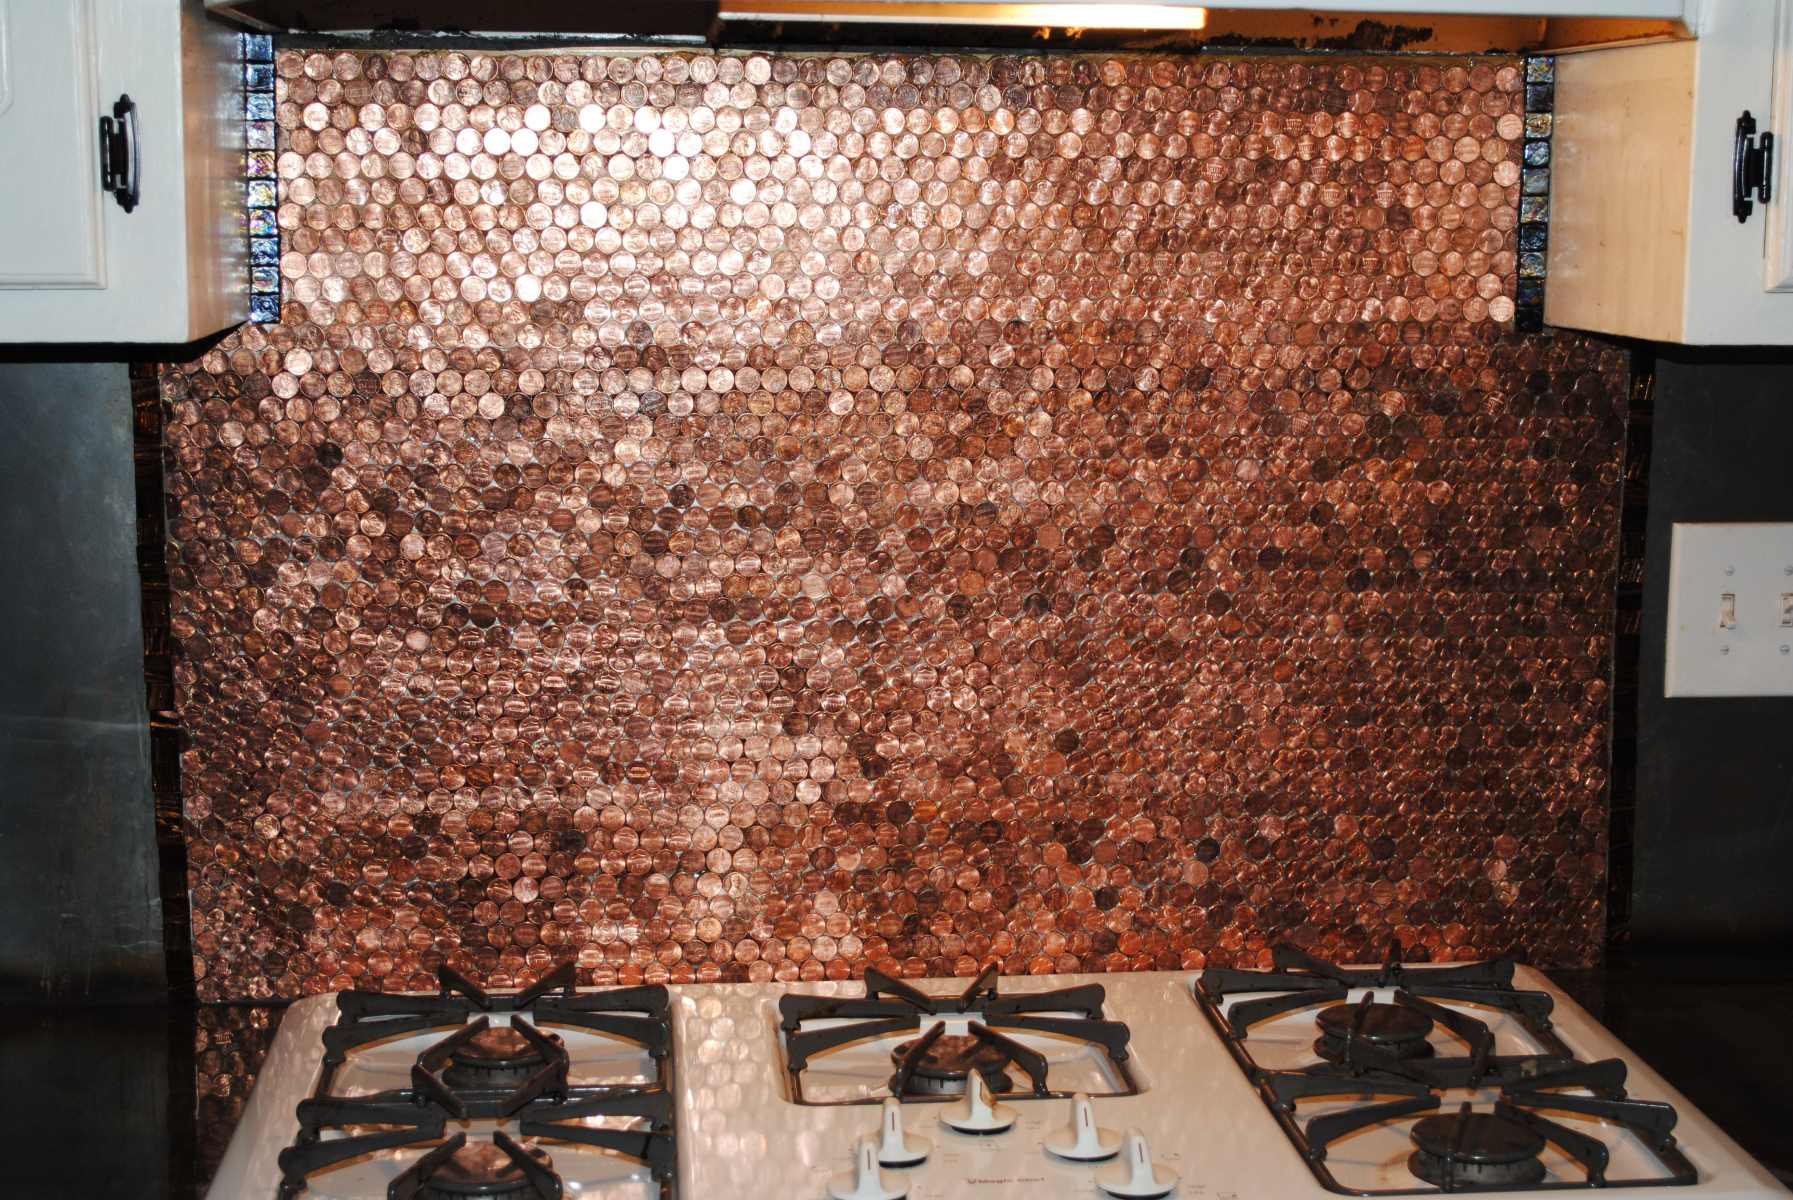
But what exactly is a penny floor? It’s exactly what it sounds like – a floor covered in pennies! Each penny is carefully arranged and secured to create a beautiful mosaic pattern. Not only does it add a distinctive and decorative element to your space, but it also serves as a conversation starter and a testament to your creativity.
In this article, we will walk you through the steps of installing a penny floor, from gathering the necessary materials to sealing the finished product. So, roll up your sleeves and get ready for a fun and rewarding DIY project!
Key Takeaways:
- Transform your space with a stunning penny floor, adding a unique and visually captivating touch to your home decor. From preparation to finishing touches, unleash your creativity and turn ordinary pennies into an extraordinary work of art.
- Embrace the artistry of installing a penny floor, balancing functionality and aesthetics to create a breathtaking mosaic. With patience, attention to detail, and a touch of imagination, turn your floor into a conversation-starting masterpiece.
Read more: How To Install Flooring
Materials Needed
To successfully install a penny floor, you will need the following materials:
- A large quantity of pennies – the number will vary depending on the size of the floor area
- Strong adhesive – epoxy resin or construction adhesive works best
- Grout – choose a color that complements the pennies
- Trowel or spatula for applying the grout
- Sealer to protect the pennies and grout
- Bucket and sponge for cleaning
- Measuring tape to determine the area to be covered
- Level to ensure a flat and even surface
- Protective gloves
- Protective goggles
- Brush or roller for applying the sealer
- Plastic drop cloths to protect surrounding areas
- Painter’s tape to mark off and protect walls and furniture
It’s important to note that the number of pennies required will depend on the size of the floor area and the desired pattern or design. On average, you will need around 200-300 pennies per square foot.
Before purchasing the adhesive and grout, make sure they are suitable for use on the type of flooring you have. Some adhesives may not be compatible with certain surfaces, so it’s important to check the product details or consult with a professional if needed.
Now that you have gathered all the necessary materials, let’s move on to the preparation process!
Preparation
Before diving into the installation process, proper preparation is essential to ensure a successful penny floor project. Follow these steps to get your space ready for the transformation:
- Clean the floor: Start by thoroughly cleaning the floor to remove any dust, dirt, or debris. Use a broom or vacuum cleaner to sweep the area, and then mop it with a gentle cleaner to eliminate any grime. Allow the floor to dry completely before proceeding to the next step.
- Measure the floor: Use a measuring tape to determine the exact dimensions of the floor area to be covered. This will help you calculate the number of pennies needed and ensure a precise installation.
- Plan the design: Before applying the adhesive, take some time to plan the design or pattern you want to create with the pennies. You can opt for a random arrangement, a specific image or shape, or even a gradient effect. Sketch out your design on paper or use a digital tool to visualize and experiment with different layouts. This step will help you stay organized during the installation process and achieve the desired result.
- Protect surrounding areas: Penny installation can be a messy process, so it’s important to protect the surrounding walls, furniture, and fixtures. Cover them with plastic drop cloths and secure them with painter’s tape to prevent any accidental damage or adhesive stains.
- Put on protective gear: Safety should always be a priority. Make sure to wear protective gloves and goggles to shield your hands and eyes from the adhesive and any potential splattering.
By following these preparation steps, you will create a clean and organized workspace, ready to bring your penny floor vision to life. Now, let’s move on to the exciting task of choosing the design!
Choosing the Design
The design of your penny floor will be the focal point of your space, so it’s important to carefully consider the options and choose a design that suits your style and preferences. Here are a few design ideas to help you get started:
- Random arrangement: This design option involves placing the pennies in a random pattern, creating a unique and eclectic look. It can be a great choice for those who appreciate a more organic and natural aesthetic.
- Geometric patterns: If you prefer a more structured and organized design, consider creating geometric patterns with the pennies. This can include checkerboard patterns, striped designs, or even intricate mosaics.
- Image or logo: For a truly personalized touch, you can arrange the pennies to create an image or logo. This could be a favorite animal, a symbol that holds meaning to you, or even your initials. Sketch out the design beforehand to ensure accurate placement.
- Gradient effect: Another interesting option is to create a gradient effect using different shades of pennies. This can be achieved by using older, more weathered pennies or even adding a patina to the coins for a rustic and unique look.
When choosing a design, consider the overall aesthetic of your space and how the penny floor will blend with the surrounding decor. Take into account factors such as the color scheme, furniture style, and the atmosphere you want to create.
Remember, the design possibilities are virtually endless, so don’t be afraid to get creative and let your imagination run wild. Once you have finalized your design, it’s time to move on to the next step – preparing the floor for the penny installation.
Preparing the Floor
Now that you have chosen your design, it’s time to prepare the floor for the penny installation. Follow these steps to ensure a smooth and durable finish:
- Level the floor: Start by ensuring that the floor surface is level and free from any cracks or irregularities. Use a level tool to check for any unevenness. If you notice any discrepancies, you may need to address them before proceeding. Uneven floors can lead to difficulties in applying the adhesive and result in an uneven penny surface.
- Fill cracks and repair imperfections: If you come across any cracks or imperfections in the flooring, use a suitable filler to repair them. Allow the filler to dry completely, and then sand it down until it is smooth and flush with the rest of the floor.
- Prime the floor: Depending on the type of flooring you have, you may need to apply a primer before proceeding with the adhesive. Priming will help the adhesive bond better with the floor. Follow the manufacturer’s instructions for the specific type of primer you are using.
- Protect baseboards and edges: To ensure clean and neat edges, protect the baseboards and edges of the floor. Apply painter’s tape along these areas to prevent any accidental adhesive or grout smudges.
By taking the time to properly prepare the floor, you will create a solid foundation for the penny installation and ensure a more seamless and professional-looking finish. Now, it’s time to move on to the exciting part – applying the adhesive and arranging the pennies!
Read more: How To Make Penny Rugs
Applying the Adhesive
With the floor prepared, it’s time to start the actual installation of your penny floor. The key to a successful and long-lasting result is using a strong and appropriate adhesive. Follow these steps to apply the adhesive:
- Mix the adhesive: If you are using epoxy resin, follow the manufacturer’s instructions to mix the resin and hardener. Be sure to mix well to ensure proper bonding. If you are using a construction adhesive, check the product instructions for any specific mixing requirements.
- Apply the adhesive: Using a trowel or spatula, spread a thin and even layer of adhesive onto a small section of the floor, starting from one corner and working your way across the area. Make sure to only apply adhesive that you can cover with pennies within the recommended drying time.
- Work in sections: It’s best to work in small sections to ensure that the adhesive doesn’t dry before you have a chance to arrange the pennies. This will also allow you to easily adjust the placement if needed.
- Place the pennies: Carefully press each penny into the adhesive, making sure they are securely adhered. Follow your predetermined design or pattern, arranging the pennies close together without overlapping.
- Continue the process: Move on to the next section and repeat the process, applying the adhesive and placing the pennies until the entire floor area is covered.
It’s important to note that working with adhesive can be time-sensitive, so be mindful of the drying time indicated by the manufacturer. Avoid walking on the adhesive or disturbing the pennies until the adhesive has completely dried and cured.
Once all the pennies are in place, take a moment to admire the stunning mosaic starting to take shape. However, your job is not quite done yet – next, you’ll need to fill the gaps between the pennies.
When installing a penny floor, make sure to use a strong adhesive and grout that is suitable for small tiles. It’s also important to seal the floor properly to protect the pennies from wear and tear.
Arranging the Pennies
Arranging the pennies is the most exciting and creative part of the penny floor installation process. Follow these steps to ensure a beautifully arranged pattern:
- Refer to your design: Use your design plan as a guide to place the pennies in the desired pattern or arrangement. Take your time and be mindful of the spacing and placement.
- Vary the orientation: To create visual interest and texture, alternate the orientation of the pennies as you place them. Some can be heads-up, while others can be tails-up.
- Randomize the shades: If you have different shades of pennies, mix them up as you arrange them to create a more natural and organic look.
- Check for uniformity: Periodically step back and assess the placement of the pennies. Ensure they are evenly spaced and aligned, making any necessary adjustments along the way.
- Take breaks: Arranging pennies can be a tedious process, so it’s important to take breaks to rest your eyes and give your back a break. This will help maintain your focus and attention to detail.
Remember, the arrangement of the pennies is where your creativity shines. Don’t be afraid to experiment and make adjustments until you achieve the desired look.
Once you have successfully arranged the pennies, it’s time to move on to filling in the gaps between them to create a seamless and polished finish.
Filling the Gaps
After arranging the pennies, it’s time to fill the gaps between them to create a smooth and cohesive surface. Follow these steps to fill the gaps:
- Mix the grout: Depending on the type of grout you are using, follow the manufacturer’s instructions to properly mix the grout. Make sure it reaches the desired consistency for easy application.
- Apply the grout: Using a trowel or spatula, carefully spread the grout over the pennies, making sure to push it into the gaps between them. Work in small sections at a time.
- Remove excess grout: After applying the grout, use a damp sponge or cloth to gently wipe away the excess grout from the penny surface. Be careful not to disturb the pennies or dislodge them.
- Clean up: Rinse the sponge or cloth frequently and continue to wipe away the excess grout until the penny surface is clean and the grout lines are well-defined.
- Allow to dry: Follow the drying time recommended by the grout manufacturer. It’s important to let the grout fully dry before proceeding to the next step.
Once the grout has dried, you will notice that the gaps are now filled, giving your penny floor a polished and professional appearance. However, before the project is complete, there is one more important step to ensure the longevity and durability of your penny floor – sealing it.
Sealing the Floor
Sealing the floor is a crucial step in the penny floor installation process. It helps protect the pennies and grout, enhances the overall appearance, and ensures the longevity of your beautiful creation. Follow these steps to seal your penny floor:
- Clean the surface: Before applying the sealer, ensure that the penny floor is clean and free from any dust or debris. Use a soft brush or vacuum cleaner to gently remove any loose dirt or particles.
- Select the appropriate sealer: Choose a sealer suitable for the material of your pennies and the type of grout used. Consider options like epoxy or polyurethane sealers, which provide durability and a glossy finish. Read the manufacturer’s instructions to ensure compatibility with your specific floor composition.
- Apply the sealer: Using a brush or roller, evenly apply the sealer on the penny surface and the grout lines. Work in small sections at a time, ensuring thorough coverage. Follow the recommended drying time mentioned by the manufacturer.
- Multiple coats (optional): Depending on the sealer product, you may need to apply multiple coats to achieve the desired level of protection and shine. Follow the manufacturer’s instructions for the recommended number of coats, allowing sufficient drying time between each application.
- Allow to cure: Once the final coat is applied, allow the sealer to fully cure, as specified by the manufacturer. During this time, avoid walking on the floor or placing heavy furniture on it to ensure the sealer sets properly.
Sealing the floor not only provides protection but also enhances the appearance of the penny floor, giving it a glossy and professional finish. The sealed surface will be easier to clean and maintain, ensuring that your penny floor remains a stunning focal point for years to come.
With the sealing process complete, your penny floor is almost done! Just a few finishing touches, and you will be able to admire your masterpiece in all its glory.
Read more: How To Install Hardwood Floors
Finishing Touches
As your penny floor nears completion, it’s time to add the finishing touches that will give your project that extra touch of perfection. Here are some ideas to consider:
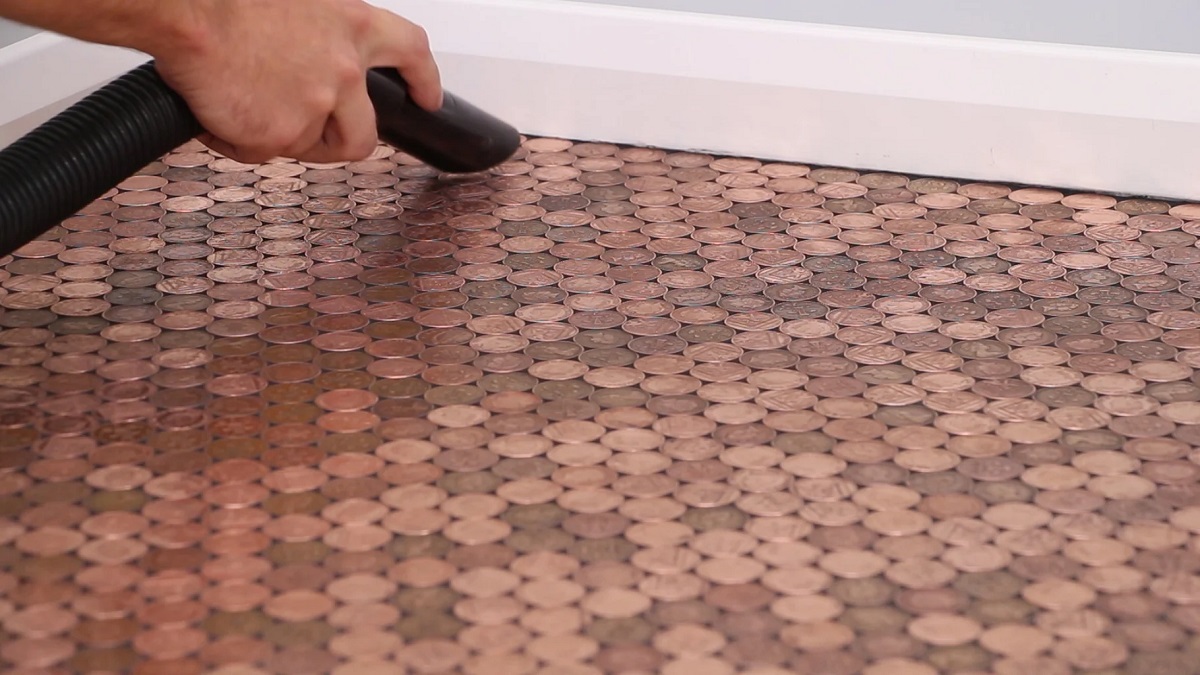
- Clean the surface: After the sealer has completely cured, give your penny floor a final cleaning to remove any residue or smudges. Use a soft, damp cloth or mop to gently wipe the surface, taking care not to scratch or damage the sealed pennies.
- Inspect for any loose pennies: As a final check, go over the entire floor surface and ensure that all the pennies are securely in place. If you come across any loose or wobbly pennies, apply a small dab of adhesive underneath and press them firmly into place.
- Choose a transition strip: Depending on the area where your penny floor meets another flooring type, consider using a transition strip to create a clean and seamless transition. Transition strips come in various styles and materials, allowing you to find one that matches your penny floor and complements the adjacent flooring.
- Add a protective rug: To further protect your penny floor and add an extra layer of comfort, consider placing a rug or a few smaller rugs in high-traffic areas. This will help prevent excessive wear on the pennies and provide a cozy touch to your space.
- Share your creation: Finally, be proud of your completed penny floor project and share it with others! Take photos to document your hard work and creativity, and perhaps even showcase it on social media or to friends and family. Your unique penny floor is sure to amaze and inspire others.
By adding these finishing touches, your penny floor will truly become a masterpiece that reflects your personal style and attention to detail.
Congratulations! You have successfully installed a stunning penny floor. Take a step back and admire your handiwork, knowing that you have transformed a mundane space into something truly extraordinary.
Remember, a penny floor is more than just a stylish addition to your home. It’s a testament to your creativity, patience, and ability to turn ordinary objects into extraordinary works of art. Enjoy your one-of-a-kind penny floor for years to come!
Conclusion
Installing a penny floor is a captivating and creative project that allows you to transform your space into a unique and visually stunning environment. From the initial preparation to the final finishing touches, each step of the process requires attention to detail and a touch of artistry.
Throughout this article, we have covered the essential elements of installing a penny floor. We discussed the materials needed, the preparation process, choosing a design, applying the adhesive, arranging the pennies, filling the gaps, sealing the floor, and adding the finishing touches. By following these steps, you can create a breathtaking penny floor that becomes the center of attention in any room.
Remember, when installing a penny floor, it’s important to strike a balance between functionality and aesthetics. Take the time to plan and design your pattern, keep the workspace clean and organized, and use the appropriate adhesives and sealers for long-lasting results. Additionally, always prioritize safety by wearing protective gear and following manufacturer instructions.
Installing a penny floor requires patience, creativity, and attention to detail, but the end result is a truly unique and personal work of art. So, roll up your sleeves, gather the materials, and let your imagination guide you as you embark on this exciting DIY project.
Whether you choose a random arrangement, a geometric pattern, or a customized image, your penny floor is sure to be a conversation starter and a source of pride for years to come. So go ahead and let your creativity shine – it’s time to create a stunning masterpiece with your very own penny floor!
Frequently Asked Questions about How To Install Penny Floor
Was this page helpful?
At Storables.com, we guarantee accurate and reliable information. Our content, validated by Expert Board Contributors, is crafted following stringent Editorial Policies. We're committed to providing you with well-researched, expert-backed insights for all your informational needs.


0 thoughts on “How To Install Penny Floor”