
Articles
How To Install Sink In Countertop
Modified: October 28, 2024
Learn step-by-step instructions for installing a sink in your countertop with informative articles that cover the process from start to finish.
(Many of the links in this article redirect to a specific reviewed product. Your purchase of these products through affiliate links helps to generate commission for Storables.com, at no extra cost. Learn more)
Introduction
Installing a sink in a countertop can be a rewarding and cost-effective way to upgrade your kitchen or bathroom. Whether you’re replacing an old sink or starting from scratch with a new installation, this article will guide you through the step-by-step process.
Before you begin, it’s important to gather all the necessary tools and materials. You’ll need a measuring tape, a pencil or marker, a jigsaw or hole saw, a drill, a wrench, plumber’s tape, plumber’s putty, a silicone caulk gun, and a bucket or towels to catch any water spills. Additionally, make sure you have the new sink, any accompanying hardware, and the necessary plumbing fittings.
Now, let’s dive into the installation process!
Key Takeaways:
- Proper preparation, precise measurements, and attention to detail are crucial for a successful sink installation. Take your time, follow the steps, and enjoy the satisfaction of a job well done!
- Testing for leaks is essential to ensure a secure and leak-free sink installation. Address any issues promptly to avoid potential water damage and maintain the integrity of your installation.
Tools and Materials Needed
To install a sink in a countertop, you’ll need the following tools and materials:
- Measuring tape
- Pencil or marker
- Jigsaw or hole saw
- Drill
- Wrench
- Plumber’s tape
- Plumber’s putty
- Silicone caulk gun
- Bucket or towels
- New sink
- Hardware (included with the sink)
- Plumbing fittings
Having these tools and materials ready will ensure a smooth installation process and prevent any unnecessary delays or last-minute trips to the hardware store.
Step 1: Preparing the Countertop
The first step in installing a sink in a countertop is to prepare the surface where the sink will be placed. Follow these steps to ensure proper preparation:
- Clear the countertop: Remove any items from the countertop and create a clutter-free work area. This will allow you to have sufficient space to work and minimize the risk of any damage to items.
- Turn off the water supply: Locate the shut-off valves under the sink or near the main water supply line and turn them off. This will prevent any water from flowing during the installation process.
- Disconnect the plumbing: Using a wrench, loosen and disconnect the water supply lines and drain pipes from the existing sink. Have a bucket or towels ready to catch any remaining water in the pipes.
- Remove the old sink: If you’re replacing an existing sink, carefully remove it from the countertop. This may involve unscrewing any clips or brackets holding the sink in place. Dispose of the old sink responsibly.
- Clean the countertop: Thoroughly clean the countertop surface to remove any dirt, debris, or adhesive residue left behind from the old sink. Use a mild detergent and water to clean the surface, then dry it with a clean cloth.
By properly preparing the countertop, you’re setting the foundation for a successful sink installation. Once you’ve completed these steps, you’re ready to move on to the next phase: measuring and marking the sink placement.
Step 2: Measuring and Marking the Sink Placement
Accurate measurements and precise markings are crucial for ensuring that the sink fits correctly in the countertop. Follow these steps to measure and mark the sink placement:
- Position the sink template: Place the sink template provided with your new sink onto the countertop. Ensure that it is centered and aligned with the edges of the countertop. Use painter’s tape to secure the template in place.
- Measure the template dimensions: Using a measuring tape, take precise measurements of the sink template’s width, length, and depth. Double-check the measurements to ensure accuracy.
- Transfer the measurements to the countertop: Using a pencil or marker, carefully transfer the measurements of the sink template onto the countertop. Mark the outline of the sink, including the corners and edges.
- Add extra space for the sink lip: To ensure the sink sits flush with the countertop, add an additional 1/8 to 1/4 inch to the dimensions of the sink template. This will provide space for the sink lip to rest on the countertop surface.
- Double-check the markings: Take a step back and review the markings on the countertop. Ensure that they align with your desired placement and are symmetrical. Make any necessary adjustments before proceeding.
By accurately measuring and marking the sink placement, you’ll ensure a proper fit and avoid any future issues. Take your time during this step to ensure precision. Once you’re satisfied with the markings, you’re ready to move on to creating the sink cutout in the countertop.
Step 3: Creating the Sink Cutout
Creating a precise cutout in the countertop is essential for a seamless and secure installation of the sink. Follow these steps to create the sink cutout:
- Drill starter holes: Using a drill, create starter holes on the inside corners of the marked sink outline. These holes will serve as entry points for the jigsaw or hole saw.
- Insert the jigsaw or hole saw: If you’re using a jigsaw, insert the blade into one of the starter holes and carefully follow the marked outline. If you’re using a hole saw, attach it to the drill and align it with one of the starter holes.
- Cut along the marked outline: With the jigsaw or hole saw, cut along the marked outline, following a steady and controlled motion. Take your time to ensure accuracy and make sure to wear protective eyewear.
- Remove the cutout: Once you’ve completed the cut, remove the sink cutout from the countertop. Be cautious when removing the cutout to prevent any damage to the countertop or injury to yourself.
- Check the fit: Place the sink into the cutout to check the fit. Ensure that the sink sits properly and aligns with the markings on the countertop. Make any necessary adjustments to the cutout if needed.
Creating a clean and accurate sink cutout requires precision and attention to detail. Take your time during this step to ensure a perfect fit for your sink. Once you’re satisfied with the cutout, you’re ready to move on to the next phase: installing the sink.
Before installing a sink in a countertop, make sure to measure the dimensions of the sink and the cutout in the countertop accurately. Use a silicone sealant to secure the sink in place and prevent water leakage.
Read more: How To Cut Laminate Countertop For Sink
Step 4: Installing the Sink
With the sink cutout created, it’s time to install the sink into the countertop. Follow these steps to ensure a secure and proper installation:
- Apply plumber’s putty: Roll a small amount of plumber’s putty into a rope-like shape and apply it to the underside of the sink flange. The flange is the lip that rests on the countertop surface. This putty creates a watertight seal.
- Place the sink into the cutout: Carefully lower the sink into the cutout, aligning it with the markings on the countertop. Press down firmly to ensure a snug fit. Clean off any excess putty that may squeeze out around the edges.
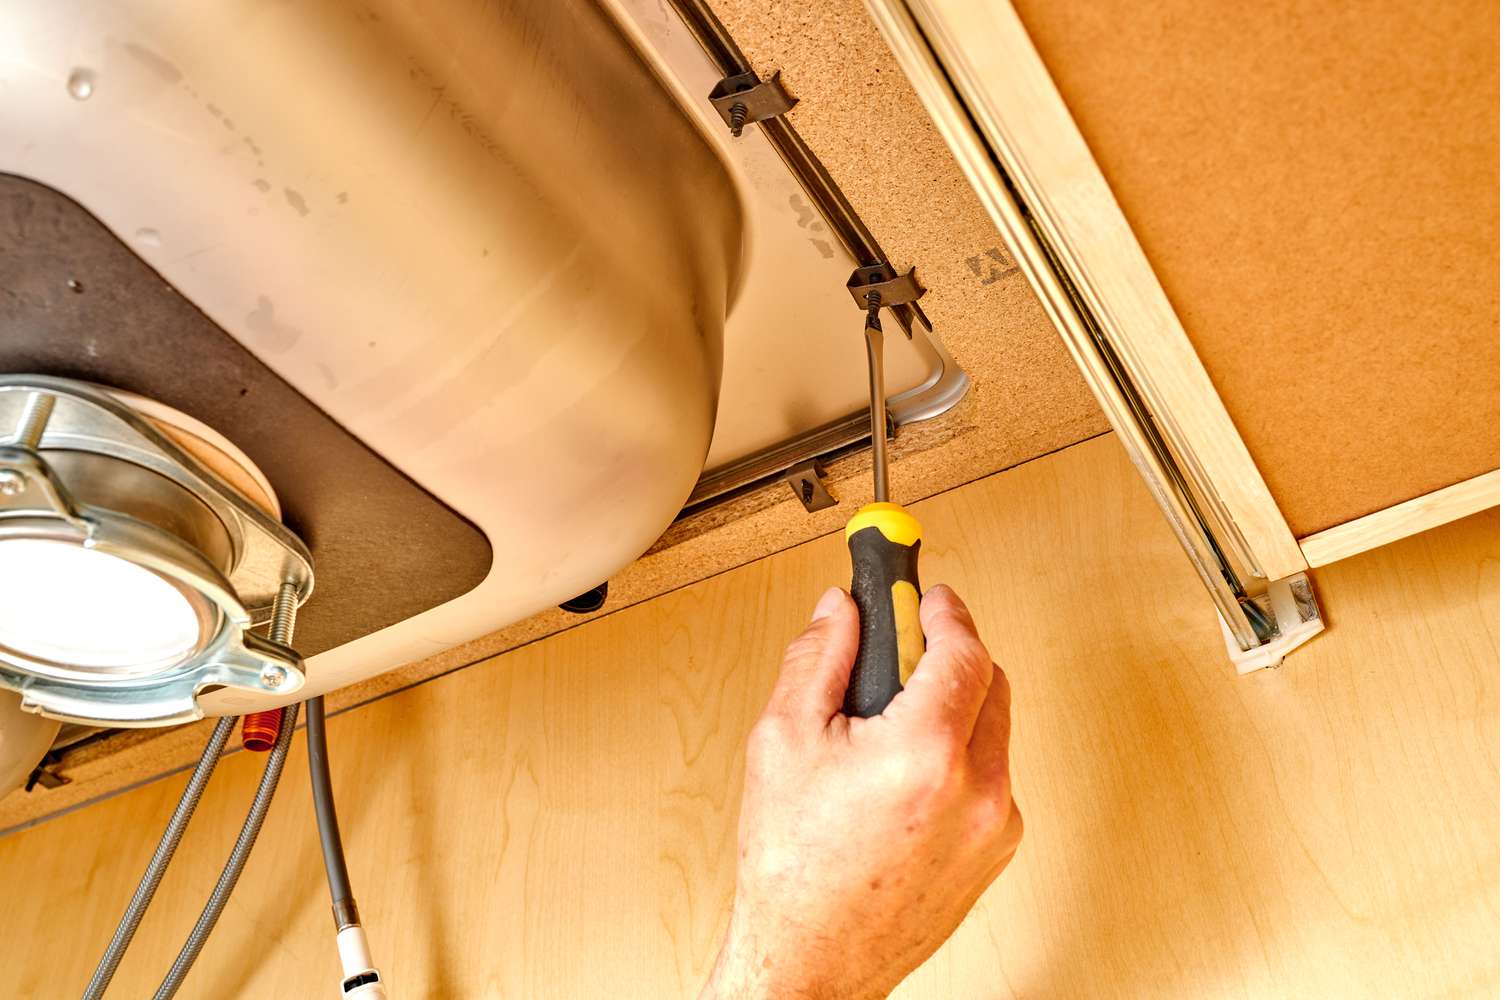
- Secure the sink: Depending on the type of sink you have, secure it to the countertop using the provided clips or brackets. Follow the manufacturer’s instructions for proper installation. Tighten the clips or brackets until the sink is firmly secured to the countertop.
- Check for levelness: Use a level to check if the sink is level both from side to side and front to back. Make any necessary adjustments by loosening or tightening the clips or brackets.
- Attach the mounting hardware: If your sink requires additional mounting hardware, such as brackets or screws, attach them according to the manufacturer’s instructions. This will provide additional stability and support for the sink.
By following these steps, you’ll ensure that your sink is securely installed in the countertop. Take your time to properly align and secure the sink for a professional-looking result. Once the sink is installed, you’re ready to move on to connecting the plumbing.
Step 5: Connecting the Plumbing
Connecting the plumbing is an important step in the sink installation process. Follow these steps to ensure proper connection of the plumbing:
- Install the drain assembly: Place the rubber gasket and washer onto the bottom of the drain assembly. Insert the drain assembly into the sink’s drain hole from below the sink. Secure it in place by tightening the nut onto the drain assembly.
- Connect the P-trap: Attach one end of the P-trap to the drain assembly and the other end to the wall or floor pipe. Use a wrench to tighten the connections and ensure they’re secure.
- Connect the water supply lines: Depending on your sink and plumbing setup, connect the hot and cold water supply lines to the corresponding valves. Use plumber’s tape on the threads to ensure a tight seal. Tighten the connections with a wrench.
- Check for leaks: Before turning on the water supply, carefully inspect all the connections for any signs of leaks or drips. If you notice any leaks, tighten the connections further or replace any faulty components.
- Open the water supply valves: Once you’ve checked for leaks and made all the necessary adjustments, slowly turn on the water supply valves. Check underneath the sink for any leaks and listen for any unusual sounds.
By properly connecting the plumbing, you’ll ensure that your sink functions correctly and prevent any water leaks. Take your time during this step and double-check all the connections before turning on the water supply.
Once you’ve successfully connected the plumbing, you’re ready to move on to sealing the sink.
Step 6: Sealing the Sink
Sealing the sink is a crucial step to prevent water leakage and maintain the integrity of the installation. Follow these steps to properly seal the sink:
- Clean the area: Use a mild cleaner and a sponge or cloth to clean the area around the sink and countertop where the sealant will be applied. Ensure that the surface is dry before proceeding.
- Apply silicone caulk: Load a tube of silicone caulk into a caulk gun. Cut the tip of the caulk tube at a 45-degree angle, making a small opening. Apply a continuous bead of caulk around the perimeter of the sink where it meets the countertop.
- Smooth the caulk: Wet your finger with water and press it gently against the caulk. Smooth out the caulk by moving your finger along the bead, creating a neat and even seal. Remove any excess caulk with a damp cloth.
- Let it cure: Allow the caulk to cure and dry according to the manufacturer’s instructions. This usually takes around 24 hours. Avoid using the sink or disturbing the sealant during this time.
Applying a good sealant will provide protection against water damage and maintain the structural integrity of the sink installation. Take your time during this step to achieve a smooth and sealed finish.
Once the sealant has dried and cured, you’re ready to move on to the final step: testing for leaks.
Step 7: Testing for Leaks
Before considering the sink installation complete, it’s important to test for any potential leaks. Follow these steps to ensure there are no water leaks:
- Fill the sink with water: Close the drain stopper and fill the sink with water. Allow the water to sit in the sink for a few minutes.
- Inspect the drain and connections: Check underneath the sink and inspect the drain assembly and plumbing connections. Look for any signs of water leakage or drips. Pay close attention to the junctions between pipes and fittings.
- Check the water supply lines: Inspect the water supply lines connecting to the sink. Look for any leaks or drips where the lines connect to the valves or where they pass through any fittings.
- Monitor for water drips: Keep an eye on the sink, drain, and plumbing connections for a few minutes. Look for any water drips or signs of moisture that could indicate a leakage issue.
- Fix any leaks: If you notice any leaks during the testing, immediately address them. Tighten loose connections, replace faulty components, or apply additional sealant if necessary.
Testing for leaks is an essential final step in the sink installation process. It ensures that your sink is properly sealed and functioning without any water leakage. By addressing any leaks promptly, you can avoid potential water damage and maintain the integrity of your sink installation.
Once you’ve completed the leak testing and resolved any issues, congratulations! You’ve successfully installed a sink in your countertop. Enjoy your newly installed sink and the improved functionality and aesthetics it brings.
Read more: How To Cut A Sink Hole In A Countertop
Conclusion
Installing a sink in a countertop is a rewarding DIY project that can improve the functionality and appearance of your kitchen or bathroom. By following the steps outlined in this guide, you can confidently tackle the installation process and achieve professional results.
From preparing the countertop to connecting the plumbing and sealing the sink, each step is important to ensure a secure and leak-free installation. By taking the time to measure and mark the sink placement accurately, create a precise sink cutout, and properly connect the plumbing, you can achieve a seamless and functional sink installation.
Remember, attention to detail and patience are key during the installation process. Take your time, double-check measurements and connections, and make necessary adjustments along the way. This will help you avoid common pitfalls and ensure a successful result.
Always prioritize safety throughout the installation process. Use appropriate tools, wear protective gear, and follow manufacturer’s instructions and safety guidelines.
By successfully installing a sink in a countertop, you’ll not only enhance the functionality of your space but also add value to your home. So, roll up your sleeves, gather your tools, and get ready to enjoy the satisfaction of a job well done!
Frequently Asked Questions about How To Install Sink In Countertop
Was this page helpful?
At Storables.com, we guarantee accurate and reliable information. Our content, validated by Expert Board Contributors, is crafted following stringent Editorial Policies. We're committed to providing you with well-researched, expert-backed insights for all your informational needs.


0 thoughts on “How To Install Sink In Countertop”