Articles
How To Install Belgian Block Driveway Edging
Modified: August 17, 2024
Learn how to install Belgian block driveway edging with our informative articles. Enhance the beauty and durability of your driveway with this step-by-step guide.
(Many of the links in this article redirect to a specific reviewed product. Your purchase of these products through affiliate links helps to generate commission for Storables.com, at no extra cost. Learn more)
Introduction
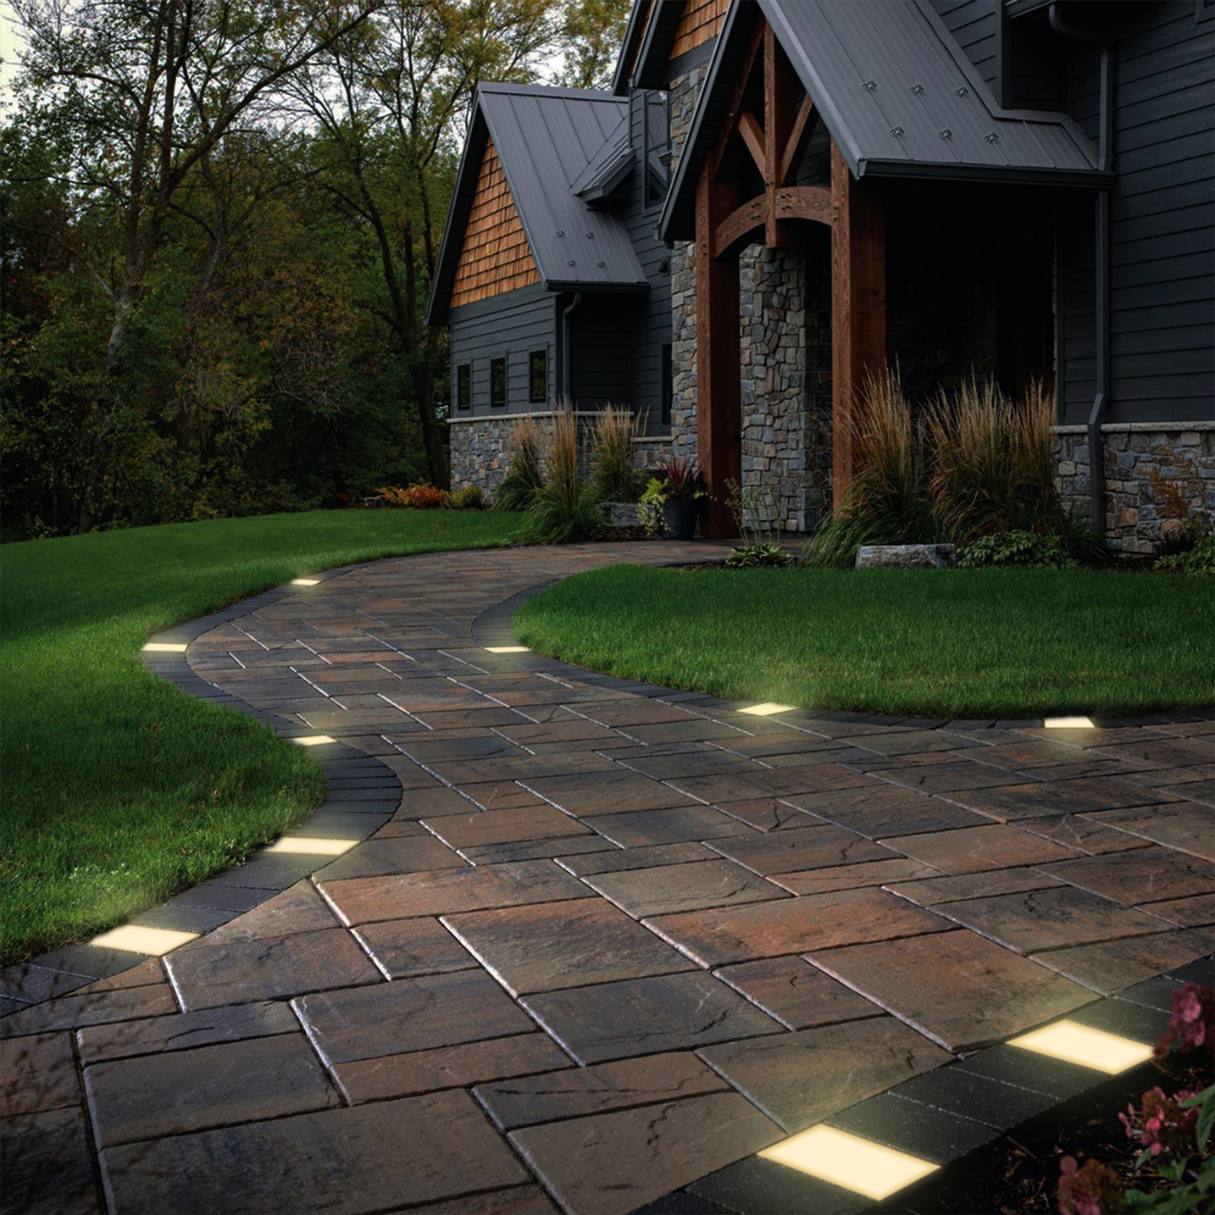
Welcome to our comprehensive guide on how to install Belgian block driveway edging! Whether you’re looking to add a touch of elegance to your driveway or enhance its durability, installing Belgian blocks can be a great solution. Belgian block, also known as cobblestone, is a popular choice for creating beautiful and functional driveways.
In this guide, we will take you through each step of the installation process, from gathering materials and tools to adding the final touches. By following these steps, you’ll be able to create a stunning Belgian block driveway edging that not only improves the overall aesthetic appeal of your property but also provides added stability and longevity to your driveway.
Before we dive into the installation process, let’s take a moment to understand the benefits of using Belgian blocks for your driveway edging. Belgian blocks are known for their timeless beauty, durability, and versatility. They offer a classic look that can complement any architectural style, whether it’s traditional or contemporary. Additionally, the natural texture and varying sizes of Belgian blocks add visual interest to your driveway, creating a unique and charming appearance.
Furthermore, Belgian blocks serve a functional purpose by preventing the shifting and spreading of the driveway surface. The interlocking nature of the blocks ensures that they stay in place, even under heavy vehicular traffic. This helps to maintain a neat and well-defined edge for your driveway while offering stability and support to the underlying materials.
Now that we understand the advantages of using Belgian blocks for driveway edging, let’s move on to the first step of the installation process: gathering the materials and tools necessary for the project.
Key Takeaways:
- Enhance Your Driveway with Timeless Elegance
Learn how to install Belgian block driveway edging to add a touch of classic beauty and durability to your property. Follow our step-by-step guide for a stunning and stable driveway upgrade. - Create a Lasting and Functional Driveway Addition
Discover the benefits of Belgian block edging and follow our comprehensive installation guide to achieve a professional and durable driveway enhancement. Enjoy the timeless appeal and added stability of Belgian blocks.
Read more: How To Edge A Driveway
Step 1: Gather Materials and Tools
Before you start installing Belgian block driveway edging, you’ll need to gather all the necessary materials and tools. Having everything ready beforehand will ensure a smoother installation process. Here’s a list of what you’ll need:
- Belgian Blocks: Measure the length of your driveway and calculate the number of blocks needed. Consider purchasing extra blocks to account for any breakage or mistakes during installation.
- Marking Paint or Chalk: Use marking paint or chalk to mark the placement of the blocks on your driveway.
- Shovel: A sturdy shovel will be essential for excavating the area where the blocks will be installed.
- Wheelbarrow: Use a wheelbarrow to transport the excavated soil and any other materials needed for the installation.
- Tamper: A tamper is used to compact the base layer and ensure a stable foundation for the blocks.
- Paver Sand: Paver sand will be used to level the base and fill in the gaps between the blocks.
- Level: A level is crucial to ensure that the blocks are installed evenly and have a consistent height.
- Rubber Mallet: A rubber mallet is useful for gently tapping the blocks into place.
- Safety Gear: Don’t forget to wear safety glasses, gloves, and appropriate footwear to protect yourself during the installation process.
Once you have gathered all the necessary materials and tools, you’ll be ready to move on to the next step: measuring and marking the driveway. This step is crucial in ensuring accurate block placement and a visually appealing final result.
Step 2: Measure and Mark the Driveway
After gathering the materials and tools, it’s time to measure and mark the driveway for the installation of the Belgian blocks. This step is essential to ensure that the blocks are placed accurately and create a visually pleasing edge. Here’s how to do it:
- Measure the Length: Start by measuring the length of the area where you want to install the Belgian block edging. Use a measuring tape to get an accurate measurement.
- Determine the Placement: Decide how wide you want the edging to be. Generally, a width of 2-4 blocks looks aesthetically pleasing. Use marking paint or chalk to outline the placement of the blocks along the edge of the driveway.
- Verify the Alignment: Use a level to ensure that the marked line is straight and aligned with the edge of the driveway. If necessary, make adjustments to achieve a straight line.
It’s important to take your time during this step to ensure precise measurements and markings. A well-measured and properly aligned guide will make the installation process much easier and result in a polished finished product.
Once you have measured and marked the driveway, you’re ready to move on to the next step: excavating the area. By removing the necessary layers of soil, you’ll create a suitable base for the Belgian block edging.
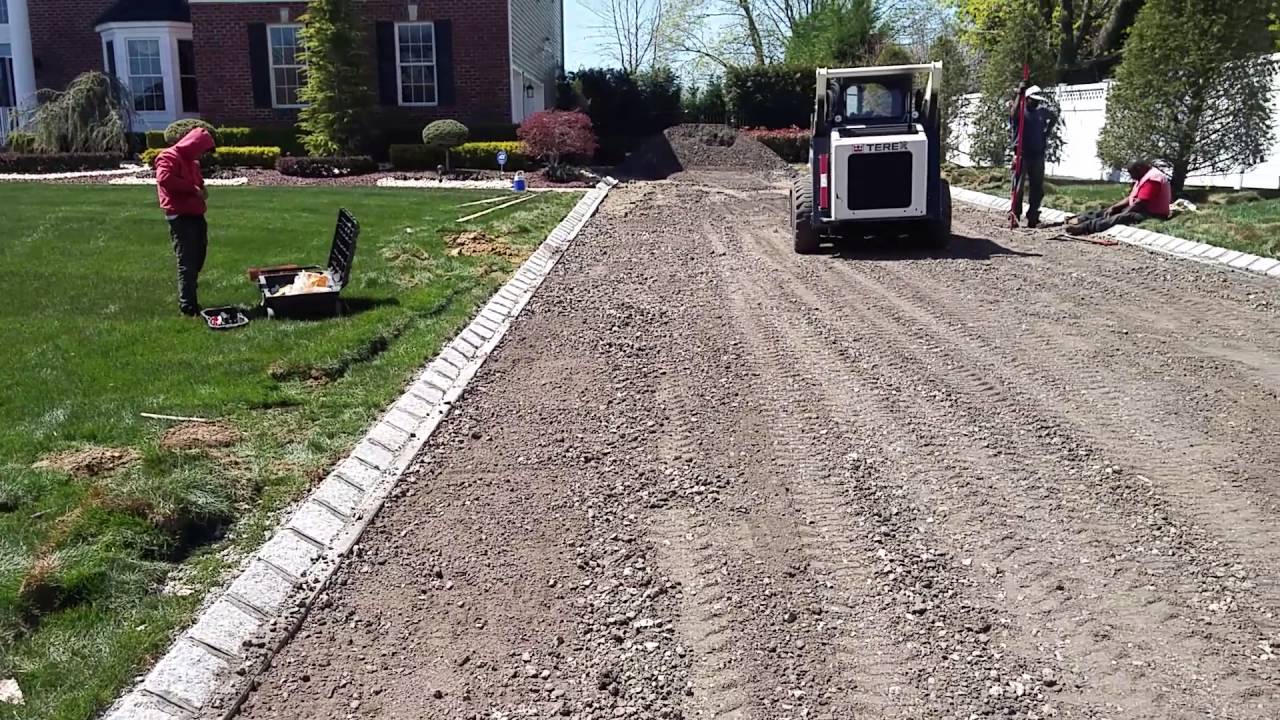
Step 3: Excavate the Area
With the driveway measured and marked, it’s time to excavate the area where the Belgian block edging will be installed. Excavation is a crucial step in creating a stable foundation for the blocks. Here’s how to do it:
- Start by using a shovel to remove any grass, plants, or debris along the marked edge of the driveway. Clearing this vegetation will ensure a clean and even surface for the blocks.
- Next, use the shovel to dig down about 6-8 inches along the marked edge. The depth will vary depending on the thickness of your blocks and the desired height of the edging. Make sure to create a consistent depth across the entire length of the excavation area.
- Use a level to check the excavated area for any uneven spots. Remove additional soil as needed to create a level base.
- Once the area is excavated and leveled, use a tamper to compact the soil. This will provide a stable foundation for the blocks and help prevent shifting over time.
As you excavate, it’s important to dispose of the excavated soil properly. You can use a wheelbarrow to transport the soil to a designated area or choose to repurpose it for other landscaping projects. Remember to take safety precautions while excavating and lifting heavy loads to avoid any injuries.
With the area excavated, you’re ready to move on to the next step: preparing the base layer. A proper base layer is essential for ensuring the stability and longevity of the Belgian block edging.
Step 4: Install a Base Layer
Now that the area is excavated, it’s time to create a sturdy base layer for the Belgian block edging. The base layer will provide stability and prevent shifting of the blocks over time. Follow these steps to install the base layer:
- Start by adding a layer of crushed stone or gravel to the excavated area. This layer, often referred to as the “base,” should be about 4-6 inches thick.
- Spread the crushed stone evenly across the excavated area, using a rake or shovel to smooth it out. Make sure that the base layer is compacted and leveled to provide a solid foundation for the blocks.
- Use a tamper or plate compactor to compact the base layer. This will ensure that the crushed stone is tightly packed and stable.
- Check the level of the base layer using a straightedge or level. Make any necessary adjustments to ensure a consistent level across the entire area.
The base layer is critical for the longevity and stability of the Belgian block edging. It helps to distribute the weight of vehicles evenly and prevents the blocks from sinking or shifting over time. Taking the time to properly install and compact the base layer will greatly improve the overall durability and functionality of your driveway edging.
With the base layer in place, you’re ready to move on to the next step: laying the Belgian blocks. This step will bring your driveway edging to life, adding a touch of elegance and charm to your property.
Read more: How To Edge A Gravel Driveway
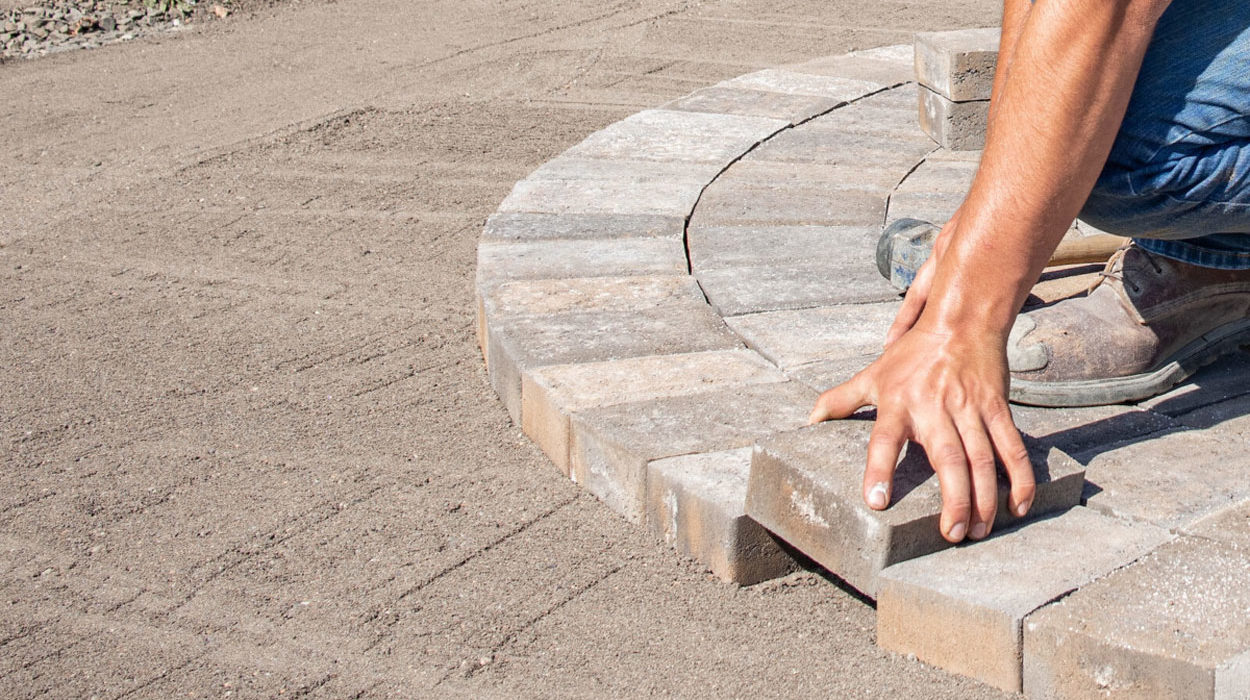
Step 5: Lay the Belgian Blocks
With the base layer installed, it’s time to lay the Belgian blocks and create the beautiful edging for your driveway. Follow these steps to properly lay the blocks:
- Start by placing the first Belgian block at one end of the excavated area. Make sure it is aligned with the marked edge of the driveway.
- Continue placing the blocks, closely aligning them next to each other. Use a level to ensure that they are evenly positioned and maintain a consistent height.
- If necessary, you can use a rubber mallet to gently tap the blocks into place. This will help to create a secure and flush fit.
- Try to alternate the orientation of the blocks, using longer and shorter sides, to create an interlocking pattern. This not only adds visual interest but also improves the stability of the edging.
- As you lay the blocks, periodically check the level and alignment to ensure a professional-looking finish. Make any necessary adjustments to maintain a straight and even line.
- Continue laying the blocks along the entire length of the excavated area until you reach the other end.
Keep in mind that it’s crucial to take your time and be meticulous during this step. Proper alignment and spacing between the blocks will enhance the overall appearance and functionality of the driveway edging.
Once you have laid all the Belgian blocks, you’re ready to move on to the next step: securing the blocks in place. This will further reinforce the stability of your driveway edging and prevent any movement or shifting over time.
When installing Belgian block driveway edging, make sure to properly prepare the base by excavating and compacting the soil. Use a string line to ensure straight and even placement of the blocks. Fill the gaps with sand to secure the blocks in place.
Step 6: Secure the Blocks
Now that you have laid the Belgian blocks in place, it’s important to secure them to ensure they remain stable and intact. Follow these steps to properly secure the blocks:
- Use a rubber mallet to gently tap each block to ensure it is properly seated and leveled.
- Once all the blocks are in position, insert plastic or metal edging spikes into the ground at regular intervals along the edge of the blocks. The spikes should be inserted at a slight angle towards the blocks and driven down until they are firmly anchored.
- A good rule of thumb is to place spikes roughly every 2-3 feet. This will help to hold the blocks firmly in place and prevent them from shifting.
- Check the alignment and stability of the blocks as you go along, making any necessary adjustments.
Securing the blocks with edging spikes will provide additional stability and prevent any movement or shifting. It’s important to drive the spikes firmly into the ground to ensure a secure hold. However, be careful not to exert too much force, as it could damage the blocks.
With the blocks secured, you’re ready to move on to the next step: filling in the gaps. This will help create an even and cohesive look for your Belgian block driveway edging.
Step 7: Fill in the Gaps
After securing the blocks in place, it’s time to fill in the gaps between the Belgian blocks. This step will help create a seamless and cohesive look for your driveway edging. Follow these steps to properly fill in the gaps:
- Start by spreading a layer of paver sand over the entire surface of the blocks.
- Use a broom or a soft-bristle brush to sweep the sand into the gaps between the blocks, ensuring that it fills each space completely.
- Gently tap the blocks with a rubber mallet to settle the sand and ensure a tight fit.
- Continue adding more sand and repeating the process until all the gaps are filled.
- Use the broom or brush to remove any excess sand from the surface of the blocks.
The paver sand will help lock the blocks into place and prevent any movement or shifting. It also adds stability and durability to the overall structure of the driveway edging. Take your time during this step to ensure that the gaps are filled evenly and the sand is properly settled.
With the gaps filled in, you’re ready to move on to the next step: compacting the surface. This will help set the blocks and create a solid and level driveway edging.
Step 8: Compact the Surface
Once you have filled in the gaps with sand, it’s important to compact the surface of the Belgian block driveway edging. This step will help to settle the blocks and create a solid and level surface. Follow these steps to properly compact the surface:
- Use a plate compactor or hand tamper to compact the entire surface of the driveway edging.
- Start at one end and work your way across, applying even pressure as you go.
- Make multiple passes over the entire surface, paying close attention to any areas that may feel uneven or unstable.
- Check the level of the blocks as you compact, ensuring they remain even and properly aligned.
- Continue compacting until the surface feels solid and there are no visible gaps or movement between the blocks.
Compacting the surface is crucial for the long-term stability and durability of your Belgian block driveway edging. It helps to ensure that the blocks are firmly set in place and will withstand the weight of vehicles and regular use.
With the surface compacted, you’re almost done! The next step is to clean up any excess materials and add the final touches to your Belgian block driveway edging.
Read more: How To Edge An Asphalt Driveway
Step 9: Clean up and Final Touches
Congratulations! You’re in the final step of installing your Belgian block driveway edging. Step 9 involves cleaning up any debris and adding those finishing touches that will truly enhance the beauty of your driveway. Here’s what you need to do:
- Use a broom or a leaf blower to remove any loose sand or debris from the surface of the blocks.
- Inspect the edging and make sure all the blocks are securely in place and aligned correctly.
- If any gaps or voids are visible between the blocks, add more sand and sweep it into those areas to fill them in.
- Check the overall level of the edging and make adjustments if needed.
- Consider adding a sealant to the surface of the blocks to protect them and enhance their appearance. Follow the manufacturer’s instructions for applying the sealant.
- Take a step back and admire your beautiful Belgian block driveway edging!
By cleaning up any excess materials and giving attention to the final details, you will have a polished and professional-looking driveway edging that is both functional and visually appealing.
Remember to follow any specific recommendations or guidelines provided by the manufacturer of the Belgian blocks or any additional products you have used during the installation process.
And there you have it! You’ve successfully completed the installation of your Belgian block driveway edging. It’s time to enjoy the enhanced curb appeal and added durability that your new edging brings to your property.
Thank you for following this comprehensive guide, and we hope it has been helpful in your journey to create a stunning Belgian block driveway edging.
Happy driving!
Conclusion
Installing Belgian block driveway edging can greatly enhance the overall look and functionality of your driveway. Not only does it provide a timeless and elegant aesthetic, but it also offers stability and durability to your driveway surface. By following the step-by-step process outlined in this guide, you can successfully install Belgian block edging and enjoy its numerous benefits.
Throughout the installation process, we have covered important steps such as gathering materials and tools, measuring and marking the driveway, excavating the area, installing a base layer, laying the Belgian blocks, securing the blocks, filling in the gaps, compacting the surface, cleaning up, and adding the final touches.
Remember to take your time during each step, paying attention to details and ensuring proper alignment and stability. This will result in a high-quality installation that will withstand the test of time.
Additionally, consider using a sealant to protect the blocks and further enhance their appearance. Regular maintenance, such as sweeping and removing debris, will help keep your driveway edging looking its best.
With your newly installed Belgian block driveway edging in place, you can enjoy a beautiful and functional addition to your property. The classic elegance and durability of Belgian blocks will add value and curb appeal to your home for years to come.
We hope that this comprehensive guide has provided you with the knowledge and confidence to successfully install Belgian block driveway edging. Happy driving and enjoy your stunning new addition!
Now that you've got the hang of installing Belgian block driveway edging, why stop there? Dive deeper into perfecting your driveway's look with our guide on driveway edging. For those aiming to boost their home's first impression, our article on curb appeal offers creative mailbox landscaping ideas that are sure to turn heads. Both pieces are packed with practical tips and inspiring designs to help you elevate your outdoor space effortlessly.
Frequently Asked Questions about How To Install Belgian Block Driveway Edging
Was this page helpful?
At Storables.com, we guarantee accurate and reliable information. Our content, validated by Expert Board Contributors, is crafted following stringent Editorial Policies. We're committed to providing you with well-researched, expert-backed insights for all your informational needs.


0 thoughts on “How To Install Belgian Block Driveway Edging”