Articles
How To Install Roof Drip Edge
Modified: October 21, 2024
Learn how to install roof drip edge with our comprehensive articles. Get step-by-step instructions and expert tips to ensure a professional installation.
(Many of the links in this article redirect to a specific reviewed product. Your purchase of these products through affiliate links helps to generate commission for Storables.com, at no extra cost. Learn more)
Introduction
Welcome to this guide on how to install roof drip edge. If you’re planning to install a new roof or replace an existing one, including a drip edge can significantly improve the longevity and performance of your roofing system. In this article, we will explain what a roof drip edge is, why it is important, and provide a step-by-step guide on how to install it properly.
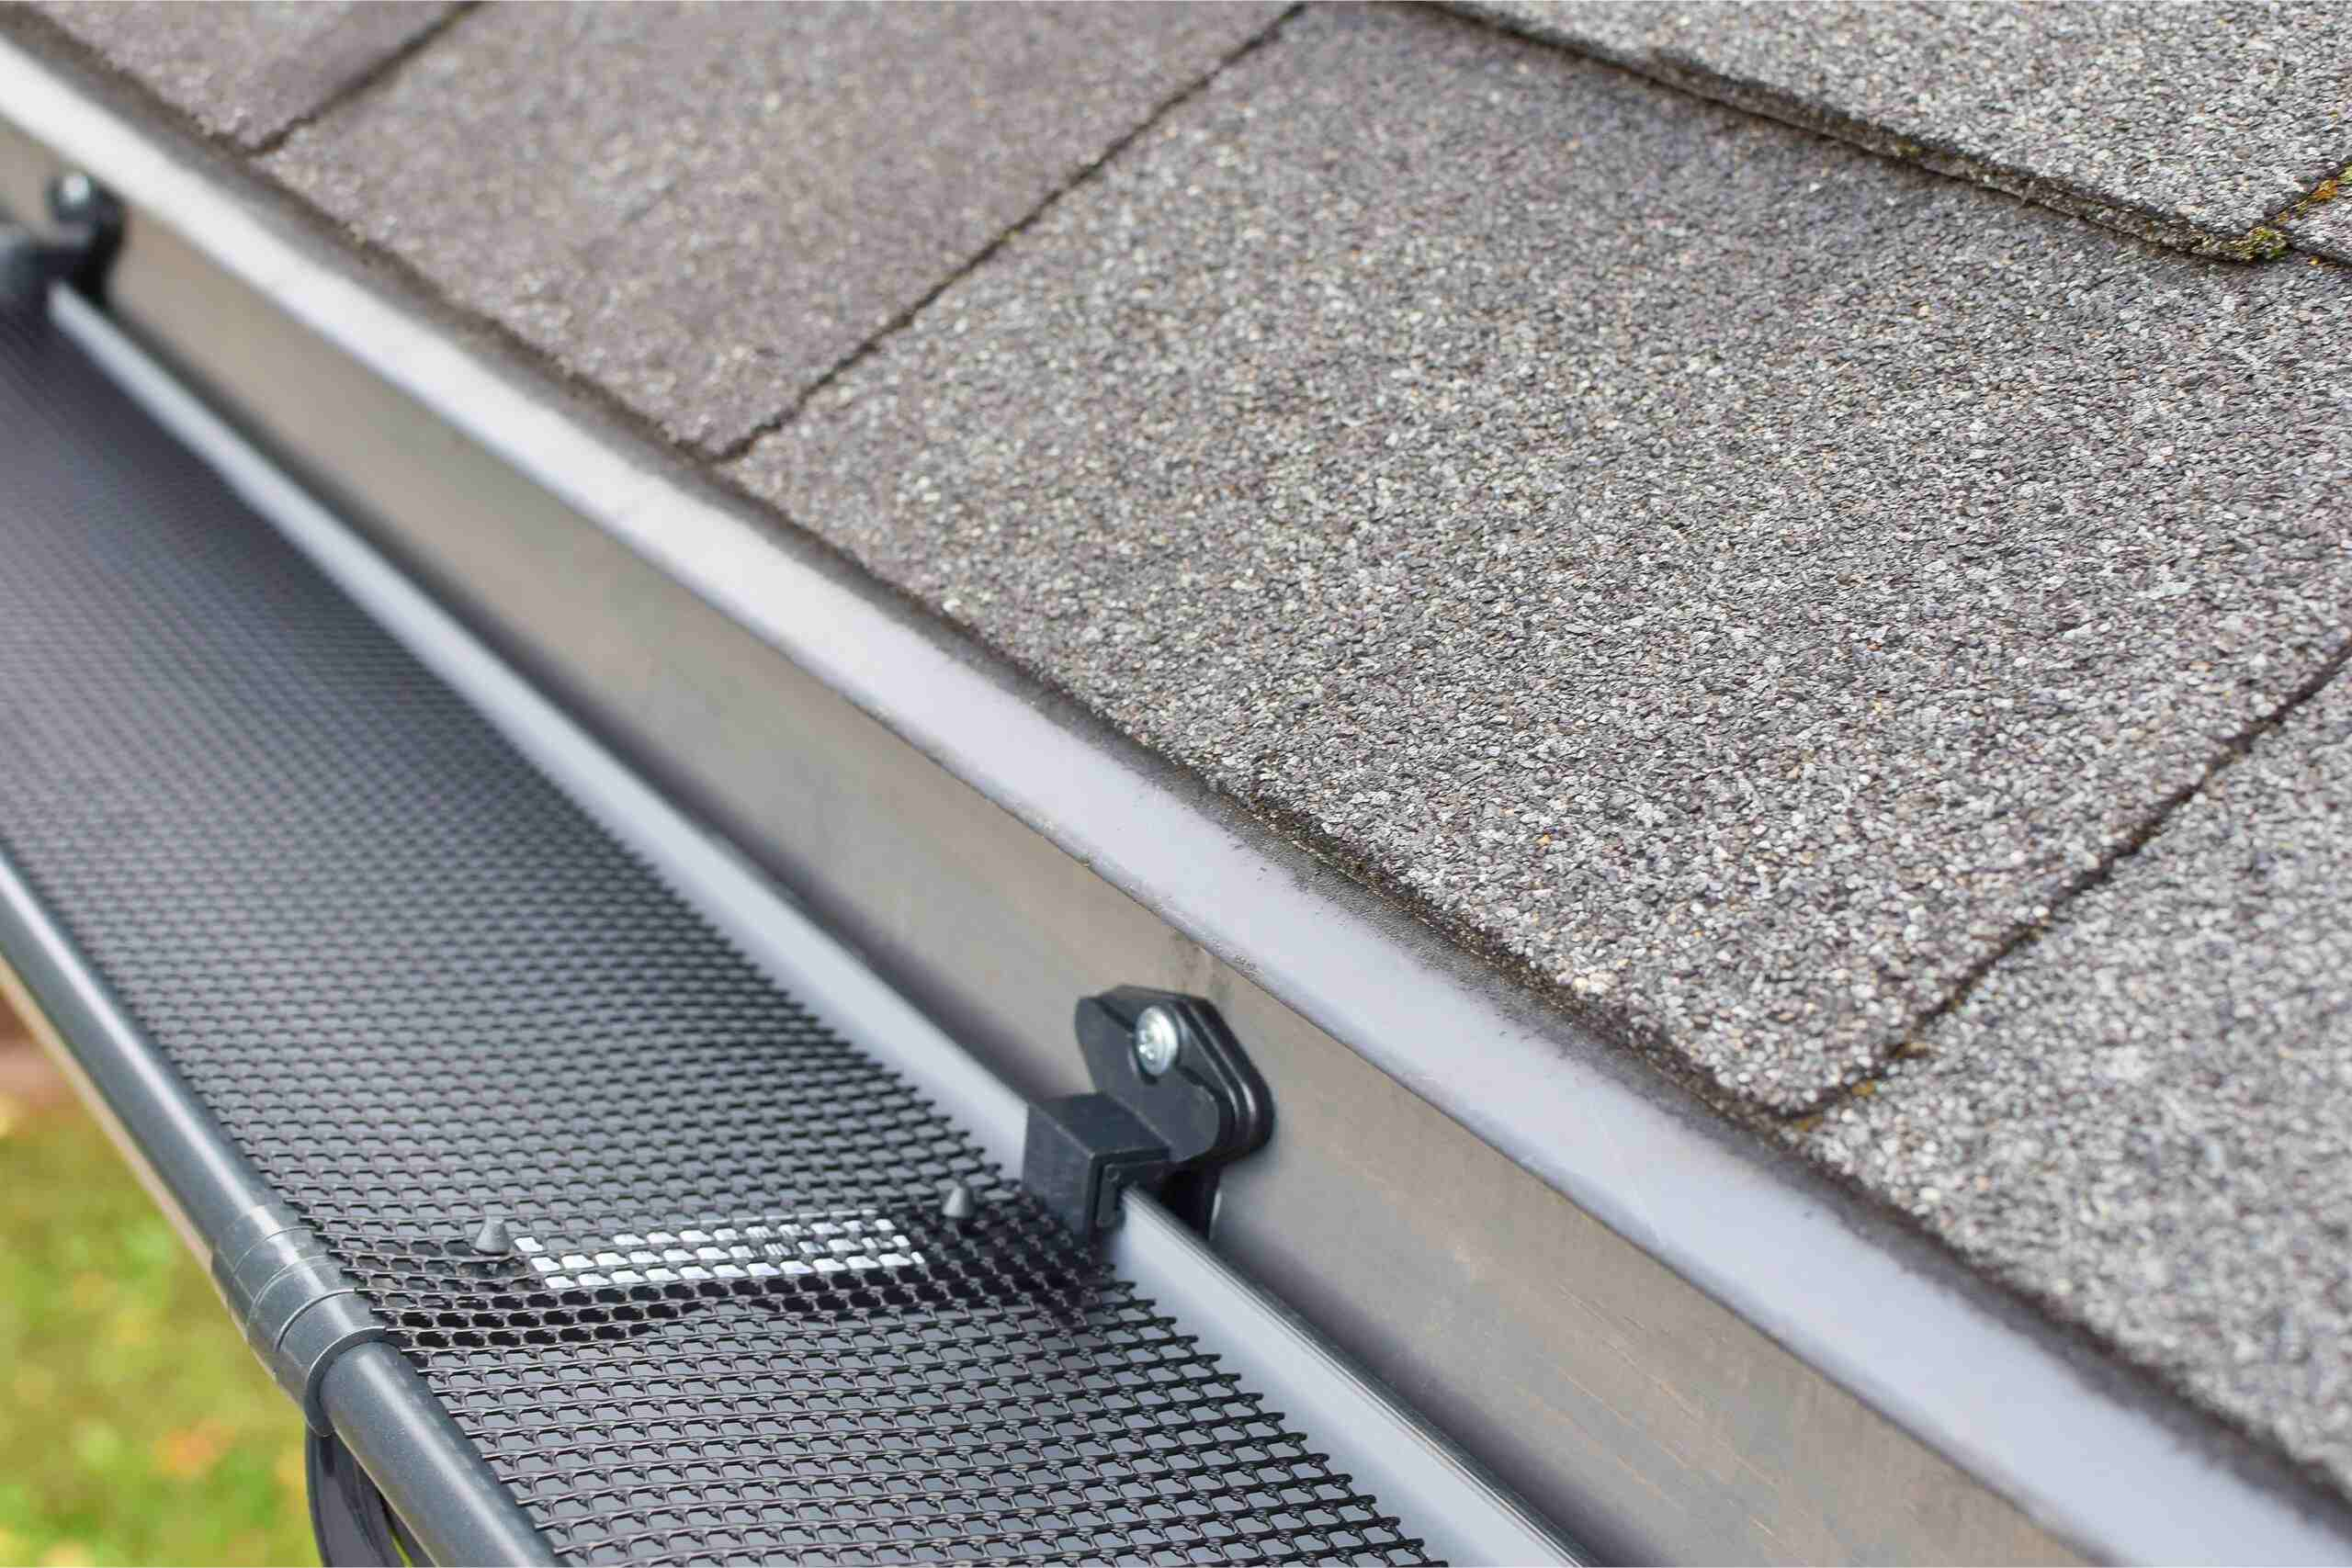
A roof drip edge is a piece of metal flashing that is installed along the edges of a roof to help redirect water away from the underlying structure. It is typically made of aluminum or galvanized steel and is designed to prevent water from seeping under the roofing materials and causing damage, such as rot, mold, or even structural issues.
Aside from its primary function of directing water away from the roof, a drip edge also provides several other benefits. It helps to protect the fascia and soffit areas from moisture, prevents wind-driven rain from entering the eaves, and can even deter pests, such as rodents and insects, from gaining access to your home.
Now that we understand why a roof drip edge is essential, let’s dive into the step-by-step process of installing one. Make sure to gather all the necessary tools and materials before beginning the installation process.
Key Takeaways:
- Proper installation of a roof drip edge is essential for protecting your home from water damage, rot, and structural issues. By following safety precautions, preparing the roof surface, and securing the drip edge, you can ensure the longevity of your roofing system.
- Regular inspections and maintenance of the drip edge installation are crucial for preserving its functionality and effectiveness. By checking alignment, secure attachment, and proper water flow, you can maintain a durable and well-protected roofing system for years to come.
Read more: What Is A Drip Edge On A Roof
What is Roof Drip Edge?
A roof drip edge is a crucial component of a roofing system that helps protect your home from water damage. It is a metal flashing that is installed along the edges of your roof, typically at the eaves and gable ends. The drip edge acts as a barrier between the roofing materials and the fascia, preventing water from seeping into the underlying structure.
The primary purpose of a roof drip edge is to direct water away from the roof’s edges and into the gutters or off the roof. By doing so, it helps to prevent water from pooling or flowing under the roofing materials, which can lead to damage and deterioration over time.
Aside from its water-shedding capabilities, a drip edge also provides protection for the fascia and soffit areas. These vulnerable parts of your home can be easily damaged by water infiltration, leading to rot, mold growth, and decay. By installing a drip edge, you create a barrier that prevents water from reaching these areas, preserving the structural integrity of your home.
Another benefit of a roof drip edge is its ability to prevent wind-driven rain from entering the eaves. Strong winds can push rainwater up and under the roofing materials, causing water damage and leaks. The drip edge acts as a shield, diverting the water away from the vulnerable edges of the roof and ensuring that it flows properly into the gutters or off the roof.
In addition to its water-related functions, a roof drip edge can also act as a deterrent for pests. The metal flashing creates a barrier that pests, such as rodents and insects, find difficult to penetrate. By installing a drip edge, you can help keep unwanted critters out of your home.
Overall, a roof drip edge plays a vital role in protecting your home from water damage and ensuring the longevity of your roofing system. Its installation is a relatively simple and cost-effective way to enhance the performance and durability of your roof. In the following sections, we will guide you through the process of installing a roof drip edge step-by-step.
Tools and Materials Required
Before you begin installing a roof drip edge, gather the necessary tools and materials to ensure a smooth and efficient installation process. Here’s a list of what you’ll need:
Tools:
- Measuring tape
- Pencil or marker
- Straight edge or level
- Tin snips or aviation shears
- Roofing nails
- Hammer or nail gun
- Roofing adhesive or caulking gun
- Roofing cement or sealant
- Safety goggles
- Gloves
- Ladder or scaffolding
Materials:
- Roof drip edge flashing (galvanized steel or aluminum)
- Roofing underlayment
- Roofing shingles
- Drip edge corner pieces (if applicable)
- Gutter apron (if applicable)
- Gutter hangers or brackets (if applicable)
- Gutter system (if installing or replacing)
It is essential to use high-quality materials to ensure the longevity and effectiveness of your roof drip edge. Choose a drip edge flashing material that is suitable for your climate and matches the style of your roof. Galvanized steel and aluminum are popular choices due to their durability and resistance to corrosion.
Additionally, ensure that you have the appropriate safety gear, such as goggles and gloves, to protect yourself during the installation process. Safety should always be a top priority when working at heights or with tools.
Now that you have all the necessary tools and materials, you’re ready to proceed with the installation of your roof drip edge. Remember to follow safety precautions and consult the manufacturer’s instructions for specific guidelines related to your chosen materials. Let’s move on to the step-by-step guide.
Read more: How To Install Drip Edge On A Shed
Step 1: Safety Precautions
Prior to beginning the installation of your roof drip edge, it’s crucial to prioritize safety. Working at heights and with tools can be hazardous, so following proper safety precautions is essential. Here are some important safety measures to keep in mind:
1. Use Protective Gear:
Wear safety goggles to protect your eyes from debris and sharp objects. It’s also advisable to wear gloves to safeguard your hands during the installation process.
2. Check Weather Conditions:
Make sure to choose a day with calm weather conditions to ensure stability and reduce the risk of accidents. Avoid working on your roof during rainy, windy, or icy conditions, as these can increase the chances of slips and falls.
3. Use Proper Ladder Safety:
If you require a ladder to access your roof, ensure that it is in good condition and set up correctly. Make sure the ladder is on stable ground and secure it to prevent shifting or sliding. Always maintain three points of contact when climbing or descending the ladder.
Read more: How To Install Gutters With Drip Edge
4. Be Mindful of Electrical Hazards:
Be aware of any nearby power lines or electrical hazards while working on your roof. Avoid coming into contact with electrical wires and keep all tools and materials away from electrical sources.
5. Communicate with Helpers:
If you have someone assisting you with the installation, establish clear communication and ensure that they also adhere to safety protocols. Having an extra set of hands can be beneficial, especially when maneuvering materials and tools on the roof.
6. Take Breaks and Stay Hydrated:
Roof work can be physically demanding, so remember to take regular breaks and stay hydrated. Working in the heat can lead to fatigue and dehydration, which can impair your concentration and safety.
By following these safety precautions, you’ll create a safer working environment for yourself and reduce the risk of accidents or injuries during the installation process. Once you’ve ensured that all necessary safety measures are in place, you can move on to preparing the roof surface for the installation of the drip edge.
Step 2: Preparing the Roof Surface
Before installing the roof drip edge, it’s important to prepare the roof surface to ensure a proper and secure installation. Follow these steps to prepare the roof surface:
Read more: How To Install Landscaping Edging
1. Clear Debris:
Begin by removing any debris, such as leaves, branches, or dirt, from the roof surface. Use a broom or a leaf blower to clear the area, paying special attention to the edges where the drip edge will be installed.
2. Inspect the Roof:
Thoroughly inspect the roof for any signs of damage, such as loose or broken shingles, rotted wood, or cracked flashing. Address any repairs or replacements before proceeding with the installation of the drip edge. It’s crucial to have a solid and stable roof surface for the best results.
3. Install Underlayment:
If your roofing project involves replacing the entire roof or installing a new one, it’s important to install a roofing underlayment. The underlayment acts as an additional barrier against moisture and helps to protect the roof deck. Follow the manufacturer’s instructions for proper installation.
4. Position Starter Course:
If you’re installing a new roof, position the starter course of shingles at the eaves of the roof. The starter course provides a solid base for the first row of shingles and helps ensure a proper water-shedding system. Refer to the manufacturer’s guidelines for the specific installation process.
Read more: How To Finish The Top Edge Of A Shed Roof
5. Flashing Application:
Inspect and repair any existing flashing around the edges of the roof before installing the drip edge. Proper flashing is essential for a watertight seal and prevents water intrusion beneath the roofing materials.
By taking the time to prepare the roof surface, you’ll create a solid foundation for the installation of the roof drip edge. This will help ensure the longevity and effectiveness of the drip edge, as well as the overall durability of your roofing system. Once you’ve completed these steps, you’re ready to move on to measuring and cutting the drip edge.
Step 3: Measuring and Cutting the Drip Edge
Properly measuring and cutting the roof drip edge is crucial to ensure a precise and secure fit. Follow these steps to accurately measure and cut the drip edge:
1. Measure the Length:
Starting at one corner of the roof, use a measuring tape to determine the length of the drip edge needed for the eave. Measure from the corner to the opposite end, accounting for any overhang. Add an extra 2-3 inches on each end to allow for proper installation and overlap with adjacent pieces.
2. Mark the Measurements:
Using a pencil or marker, mark the measurements on the drip edge, ensuring that the marks are visible and accurate. This will serve as a guide when it comes time to cut the drip edge.
Read more: How To Install Sawtooth Brick Edging
3. Cut the Drip Edge:
Using tin snips or aviation shears, carefully cut along the marked lines to create the necessary sections of the drip edge. Make smooth and precise cuts to ensure a clean and professional finish. Take your time and double-check the measurements before cutting to avoid any errors.
4. Repeat for Gable Ends:
If your roof has gable ends, repeat the measuring and cutting process for the drip edge on these sections as well. Measure the length needed for the gable end, account for any overhang, mark the measurements, and cut the drip edge accordingly. Remember to add an extra 2-3 inches on each end for proper installation and overlap.
5. Cut Corner Pieces:
If your roof has corners that require drip edge installation, use the measurements to cut corner pieces. Corner pieces are specially designed to fit and secure the drip edge around corners, ensuring a seamless and secure connection.
By accurately measuring and cutting the drip edge, you’ll create sections that fit precisely along the eaves and gable ends of your roof. This will ensure a tight and secure installation, maximizing the effectiveness of the drip edge in redirecting water away from your roof. Once you’ve completed these steps, you’re ready to move on to installing the drip edge on the eaves.
Step 4: Installing the Drip Edge on the Eaves
The next step in installing the roof drip edge is to secure it along the eaves of your roof. Follow these steps to properly install the drip edge on the eaves:
Read more: How To Install A Roof Vent
1. Position the Drip Edge:
Starting at one end of the eave, position the drip edge along the edge of the roof, ensuring that it extends slightly over the edge to direct water away. Align the drip edge vertically, keeping it flush with the roof deck and fascia board.
2. Nail the Drip Edge:
Using roofing nails, secure the drip edge by driving nails through the pre-drilled holes in the drip edge and into the roof deck. Space the nails approximately 6-8 inches apart along the entire length of the drip edge. Be careful not to hammer the nails too tightly, as this can cause damage to the drip edge or the roof materials.
3. Overlap the Drip Edge:
As you install subsequent sections of the drip edge, overlap each piece by approximately 2-3 inches. This ensures a watertight seal and prevents water from seeping between the sections. Secure the overlapping sections with nails, ensuring that they are properly aligned and flush with the roof deck.
4. Install Corner Pieces:
If your roof has corners that require drip edge installation, attach the corner pieces where the drip edge turns the corner. Position the corner pieces securely, ensuring they fit snuggly against the drip edge on both sides of the corner. Nail them in place using roofing nails.
Read more: How To Install Belgian Block Driveway Edging
5. Check for Proper Alignment:
Periodically check the alignment and straightness of the drip edge as you install it along the eaves. Use a level or straight edge to ensure that the drip edge is installed straight and in line with the roof edge. This will help ensure proper water flow and effective water redirection.
By properly installing the drip edge on the eaves of your roof, you provide a barrier that directs water away from the edge and prevents moisture damage to the underlying structure. Once you’ve completed these steps, you’re ready to move on to installing the drip edge on the gable ends.
Step 5: Installing the Drip Edge on the Gable Ends
The next step in installing the roof drip edge is to secure it along the gable ends of your roof. Follow these steps to properly install the drip edge on the gable ends:
Read more: How To Install A Roof Vent
1. Position the Drip Edge:
Starting at one end of the gable end, position the drip edge along the edge of the roof, aligning it with the roof edge and extending it slightly over the edge. Ensure that the drip edge is flush with the roof deck and fascia board, and that it sits flat against the surface.
2. Nail the Drip Edge:
Using roofing nails, secure the drip edge by driving nails through the pre-drilled holes in the drip edge and into the roof deck. Space the nails approximately 6-8 inches apart along the entire length of the drip edge, ensuring a secure attachment. Avoid hammering the nails too tightly, as this can damage the drip edge or roof materials.
3. Overlap the Drip Edge:
As you install subsequent sections of the drip edge along the gable end, overlap each piece by approximately 2-3 inches. This overlap ensures a watertight seal and prevents water from seeping between the sections. Secure the overlapping sections with nails, ensuring alignment and a flush fit with the roof deck.
4. Install Corner Pieces:
When reached the corner of the gable end, attach the corner pieces designed for the drip edge. These corner pieces will ensure a proper fit and a seamless transition around the corner. Position them securely, aligning them with the drip edge on both sides of the corner, and secure them with roofing nails.
Read more: How To Install Belgian Block Driveway Edging
5. Check for Proper Alignment:
Throughout the installation process, periodically check the alignment and straightness of the drip edge along the gable ends. Use a level or straight edge to ensure that the drip edge is installed straight and in line with the roof edge. This will help maintain proper water flow and efficient water redirection.
By installing the drip edge on the gable ends of your roof, you ensure that water is directed away from these vulnerable areas. This helps protect against moisture damage and maintains the overall integrity of your roof structure. Once you’ve completed these steps, you’re ready to move on to securing the drip edge in place.
Step 6: Securing the Drip Edge in Place
After installing the roof drip edge along the eaves and gable ends, the next step is to secure it in place. Properly securing the drip edge ensures its stability and effectiveness in redirecting water away from your roof. Follow these steps to secure the drip edge:
Read more: How To Install A Shed Roof
1. Double-Check Alignment:
Before securing the drip edge, double-check its alignment and make any necessary adjustments. Ensure that it is straight, flush with the roof deck, and properly overlapped at the seams. This will help maintain proper water flow and prevent any gaps that could allow water to seep under the roofing materials.
2. Apply Roofing Adhesive:
Using a roofing adhesive or a caulking gun, apply a thin bead of adhesive along the top inner edge of the drip edge. This adhesive will provide an additional layer of protection against water intrusion and secure the drip edge in place.
3. Secure with Roofing Nails:
Along the length of the drip edge, drive roofing nails through the top edge and into the roof deck. Space the nails approximately 6-8 inches apart for a secure attachment. Avoid overdriving the nails, as this can damage the drip edge or roof materials.
4. Seal the Seams:
Inspect the overlapping seams of the drip edge and apply roofing cement or sealant to seal any gaps. This will prevent water from seeping between the sections and ensure a watertight seal.
5. Repeat for Each Section:
Repeat these steps for each section of the drip edge, ensuring a secure installation along all edges and corners of the roof. Take your time and ensure that each piece is properly secured and sealed for optimal performance.
6. Inspect for Proper Fit:
Once the drip edge is secured in place, inspect the entire installation to ensure that it is properly fitted and aligned. Verify that there are no gaps or loose sections that could compromise its effectiveness in diverting water away from the roof.
By properly securing the drip edge, you ensure its stability and durability, enhancing its ability to protect your roof from water damage. Once you’ve completed these steps, you can move on to the final step of the installation process: inspecting the installation.
Step 7: Inspecting the Installation
After completing the installation of the roof drip edge, the final step is to thoroughly inspect the installation to ensure its quality and effectiveness. Proper inspection helps identify any potential issues and allows for necessary adjustments or repairs. Follow these steps to inspect the drip edge installation:
1. Check Alignment and Levelness:
Carefully examine the drip edge along all edges and corners of the roof. Check for proper alignment and levelness, ensuring that the drip edge is straight and in line with the roof edge. This promotes adequate water flow and effective water redirection.
Read more: How To Install Modified Bitumen Roofing
2. Verify Secure Attachment:
Confirm that the drip edge is securely attached to the roof deck. Check the nails or fasteners used to secure the drip edge, ensuring they are firmly in place and not loose. Any loose sections should be re-secured to maintain the integrity of the installation.
3. Inspect Overlapping Seams:
Inspect the overlapping seams of the drip edge for any gaps or openings. Make sure the seams are properly sealed with roofing cement or sealant to prevent water infiltration. If any gaps are found, apply additional sealant as needed.
4. Evaluate Overall Condition:
Evaluate the overall condition of the drip edge installation, looking for any signs of damage or defects. Check for dents, bends, or other issues that could compromise the performance of the drip edge. If damage is found, replace the affected sections to ensure optimal functionality.
5. Check for Proper Water Flow:
Observe the flow of water along the drip edge during a simulated rainfall or by using a hose. Ensure that water is properly directed away from the roof and into the gutters or off the roof. Adjust the positioning of the drip edge, if necessary, to optimize water flow and prevent pooling or stagnation.
Read more: How To Install A Metal Roof On A Shed
6. Conduct Periodic Inspections:
After the initial inspection, it’s important to conduct periodic inspections of the drip edge installation. Regularly check for any signs of damage, deterioration, or loose sections. Promptly address any issues to maintain the effectiveness and longevity of the drip edge.
By thoroughly inspecting the drip edge installation, you ensure its functionality and performance in protecting your roof from water damage. Take the time to make any necessary adjustments or repairs to maintain the integrity of the installation. With a properly installed and well-maintained drip edge, you can enjoy a durable and long-lasting roofing system.
Conclusion
Congratulations! You have successfully learned how to install a roof drip edge. By following this comprehensive guide and taking the necessary steps, you have ensured the protection and longevity of your roofing system.
A roof drip edge is a vital component that redirects water away from the edges of your roof, preventing water damage, rot, and structural issues. It acts as a barrier between the roofing materials and the underlying structure, safeguarding your home against moisture infiltration and potential damage.
Throughout the installation process, you have learned about the importance of safety precautions and gathering the required tools and materials. You have prepared the roof surface, measured and cut the drip edge, and installed it securely along the eaves and gable ends of your roof.
Inspecting the installation ensures that the drip edge is properly aligned, securely attached, and effectively sealing against water intrusion. Regular inspections will help maintain the integrity of the installation and allow for timely repairs or adjustments as needed.
Remember, a well-installed and maintained drip edge will not only protect your roof and home from water damage but also contribute to the overall durability and longevity of your roofing system.
Thank you for using this guide to learn how to install a roof drip edge. By following the steps outlined in this article, you have taken an important step in safeguarding your home against water damage and ensuring the longevity of your roof. Now you can confidently enjoy a durable and well-protected roofing system for years to come.
Frequently Asked Questions about How To Install Roof Drip Edge
Was this page helpful?
At Storables.com, we guarantee accurate and reliable information. Our content, validated by Expert Board Contributors, is crafted following stringent Editorial Policies. We're committed to providing you with well-researched, expert-backed insights for all your informational needs.

0 thoughts on “How To Install Roof Drip Edge”