Articles
How To Level Floor In Old House
Modified: May 6, 2024
Learn how to level the floor in an old house with our informative articles. Find step-by-step guides and expert tips for a smooth and even surface.
(Many of the links in this article redirect to a specific reviewed product. Your purchase of these products through affiliate links helps to generate commission for Storables.com, at no extra cost. Learn more)
Introduction
Welcome to the ultimate guide on how to level the floor in an old house. If you’ve recently purchased or inherited an older home, you may have noticed that the floors are uneven or sagging in certain areas. Uneven floors not only pose a safety risk, but they can also affect the stability of furniture and the overall aesthetic of your living space. Fortunately, with some time, effort, and a few simple tools, you can level the floor and restore it to its former glory.
Leveling a floor in an old house requires a systematic approach and a thorough understanding of the underlying issues. In this guide, we will take you through all the necessary steps to assess the condition of your old house floor, gather the tools and materials you’ll need, remove the existing flooring, fix supporting beams and joists, fill gaps and holes in the subfloor, and finally, apply a floor leveling compound to achieve a level and stable surface.
Before we dive into the details, it’s important to note that leveling a floor in an old house can be a challenging task, especially if you have little to no experience with construction or carpentry. If you’re unsure about any step of the process or feel overwhelmed, it’s always a good idea to consult with a professional contractor or a structural engineer who can provide guidance and ensure that the job is done correctly.
Now, let’s begin our journey to level the floor in your old house. By the end of this guide, you’ll have the knowledge and confidence to take on this rewarding DIY project. So, roll up your sleeves, put on your safety gear, and let’s get started!
Key Takeaways:
- Safety, stability, and aesthetics are all improved by leveling the floor in an old house. This DIY project not only enhances the living space but also increases the value of the property.
- Proper assessment, preparation, and execution are essential for successfully leveling the floor. Attention to detail and patience throughout the process ensure a safe and stable environment.
Read more: How To Level A Floor
Understanding the Importance of Leveling the Floor
When it comes to an old house, it’s not uncommon for the floors to become uneven over time. This can be due to a variety of factors, such as foundation settlement, rotting wood, or even poor construction practices. While uneven floors may seem like a minor inconvenience, they can have significant implications for your home and your day-to-day life.
One of the main reasons why leveling the floor in an old house is important is safety. Uneven floors can create tripping hazards, especially for young children, seniors, or anyone with mobility issues. It’s crucial to provide a stable and level surface to prevent accidents and injuries.
In addition to safety concerns, uneven floors can also affect the structural integrity of your home. If the floor is not level, it can put unnecessary stress on the supporting beams and joists, leading to further damage and potentially compromising the overall stability of the house. By leveling the floor, you can distribute the weight more evenly, reducing the risk of future structural issues.
Another reason to level the floor is for the proper installation of flooring materials. Whether you plan to install hardwood, tile, laminate, or carpet, having a level surface is essential to ensure a seamless and professional-looking finish. Uneven floors can cause gaps, buckling, or even breakage in the flooring, diminishing its durability and aesthetics.
Furthermore, leveling the floor can significantly improve the comfort of your living space. Uneven floors can create noticeable slopes or dips, making it uncomfortable to walk or stand for long periods. By leveling the floor, you can eliminate these inconsistencies and create a more pleasant environment for yourself and your family.
Last but not least, leveling the floor can increase the value of your home. Potential buyers will often inspect for any structural issues, and uneven floors can be a red flag. By taking the time to level the floor, you not only ensure a stable and safe living environment but also enhance the marketability and resale value of your property.
Now that you understand the importance of leveling the floor in an old house, it’s time to move on to the next step: assessing the condition of your floor. This will help you determine the extent of the leveling required and plan your approach accordingly.
Assessing the Condition of the Old House Floor
Before you begin leveling the floor in your old house, it’s important to assess the condition of the existing floor. This step is crucial in determining the scope of the project and understanding the underlying issues that have led to unevenness or sagging.
Start by visually inspecting the floor for any visible signs of damage or deterioration. Look for areas where the floor appears uneven, slopes, or shows signs of sagging. Pay attention to any cracks, gaps, or gaps between the floorboards or tiles, as these may indicate structural problems.
Next, walk across the floor and pay attention to any squeaks, creaks, or soft spots. These could be signs of damage to the subfloor or underlying support beams. Also, take note of any areas where the floor feels bouncy or unstable.
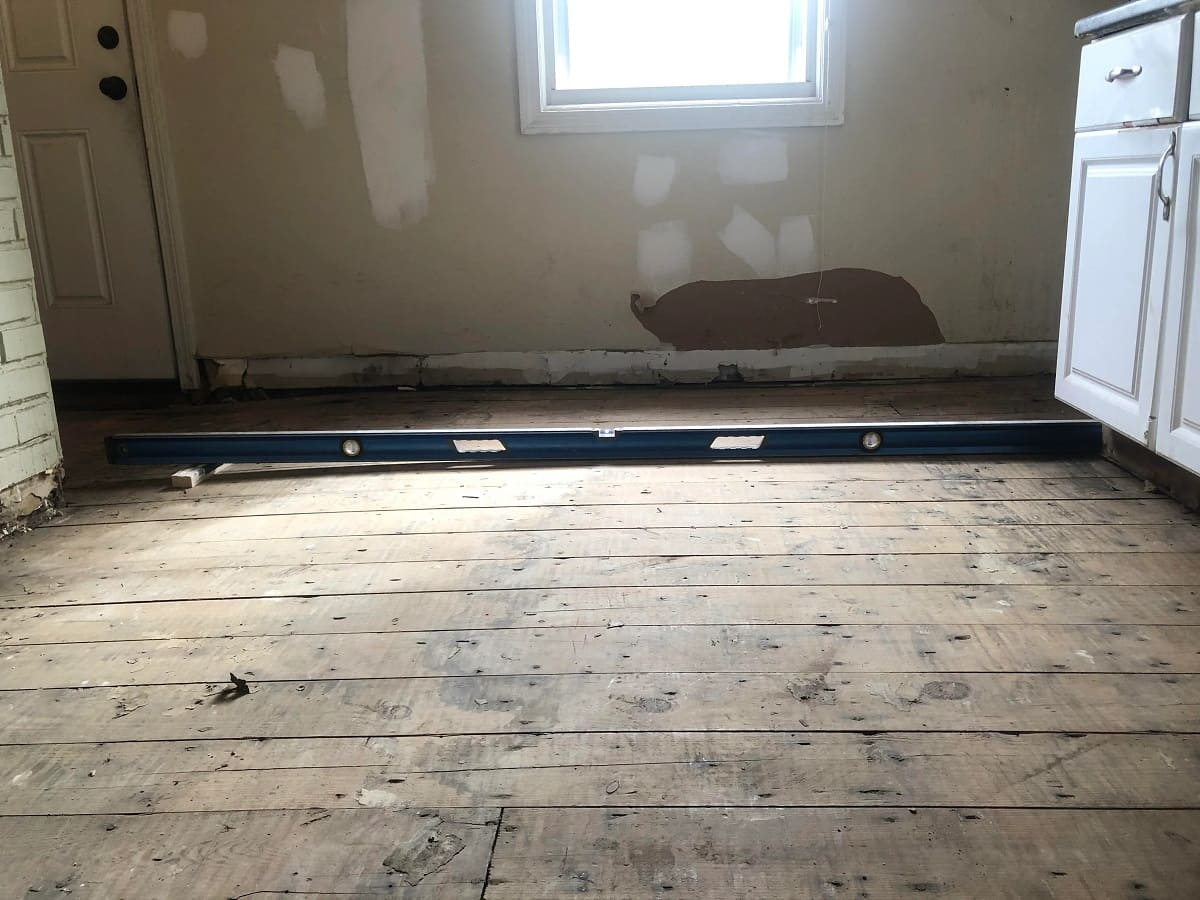
Once you have completed the visual inspection, you may want to use a long straight edge or level to further assess the floor’s levelness. Place the straight edge on different areas of the floor and see if there are any noticeable gaps between the floor and the straight edge. This will help you pinpoint areas that require leveling.
If you suspect that there may be significant structural issues with your old house floor, it’s recommended to consult with a professional contractor or a structural engineer. They will be able to conduct a more thorough inspection and provide expert advice on how to address any underlying problems.
Based on your assessment, you will have a better understanding of the extent of the leveling required. It may range from minor adjustments to major repairs and replacements of supporting beams or joists. Properly assessing the condition of the old house floor will ensure that you approach the leveling process with the right techniques and materials.
Now that you’ve assessed the condition of your old house floor, it’s time to gather the necessary tools and materials for the leveling project. Having the right equipment will make the process smoother and more efficient, allowing you to achieve a level and stable floor in your old house.
Gathering the Necessary Tools and Materials
Now that you have assessed the condition of your old house floor and determined the scope of the leveling project, it’s time to gather the necessary tools and materials. Having the right equipment at hand will help you complete the job efficiently and with better results.
Here is a list of tools and materials you will need:
Tools:
- Tape measure
- Straight edge or level
- Circular saw or jigsaw
- Hammer
- Screwdriver
- Chisel
- Paint scraper
- Drill
- Impact driver
- Power sander
- Trowel
- Utility knife
- Caulking gun
Read more: How To Level Bathroom Floor
Materials:
- Protective gloves and safety goggles
- Hardwood or plywood for subfloor repairs or replacement
- Shims or wood shingles
- Construction adhesive
- Wood screws
- Carpenter’s glue
- Wood filler
- Self-leveling compound
- Primer
- Floor leveling compound
- New flooring material of your choice
Ensure that you have all the necessary tools and materials before you start the floor leveling project. This will save you time and minimize interruptions during the process. It’s also a good idea to wear protective gloves and safety goggles to protect yourself from any potential hazards.
While the specific tools and materials may vary depending on the condition of your old house floor and the leveling techniques you plan to use, this list provides a general overview of the essentials. If you’re uncertain about any specific tools or materials, seek guidance from a professional or do some further research to ensure you have everything you need.
Now that you’re well-equipped with the necessary tools and materials, it’s time to move on to the next step: removing the existing flooring. This will allow you to access the subfloor and make the necessary repairs or adjustments to achieve a level surface.
Removing the Existing Flooring
Before you can begin leveling the floor in your old house, you’ll need to remove the existing flooring. This step is essential as it allows you to access the subfloor and address any underlying issues or damage.
The process of removing the existing flooring will vary depending on the type of flooring material you have. Here are some general guidelines:
Carpet:
If your old house floor is covered with carpet, start by cutting the carpet into manageable sections using a utility knife. Roll up these sections and remove them from the room. Additionally, remove any carpet padding or underlayment that may be present.
Hardwood or Laminate Flooring:
To remove hardwood or laminate flooring, start by removing any trim or molding around the edges of the room. Next, carefully pry up the planks using a pry bar or a flathead screwdriver, working your way from one end of the room to the other. Be cautious not to damage the subfloor as you remove the flooring.
Read more: How To Level Floor For Tile
Tile or Vinyl Flooring:
For tile or vinyl flooring, begin by removing any trim or molding around the edges of the room. Then, use a chisel and hammer to break the tiles or vinyl into smaller pieces. Remove these pieces and any adhesive or mortar residue from the subfloor.
Regardless of the type of flooring, be aware that there may be layers of old flooring materials, particularly in older houses. Take your time to remove each layer, ensuring that you reach the original subfloor.
Once the existing flooring has been removed, take a moment to inspect the subfloor for any signs of damage, such as rot, water damage, or termite infestation. Address any issues you come across before proceeding with the leveling process.
Remember to wear protective gloves and safety goggles during the flooring removal process, as it may involve sharp tools and debris. Properly disposing of the old flooring materials is also important to maintain a clean and safe work environment.
With the existing flooring removed, you’re now ready to move on to the next step: fixing supporting beams and joists. This crucial step will ensure the stability and structural integrity of the floor.
Fixing Supporting Beams and Joists
After removing the existing flooring in your old house, it’s time to turn your attention to the supporting beams and joists. These structural elements play a crucial role in maintaining the stability and levelness of the floor. By addressing any issues with them, you can ensure a solid foundation for the leveled floor.
Here are the steps involved in fixing supporting beams and joists:
1. Inspect for Damage:
Thoroughly examine the beams and joists for any signs of damage, such as rot, insect infestation, or structural issues. Pay close attention to areas where there is noticeable sagging or weakness.
2. Reinforcement:
If you notice any beams or joists that are weakened or damaged, you may need to reinforce or replace them. This might involve installing additional supports, such as sister joists or support beams, alongside the existing ones. Consult with a professional if you’re uncertain about the extent of reinforcement required.
Read more: How To Level A Wood Floor
3. Leveling:
If there are areas of the floor that are noticeably uneven due to sagging beams or joists, you’ll need to address them before proceeding. One common method is to use shims or wood shingles to level out the discrepancies. Place the shims or wood shingles between the beams or joists and the subfloor, adjusting them until the floor becomes level.
4. Fastening and Securing:
Ensure that all beams and joists are securely fastened to their supporting structures. Use wood screws, nails, or brackets to secure them in place and prevent any movement or flexing.
5. Repairing or Replacing:
If you come across any severely damaged beams or joists that cannot be adequately repaired, they may need to be replaced. Carefully remove the damaged sections and install new ones, making sure to align them properly and secure them tightly.
While fixing supporting beams and joists can be a complex task, it’s essential to address any issues to ensure the stability and longevity of the leveled floor. Take the time to assess and reinforce these structural elements before moving on to the next steps of the floor leveling process.
Once the supporting beams and joists have been fixed, you can proceed to the next phase: filling gaps and holes in the subfloor. This step is crucial to create a solid and even surface for the leveling compound.
Filling Gaps and Holes in the Subfloor
Before applying a floor leveling compound, it’s important to ensure that the subfloor is in good condition and free from any gaps or holes. Filling these imperfections will create a solid and even surface for the leveling compound to adhere to, resulting in a smoother and more level finished floor.
Here are the steps involved in filling gaps and holes in the subfloor:
Read more: How To Level A Concrete Floor
1. Clean the Subfloor:
Start by thoroughly cleaning the subfloor to remove any dust, debris, or loose material. Use a broom or vacuum cleaner to sweep the surface, and wipe away any remaining dirt with a damp cloth or mop.
2. Identify the Gaps and Holes:
Carefully inspect the subfloor for any gaps, cracks, or holes. These can occur due to natural settlement, previous damage, or the removal of old flooring materials. Pay close attention to areas near walls, corners, and where different floor sections meet.
3. Fill Small Gaps and Cracks:
For smaller gaps and cracks, you can use a high-quality wood filler or latex-based caulk. Apply the filler or caulk directly into the gap or crack, ensuring that it fills the entire space. Smooth out the surface using a putty knife or your finger, and follow the manufacturer’s instructions for drying and curing times.
4. Patch Large Holes:
If you encounter larger holes or damaged sections of the subfloor, you may need to patch them with a more substantial material. Cut a piece of plywood or another suitable subfloor material to fit the size of the hole, and secure it in place using construction adhesive and screws. Ensure that the patched area is flush with the surrounding subfloor.
Read more: How To Level Garage Floor
5. Sand and Level:
Once the filler or patches have dried and cured, use a power sander to smooth out any uneven surfaces. This will help create a level and seamless subfloor for the leveling compound to be applied later on. Pay attention to the edges of the filled gaps or patched holes to ensure a smooth transition to the surrounding subfloor.
6. Vacuum and Clean Again:
After sanding, vacuum the subfloor to remove any dust or debris. Wipe the surface with a damp cloth or mop to ensure it’s clean and ready for the next steps of the leveling process.
Filling gaps and holes in the subfloor is an important step in creating a solid and level foundation for your new floor. Taking the time to properly fill in these imperfections will ensure a smoother and more successful floor leveling process. Now that the subfloor is prepared, it’s time to move on to the next phase: using a self-leveling compound.
Using Self-Leveling Compound
Once the gaps and holes in the subfloor have been filled and smoothed, it’s time to move on to using a self-leveling compound. This material is designed to create a flat and even surface by automatically spreading and leveling itself across the subfloor.
Here are the steps involved in using self-leveling compound:
1. Prepare the Area:
Start by thoroughly cleaning the subfloor once again to remove any dust, debris, or moisture. Make sure the surface is dry and free from any obstacles or loose material that could interfere with the self-leveling process.
Read more: How To Level Floor For Laminate
2. Mix the Compound:
Follow the manufacturer’s instructions to mix the self-leveling compound properly. Typically, this involves combining the compound powder with water in a clean bucket or mixing container. Use a drill with a mixing attachment to achieve a smooth and lump-free consistency.
3. Start Pouring:
Working quickly, pour the mixed self-leveling compound onto the subfloor. Start at the highest point of the room and gradually pour the compound towards the lower areas. Use a squeegee or gauge rake to spread and smooth the compound as you pour, making sure it fills in all the low spots and levels itself out.
4. Spread and Feather Out:
Use a long-handled trowel to spread and feather out the self-leveling compound. This will help to ensure an even and consistent surface. Work in small sections, moving across the room to cover the entire floor. Pay extra attention to the edges and transitions to create a seamless blend with the existing subfloor.
5. Allow for Self-Leveling:
Once the self-leveling compound has been spread, allow it to level itself out and settle. Avoid walking on the compound during this time to avoid disturbing its leveling process. Follow the manufacturer’s instructions for the recommended drying and curing time, and be patient as the compound sets.
Read more: How To Replace Plumbing In Old House
6. Inspect the Surface:
Once the compound has fully dried and cured, inspect the surface for any imperfections, low spots, or uneven areas. If necessary, you can sand down any rough edges or high spots using a power sander to achieve a perfectly level surface.
Using a self-leveling compound is an effective way to achieve a smooth and level floor surface. By following these steps, you can ensure that the compound is applied correctly and that your floor is ready for the next phase: applying the floor leveling compound.
Applying Floor Leveling Compound
After the self-leveling compound has fully dried and cured, it’s time to move on to the next phase: applying the floor leveling compound. This compound will further smooth out any remaining imperfections and provide a solid and level surface for your new flooring material.
Here are the steps involved in applying floor leveling compound:
1. Prepare the Area:
Ensure that the subfloor surface is clean and free from any debris or dust. Remove any loose material or obstacles that could interfere with the application of the floor leveling compound. It’s also important to check the manufacturer’s instructions for any specific preparation requirements.
Read more: How To Level Floor For Laminate
2. Mix the Compound:
Follow the manufacturer’s instructions to mix the floor leveling compound properly. Similar to the self-leveling compound, you will typically need to combine the compound powder with water in the correct ratio to achieve the desired consistency. Use a drill with a mixing attachment to ensure a thorough and uniform mix.
Read more: How To Design A Small Old House
3. Start Pouring and Spreading:
Working in small sections, pour the mixed floor leveling compound onto the subfloor. Start at one end of the room and gradually spread the compound with a trowel or a gauge rake. Use long, sweeping motions to achieve an even and consistent application. Ensure that the compound is spread up to the edges and fills any low spots.
4. Smooth and Level:
Once the compound is spread, use a long-handled smoothing trowel or a floor squeegee to smooth and level the surface. Apply even pressure and work in a back-and-forth motion to create a smooth and even finish. Pay extra attention to the edges and transitions to ensure a seamless blend with the surrounding areas.
5. Allow for Drying and Curing:
After applying the floor leveling compound, allow it to dry and cure according to the manufacturer’s instructions. This usually takes several hours or even overnight. Avoid walking on the compound during this time to prevent any disruptions or damage to the leveling process.
Read more: How To Replace Plumbing In Old House
6. Inspect the Surface:
Once the floor leveling compound has fully dried and cured, inspect the surface for any remaining imperfections or uneven areas. If necessary, you can lightly sand down any rough edges or high spots using a power sander to achieve a perfectly level and smooth surface.
By following these steps, you can successfully apply the floor leveling compound and achieve a solid and level base for your new flooring material. With the compound dried and cured, you are now ready to move on to the final phase: installing your new flooring.
Allowing the Compound to Cure
Once you have applied the floor leveling compound, it is essential to allow it sufficient time to cure before proceeding with any further steps. The curing process is crucial as it ensures the compound sets and hardens properly, providing a stable and level foundation for your new flooring material.
Here are the important considerations and steps to follow when allowing the compound to cure:
1. Read the Manufacturer’s Instructions:
Refer to the manufacturer’s instructions for the recommended curing time of the floor leveling compound. This duration can vary depending on the specific product, so it is crucial to follow their guidelines to ensure the compound cures properly.
2. Create a Controlled Environment:
To aid in the curing process, it is important to create a controlled environment. Maintain a stable room temperature, and ensure proper ventilation to promote airflow and assist with the drying process. Avoid extreme temperature changes and humidity, as they can impact the curing time and quality.
3. Restrict Access to the Area:
During the curing process, it is essential to restrict access to the area where the floor leveling compound has been applied. Prevent foot traffic, heavy objects, and any other potential disturbances that could compromise the curing compound’s integrity.
Read more: What Is A Split-Level House?
4. Monitor the Curing Progress:
Regularly monitor the curing progress by visually inspecting the compound. Look for any signs of tackiness or softness that may indicate incomplete curing. Additionally, check for any visible cracks or inconsistencies that may require additional attention or touch-ups after the initial curing period.
5. Exercise Patience:
Patience is crucial during the curing process. Although it can be tempting to rush to the next step, allowing the compound ample time to cure ensures the best results. Be mindful of the recommended curing time and resist the urge to proceed until the compound has fully hardened and dried.
6. Seek Professional Guidance if Necessary:
If you have any doubts or concerns regarding the curing process or the condition of the floor leveling compound, seek professional guidance. Consulting with a flooring specialist or contractor can provide valuable insights and ensure that the compound has cured correctly before moving forward.
By following these steps and allowing the floor leveling compound sufficient time to cure, you are setting the stage for a successful and long-lasting flooring installation. Once the compound has fully cured, you are now ready for the final phase: installing your new flooring.
Installing New Flooring
Now that the floor leveling compound has fully cured and provided a smooth and level surface, you are ready to move forward with installing your new flooring. Whether you have chosen hardwood, tile, laminate, carpet, or another type of flooring material, proper installation is key to achieving a beautiful and functional finished floor.
Here are the steps involved in installing new flooring:
Read more: How To Build A Floor For A House
1. Gather the Necessary Tools and Materials:
Before you begin installing the new flooring, ensure that you have all the necessary tools and materials on hand. These may include flooring adhesive, underlayment, spacers, a tape measure, a utility knife, a miter saw or circular saw (depending on the type of flooring), and any specific tools required for your chosen flooring material.
2. Prepare the Subfloor:
Ensure that the cured floor leveling compound is clean and free of debris. If necessary, lightly sand any rough edges or high spots to create a smooth surface for the new flooring. Follow the manufacturer’s instructions on any additional subfloor preparation required for your specific flooring material.
3. Follow Manufacturer’s Guidelines:
Refer to the manufacturer’s guidelines for your chosen flooring material to ensure proper installation. Different types of flooring have specific installation techniques and requirements, so make sure to read and follow these instructions carefully.
4. Start in a Corner:
Begin the installation in one corner of the room. Place spacers along the walls to allow for expansion and contraction of the flooring material. Follow a predetermined pattern or layout, and ensure that the first row is straight and aligned correctly.
Read more: How To Level A House With A Crawl Space
5. Install the Flooring:
Continue installing the flooring material row by row, following the manufacturer’s recommended installation method. This may involve using adhesive, clicks system, or tongue and groove connections, depending on the type of flooring. Cut the pieces to size using a miter saw or circular saw as needed.
6. Pay Attention to Details:
Ensure that each piece of flooring is properly aligned and fitted together, taking care not to leave any gaps between pieces. Use a tapping block and mallet or other appropriate tools to gently tap the pieces into place and create a snug fit.
7. Trim and Finish:
As you approach walls, doorways, and other obstacles, you may need to trim the flooring to fit. Use a tape measure and a utility knife to carefully cut the flooring to the desired size. Follow up with any necessary finishing touches, such as installing baseboards or transition strips between different flooring areas.
8. Clean and Maintain:
Once the new flooring is installed, clean the surface following the manufacturer’s recommendations. Take note of any specific cleaning or maintenance instructions to prolong the lifespan and appearance of your flooring.
By following these steps and ensuring proper installation techniques, you can achieve a professionally installed floor that enhances the beauty and functionality of your space. Enjoy your newfound level and stunning floor in your old house!
Read more: How To Level A Concrete Basement Floor
Conclusion
Congratulations! You have successfully completed the process of leveling the floor in your old house. By following the steps outlined in this guide, you have not only addressed the safety concerns and structural issues posed by uneven floors but also created a solid and level foundation for your new flooring.
Leveling the floor in an old house is no small task, but the effort and time invested will greatly improve the functionality, aesthetics, and value of your home. Uneven floors can pose safety risks, affect the stability of furniture, and detract from the overall appearance of your living space. By taking the initiative to level the floor, you have created a safer and more stable environment for you and your loved ones.
Throughout the process, you have learned the importance of assessing the condition of the old house floor, gathering the necessary tools and materials, removing the existing flooring, fixing supporting beams and joists, filling gaps and holes in the subfloor, using self-leveling compound, and applying the floor leveling compound. Each step was crucial in achieving a level and stable floor.
Remember, patience and attention to detail are key when it comes to leveling the floor. Take the time to properly assess, plan, and execute each step, ensuring that everything is done correctly. If at any point you feel unsure or overwhelmed, don’t hesitate to seek professional advice or assistance.
Now, with the leveled floor as your foundation, you are ready to install your new flooring material of choice. Whether it’s hardwood, tile, laminate, or carpet, proper installation techniques will ensure a beautiful and durable finished floor.
Lastly, don’t forget to maintain and care for your new floor to keep it in excellent condition. Regular cleaning, proper maintenance, and addressing any issues promptly will help prolong the lifespan of your flooring investment.
Thank you for following this comprehensive guide on how to level the floor in an old house. We hope that it has provided you with the knowledge and confidence to tackle this rewarding DIY project. Enjoy your leveled floor and the enhanced beauty and functionality it brings to your old house!
Now that you've mastered leveling floors in old homes, why not enhance your skills further? Dive into our guide to find the best hardwood floors for any home renovation. These selections not only boost your home's aesthetic but also its value. After sprucing up your floors, you might want to tackle more projects yourself. Check out our practical advice on DIY home improvement to transform your space skillfully without needing professional help. Ready to take on these exciting challenges? Click through for insightful details.
Frequently Asked Questions about How To Level Floor In Old House
Was this page helpful?
At Storables.com, we guarantee accurate and reliable information. Our content, validated by Expert Board Contributors, is crafted following stringent Editorial Policies. We're committed to providing you with well-researched, expert-backed insights for all your informational needs.

0 thoughts on “How To Level Floor In Old House”